
Spring学习记录(八)---Bean的生命周期
之前说过,在调用下面时,就创建了容器和对象
ApplicationContext ctx = new ClassPathXmlApplicationContext("bean.xml");
那它又是怎样一步步创建的呢?要销毁怎么销毁?
用一个例子来看
 package com.guigu.spring.Car;

 public class Car {

     private String brand;

     public Car(){

         System.out.println("构造函数。。");

     }

     public String getBrand() {

         System.out.println("返回属性。。");

         return brand;

     }

     public void setBrand(String brand) {

         this.brand = brand;

         System.out.println("设置属性。。");

     }

     public void init(){

         System.out.println("init()。。");

     }

     public void destroy(){

         System.out.println("destroy()。。");

     }

 }
xml中用init-mehod、 destroy-method表示调用初始化函数和销毁函数
 <bean id="car" class="com.guigu.spring.Car" init-method="init" destroy-method="destroy">

 <property name="brand" value="Aodi"></property>

 </bean>
main中
   ApplicationContext ctx = new ClassPathXmlApplicationContext("bean.xml");

   Car car=(Car)ctx.getBean("car");

   System.out.println(car);

    //关闭IOC容器

   ctx.close();
输出:
  构造函数。。

  设置属性。。

  init()。。

  car[brand=Aodi]

  destroy()。。
可以看出来,先调用构造函数和设置属性,然后再init()。
bean后置处理器:检查bean属性的正确性或根据需要修改属性,要实现BeanPostProcessor接口
写一个实现类MyBeanPostProcessor
 package com.guigu.spring.Car;

 import org.springframework.beans.BeansException;

 import org.springframework.beans.factory.config.BeanPostProcessor;

 public class MyBeanPostProcessor implements BeanPostProcessor {

     @Override    //before

     public Object postProcessBeforeInitialization(Object bean, String beanName)

             throws BeansException {

         System.out.println("postProcessBeforeInitialization: "+bean +beanName);

         return bean;

     }

     @Override    //after

     public Object postProcessAfterInitialization(Object bean, String beanName)

             throws BeansException {

         System.out.println("postProcessAfterInitialization: "+bean +beanName);

         return bean;

     }

 }
xml中添加此接口
   <bean id="car" class="com.guigu.spring.Car" init-method="init" destroy-method="destroy">

   <property name="brand" value="Aodi"></property>

   </bean>

4     <!--配置bean后置处理器,不需要配置id-->

5   <bean class="com.guigu.spring.Car"></bean>
再重新运行一次,输出:
   构造函数。。

   设置属性。。

   postProcessBoforeInitialization: car[brand=Aodi], car


   init()。。

   postProcessAfterInitialization: car[brand=Aodi], car

   car[brand=Aodi]

   destroy()。。
注意:一个再init之前调用,一个再init之后调用
如何修改属性? 在接口函数中修改
 package com.guigu.spring.Car;

 import org.springframework.beans.BeansException;

 import org.springframework.beans.factory.config.BeanPostProcessor;

 import com.guigu.spring.autowireautowire.Car;

 public class MyBeanPostProcessor implements BeanPostProcessor {

     @Override

     public Object postProcessBeforeInitialization(Object bean, String beanName)

             throws BeansException {

         System.out.println("postProcessBeforeInitialization: "+bean +beanName);

         return bean;

     }

     @Override

     public Object postProcessAfterInitialization(Object bean, String beanName)

             throws BeansException {

         System.out.println("postProcessAfterInitialization: "+bean +beanName);

         Car car = (Car) bean;   // 获取要修改的bean对象

         car.setBrand("Ford");   //修改属性

         return bean;

     }

 }
注意:上面的bean是bean实例本身;beanName指IOC容器配置的bean的名字
这样,就成功修改了属性,输出:
    构造函数。。

    设置属性。。

    postProcessBoforeInitialization:car[brand=Aodi], car

    init()。。

    postProcessAfterInitialization: car[brand=Aodi], car

    car[brand=Ford]

    destroy()。。
还可以过滤,因为处理所有bean时,可能对某些进行操作
     @Override

     public Object postProcessBeforeInitialization(Object bean, String beanName)

             throws BeansException {

       System.out.println("postProcessBeforeInitialization: "+bean +beanName);

          if("car".equals(beanName)){

             //过滤的操作

     }

        return bean;

     }
再看一遍bean生命周期
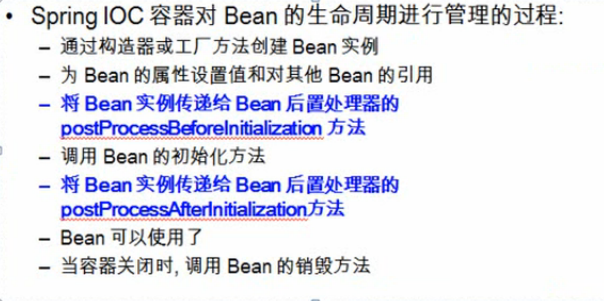
Spring学习记录(八)---Bean的生命周期的更多相关文章
- MyEclipse Spring 学习总结二 Bean的生命周期
文件结构可以参考上一节 Bean的生命周期有方法有:init-method,destroy-method ApplicationContext.xml 文件配置如下: <?xml version ...
- Spring系列13:bean的生命周期
本文内容 bean的完整的生命周期 生命周期回调接口 Aware接口详解 Spring Bean的生命周期 面试热题:请描述下Spring的生命周期? 4大生命周期 从源码角度来说,简单分为4大阶段: ...
- spring IOC 容器中 Bean 的生命周期
IOC 容器中 Bean 的生命周期: 1.通过构造器或工厂方法创建 Bean 实例 2.为 Bean 的属性设置值和对其他 Bean 的引用 3.调用 Bean 后置处理器接口(BeanPostPr ...
- Spring IOC容器中Bean的生命周期
1.IOC容器中Bean的生命周期 构造器函数 设置属性 初始化函数(在Bean配置中 init-method) 使用Bean 结束时关闭容器(在Bean中配置destroy-method) 2.Be ...
- Spring应用上下文中Bean的生命周期
Bean装载到Spring应用上下文的生命周期,如图: Bean在Spring容器中从创建到销毁经历了若干个阶段,每一阶段都可以对Spring如何管理Bean进行个性化定制,以下我们通过代码去验证生命 ...
- Spring学习记录(五)---bean的作用域scope
作用域:singleton:单例,整个应用中只创建一个实例(默认) prototype:原型,每次注入时都新建一个实例 session:会话,每个会话创建一个实例 request:请求,每个请求创建一 ...
- Spring学习记录(四)---bean之间的关系:继承、依赖
继承 这里说的继承和java的继承是不一样的,不是父类子类.但思想很相似,是父bean和子bean 1.父bean是一个实例时.它本身是一个完整的bean 2.父bean是模板,抽象bean ...
- Spring学习记录(三)---bean自动装配autowire
Spring IoC容器可以自动装配(autowire)相互协作bean之间的关联关系,少写几个ref autowire: no ---默认情况,不自动装配,通过ref手动引用 byName---根据 ...
- Spring IOC容器对bean的生命周期进行管理的过程
1.通过构造器或者工厂方法创建bean的实例 2.为bean的属性设置值和对其他bean的引用 3.将bean的实例传递给bean的后置处理器BeanPostProcessor的postProcess ...
随机推荐
- webpack 打包一个简单react组件
安装Webpack,并加载一个简单的React组件 全局的npm模块安装: npm install -g webpack 安装jsx-loader npm install --save-dev jsx ...
- 《转》Unity3D研究院编辑器之5.3JSON的序列化
Unity5.3 的一项新功能就是Json的序列化,支持嵌套使用,可以把json字符串转成对象,把对象转成json字符串. using UnityEngine; using UnityEditor; ...
- IIS ISAPI
cscript.exe %SYSTEMDRIVE%\inetpub\adminscripts\adsutil.vbs SET W3SVC/AppPools/Enable32bitAppOnWin64 ...
- html5shiv.js and respond.min.js
因为用到这两个插件,所以记录下来.. html5shiv:解决ie9以下浏览器对html5新增标签的不识别,并导致CSS不起作用的问题. respond.min:让不支持Css3 Media Quer ...
- myEclipse Could not create the view: An unexpected exception was thrown.
myEclipse 非正常关闭,打开后 service Explorer or Package Explorer 视图显示不出来.报“Could not create the view: An une ...
- 【Telerik】查询控件<telerik:RadMaskedTextBox>的使用
在SilverLight项目中,实现模糊查询,并将值绑定到列表中,使用了Telerik中的<telerik:RadMaskedTextBox>控件. 要先添加命名空间的引用: xmlns: ...
- reconnectingwebsocket.js
// MIT License: // // Copyright (c) 2010-2012, Joe Walnes // // Permission is hereby granted, free o ...
- USACO翻译:USACO 2012 JAN三题(3)
USACO 2012JAN(题目三) 一.题目概览 中文题目名称 放牧 登山 奶牛排队 英文题目名称 grazing climb lineup 可执行文件名 grazing climb lineup ...
- USACO翻译:USACO 2012 JAN三题(1)
USACO 2012 JAN(题目一) 一.题目概览 中文题目名称 礼物 配送路线 游戏组合技 英文题目名称 gifts delivery combos 可执行文件名 gifts delivery c ...
- 20145337 GDB调试汇编堆栈过程分析
20145337 GDB调试汇编堆栈过程分析 测试代码 #include<stdio.h> short addend1 = 1; static int addend2 = 2; const ...