设计模式---对象性能模式之单例模式(Singleton)
前提:“对象性能”模式
面向对象很好的解决了“抽象”的问题,但是必不可免地要付出一定的代价。
对于通常情况来讲,面向对象的成本大都可以忽略不计。但是某些情况,面向对象所带来的成本必须谨慎处理。
前面是利用抽象手段来实现松耦合的设计,但是抽象必不可免的会带来一定代价,比如虚函数(倍乘)
典型模式:
单件模式:Singleton

享元模式:Flyweight

只有这两个模式不是解决抽象问题,而是解决性能问题。
一:单例模式
(一)概念
保证了一个类只生成唯一的实例对象。保证一个类,只有一个实例存在,同时提供能对该实例加以访问的全局方法
(二)动机
在软件系统中,经常有这样一个特殊的类,必须保证它们在系统中只存在一个示例,才能确保他们的逻辑正确性、以及良好的效率。
如何绕过常规的构造器,提供一种机制来保证一个类只有一个实例?工厂模式绕过new是为了避开紧耦合,单例模式避开new,是解决性能问题
这个应该类设计者的责任,而不是使用者的责任。
解决方案:

.将构造函数设置为私有的

.提供一个全局的静态方法

.定义一个静态指针,指向本类的变量的静态变量指针
(三)代码讲解(四种版本)
1.线程非安全版本(单线程OK)
class Singleton{

private:

    Singleton();

    Singleton(const Singleton& other);

public:

    static Singleton* getInstance();

    static Singleton* m_instance;

};

Singleton* Singleton::m_instance=nullptr;

//线程非安全版本

Singleton* Singleton::getInstance() {  //由于是在类的外部定义,也是静态方法,不用加static

    if (m_instance == nullptr) {

        m_instance = new Singleton();

    }

    return m_instance;

}
多线程模式,当多个线程都进入到if中,会导致创建多个实例对象
2.线程安全版本,但是锁的代价过高
//线程安全版本,但锁的代价过高

Singleton* Singleton::getInstance() {

    Lock lock;  //锁的局部变量,会在函数结束时自动释放,我们也可以设置为全局变量锁。局部变量锁可用是因为这个函数是静态方法,所以大家获取的还是一个锁

    if (m_instance == nullptr) {

        m_instance = new Singleton();

    }

    return m_instance;

}
问题:高并发时,代价过高,对读线程的锁来说是浪费的。读线程本来应该直接跳过创建实例,直接去使用唯一实例,但是这里还有等待锁的释放,是不必要的。
3.双检测锁(锁前锁后检查),但由于内存读写reorder不安全
//双检查锁,但由于内存读写reorder不安全

Singleton* Singleton::getInstance() {

    if(m_instance==nullptr){

        Lock lock;

        if (m_instance == nullptr) {

            m_instance = new Singleton();

        }

    }

    return m_instance;

}
解决了上面的问题,但是还有新的问题出现:内存读写reorder不安全
reorder不安全::代码执行顺序不确定
假象顺序:
分配内存; 调用构造器; 返回指针
CPU层面指令集(有可能reorder)<时间片的获取>:
1分配内存;2返回指针 m_instance ;3调用构造器
(执行第2步之后,另外一个线程进来发现m_instance不是null,但未执行构造器,对象状态不正确,而之前获取m_instance的线程已经开始使用了对象,会出错)
4.C++11版本之后的跨平台实现(volatile)
//C++ 11版本之后的跨平台实现 (volatile)

std::atomic<Singleton*> Singleton::m_instance;  //原子对象

std::mutex Singleton::m_mutex;

Singleton* Singleton::getInstance() {

    Singleton* tmp = m_instance.load(std::memory_order_relaxed);  //屏蔽编译器reorder

    std::atomic_thread_fence(std::memory_order_acquire);//获取内存fence

    if (tmp == nullptr) {

        std::lock_guard<std::mutex> lock(m_mutex);  //锁的设置

        tmp = m_instance.load(std::memory_order_relaxed);  //取变量出来

        if (tmp == nullptr) {

            tmp = new Singleton;

            std::atomic_thread_fence(std::memory_order_release);//释放内存fence

            m_instance.store(tmp, std::memory_order_relaxed);  //存放变量回去

        }

    }

    return tmp;

}
四种版本场景使用:
版本一:单线程可用,足够好

版本二:多线程可用,不算错,代价过高

版本三:不能用,所有编译器例出问题概率较高

版本四:C++11前各个平台不同实现
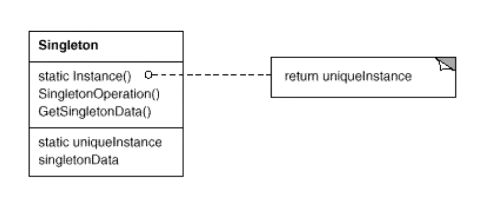
(四)模式定义
保证一个类仅有一个实例,并提供一个该实例的全局访问点。

                                                                       ——《设计模式》GoF
(五)类图(结构)
(六)要点总结
1.Singleton模式中的实例构造器可以设置为protected以允许子类派生。
2.Singleton模式一般不要支持拷贝构造函数和Clone接口,因为这有可能会导致多个对象实例,与Singleton模式的初衷相违背。
3.如何实现多线程环境下安全的Singleton?注意对双检查锁的正确实现。
(七)案例实现
1.单线程版本
#include <iostream>
#include <stdlib.h>
using namespace std; class Singleton
{
private:
static Singleton* m_singer;
static int count;
private:
Singleton()
{
m_singer = NULL;
count = ;
cout << "contruct function exec" << endl;
}
public:
static Singleton* getInstance()
{
if (m_singer==NULL)
{
m_singer = new Singleton();
count++;
}
return m_singer;
} static void printInfo()
{
cout << "create object " << count << endl;
}
}; Singleton* Singleton::m_singer = NULL; //懒汉模式,并没有创建对象
int Singleton::count = ; void main()
{
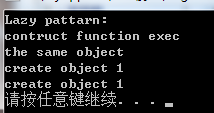
cout << "Lazy pattarn:" << endl;
Singleton* p1 = Singleton::getInstance();
Singleton* p2 = Singleton::getInstance();
if (p1!=p2)
{
cout << "not the same object" << endl;
}
else
{
cout << "the same object" << endl;
}
p1->printInfo();
p2->printInfo(); system("pause");
return;
}
懒汉模式
Singleton* Singleton::m_singer = NULL;
#include <iostream>
#include <stdlib.h>
using namespace std; class Singleton
{
private:
static Singleton* m_singer;
static int count;
private:
Singleton()
{
m_singer = NULL;
count = ;
cout << "contruct function exec" << endl;
}
public:
static Singleton* getInstance()
{
return m_singer;
} static void printInfo()
{
cout << "create object " << count << endl;
} static void FreeInstance()
{
if (m_singer!=NULL)
{
delete m_singer;
m_singer = NULL;
count = ;
}
}
}; Singleton* Singleton::m_singer = new Singleton(); //饿汉模式,不管你创不创建实例,先给你实例了再说
int Singleton::count = ; void main()
{
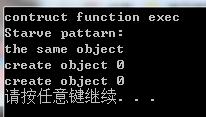
cout << "Starve pattarn:" << endl;
Singleton* p1 = Singleton::getInstance();
Singleton* p2 = Singleton::getInstance();
if (p1!=p2)
{
cout << "not the same object" << endl;
}
else
{
cout << "the same object" << endl;
} p1->printInfo();
p2->printInfo(); p1->FreeInstance();
p2->FreeInstance(); //不会报错,因为我们会做if判断 system("pause");
return;
}
饿汉模式
Singleton* Singleton::m_singer = new Singleton();
补充:在两个模式的类的private中加上
    Singleton(const Singleton& obj){}    //防止拷贝构造

    Singleton& operator=(const Singleton& obj){}    //防止赋值
2.多线程版本,使用锁(讨论懒汉模式,饿汉无影响)
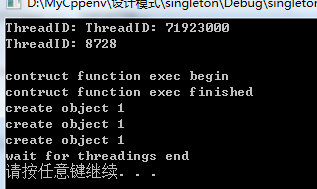
未使用锁的多线程
#include <iostream>

#include <windows.h>

#include <winbase.h>

#include <process.h>

#include <stdlib.h>

using namespace std;

class Singleton

{

private:

    static Singleton* m_singer;

    static int count;

private:

    Singleton()

    {

        cout << "contruct function exec begin" << endl;

        m_singer = NULL;

        count = ;

        Sleep();

        cout << "contruct function exec finished" << endl;

    }

    Singleton(const Singleton& obj){}    //防止拷贝构造

    Singleton& operator=(const Singleton& obj){}    //防止赋值

public:

    static Singleton* getInstance()

    {

        if (m_singer==NULL)

        {

            m_singer = new Singleton();

            count++;

        }

        return m_singer;

    }

    static void printInfo()

    {

        cout << "create object " << count << endl;

    }

    static void FreeInstance()

    {

        if (m_singer != NULL)

        {

            delete m_singer;

            m_singer = NULL;

            count = ;

        }

    }

};

Singleton* Singleton::m_singer = NULL;

int Singleton::count = ;

void threadfunc(void *mylpAdd)

{

    int id = GetCurrentThreadId();

    cout << "ThreadID: " << id << endl;

    Singleton::getInstance()->printInfo();    //线程中获取一个实例对象

}

unsigned __stdcall threadfunc2(void *mylpAdd)

{

    int id = GetCurrentThreadId();

    cout << "ThreadID: " << id << endl;

    Singleton::getInstance()->printInfo();    //线程中获取一个实例对象

    return ;

}

void main()

{

    int i = ;

    unsigned int dwThreadId[], dwThrdParam = ;

    HANDLE hThread[];

    int threadnum = ;

    //生成线程

    for (i = ; i < threadnum;i++)

    {

        hThread[i] = (HANDLE)_beginthreadex(NULL, , &threadfunc2, NULL, , &dwThreadId[i]);

        //hThread[i] = (HANDLE)_beginthread(&threadfunc, 0, NULL);

        if (hThread[i]==NULL)

        {

            cout << "product thread failure" << endl;

            break;

        }

    }

    //等待线程

    for (i = ; i < threadnum;i++)

    {

        WaitForSingleObject(hThread[i], INFINITE);

    }

    cout << "wait for threadings end" << endl;

    //删除

    for (i = ; i < threadnum;i++)

    {

        CloseHandle(hThread[i]);  //注意CloseHandle只能和_beginthreadex使用,使用_beginthread时不需要这个

    }

    Singleton::FreeInstance();

    system("pause");

    return;

}
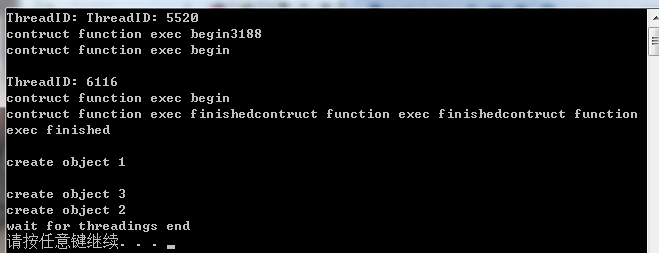
我们发现多线程创建实例是不按顺序,谁先抢占时间片谁就先来
线程内核对象的内部初始使用计数为2 从线程函数返回时会递减使用计数. 此时线程已经终止,但线程内核对象的使用计数为1 线程内核对象并不会释放.
调用_beginthreadex线程终止时使用计数为1 调用_beginthread终止时使用计数由于_endthread内部调用了CloseHandle使用计数变为0
释放线程内核对象,而_beginthreadex中线程终止时使用计数为1 要显示调用CloseHandle才会释放.
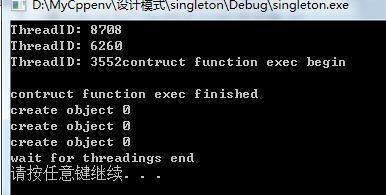
使用锁的多线程
#include <iostream>

#include <windows.h>

#include <winbase.h>

#include <process.h>

#include <stdlib.h>

using namespace std;

class CMyCritical  //实现了对锁的封装

{

public:

    CMyCritical()

    {

        InitializeCriticalSection(&m_sec);

    }

    ~CMyCritical()

    {

        DeleteCriticalSection(&m_sec);

    }

    void Lock()

    {

        EnterCriticalSection(&m_sec);

    }

    void Unlock()

    {

        LeaveCriticalSection(&m_sec);

    }

private:

    CRITICAL_SECTION m_sec;

};


//临界区,线程锁

static CMyCritical cs;    //是对关键段CRITICAL_SECTION的封装

class Singleton

{

private:

    static Singleton* m_singer;

    static int count;

private:

    Singleton()

    {

        cout << "contruct function exec begin" << endl;

        m_singer = NULL;

        count = ;

        Sleep();

        cout << "contruct function exec finished" << endl;

    }

    Singleton(const Singleton& obj){}    //防止拷贝构造

    Singleton& operator=(const Singleton& obj){}    //防止赋值

public:

    static Singleton* getInstance()

    {

        cs.Lock();

        if (m_singer==NULL)

        {

            m_singer = new Singleton();

            count++;

        }

        cs.Unlock();

        return m_singer;

    }

    static void printInfo()

    {

        cout << "create object " << count << endl;

    }

    static void FreeInstance()

    {

        if (m_singer != NULL)

        {

            delete m_singer;

            m_singer = NULL;

            count = ;

        }

    }

};

Singleton* Singleton::m_singer = NULL;

int Singleton::count = ;

void threadfunc(void *mylpAdd)

{

    int id = GetCurrentThreadId();

    cout << "ThreadID: " << id << endl;

    Singleton::getInstance()->printInfo();    //线程中获取一个实例对象

}

unsigned __stdcall threadfunc2(void *mylpAdd)

{

    int id = GetCurrentThreadId();

    cout << "ThreadID: " << id << endl;

    Singleton::getInstance()->printInfo();    //线程中获取一个实例对象

    return ;

}

void main()

{

    int i = ;

    unsigned int dwThreadId[], dwThrdParam = ;

    HANDLE hThread[];

    int threadnum = ;

    //生成线程

    for (i = ; i < threadnum;i++)

    {

        hThread[i] = (HANDLE)_beginthreadex(NULL, , &threadfunc2, NULL, , &dwThreadId[i]);

        //hThread[i] = (HANDLE)_beginthread(&threadfunc, 0, NULL);

        if (hThread[i]==NULL)

        {

            cout << "product thread failure" << endl;

            break;

        }

    }

    //等待线程

    for (i = ; i < threadnum;i++)

    {

        WaitForSingleObject(hThread[i], INFINITE);

    }

    cout << "wait for threadings end" << endl;

    //删除

    for (i = ; i < threadnum;i++)

    {

        CloseHandle(hThread[i]);

    }

    Singleton::FreeInstance();

    system("pause");

    return;

}
注意:我们不能直接使用CCriticalSection,这是MFC类库中的,我们要先引入
3.C++11版本
#include <iostream>

#include <windows.h>

#include <winbase.h>

#include <process.h>

#include <stdlib.h>

#include <mutex>

#include <atomic>

#include <thread>

using namespace std;

class Singleton;

std::atomic<Singleton*> m_install;    //原子对象

std::mutex m_mutex;

class Singleton

{

private:

    static Singleton* m_singer;

    static int count;

private:

    Singleton()

    {

        cout << "contruct function exec begin" << endl;

        m_singer = NULL;

        count = ;

        Sleep();

        cout << "contruct function exec finished" << endl;

    }

    Singleton(const Singleton& obj){}    //防止拷贝构造

    Singleton& operator=(const Singleton& obj){}    //防止赋值

public:

    static Singleton* getInstance()

    {

        Singleton* tmp = m_install.load(std::memory_order_relaxed);    //屏蔽编译器reorder

        std::atomic_thread_fence(std::memory_order_acquire);    //获取内存fence

        if (tmp == nullptr) {

            std::lock_guard<std::mutex> lock(m_mutex);    //锁的设置

            tmp = m_install.load(std::memory_order_relaxed);    //取变量出来

            if (tmp == nullptr) {

                tmp = new Singleton;

                std::atomic_thread_fence(std::memory_order_release);//释放内存fence

                m_install.store(tmp, std::memory_order_relaxed);    //存放变量回去

            }

        }

        return tmp;

    }

    static void printInfo()

    {

        cout << "create object " << count << endl;

    }

    static void FreeInstance()

    {

        if (m_singer != NULL)

        {

            delete m_singer;

            m_singer = NULL;

            count = ;

        }

    }

};

Singleton* Singleton::m_singer = NULL;

int Singleton::count = ;

void threadfunc(void *mylpAdd)

{

    int id = GetCurrentThreadId();

    cout << "ThreadID: " << id << endl;

    Singleton::getInstance()->printInfo();    //线程中获取一个实例对象

}

unsigned __stdcall threadfunc2(void *mylpAdd)

{

    int id = GetCurrentThreadId();

    cout << "ThreadID: " << id << endl;

    Singleton::getInstance()->printInfo();    //线程中获取一个实例对象

    return ;

}

void main()

{

    int i = ;

    unsigned int dwThreadId[], dwThrdParam = ;

    HANDLE hThread[];

    int threadnum = ;

    //生成线程

    for (i = ; i < threadnum;i++)

    {

        hThread[i] = (HANDLE)_beginthreadex(NULL, , &threadfunc2, NULL, , &dwThreadId[i]);

        //hThread[i] = (HANDLE)_beginthread(&threadfunc, 0, NULL);

        if (hThread[i]==NULL)

        {

            cout << "product thread failure" << endl;

            break;

        }

    }

    //等待线程

    for (i = ; i < threadnum;i++)

    {

        WaitForSingleObject(hThread[i], INFINITE);

    }

    cout << "wait for threadings end" << endl;

    //删除

    for (i = ; i < threadnum;i++)

    {

        CloseHandle(hThread[i]);

    }

    Singleton::FreeInstance();

    system("pause");

    return;

}
设计模式---对象性能模式之单例模式(Singleton)的更多相关文章
- 设计模式---对象性能模式之享元模式(Flyweight)
一:概念 通过与其他类似对象共享数据来减少内存占用 如果一个应用程序使用了太多的对象, 就会造成很大的存储开销. 特别是对于大量轻量级 (细粒度)的对象,比如在文档编辑器的设计过程中,我们如果为每个字 ...
- C++设计模式 之 “对象性能” 模式:Singleton、Flyweight
“对象性能”模式 面向对象很好地解决了“抽象”的问题,但是必不可免地要付出一定的代价.对于通常情况来讲,面向对象的成本大都可以忽略不计.但是某些情况,面向对象所带来的成本必须谨慎处理. 典型模式 # ...
- 学习记录:《C++设计模式——李建忠主讲》5.“对象性能”模式
对象性能模式:面向对象很好地解决了抽象地问题,但是必不可免地要付出一定地代价.对于通常情况来讲,面向对象地成本大都可以忽略不计,但某些情况,面向对象所带来地成本必须谨慎处理. 典型模式:单件模式(Si ...
- 23种设计模式 - 对象性能(Singleton - Flyweight享元)
其他设计模式 23种设计模式(C++) 每一种都有对应理解的相关代码示例 → Git原码 ⌨ 对象性能 面向对象很好地解决了"抽象"的问题,但是必不可免地付出一定的代价.对于通常情 ...
- PHP 设计模式 笔记与总结(6)基础设计模式:工厂模式、单例模式和注册树模式
三种基础设计模式(所有面向对象设计模式中最常见的三种): ① 工厂模式:使用工厂方法或者类生成对象,而不是在代码中直接new 在 Common 目录下新建 Factory.php: <?php ...
- java中单态模式或单例模式(Singleton)有什么意义?
8.单态模式或单例模式(Singleton) 单态模式有什么用呢?想一下Adobe Photoshop ,处理两张图,会启动两个photoshop吗?多耗费内存呀! ( Consider Adobe ...
- 设计模式---对象创建模式之原型模式(prototype)
一:概念 原型模式(Prototype Pattern) 实际上就是动态抽取当前对象运行时的状态 Prototype模式是一种对象创建型模式,它采取复制原型对象的方法来创建对象的实例.使用Protot ...
- 设计模式---对象创建模式之工厂方法模式(Factory Method)
前提:“对象创建”模式 通过“对象创建”模式绕开new,来避免对象创建(new)过程中所导致的紧耦合(依赖具体类),从而支持对象创建的稳定.它是接口抽象之后的第一步工作. 典型模式(表现最为突出) 工 ...
- "围观"设计模式(7)--创建型之单例模式(Singleton Pattern)
单例模式,也叫单子模式,是一种经常使用的软件设计模式.在应用这个模式时,单例对象的类必须保证仅仅有一个实例存在. 很多时候整个系统仅仅须要拥有一个的全局对象.这样有利于我们协调系统总体的行为.比方在某 ...
随机推荐
- Codeforces 719A 月亮
参考自:https://www.cnblogs.com/ECJTUACM-873284962/p/6395221.html A. Vitya in the Countryside time limit ...
- 一个服务器创建两个MySQL
转载:http://www.2cto.com/database/201412/357863.html 将已安装的数据库文件夹复制到另一个目录下 打开复制目录下的my.ini文件修改 [client] ...
- MYSQL理论
1.数据库相关概念 数据库服务器(本质就是一个台计算机,该计算机之上安装有数据库管理软件的服务端) 数据库管理管理系统RDBMS(本质就是一个C/S架构的套接字软件) 库(文件夹)=====>数 ...
- Docker基本使用(二)
Docker 客户端 我们可以直接输入 docker 命令来查看到 Docker 客户端的所有命令选项. 可以通过命令 docker command --help 更深入的了解指定的 Docker 命 ...
- 【XSY2523】神社闭店之日 莫比乌斯反演
题目大意 给你\(a_1\ldots a_n,l,c\)每次给你\(x,y\),求有多少个序列满足:长度\(\leq l\),每个元素是\([1,c]\),循环右移\(a_j(x\leq j\leq ...
- 七牛云 qshell 使用
七牛云 qshell 控制台工具上传 命令:qshell fput another1 demo.txt /users/tianyang/demo.txt ======================= ...
- <Android基础>(三) UI开发 Part 1
1.常用控件 1)TextView 2)Button 3)EditText 4)ImageView 5)ProgressBar 6)AlertDialog 7)ProgressDialog 2.四种布 ...
- Jupyter-Notebook服务器自定义密码
往期回顾 Anaconda安装:https://www.cnblogs.com/dotnetcrazy/p/9158715.html 基本知识导航篇:https://www.cnblogs.com/d ...
- nodejs的某些api~(三)net模块
net模块和http模块是node最重要的两个模块,前者是基于TCP的封装,后者的本质也是TCP.他们通过 tcp通信,建立一个可以收发消息的web服务器.我在写的作品里面用的express也是封装的 ...
- nodejs的某些api~(一)node的流1
根据心情整理一些node的api~ 今天第一篇,node的流:node的流比较重要,node的流存在于node的各个模块,包括输入输出流,stdin,stout.fs读取流,zlib流,crypto流 ...