004.Heartbeat+HAProxy+MySQL半复制高可用架构
一 基础环境
|
节点
|
系统版本
|
MySQL版本
|
业务IP
|
心跳IP
|
|
Master
|
CentOS 7.5
|
MySQL 5.6
|
192.168.88.100
|
192.168.77.100
|
|
Slave
|
CentOS 7.5
|
MySQL 5.6
|
192.168.88.101
|
192.168.77.101
|
|
VIP
|
192.168.88.88
|
|||
二 架构设计
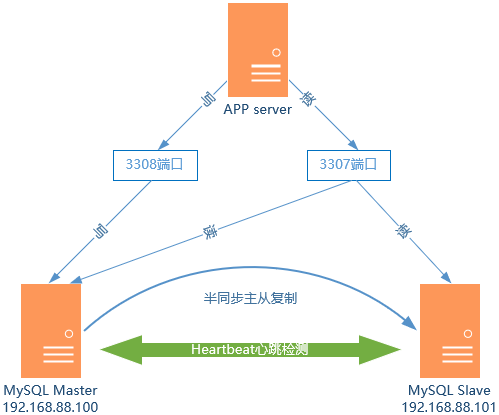
- (1)VIP漂移到主机Slave上;
- (2)重置Slave的MySQL Slave角色,使之切换为Master;
- (3)启动Slave上的haproxy,继续接收应用的请求。
三 安装MySQL
3.1 安装MySQL
 [root@master ~]# yum list installed | grep mysql	#查看是否存在其他MySQL组件

 [root@master ~]# yum -y remove mysql*			#为避免冲突引,卸载已存在的组件

 [root@master ~]# yum -y install mariadb mariadb-server

 [root@master ~]# systemctl start mariadb.service
3.2 初始化MySQL
 [root@master ~]# mysql_secure_installation		#设置root密码

 [root@master ~]# systemctl restart mariadb.service
四 配置MySQL半同步
4.1 加载插件
 [root@master ~]# ll /usr/lib64/mysql/plugin/		#查看插件

 [root@master ~]# mysql -uroot -p

 Enter password:

 MariaDB [(none)]> install plugin rpl_semi_sync_master soname 'semisync_master.so';

 MariaDB [(none)]> install plugin rpl_semi_sync_slave soname 'semisync_slave.so';
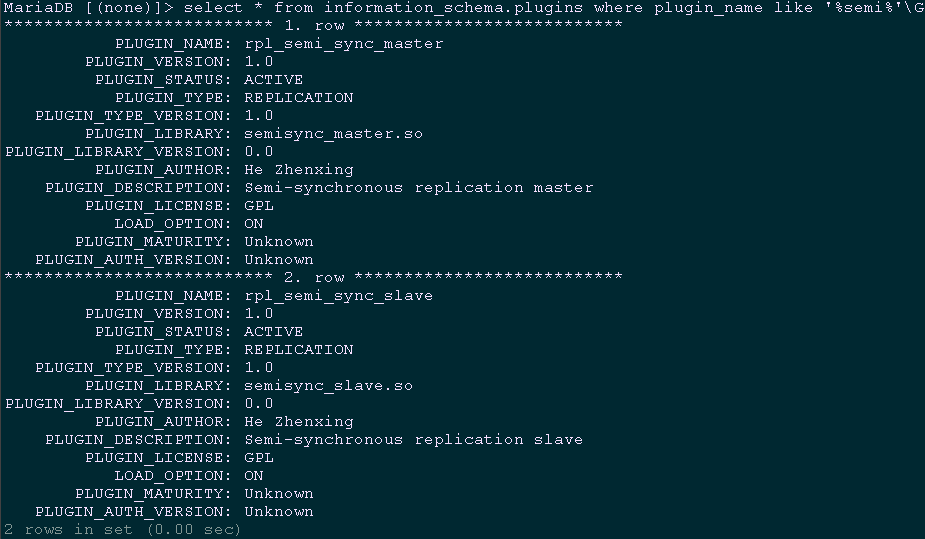
MariaDB [(none)]> select * from information_schema.plugins where plugin_name like '%semi%'\G #查看加载情况
4.2 配置半同步复制
4.2.1 master my.cf配置
 [root@master ~]# vi /etc/my.cnf

 [mysqld]

 ……

 server-id=1				#设置主服务器master的id

 log-bin=mysql-bin			#配置二进制变更日志命名格式

 plugin-load=rpl_semi_sync_master=semisync_master.so

 rpl_semi_sync_master_enabled=1

 rpl_semi_sync_master_timeout=1000
4.2.2 slave my.cf配置
 [root@slave ~]# vi /etc/my.cnf

 [mysqld]

 ……

 server-id=2				#设置本服务器slave的id

 log-bin=mysql-bin			#配置二进制变更日志命名格式

 plugin-load=rpl_semi_sync_master=semisync_master.so

 rpl_semi_sync_master_enabled=1

 read-only				#设为只读模式,只能从master同步,不能直接写入
4.3 master创建账号并授权
 [root@master ~] mysql -uroot -p

 Enter password:

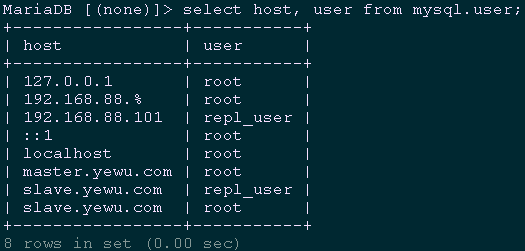
 MariaDB [(none)]> grant replication slave on *.* to 'repl_user'@'192.168.88.101' identified by 'x12345678';

 MariaDB [(none)]> grant replication slave on *.* to 'repl_user'@'slave.yewu.com' identified by 'x12345678';

 MariaDB [(none)]> grant all privileges on *.* to 'root'@'192.168.88.%'  identified by 'x120952576' with grant option;

 MariaDB [(none)]> grant all privileges on *.* to 'root'@'slave.yewu.com' identified by 'x120952576';

 MariaDB [(none)]> flush privileges;

 MariaDB [(none)]> select host, user from mysql.user;		#查看权限
 [root@master ~]# systemctl restart mariadb.service

 [root@master ~]# mysql -uroot -p

 Enter password:

 MariaDB [(none)]> show master status;
4.4 slave创建账号并授权
 [root@slave ~] mysql -uroot -p

 Enter password:

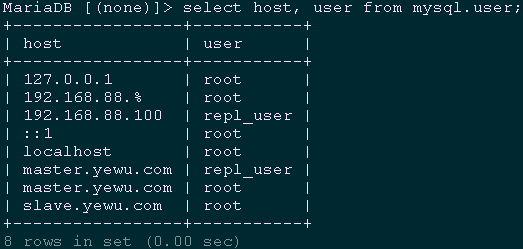
 MariaDB [(none)]> grant replication slave on *.* to 'repl_user'@'192.168.88.100' identified by 'x12345678';

 MariaDB [(none)]> grant replication slave on *.* to 'repl_user'@'master.yewu.com' identified by 'x12345678';

 MariaDB [(none)]> grant all privileges on *.* to 'root'@'192.168.88.%'  identified by 'x120952576' with grant option;

 MariaDB [(none)]> grant all privileges on *.* to 'root'@'master.yewu.com' identified by 'x120952576' with grant option;

 MariaDB [(none)]> select host, user from mysql.user;		#查看权限
 [root@master ~]# systemctl restart mariadb.service

 [root@master ~]# mysql -uroot -p

 Enter password:

 MariaDB [(none)]> show master status;
4.4 启动同步
 [root@slave ~]# systemctl restart mariadb.service

 [root@slave ~]# mysql -uroot -p

 Enter password:

 MariaDB [(none)]> change master to master_host='192.168.88.100',

 master_user='repl_user',

 master_password='x12345678',

 master_log_file='mysql-bin.000001',

 master_port=3306,

 master_log_pos=245;

 MariaDB [(none)]> start slave;

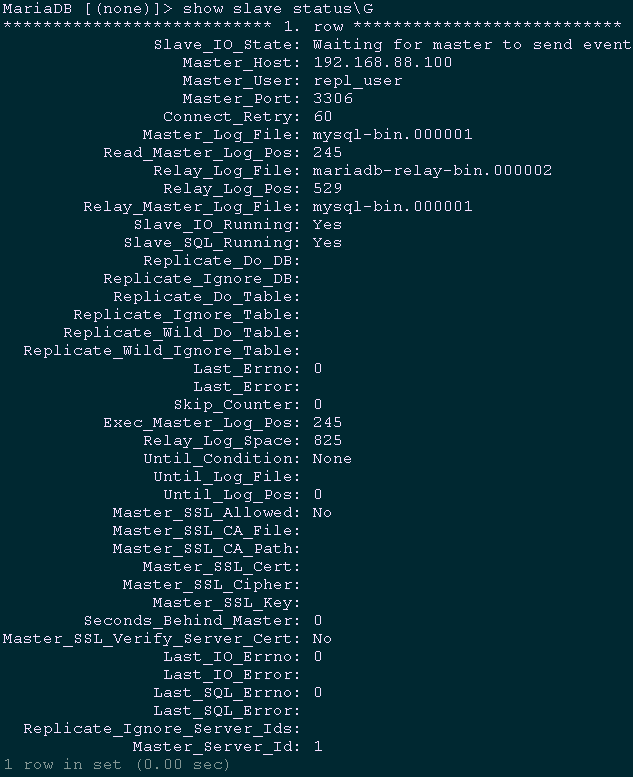
 MariaDB [(none)]> show slave status\G			#查看slave状态
五 安装HAProxy
5.1 下载及安装
 [root@master ~]# wget http://www.haproxy.org/download/1.9/src/haproxy-1.9.0.tar.gz

 [root@master ~]# tar -zxvf haproxy-1.9.0.tar.gz

 [root@master ~]# cd haproxy-1.9.0/

 [root@master haproxy-1.9.0]# make TARGET=linux3100 CPU=x86_64 PREFIX=/usr/local/haprpxy

 #编译uname -r #查看系统内核版本号

 [root@master haproxy-1.9.0]# make install PREFIX=/usr/local/haproxy
5.2 创建HAProxy相关配置文件
 [root@master ~]# mkdir /usr/local/haproxy/conf				#创建配置文件目录

 [root@master ~]# mkdir -p /etc/haproxy					#创建配置文件目录

 [root@master ~]# touch /usr/local/haproxy/haproxy.cfg			#创建配置文件

 [root@master ~]# ln -s /usr/local/haproxy/conf/haproxy.cfg /etc/haproxy/haproxy.cfg		 #添加配置文件软连接

 [root@master ~]# cp -r /root/haproxy-1.9.0/examples/errorfiles /usr/local/haproxy/errorfiles #拷贝错误页面

 [root@master ~]# ln -s /usr/local/haproxy/errorfiles /etc/haproxy/errorfiles

 #添加软连接

 [root@master ~]# mkdir -p  /usr/local/haproxy/log			#创建日志文件目录

 [root@master ~]# touch /usr/local/haproxy/log/haproxy.log		#创建日志文件目录

 [root@master ~]# ln -s /usr/local/haproxy/log/haproxy.log /var/log/haproxy.log

 #添加软连接

 [root@master ~]# cp /usr/local/haproxy/sbin/haproxy /usr/sbin/	#拷贝HAProxy命令

 [root@master ~]# cp /root/haproxy-1.7.9/examples/haproxy.init /etc/rc.d/init.d/haproxy

 #拷贝开机启动文件

 [root@master ~]# chmod u+x /etc/rc.d/init.d/haproxy			#添加脚本执行权限

 [root@master ~]# chkconfig haproxy on				#设置开机启动
六 配置HAProxy
6.1 配置master的HAProxy
 [root@master ~]# vi /etc/haproxy/haproxy.cfg

 global

     log         127.0.0.1 local2        # 日志定义级别

     chroot      /usr/local/haproxy      # 当前工作目录

     pidfile     /var/run/haproxy.pid    # 进程id

     maxconn     4000                    # 最大连接数

     user        haproxy                 # 运行改程序的用户

     group       haproxy

     daemon                              # 后台形式运行

     stats socket /usr/local/haproxy/stats

 defaults

     mode                    tcp         # haproxy运行模式(http | tcp | health)

     log                     global      # 采用全局定义的日志

     option                  dontlognull # 不记录健康检查的日志信息

     option                  redispatch  # serverId对应的服务器挂掉后,强制定向到其他健康的服务器

     retries                 3           # 三次连接失败则服务器不用

     timeout http-request    10s

     timeout queue           1m

     timeout client          1m          # 客户端超时

     timeout server          1m          # 服务器超时

     timeout http-keep-alive 10s

     timeout check           10s         # 心跳检测

     maxconn                 600         # 最大连接数

 listen stats                            # 配置haproxy状态页(用来查看的页面)

     mode http

     bind 0.0.0.0:8888

     stats enable

     stats refresh 30s                   #设置统计页面自动刷新的时间

     stats uri /stats                    #设置统计页面url

     stats realm Haproxy Manager         #设置登录HAProxy统计页面密码框上提示文本

     stats auth admin:admin              #设置登录HAProxy统计页面用户名和密码设置

     #stats hide-version                 #隐藏统计页面上HAProxy的版本信息

 frontend  read

     bind *:3307                         # 监听前端3307端口(表示任何ip访问3307端口都会将数据轮番转发到mysql服务器群组中)

     default_backend        mysql_read   # 后端服务器组名

 backend mysql_read

     balance     roundrobin              # 使用轮询方式调度

     server mysql1 192.168.88.100:3306 check port 3306 maxconn 300

     server mysql2 192.168.88.101:3306 check port 3306 maxconn 300

 frontend  write

     bind *:3308                         # 监听前端3308端口(表示任何ip访问3308端口都会将数据轮番转发到mysql服务器群组中)

     default_backend        mysql_write  # 后端服务器组名

 backend mysql_write

     server mysql1 192.168.88.100:3306 check port 3306 maxconn 300
6.2 配置slave的HAProxy
 [root@slave ~]# vi /etc/haproxy/haproxy.cfg

 global

     log         127.0.0.1 local2        # 日志定义级别

     chroot      /usr/local/haproxy      # 当前工作目录

     pidfile     /var/run/haproxy.pid    # 进程id

     maxconn     4000                    # 最大连接数

     user        haproxy                 # 运行改程序的用户

     group       haproxy

     daemon                              # 后台形式运行

     stats socket /usr/local/haproxy/stats

 defaults

     mode                    tcp         # haproxy运行模式(http | tcp | health)

     log                     global      # 采用全局定义的日志

     option                  dontlognull # 不记录健康检查的日志信息

     option                  redispatch  # serverId对应的服务器挂掉后,强制定向到其他健康的服务器

     retries                 3           # 三次连接失败则服务器不用

     timeout http-request    10s

     timeout queue           1m

     timeout client          1m          # 客户端超时

     timeout server          1m          # 服务器超时

     timeout http-keep-alive 10s

     timeout check           10s         # 心跳检测

     maxconn                 600         # 最大连接数

 listen stats                            # 配置haproxy状态页(用来查看的页面)

     mode http

     bind 0.0.0.0:8888

     stats enable

     stats refresh 30s                   #设置统计页面自动刷新的时间

     stats uri /stats                    #设置统计页面url

     stats realm Haproxy Manager         #设置登录HAProxy统计页面密码框上提示文本

     stats auth admin:admin              #设置登录HAProxy统计页面用户名和密码设置

     #stats hide-version                 #隐藏统计页面上HAProxy的版本信息

 frontend  read

     bind *:3307                         # 监听前端3307端口(表示任何ip访问3307端口都会将数据轮番转发到mysql服务器群组中)

     default_backend        mysql_read   # 后端服务器组名

 backend mysql_read

     balance     roundrobin              # 使用轮询方式调度

     server mysql1 192.168.88.100:3306 check port 3306 maxconn 300

     server mysql2 192.168.88.101:3306 check port 3306 maxconn 300

 frontend  write

     bind *:3308                         # 监听前端3308端口(表示任何ip访问3308端口都会将数据轮番转发到mysql服务器群组中)

     default_backend        mysql_write  # 后端服务器组名

 backend mysql_write

     server mysql1 192.168.88.101:3306 check port 3306 maxconn 300
七 安装Heartbeat
八 配置Heartbeat
8.1 配置authkeys
 [root@master ~]# vi /usr/local/heartbeat/etc/ha.d/authkeys

 auth 3

 3 md5 Yes!
8.2 配置Heartbeat
 [root@master ~]# vi /usr/local/heartbeat/etc/ha.d/ha.cf

 logfile /var/log/ha-log			#记录Heartbeat其他相关日志信息

 logfacility     local0			#设置heartbeat的日志,这里用的是系统日志

 keepalive 2				#设定心跳(监测)时间间隔为2秒

 deadtime 15				#宣告死亡时间

 warntime 10				#心跳延时时间

 initdead 60				#初始化时间

 udpport 694				#用于通信的UDP端口

 bcast   eth1				#接受广播心跳的网卡接口

 ucast eth1 192.168.77.101		#置对方机器心跳检测的IP

 auto_failback off			#关闭自动切回恢复正常的主节点

 node master.yewu.com			#集群节点的名称,必须匹配uname -n的结果。

 node slave.yewu.com

 ping 192.168.88.1

 respawn hacluster /usr/local/heartbeat/libexec/heartbeat/ipfail
8.3 配置主备切换
 [root@master ~]# vi /root/remove_slave.sh

 #!/bin/sh

 #****************************************************************#

 # ScriptName: remove_slave.sh

 # Author: xhy

 # Create Date: 2018-12-22 09:58

 # Modify Author: xhy

 # Modify Date: 2018-12-22 09:58

 # Version:

 #***************************************************************#

 user=root

 password=x120952576

 log=/var/log/mariadb/remove_slave.log

 echo "`date`" >> $log

 rm -rf /tmp/kill.sql

 mysql -u$user -p$password -e "select * into outfile '/tmp/kill.sql' from (select concat('kill ',id,';') from information_schema.processlist where command='sleep' union all select 'set global read_o

 nly=OFF;' union all select 'stop slave;' union all select 'reset slave all;') t;"

 mysql -u$user -p$password < /tmp/kill.sql >> $log

  /bin/sed -i 's#read-only#\#read-only#' /etc/my.cnf
 # vi /usr/lib/systemd/system/mariadb.service

 #PrivateTmp=true

 PrivateTmp=false

 # systemctl daemon-reload

 # systemctl restart mariadb.service
 [root@master ~]# chmod 755 /root/remove_slave.sh

 [root@master ~]# scp /root/remove_slave.sh root@192.168.88.101:/root/
8.4 添加MySQL健康检查
 [root@master ~]# vi mysql_check.sh

 #!/bin/sh

 #****************************************************************#

 # ScriptName: mysql_check.sh

 # Author: xhy

 # Create Date: 2018-12-20 16:40

 # Modify Author: xhy

 # Modify Date: 2018-12-20 16:40

 # Version:

 #***************************************************************#

 MYSQL=/usr/bin/mysql

 MYSQL_HOST=localhost

 MYSQL_USER=root

 MYSQL_PASSWORD=x120952576

 date=`date +%y%m%d-%H:%M:`

 echo $date

 $MYSQL -h $MYSQL_HOST -u $MYSQL_USER -p$MYSQL_PASSWORD -e "show status;" >/dev/null 2>&1

 #$mysqlclient --host=$host --port=$port--user=$user --password=$password  -e"show databases;" > /dev/null 2>&1

 if [ $? == 0 ]

 then

    echo " $host mysql login successfully "

    exit 0

 else

    echo " $host mysql login faild"

    /etc/init.d/heartbeat stop

    exit 2

 fi

 [root@master ~]# chmod 755 /root/mysql_check.sh

 [root@master ~]# scp /root/mysql_check.sh root@192.168.88.101:/root/

 [root@master ~]# crontab -e			#定时任务

 */1 * * * * /root/mysql_check.sh >>/var/log/mariadb/check_mysql.log

 [root@slave ~]# crontab -e			#定时任务

 */1 * * * * /root/mysql_check.sh >>/var/log/mariadb/check_mysql.log
8.5 配置haresources
 root@master ~]# vi /usr/local/heartbeat/etc/ha.d/resource.d/changemysql

 /root/remove_slave.sh

 /etc/init.d/haproxy restart

 [root@master ~]# chmod 755 /usr/local/heartbeat/etc/ha.d/resource.d/changemysql

 [root@master ~]# ll /usr/local/heartbeat/etc/ha.d/resource.d/	#查看现有资源类型

 [root@master ~]# vi /usr/local/heartbeat/etc/ha.d/haresources

 master.yewu.com IPaddr::192.168.88.88/24/eth0 mariadb changemysql

 [root@master ~]# scp /usr/local/heartbeat/etc/ha.d/{ha.cf,haresources,authkeys} 192.168.88.101:/usr/local/heartbeat/etc/ha.d/		#将所有配置复制至slave节点

 [root@master ~]# scp /usr/local/heartbeat/etc/ha.d/resource.d/changemysql root@192.168.88.101:/usr/local/heartbeat/etc/ha.d/resource.d/

 [root@slave ~]# vi /usr/local/heartbeat/etc/ha.d/ha.cf

 ucast eth1 192.168.77.100		#置对方机器心跳检测的IP
九 启动服务
9.1 启动Heartbeat
 [root@slave ~]# systemctl start heartbeat.service

 [root@slave ~]# systemctl enable heartbeat.service

 [root@master ~]# service haproxy start

 [root@master ~]# systemctl start heartbeat.service

 [root@master ~]# systemctl enable heartbeat.service
十 验证服务
10.1 验证VIP
[root@master ~]# ifconfig

10.2 验证进程
[root@master ~]# ps -ef | grep -E 'heartbeat|haproxy' | grep -v grep

[root@slave ~]# ps -ef | grep -E 'heartbeat|haproxy' | grep -v grep

十一 功能测试
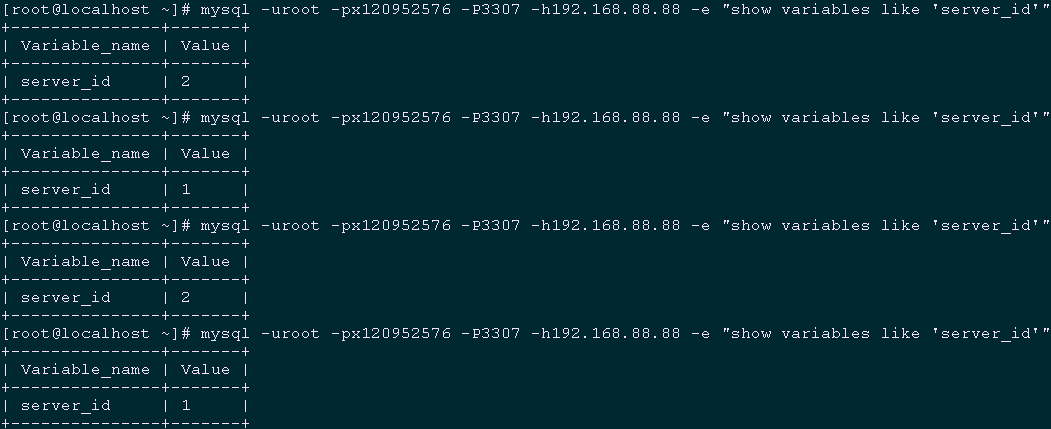
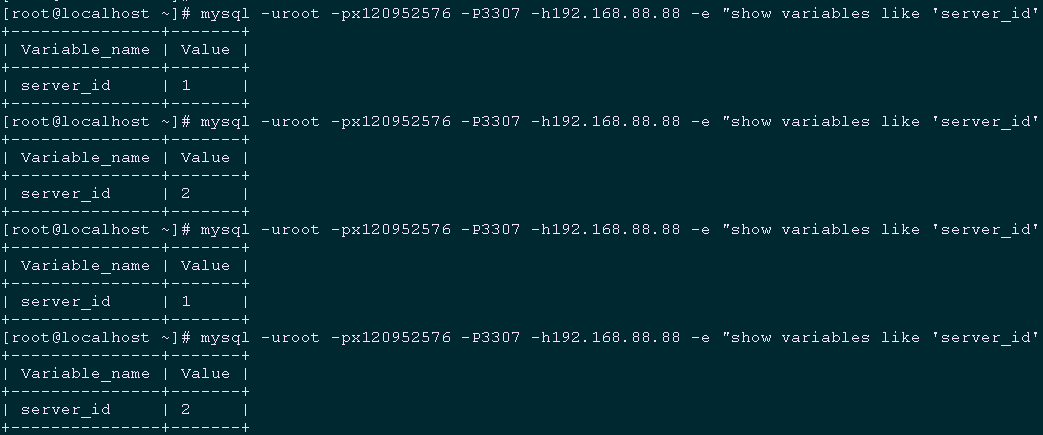
11.1 验证3307端口的读负载均衡转发策略
[root@localhost ~]# mysql -uroot -px120952576 -P3307 -h192.168.88.88 -e "show variables like 'server_id'"
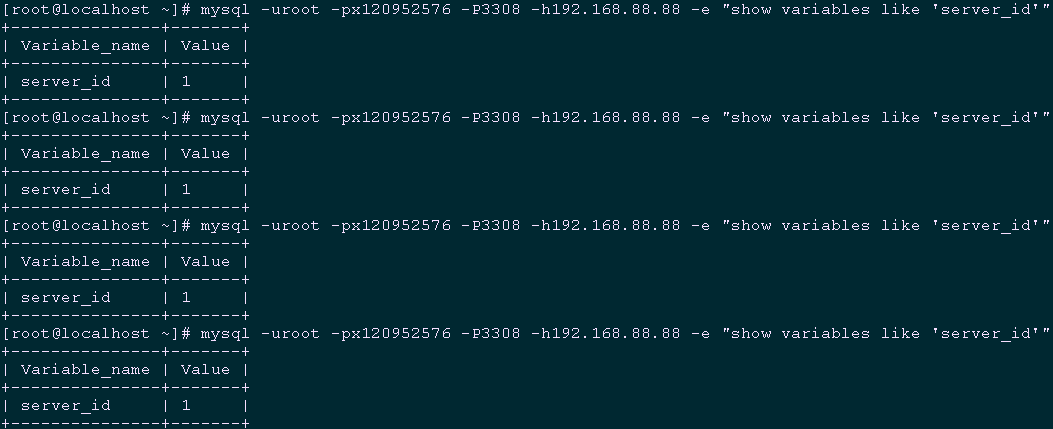
11.2 验证3308端口的读负载均衡转发策略
[root@localhost ~]# mysql -uroot -px120952576 -P3308 -h192.168.88.88 -e "show variables like 'server_id'"
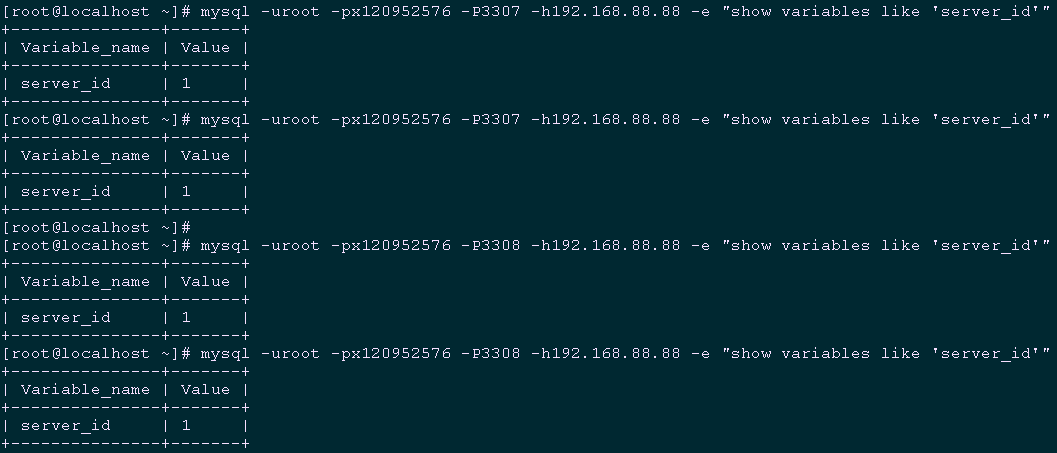
11.3 模拟从库crash
 [root@slave ~]# pkill -9 mysqld

 [root@localhost ~]# mysql -uroot -px120952576 -P3307 -h192.168.88.88 -e "show variables like 'server_id'"

 [root@localhost ~]# mysql -uroot -px120952576 -P3308 -h192.168.88.88 -e "show variables like 'server_id'"
 [root@slave ~]# systemctl start mariadb.service		#重启从库

 [root@localhost ~]# mysql -uroot -px120952576 -P3307 -h192.168.88.88 -e "show variables like 'server_id'"    #再次验证3307端口的读负载均衡转发策略
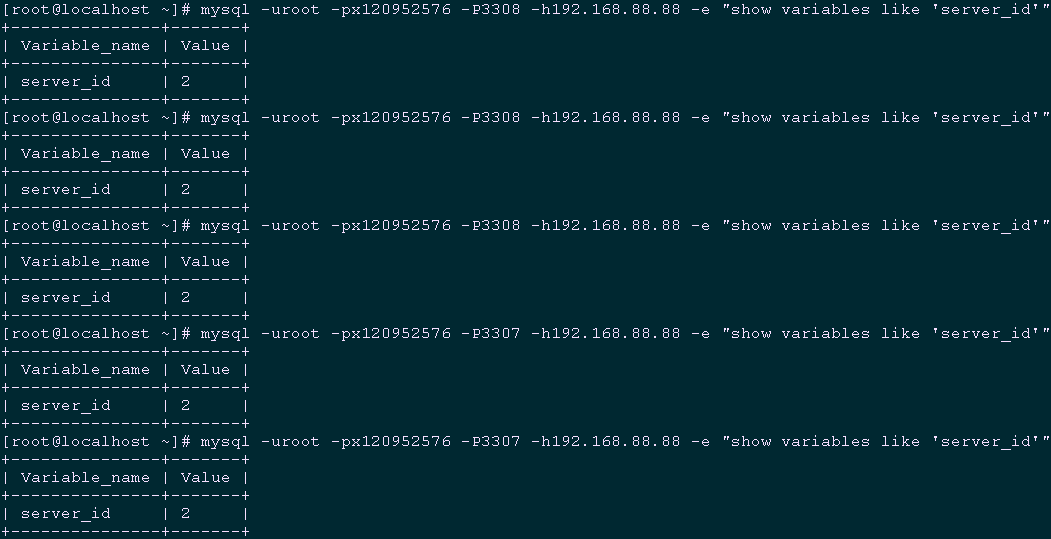
11.4 模拟主库crash
 [root@master ~]# pkill -9 mysqld

 [root@localhost ~]# mysql -uroot -px120952576 -P3308 -h192.168.88.88 -e "show variables like 'server_id'"

 [root@localhost ~]# mysql -uroot -px120952576 -P3307 -h192.168.88.88 -e "show variables like 'server_id'"
附录一:半同步复制概念
004.Heartbeat+HAProxy+MySQL半复制高可用架构的更多相关文章
- Heartbeat+HAProxy+MySQL半复制高可用架构
目录 一 基础环境 二 架构设计 三 安装MySQL 3.1 安装MySQL 3.2 初始化MySQL 四 配置MySQL半同步 4.1 加载插件 4.2 配置半同步复制 4.3 master创建账号 ...
- MySQL数据库的优化(下)MySQL数据库的高可用架构方案
MySQL数据库的优化(下)MySQL数据库的高可用架构方案 2011-03-09 08:53 抚琴煮酒 51CTO 字号:T | T 在上一篇MySQL数据库的优化中,我们跟随笔者学习了单机MySQ ...
- MySQL系列:高可用架构之MHA
前言 从11年毕业到现在,工作也好些年头,入坑mysql也有近四年的时间,也捣鼓过像mongodb.redis.cassandra.neo4j等Nosql数据库.其实一直想写博客分享下工作上的零零碎碎 ...
- 实现基于Haproxy+Keepalived负载均衡高可用架构
1.项目介绍: 上上期我们实现了keepalived主从高可用集群网站架构,随着公司业务的发展,公司负载均衡服务已经实现四层负载均衡,但业务的复杂程度提升,公司要求把mobile手机站点作为单独的服务 ...
- Windows 环境搭建 PostgreSQL 逻辑复制高可用架构数据库服务
本文主要介绍 Windows 环境下搭建 PostgreSQL 的主从逻辑复制,关于 PostgreSQl 的相关运维文章,网络上大多都是 Linux 环境下的操作,鲜有在 Windows 环境下配置 ...
- Windows 环境搭建 PostgreSQL 物理复制高可用架构数据库服务
PostgreSQL 高可用数据库的常见搭建方式主要有两种,逻辑复制和物理复制,上周已经写过了关于在Windows环境搭建PostgreSQL逻辑复制的教程,这周来记录一下 物理复制的搭建方法. 首先 ...
- mysql复制(高可用架构方案的基础)
mysql复制:把一个数据库实例上所有改变复制到另外一个数据库库服务器实例的过程特点:1.没有改变就无所谓复制 ;改变是复制的根本与数据源2.所有的改变:是指可以复制全部改变,也可以复制部分改变 可以 ...
- 浅谈MySQL集群高可用架构
前言 高可用架构对于互联网服务基本是标配,无论是应用服务还是数据库服务都需要做到高可用.对于一个系统而言,可能包含很多模块,比如前端应用,缓存,数据库,搜索,消息队列等,每个模块都需要做到高可用,才能 ...
- mysql集群高可用架构
前言 高可用架构对于互联网服务基本是标配,无论是应用服务还是数据库服务都需要做到高可用.对于一个系统而言,可能包含很多模块,比如前端应用,缓存,数据库,搜索,消息队列等,每个模块都需要做到高可用,才能 ...
随机推荐
- Confluence 6 通过 SSL 或 HTTPS 运行 - 重定向所有的 URLS 到 HTTPS 的安全考虑
尽管现在 HTTPS 现在已经激活并且可用了.老的 HTTP URLs (http://localhost:8090)还是可以访问的.现在你需要重定向所有 URLs 到他们的 HTTPS 链接中.你可 ...
- vue element-UI 升级报错Cannot find module "element-ui/lib/theme-default/index.css"
饿了么 用之前的版本 有些组件跟api 不一样了所以更新了最新的版本,发现 报一堆错误 主要错误是这个 Cannot find module "element-ui/lib/theme-de ...
- Mycat配置文件详解及全局序列号
来详细的看看 mycat的配置文件,更多信息请查看:mycat权威指南. schema.xml: Schema.xml 作为 MyCat 中重要的配置文件之一,管理着 MyCat 的逻辑库.表.分片规 ...
- LeetCode(110):平衡二叉树
Easy! 题目描述: 给定一个二叉树,判断它是否是高度平衡的二叉树. 本题中,一棵高度平衡二叉树定义为: 一个二叉树每个节点 的左右两个子树的高度差的绝对值不超过1. 示例 1: 给定二叉树 [3, ...
- MongoDB----提升
文档之间的联系 一对一:通过文档内嵌的形式体现一对一的关系 db.user.insert({name:"xiaoming",frind:{name:"xiahua&quo ...
- Android 中的缓存
AsimpleCache 1.它可以缓存什么东西? 普通的字符串. json. 序列化的java对象 字节数字. 2.主要特色 1:轻,轻到只有一个JAVA文件. 2:可配置,可以配置缓存路径,缓存 ...
- data-key
在foreach或者each循环中给按钮赋予值 html中:data-key="@config.key" js里获取值: var key = $(this).data(" ...
- 计蒜客31452 Supreme Number(找规律)
A prime number (or a prime) is a natural number greater than 11 that cannot be formed by multiplying ...
- 20165206 2017-2018-2 《Java程序设计》第二周学习总结
20165205 2017-2018-2 <Java程序设计>第一周学习总结 教材学习内容总结 java语言共有8种基本数据类型,分别是boolean.byte.short.char.in ...
- NHibernate:no persister for 异常
几种原因: 1.配置文件后缀名写错 mapping file 必须是.hbm.xml结尾 2.Web.config配置里面引用实体 <session-factory> .......... ...
