
在MyEclipse中搭建spring-boot+mybatis+freemarker框架
一、创建项目
1.右键-->New-->Project...
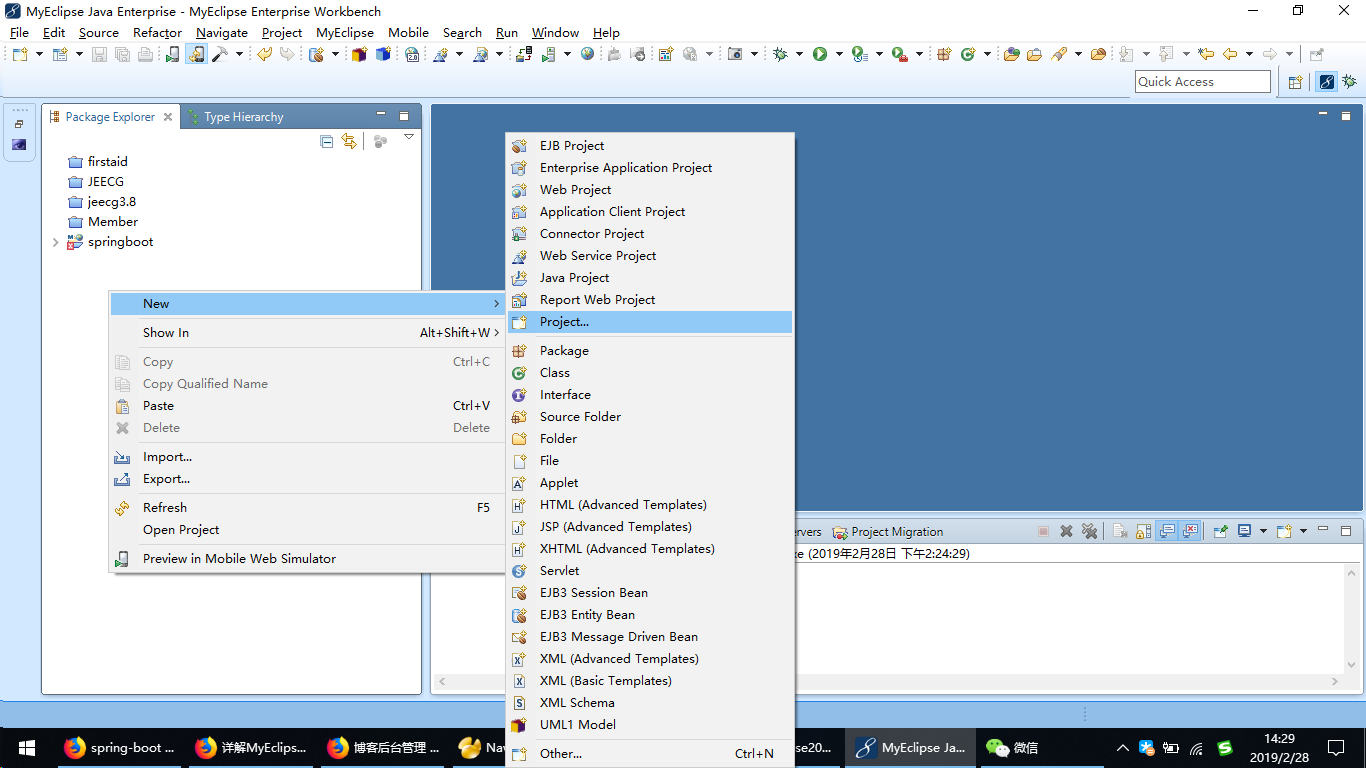
2.选中Maven Project,点击next
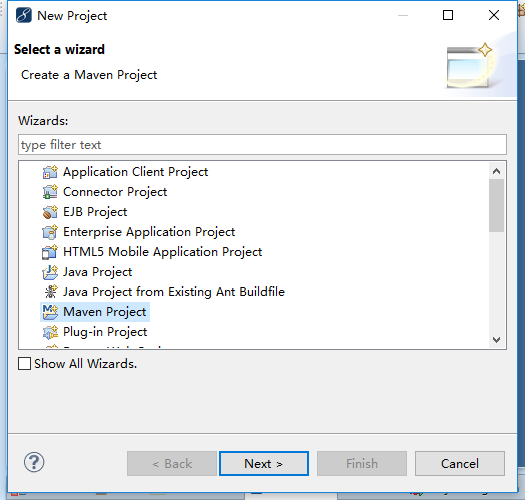
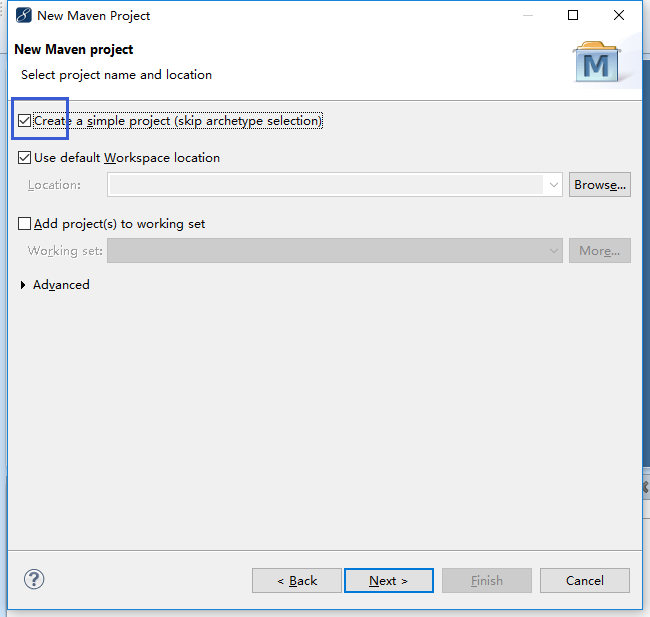
3.选中第一个
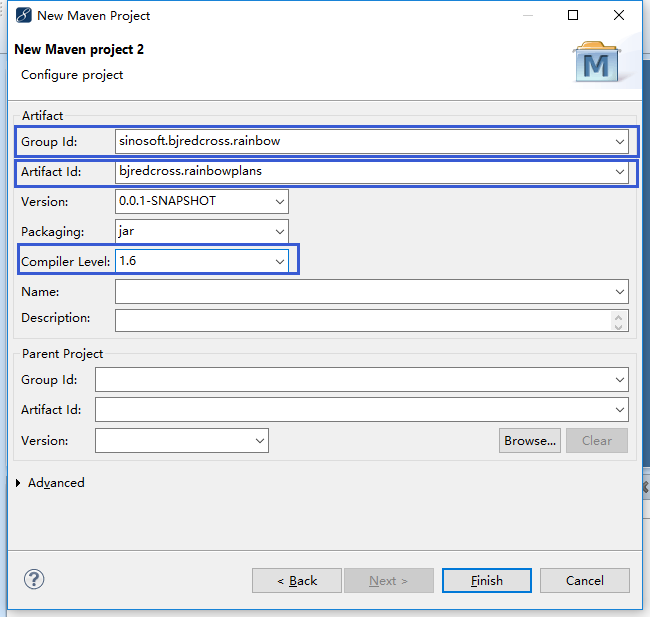
4.添写Group Id,Artifact Id,选择Compiler Level为1.6
5.创建完成后的目录结构如下
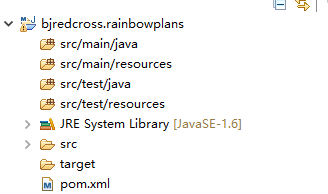
二、创建目录环境
1.修改pom.xml,更新内容如下:
<?xml version="1.0" encoding="UTF-8"?>

<project xmlns="http://maven.apache.org/POM/4.0.0" xmlns:xsi="http://www.w3.org/2001/XMLSchema-instance"

  xsi:schemaLocation="http://maven.apache.org/POM/4.0.0 http://maven.apache.org/xsd/maven-4.0.0.xsd">

  <modelVersion>4.0.0</modelVersion>

  <groupId>com.lm.spring-boot</groupId>

  <artifactId>spring-boot</artifactId>

  <version>0.0.1-SNAPSHOT</version>

  <properties>

    <project.build.sourceEncoding>UTF-8</project.build.sourceEncoding>

  </properties>

  <parent>

    <groupId>org.springframework.boot</groupId>

    <artifactId>spring-boot-starter-parent</artifactId>

    <version>1.3.0.RELEASE</version>

  </parent>

  <dependencies>

    <dependency>

      <groupId>org.springframework.boot</groupId>

      <artifactId>spring-boot-starter-web</artifactId>

    </dependency>

    <!--视图采用freemarker渲染 -->

    <dependency>

      <groupId>org.springframework.boot</groupId>

      <artifactId>spring-boot-starter-freemarker</artifactId>

    </dependency>

    <!-- JDBC -->

    <dependency>

      <groupId>org.springframework.boot</groupId>

      <artifactId>spring-boot-starter-jdbc</artifactId>

    </dependency>

    <!-- mybatis -->

    <dependency>

      <groupId>org.mybatis</groupId>

      <artifactId>mybatis-spring</artifactId>

      <version>1.2.2</version>

    </dependency>

    <dependency>

      <groupId>org.mybatis</groupId>

      <artifactId>mybatis</artifactId>

      <version>3.2.8</version>

    </dependency>

    <!-- mysql -->

    <dependency>

      <groupId>mysql</groupId>

      <artifactId>mysql-connector-java</artifactId>

    </dependency>

    <dependency>

	    <groupId>com.alibaba</groupId>

	    <artifactId>fastjson</artifactId>

	    <version>1.2.13</version>

	</dependency>

  </dependencies>

  <build>

    <plugins>

      <plugin>

        <artifactId>maven-compiler-plugin</artifactId>

        <configuration>

          <source>1.6</source>

          <target>1.6</target>

        </configuration>

      </plugin>

      <plugin>

        <groupId>org.springframework.boot</groupId>

        <artifactId>spring-boot-maven-plugin</artifactId>

        <executions>

          <execution>

            <goals>

              <goal>repackage</goal>

            </goals>

          </execution>

        </executions>

        <dependencies>

          <dependency>

            <groupId>org.springframework</groupId>

            <artifactId>springloaded</artifactId>

            <version>1.2.5.RELEASE</version>

          </dependency>

        </dependencies>

      </plugin>

    </plugins>

    <!-- 指定最终生成jar包的文件名-->

    <finalName>spring-boot</finalName>

  </build>

</project>
2.更新maven相关的jar包
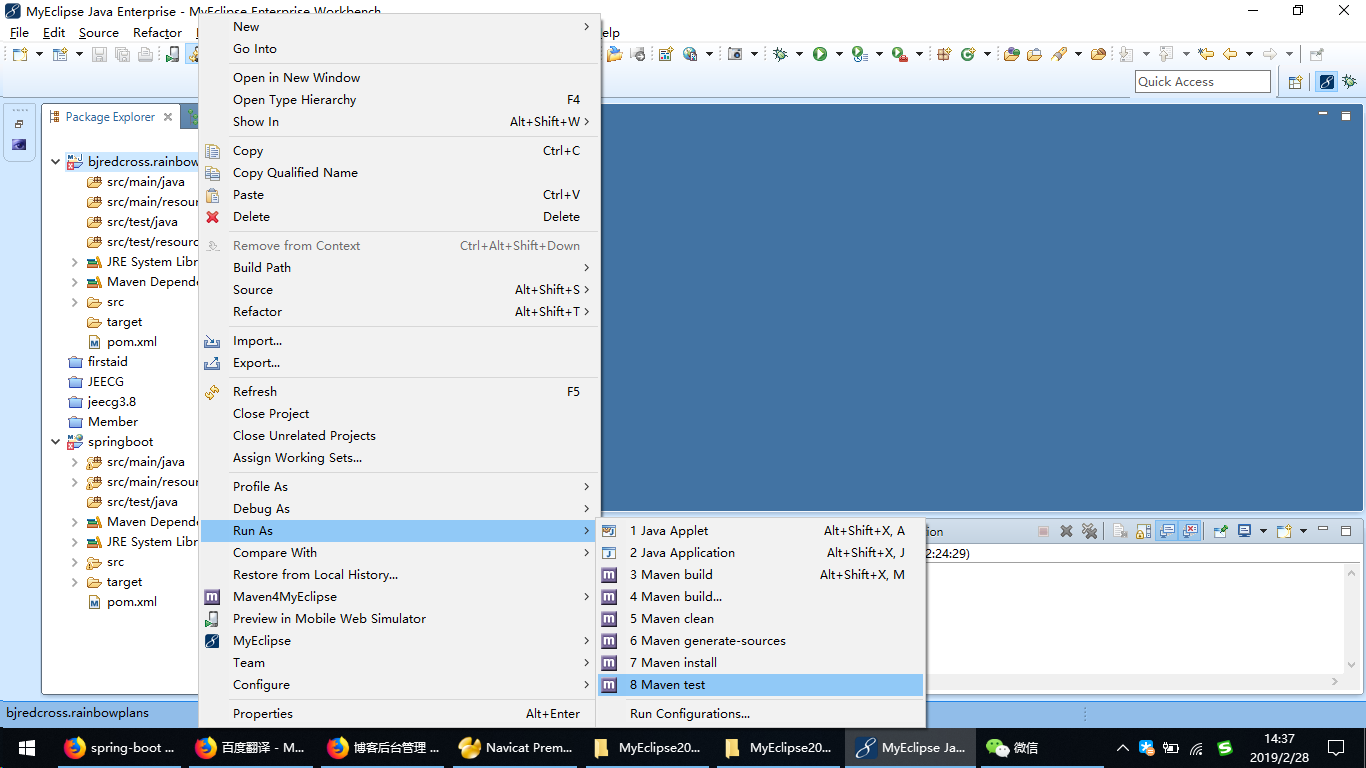
3.创建相关的包和目录,创建后的目录结构如下:
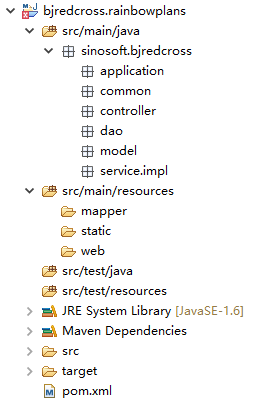
application包存放的是应用程序启动类。
common包存放应用类。
controller包存放控制类。
dao包存放数据类。
model包存放实体类。
service包存放服务类。
mapper文件夹存放映射文件。
static文件夹存放页面相关的静态文件,如js、css等。
web文件夹存放ftl页面。
三、创建程序入口Application.java
在application包创建类文件Application.java
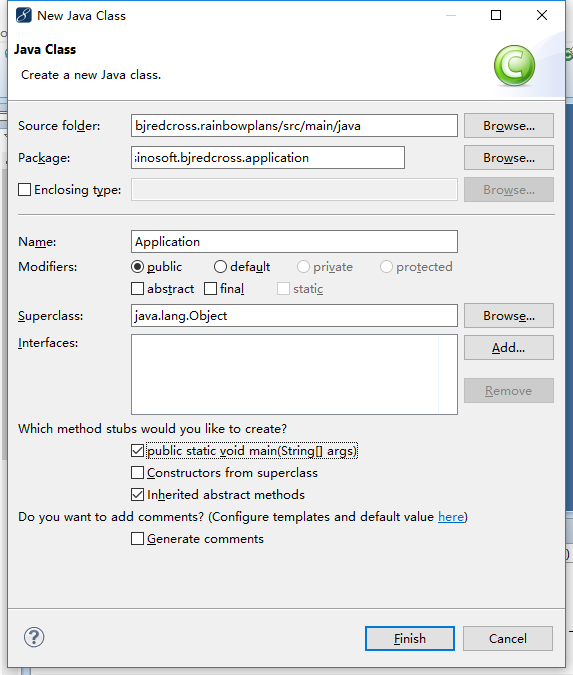
类文件内容为:
package sinosoft.bjredcross.application;

import org.apache.ibatis.session.SqlSessionFactory;
import org.apache.tomcat.jdbc.pool.DataSource;
import org.mybatis.spring.SqlSessionFactoryBean;
import org.mybatis.spring.annotation.MapperScan;
import org.springframework.boot.SpringApplication;
import org.springframework.boot.autoconfigure.EnableAutoConfiguration;
import org.springframework.boot.autoconfigure.SpringBootApplication;
import org.springframework.boot.context.properties.ConfigurationProperties;
import org.springframework.context.annotation.Bean;
import org.springframework.context.annotation.ComponentScan;
import org.springframework.core.io.support.PathMatchingResourcePatternResolver;
import org.springframework.jdbc.datasource.DataSourceTransactionManager;
import org.springframework.transaction.PlatformTransactionManager;

@EnableAutoConfiguration
@SpringBootApplication
@ComponentScan(basePackages={"sinosoft.bjredcross"})//指定spring管理的bean所在的包
@MapperScan("sinosoft.bjredcross.dao")//指定mybatis的mapper接口所在的包
public class Application {

    public static void main(String[] args) {

        SpringApplication.run(Application.class, args);
    }

    //创建数据源
    @Bean
    @ConfigurationProperties(prefix = "spring.datasource")//指定数据源的前缀 ,在application.properties文件中指定
    public DataSource dataSource() {
        return new DataSource();
    }

    //创建SqlSessionFactory
    @Bean
    public SqlSessionFactory sqlSessionFactory() throws Exception {
        SqlSessionFactoryBean sqlSessionFactoryBean = new SqlSessionFactoryBean();
        sqlSessionFactoryBean.setDataSource(dataSource());
        PathMatchingResourcePatternResolver resolver = new PathMatchingResourcePatternResolver();
        sqlSessionFactoryBean.setMapperLocations(resolver.getResources("classpath:/mapper/*.xml"));
        return sqlSessionFactoryBean.getObject();
    }

    //创建事物管理器
    @Bean
    public PlatformTransactionManager transactionManager() {
        return new DataSourceTransactionManager(dataSource());
    }
}
四、创建配置文件application.properties
在src/main/resource目录创建文件application.properties,文件内容如下:
#datasource

spring.datasource.url=jdbc\:mysql\://localhost\:3306/firstaid?useUnicode\=true&characterEncoding\=utf8&zeroDateTimeBehavior\=convertToNull

spring.datasource.username=root

spring.datasource.password=SinoSoftadmin123

spring.datasource.driver-class-name=com.mysql.jdbc.Driver

# FREEMARKER (FreeMarkerAutoConfiguration)

spring.freemarker.allow-request-override=false

spring.freemarker.allow-session-override=false

spring.freemarker.cache=false

spring.freemarker.charset=UTF-8

spring.freemarker.check-template-location=true

spring.freemarker.content-type=text/html

spring.freemarker.enabled=true

spring.freemarker.expose-request-attributes=true

spring.freemarker.expose-session-attributes=true

spring.freemarker.expose-spring-macro-helpers=true

spring.freemarker.prefer-file-system-access=true

spring.freemarker.request-context-attribute=request

spring.freemarker.suffix=.ftl

spring.freemarker.template-loader-path=classpath:/web/

spring.freemarker.settings.template_update_delay=0

spring.freemarker.settings.default_encoding=UTF-8

spring.freemarker.settings.classic_compatible=true

spring.freemarker.order=1

#server

server.port=8088
五、系统运行测试
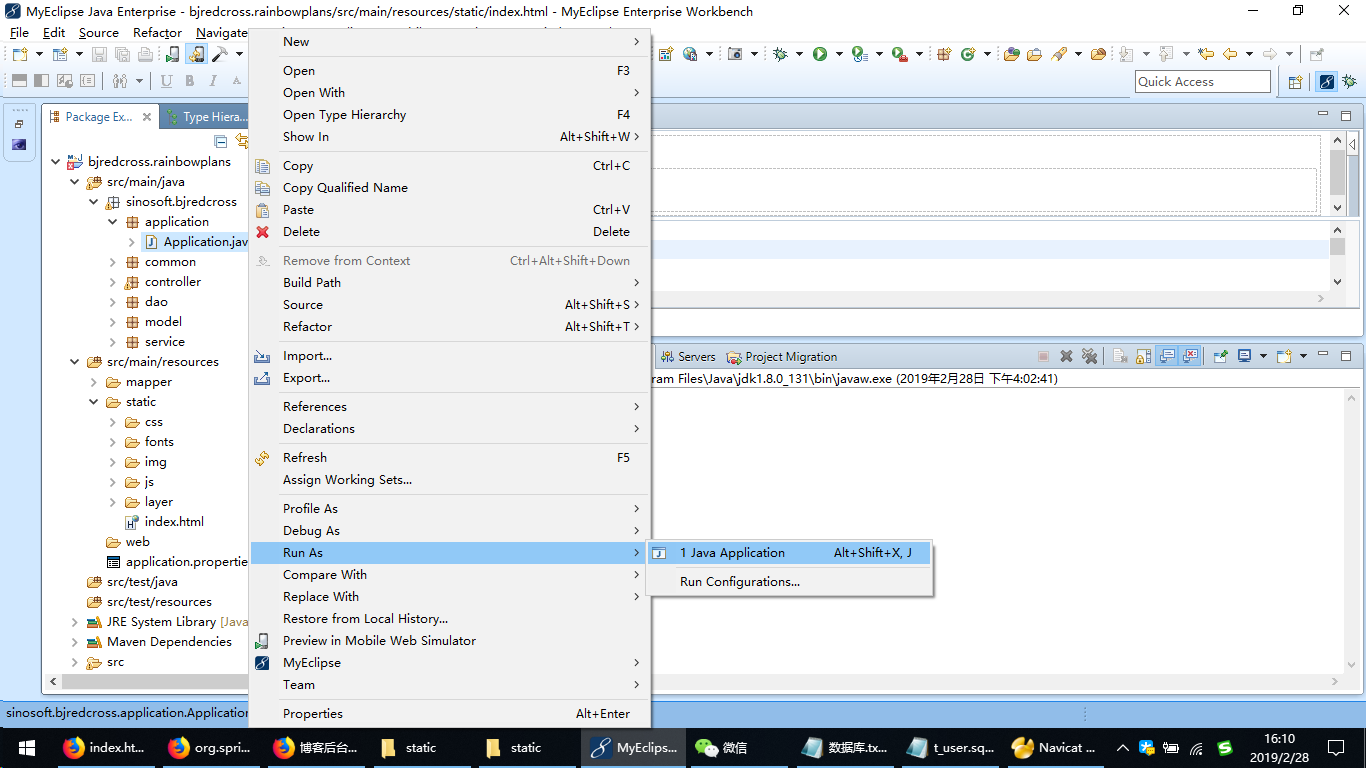
在Application.java文件上右键run as点击java application
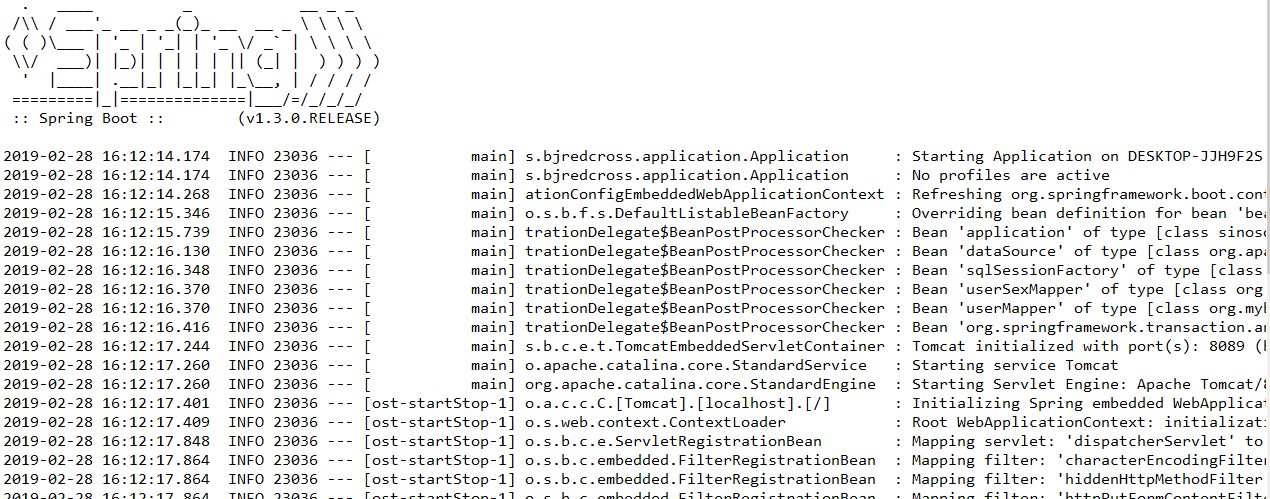
执行正常显示如下:
在MyEclipse中搭建spring-boot+mybatis+freemarker框架的更多相关文章
- idea搭建Spring Boot+Mybatis及使用教程
环境准备 idea 15 jDK tomcat maven 搭建方式 官网下载源码包解压缩 使用idea中的Spring initializr创建 这两种方法创建的项目完全相同,只是操作方式不一样 这 ...
- myEclipse 搭建 Spring boot+myBatis+maven 项目流程
1.新建一个工程 new-->maven project-->next-->next-->在filter中搜索webapp-->group id.Artifact id- ...
- 在MyEclipse中搭建Spring MVC开发环境
环境版本 IDE:MyEclipse 8.5 Spring:spring 3.2.8 JDK:1.6 1.打开MyEclipse-->File-->New-->Web Project ...
- IntelliJ IDEA 14.0.3 实战搭建Spring+SpringMVC+MyBatis组合框架
简介 Spring+SpringMVC+MyBatis框架(SSM)是比较热门的中小型企业级项目开发的框架,对于新手来说也是比较容易学习入门的.虽说容易,但在框架搭建过程中仍然遇到了许多问题,因此用实 ...
- idea搭建Spring Boot+MyBatis
需要准备的环境: idea 2017.2 jdk1.8.0_144 Maven 3.5.0 请提前将idea与Maven.jdk配置好,本次项目用的都是比较新的. 步骤: 一.首先使用idea新建一个 ...
- spring boot+mybatis+quartz项目的搭建完整版
1. 利用spring boot提供的工具(http://start.spring.io/)自动生成一个标准的spring boot项目架构 2. 因为这里我们是搭建spring boot+mybat ...
- Spring boot+Mybatis+MySQL插入中文乱码
转载:https://www.jianshu.com/p/bd0311a33c16 现象: 搭建spring boot+mybatis+mysql时出现插入mysql的中文出现乱码???. mys ...
- Myeclipse下使用Maven搭建spring boot项目
开发环境:Myeclipse2017.JDK1.6.Tomcat 8.0.Myeclipse下使用Maven搭建spring boot项目,详细过程如下: 1. New -> Project.. ...
- spring boot+mybatis搭建项目
一.创建spring boot项目 1.File->New->Project 2.选择 Spring Initializr ,然后选择默认的 url 点击[Next]: 3.修改项目信息 ...
- 快速搭建一个Spring Boot + MyBatis的开发框架
前言:Spring Boot的自动化配置确实非常强大,为了方便大家把项目迁移到Spring Boot,特意总结了一下如何快速搭建一个Spring Boot + MyBatis的简易文档,下面是简单的步 ...
随机推荐
- 通过ClickOnce本地打包发布WPF应用程序
环境: 1)VS 2015 Windows10 x64 .net framework 4.5.2 要点: 1)安装模式和设置选择可以脱机使用. 2)系统必备组件中安装位置选择与应用程序相同位置下载系 ...
- 请简单介绍一下BootStrap:
1.轻量级的开发响应式页面的框架 2.全局CSS,组件,JS插件 3.栅格系统:将页面分为12个等分(CSS3@media媒体查询) 4.col-xs-*:手机屏幕 5.col-sm-*:平板 6.c ...
- SAP S/4 HANA 1709 Fully Activated Appliance
SAP S4HANA 1709 Fully Activated Appliance:简单来说比IDES版本功能更加强大,内置三个集团,分别用于测试不同业务.内置官方的BP内容 安装需要500G SSD ...
- 稀疏矩阵 part 2
▶ 各种稀疏矩阵数据结构之间的转化 ● MAT ←→ CSR CSR * MATToCSR(const MAT *in) // MAT 转 CSR { checkNULL(in); CSR * out ...
- Git的操作理解
1.本地和远程的关系相当于两个分支,是相互独立的. 2.本地分支属于本地仓库,一个仓库可以包含多个分支. 3.commit是为了告诉Git这次提交我改了哪些东西: pull是将远程comm ...
- Nginx性能调优之buffer参数设置
Nginx 的缓存功能有:proxy_cache / fastcgi_cache proxy_cache的作用是缓存后端服务器的内容,可能是任何内容,包括静态的和动态.fastcgi_cache的作用 ...
- zabbix 本地编译安装
转载地址 https://www.cnblogs.com/wangxiaoqiangs/p/5412147.html 简介: 单独整理一下 Zabbix Agent . 1.安装包选择 下载地址:ht ...
- pyhon的yileld的一点笔记
yield感觉很神秘,感觉也不好理解,学习pyhon最后终归是要学习这个东西,研究了一段时间,把自己的笔记写下来 说简单点就是遇到yield就停止往下执行代码,也包括不执行yield这条语句,然后返回 ...
- anu小程序快速入门
众所周知,微信推出小程序以来,可谓火遍大江南北,就像当前互联网兴起时,大家忙着抢域名与开私人博客一样.小程序之所以这么火,是因为微信拥有庞大的用户量,并且腾讯帮你搞定后台问题及众多功能问题(如分享,支 ...
- [INet] I/O模型:同步阻塞,同步非阻塞,异步非阻塞
POSIX 把这同步.异步两个术语定义 如下: 同步 I/O 操作( synchronous I/O opetation) 导致请求进程阻塞, 直到 I/O 操作完成: 异步 I/O 操作( asyn ...