centos6.5磁盘扩容
3台虚拟机都是20G磁盘,用着用着发现不够了,先扩容了一台,各种百度...各种坑,每个人的情况不一样,发现不一样的地方最后立即百度查看。一台扩容成功后,打算再扩容一台,目的是留一个记录。(我是用xshell超级用户链接的的虚拟机)
扩容大致分为3步:1.外部设置;2.设置分区;3.重启;4挂载;(挂载过程中解决了物理卷、卷组、逻辑卷、格式化问题,如果挂载失败,则可以一次解决排除这些问题)
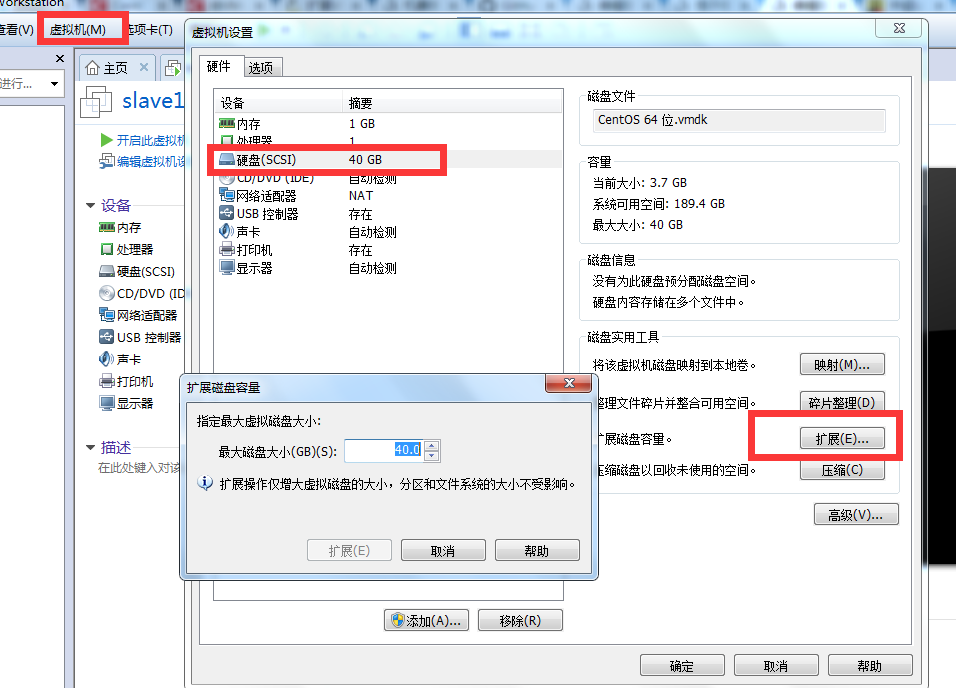
1.关闭虚拟机(不是挂起),点击“虚拟机/设置”,选择“硬盘”,扩容至40G
2.启动虚拟机,root用户进入linux系统,添加新的分区
2.1查看当前分区状况
[root@slave1 /root]$ fdisk -l
Disk /dev/sda: 42.9 GB, 42949672960 bytes
255 heads, 63 sectors/track, 5221 cylinders
Units = cylinders of 16065 * 512 = 8225280 bytes
Sector size (logical/physical): 512 bytes / 512 bytes
I/O size (minimum/optimal): 512 bytes / 512 bytes
Disk identifier: 0x000381a8
Device Boot Start End Blocks Id System
/dev/sda1 * 1 39 307200 83 Linux
Partition 1 does not end on cylinder boundary.
/dev/sda2 39 2358 18631680 83 Linux
/dev/sda3 2358 2611 2031616 82 Linux swap / Solaris
当前最大分区为sda3,新创建的分区为sda4。(请留意加重部分)
2.2输入以下命令
[root@slave1 /root]$ fdisk /dev/sda
WARNING: DOS-compatible mode is deprecated. It's strongly recommended to
switch off the mode (command 'c') and change display units to
sectors (command 'u').
Command (m for help): m #2.3命令行提示下输入【m】
Command action
a toggle a bootable flag
b edit bsd disklabel
c toggle the dos compatibility flag
d delete a partition
l list known partition types
m print this menu
n add a new partition
o create a new empty DOS partition table
p print the partition table
q quit without saving changes
s create a new empty Sun disklabel
t change a partition's system id
u change display/entry units
v verify the partition table
w write table to disk and exit
x extra functionality (experts only)
Command (m for help): n #输入命令【n】添加新分区
Command action
e extended
p primary partition (1-4)
p #输入命令【p】创建主分区。
Selected partition 4
First cylinder (2611-5221, default 2611): #回车
Using default value 2611
Last cylinder, +cylinders or +size{K,M,G} (2611-5221, default 5221): #回车
Using default value 5221
Command (m for help): w #输入【w】保存
The partition table has been altered!
Calling ioctl() to re-read partition table.
WARNING: Re-reading the partition table failed with error 16: Device or resource busy.
The kernel still uses the old table. The new table will be used at
the next reboot or after you run partprobe(8) or kpartx(8)
Syncing disks.
[root@slave1 /]$ mkdir disk4

[root@slave1 /]$ mount /dev/sda4 /disk4

mount: you must specify the filesystem type
挂载的时候发生了报错,看红色字体,原因可能是没有物理卷、卷组、逻辑卷、格式化引起的(4.1,4.2,4.3主要用于解决这3个问题)
4.1查看物理卷:
[root@slave1 /]$ pvs
没有输出!!!说明没有物理卷,创建的分区是sda4,这里为这个分区创建物理卷。
[root@slave1 /]$ pvcreate /dev/sda4

  Physical volume "/dev/sda4" successfully created
此时再查看物理卷,ok
[root@slave1 /]$ pvs

  PV         VG   Fmt  Attr PSize  PFree

  /dev/sda4       lvm2 a--  .99g .99g
4.2查看卷组
[root@slave1 /]$ vgs

  No volume groups found
报错,没有,先创建卷组vgdata
[root@slave1 /]$ vgcreate vgdata /dev/sda4

Volume group "vgdata" successfully created
再次查看卷组,OK!!!
[root@slave1 /]$ vgs

  VG     #PV #LV #SN Attr   VSize  VFree

  vgdata          wz--n- .99g .09g

[root@slave1 /]$ vgdisplay

  --- Volume group ---

  VG Name               vgdata

  System ID

  Format                lvm2

  Metadata Areas

  Metadata Sequence No

  VG Access             read/write

  VG Status             resizable

  MAX LV

  Cur LV

  Open LV

  Max PV

  Cur PV

  Act PV

  VG Size               19.99 GiB

  PE Size               4.00 MiB

  Total PE

  Alloc PE / Size        / 4.90 GiB

  Free  PE / Size        / 15.09 GiB

  VG UUID               f8keeP-x5yH-qdfd-9roM-hbAt-ALEI-yYG4wB
4.3查看逻辑卷
[root@slave1 /]$ lvdisplay

  No volume groups found
报错,没有,创建逻辑卷
[root@slave1 /]$ lvcreate -L4.9G vgdata -n lvolhome /dev/sda4

  Rounding up size to full physical extent 4.90 GiB

  Logical volume "lvolhome" created
查看创建结果,OK!!!
[root@slave1 /]$ lvdisplay

  --- Logical volume ---

  LV Path                /dev/vgdata/lvolhome

  LV Name                lvolhome

  VG Name                vgdata

  LV UUID                dI2lMQ-sayc-XGlG-xa9I-USfC-97kt-0Kbt6k

  LV Write Access        read/write

  LV Creation host, time slave1, -- :: -

  LV Status              available

  # open

  LV Size                4.90 GiB

  Current LE

  Segments

  Allocation             inherit

  Read ahead sectors     auto

  - currently set to

  Block device           :
4.4格式化磁盘
[root@slave1 /]$ mkfs.ext4 /dev/sda4

mke2fs 1.41.12 (17-May-2010)

/dev/sda4 is apparently in use by the system; will not make a filesystem here!
报错、手动移除DM管理
[root@slave1 /]$ dmsetup status

vgdata-lvolhome:   linear

[root@slave1 /]$ dmsetup remove_all

[root@slave1 /]$ dmsetup status

No devices found
重新格式化,OK!!!
[root@slave1 /]$ mkfs.ext4 /dev/sda4

mke2fs 1.41. (-May-)

Filesystem label=

OS type: Linux

Block size= (log=)

Fragment size= (log=)

Stride= blocks, Stripe width= blocks

 inodes,  blocks

 blocks (5.00%) reserved for the super user

First data block=

Maximum filesystem blocks=

 block groups

 blocks per group,  fragments per group

 inodes per group

Superblock backups stored on blocks:

    , , , , , , , , ,

Writing inode tables: done

Creating journal ( blocks): done

Writing superblocks and filesystem accounting information: done

This filesystem will be automatically checked every  mounts or

 days, whichever comes first.  Use tune2fs -c or -i to override.
重新挂载,没有报错,mount成功,磁盘扩容成功
[root@slave1 /]$ mount /dev/sda4 /disk4
挂载前:
[root@slave1 /root]$ df -lh

Filesystem      Size  Used Avail Use% Mounted on

/dev/sda2        18G  .0G   14G  % /

tmpfs           491M   72K  491M   % /dev/shm

/dev/sda1       291M   34M  242M  % /boot
挂载后:
Filesystem      Size  Used Avail Use% Mounted on

/dev/sda2        18G  .1G   14G  % /

tmpfs           491M   72K  491M   % /dev/shm

/dev/sda1       291M   34M  242M  % /boot

/dev/sda4        20G  172M   19G   % /disk4
centos6.5磁盘扩容的更多相关文章
- 阿里云ECS 实例Centos7系统磁盘扩容
需求:一台阿里云的数据盘磁盘空间不足,需要扩容,我这里只有一个主分区,ext4文件系统. 因为磁盘扩容场景不同,阿里云的文档比较全面一些,所以先奉上阿里云的文档,下面开始我的操作步骤: 1.登录控制台 ...
- VMware下对虚拟机Ubuntu14系统所在分区sda1进行磁盘扩容
VMware下对虚拟机Ubuntu14系统所在分区sda1进行磁盘扩容 一般来说,在对虚拟机里的Ubuntu下的磁盘进行扩容时,都是添加新的分区,而并不是对其系统所在分区进行扩容,如在此链接中http ...
- SQL Server 磁盘空间告急(磁盘扩容)转载
一.背景 在线上系统中,如果我们发现存放数据库文件的磁盘空间不够,我们应该怎么办呢?新买一个硬盘挂载上去可以嘛?(linux下可以直接挂载硬盘进行扩容),但是我们的SQL Server是运行在Wind ...
- 【转载】CentOS LVM磁盘扩容
转自:http://blog.sina.com.cn/s/blog_8882a6260101cpfs.html EXSI5.1主机有一个linux虚拟机,系统是centos运行httpd服务,因为是多 ...
- ECS Linux服务器xfs磁盘扩容
ECS Linux服务器xfs磁盘扩 ECS Linux服务器xfs磁盘使用阿里云官方提供的磁盘扩容方法扩容会有报错: [root@iZ28u04wmy2Z ~]# e2fsck /dev/xvdb1 ...
- es 加磁盘扩容
elasticsearch多磁盘扩容 1.问题 由于早前elasticsearch集群数据存储路径只配置了一个,所以某天磁盘突然爆满,集群差点当机.需重新配置多路径存储路径,因为在生产环境,得保证 ...
- VMware 虚拟机快照、克隆、磁盘扩容
1. 快照 快照是虚拟机某个时间点上完整系统的镜像,可以在虚拟机内部通过快照文件恢复系统到之前的节点. 拍摄快照: 恢复快照: 2. 克隆 克隆是原始虚拟机全部状态的一个拷贝,是脱离原始虚拟机独立存在 ...
- 故障处理:磁盘扩容出错:e2fsck: Bad magic number in super-block while trying to open /dev/vdb1
按照阿里云官网教程对云服务器进行磁盘扩容,使用fdisk重新分区,最后使用e2fsck和resize2fs来完成文件系统层面的扩容 在执行“e2fsck -f /dev/vdb1”命令时报错,如果你的 ...
- Linux磁盘扩容
Linux磁盘扩容 fdisk -l # 查看硬盘信息 lvextend -L +1G /dev/mapper/vg00-lvroot 或者 lvextend -l +%FREE /dev/mappe ...
随机推荐
- redis 全局命令 查看所有的键,删除键,检查键是否存在,获取过期时间,键的数据结构类型
Redis有5中数据结构,他们是键值对中的值,对于键来说,有一些通用的命令: 一.查看所有键 keys * 二.获取键总数:dbsize 三.检查键是否存在 exists 如果存在返回1,不存在返回0 ...
- 使用Verilog HDL语言注意事项
1.wire和reg区别,输入输出是wire型,表示硬件线的连接,要在always模块里被赋值需要中间reg型变量,两者通过: assign 输入/输出=reg型中间变量 2.case的default ...
- 十八、Linux 进程与信号---进程介绍
18.1 进程的概念 程序:程序(program)是存放再磁盘文件中的可执行文件 进程 程序的执行实例被称为进程(process) 一个程序的执行实例可能由多个 进程具有独立的权限和职责.如果系统中某 ...
- Expression 生成 Lambda
public static event Func<Student, bool> myevent; public delegate void del(int i, int j); stati ...
- Debian Security Advisory(Debian安全报告) DSA-4416-1 wireshark security update
Debian Security Advisory(Debian安全报告) DSA-4416-1 wireshark security update Package:wireshark CVE ID : ...
- nginx 基于uwsgi部署Django
1.安装nginx yum install -y nginx(需要epel源) 2.安装环境 可以考虑使用虚拟化环境,本处不再使用 3.安装uwsgi yum groupinstall "D ...
- JavaScript面试技巧(一):基础知识
1.变量类型和计算 变量类型:值类型.引用类型.typeof运算符. 变量计算:字符串拼接.==运算符.if语句.逻辑运算符 2.原型和原型链 构造函数 5个原型规则 3.作用域和闭包-执行上下文 4 ...
- 第25月第2天 Django-By-Example项目记录01
1. export PATH="$PATH":/Applications/XAMPP/xamppfiles/bin/ sudo ln -s /Applications/XAMPP/ ...
- VS 中NuGet 尝试还原程序包时出错"*"已拥有为"**"定义的依赖项
之前从Git检出项目以后,项目编译不能通过,发现是缺少依赖的外部插件,于是通过NuGet去获取项目依赖的插件,如何通过NuGet恢复使用的插件请使用NuGet还原项目插件. 但是就是在使用NuGet还 ...
- Mybatis--课程中循序渐进的体会 《黑马程序员_Springmvc+Mybatis由浅入深全套视频教程video》
mybatis 刚开始是用最原始的方法开发了一个入门程序,(没有dao) 1.将数据源配置在SqlMapConfig.xml 2.写一个po类 和映射文件User.xml(中的namespace=“名 ...