React Native 如何做轮播图 react-native-swiper
//:仿饿了么github:https://github.com/stoneWeb/elm-react-native
欢迎各位同学加入:
React-Native群:397885169
大前端群:544587175
大神超多,热情无私帮助解决各种问题。最近项目需求需要用到轮播图,所以写两Demo练练手,不过效果不太理想,希望大牛予以指正。
不多说,先上图。
这种轮播很常见,但是一个问题是,总感觉有点卡的感觉,最气人的是,你滑动到哪里,他就听到哪里,给用户感觉很不爽!
下面我分享一下该轮播的代码!
//import liraries
import React, { Component } from 'react';
import { View, Text, StyleSheet, TouchableOpacity, Dimensions, Image, ScrollView } from 'react-native';
import Swiper from 'react-native-swiper'; let { width, height } = Dimensions.get('window');
let Images = [
{ src: require('../assets/images/1.jpg') },
{ src: require('../assets/images/2.jpg') },
{ src: require('../assets/images/3.jpg') },
{ src: require('../assets/images/4.jpg') }
];
const loading = require('../assets/images/loading.gif'); // create a component
class TargetView extends Component {
static navigationOptions = {
title: '目标',
headerStyle: {
backgroundColor: '#FF3344',
},
} _renderSwiper() {
return (
<Swiper
style={styles.swiperStyle}
height={}
horizontal={true}
autolay={true}
loop={true}
paginationStyle={{ bottom: }}
showsPagination={true}
index={}
dotStyle={{ backgroundColor: 'rgba(0,0,0,.2)', width: , height: }}
activeDotStyle={{ backgroundColor: 'rgba(0,0,0,.5)', width: , height: }}>
<View style={styles.swiperItem}>
<Image style={styles.imageStyle} source={Images[].src}></Image>
</View>
<View style={styles.swiperItem}>
<Image style={styles.imageStyle} source={Images[].src}></Image>
</View>
<View style={styles.swiperItem}>
<Image style={styles.imageStyle} source={Images[].src}></Image>
</View>
<View style={styles.swiperItem}>
<Image style={styles.imageStyle} source={Images[].src}></Image>
</View>
</Swiper>
)
} render() {
return (
<ScrollView
style={styles.container}>
{this._renderSwiper()}
</ScrollView>
);
}
} // define your styles
const styles = StyleSheet.create({
container: {
flex:
},
swiperStyle: {
marginTop:,
width: width,
},
swiperItem: {
flex: ,
justifyContent: 'center',
backgroundColor: 'transparent',
},
imageStyle: {
flex: ,
width:width,
},
}); //make this component available to the app
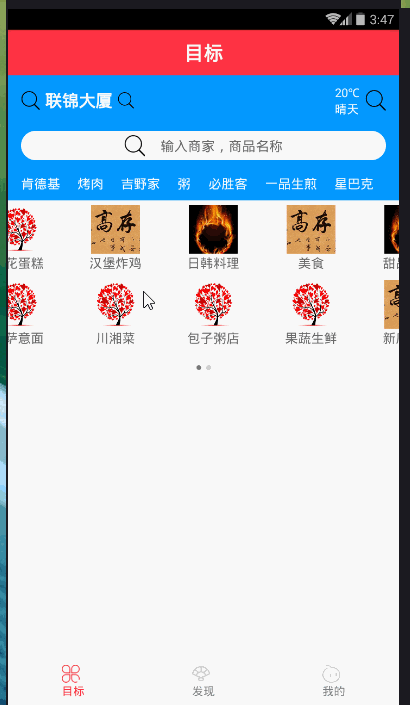
export default TargetView;第二个情况,先上一张图
都看到这是仿饿了么的轮播效果,但情况依然很不爽,大牛给出点优化建议啊!
下面我分享一下该轮播的效果,(如果你正在做轮播,做的比较好,谢谢分享我一下,本人虚心学习,微信:jkxx123321)
//import liraries

import React, { Component } from 'react';

import {

    View,

    Text,

    StyleSheet,

    Dimensions,

    Image,

    TouchableOpacity,

    TouchableNativeFeedback,

    TouchableWithoutFeedback,

    ScrollView,

    Platform,

    Animated,

} from 'react-native';

import Swiper from 'react-native-swiper';

import px2pd from '../utils/px2dp';

let { width, height } = Dimensions.get('window');

const isIOS = Platform.OS == 'ios';

const headH = px2pd(isIOS ?  : );

const inputHeight = px2pd();

const imgTypes = [

    { src: require('../assets/images/1.jpg') },

    { src: require('../assets/images/2.jpg') },

    { src: require('../assets/images/3.jpg') },

    { src: require('../assets/images/4.jpg') },

    { src: require('../assets/images/4.jpg') },

    { src: require('../assets/images/1.jpg') },

    { src: require('../assets/images/2.jpg') },

    { src: require('../assets/images/3.jpg') },

    { src: require('../assets/images/4.jpg') },

    { src: require('../assets/images/4.jpg') },

    { src: require('../assets/images/1.jpg') },

    { src: require('../assets/images/2.jpg') },

    { src: require('../assets/images/3.jpg') },

    { src: require('../assets/images/4.jpg') },

    { src: require('../assets/images/4.jpg') },

    { src: require('../assets/images/4.jpg') },

    { src: require('../assets/images/4.jpg') }

];

const loading = require('../assets/images/loading.gif');

// create a component

class TargetView extends Component {

    static navigationOptions = {

        title: '目标',

        headerStyle: {

            backgroundColor: '#FF3344',

        },

    }

    constructor(props) {

        super(props)

        this.state = {

            location: "联锦大厦",

        }

    }

    _renderHeader() {

        return (

            <View style={styles.header}>

                {/*定位、天气*/}

                <View style={styles.lbsWeather}>

                    <TouchableWithoutFeedback>

                        <View style={styles.lbs}>

                            <Image source={require('../assets/icons/search.png')} style={{ width: px2pd(), height: px2pd() }}></Image>

                            <Text style={{ fontSize: px2pd(), fontWeight: 'bold', color: '#fff', paddingHorizontal: px2pd() }}>{this.state.location}</Text>

                            <Image source={require('../assets/icons/search.png')} style={{ width: px2pd(), height: px2pd() }}></Image>

                        </View>

                    </TouchableWithoutFeedback>

                    <View style={styles.weather}>

                        <View style={{ marginRight: px2pd() }}>

                            <Text style={{ fontSize: px2pd(), color: '#fff', textAlign: 'center' }}>{'20℃'}</Text>

                            <Text style={{ fontSize: px2pd(), color: '#fff' }}>{'晴天'}</Text>

                        </View>

                        <Image source={require('../assets/icons/search.png')} style={{ width: px2pd(), height: px2pd() }}></Image>

                    </View>

                </View>

                {/*搜索框*/}

                <View style={{

                    marginTop: px2pd(),

                }}>

                    <TouchableWithoutFeedback onPress={() => { }}>

                        <View style={styles.searchBtn}>

                            <Image source={require('../assets/icons/search.png')} style={{ width: px2pd(), height: px2pd() }}></Image>

                            <Text style={{ fontSize: px2pd(), color: '#666', marginLeft: px2pd() }}>{'输入商家,商品名称'}</Text>

                        </View>

                    </TouchableWithoutFeedback>

                </View>

                <Animated.View style={styles.keywords}>

                    {

                        ['肯德基', '烤肉', '吉野家', '粥', '必胜客', '一品生煎', '星巴克'].map((item, i) => {

                            return (

                                <TouchableWithoutFeedback key={i}>

                                    <View style={{ marginRight: px2pd() }}>

                                        <Text style={{ fontSize: px2pd(), color: '#fff' }}>{item}</Text>

                                    </View>

                                </TouchableWithoutFeedback>

                            )

                        })

                    }

                </Animated.View>

            </View>

        )

    }

    _renderTypes() {

        const w = width / , h = w * . + ;

        let renderSwipeView = (types, n) => {

            return (

                <View style={styles.typesView}>

                    {

                        types.map((item, i) => {

                            let render = (

                                <View style={[{ width: w, height: h }, styles.typesItem]}>

                                    <Image source={imgTypes[n + i].src} style={{ width: w * ., height: w * . }} />

                                    <Text style={{ fontSize: px2pd(), color: "#666" }}>{item}</Text>

                                </View>

                            )

                            return (

                                isIOS ? (

                                    <TouchableHighlight style={{ width: w, height: h }} key={i} onPress={() => { }}>{render}</TouchableHighlight>

                                ) : (

                                        <TouchableNativeFeedback style={{ width: w, height: h }} key={i} onPress={() => { }}>{render}</TouchableNativeFeedback>

                                    )

                            )

                        })

                    }

                </View>

            )

        }

        return (

            <Swiper

                height={h * 2.4}

                paginationStyle={{ bottom:  }}

                dotStyle={{ backgroundColor: 'rgba(0,0,0,.2)', width: , height:  }}

                activeDotStyle={{ backgroundColor: 'rgba(0,0,0,.5)', width: , height:  }}>

                {renderSwipeView(['美食', '甜品饮品', '商店超市', '预定早餐', '果蔬生鲜', '新店特惠', '准时达', '高铁订餐'], )}

                {renderSwipeView(['土豪推荐', '鲜花蛋糕', '汉堡炸鸡', '日韩料理', '麻辣烫', '披萨意面', '川湘菜', '包子粥店'], )}

            </Swiper>

        )

    }

    render() {

        return (

            <View style={styles.container}>

                <ScrollView style={styles.scrollView}>

                    {this._renderHeader()}

                    <View style={{ backgroundColor: "#fff", paddingBottom: px2pd() }}>

                        {this._renderTypes()}

                    </View>

                </ScrollView>

            </View>

        );

    }

}

// define your styles

const styles = StyleSheet.create({

    container: {

        flex: ,

        backgroundColor: '#f3f3f3',

    },

    scrollView: {

        marginBottom: px2pd(),

    },

    header: {

        backgroundColor: '#0398ff',

        height: headH,

        paddingTop: px2pd(isIOS ?  : ),

        paddingHorizontal: ,

    },

    lbsWeather: {

        height: inputHeight,

        overflow: "hidden",

        flexDirection: 'row',

        justifyContent: 'space-between',

    },

    lbs: {

        flexDirection: 'row',

        justifyContent: 'center',

        alignItems: 'center',

    },

    weather: {

        flexDirection: 'row',

        alignItems: 'center',

    },

    searchBtn: {

        borderRadius: inputHeight,

        height: inputHeight,

        flexDirection: 'row',

        backgroundColor: '#fff',

        justifyContent: 'center',

        alignItems: 'center',

    },

    keywords: {

        marginTop: px2pd(),

        flexDirection: 'row',

        justifyContent: 'space-between',

    },

    typesView: {

        paddingBottom: px2pd(),

        flex: ,

        backgroundColor: "#fff",

        flexDirection: "row",

        flexWrap: "wrap"

    },

    typesItem: {

        backgroundColor: '#fff',

        justifyContent: 'center',

        alignItems: 'center'

    },

});

//make this component available to the app

export default TargetView;

//---------------------px2dp.js------------------------------//

import { Dimensions } from 'react-native'

const deviceH = Dimensions.get('window').height

const deviceW = Dimensions.get('window').width

const basePx =

export default function px2dp(px) {

    return px * deviceW / basePx

}
附一张属性表:
3.1 基本属性
Prop Default Type Description horizontal true bool 如果值为true时,那么滚动的内容将是横向排列的,而不是垂直于列中的。 loop true bool 如果设置为false,那么滑动到最后一张时,再次滑动将不会展示第一张图片。 index 0 number 初始进入的页面标识为0的页面。 showsButtons false bool 如果设置为true,那么就可以使控制按钮(即:左右两侧的箭头)可见。 autoplay false bool 设置为true,则页面可以自动跳转。 3.2 自定义属性
Prop Default Type Description width - number 如果你没有特殊的设置,就通过flex:1默认为全屏。 height - number 如果你没有特殊的设置,就通过flex:1默认为全屏。 style {...} style 设置页面的样式。 3.3 pagination 分页
Prop Default Type Description showsPagination true bool 默认值为true,在页面下边显示圆点,以标明当前页面位于第几个。 paginationStyle {...} style 设置页面原点的样式,自定义的样式会和默认样式进行合并。 renderPagination dot <View style={{backgroundColor:'rgba(0,0,0,.2)', width: 8, height:
8,borderRadius: 4, marginLeft: 3, marginRight: 3, marginTop: 3,
marginBottom: 3,}} />element 可以自定义不是当前圆点的样式 activeDot <View style={{backgroundColor: '#007aff', width: 8, height: 8,
borderRadius: 4, marginLeft: 3, marginRight: 3, marginTop: 3,
marginBottom: 3,}} />element 可以自定义当前页面圆点的样式 3.4 自动播放
Prop Default Type Description autoplay true bool设置为true可以使页面自动滑动。 autoplayTimeout 2.5 number设置每个页面自动滑动停留的时间 autoplayDirection true bool圆点的方向允许默认自己控制 3.5 控制按钮
Prop Default Type Description showsButtons true bool是否显示控制箭头按钮 buttonWrapperStyle {position: 'absolute', paddingHorizontal: 15,
paddingVertical: 30, top: 70, left: 0, alignItems:'flex-start'}style定义默认箭头按钮的样式 nextButton <Text style={{fontSize:60, color:'#00a7ec',
paddingTop:30, paddingBottom:30}}>‹</Text>element自定义右箭头按钮样式 prevButton <Text style={{fontSize:60, color:'#00a7ec',
paddingTop:30, paddingBottom:30}}>›</Text>element自定义左箭头按钮样式 加油!

React Native 如何做轮播图 react-native-swiper的更多相关文章
- React视角下的轮播图
天猫购物网站最显眼的就是轮播图了.我在学习一样新js库,一个新框架或新的编程思想的时候,总是感叹"入门必做选项卡,进阶须撸轮播图."作为一个React组件,它是状态操控行为的典型, ...
- reactjs-swiper react轮播图组件基于swiper
react轮播图组件基于swiper demo地址:http://reactjs-ui.github.io/reactjs-swiper/simple.html 1. 下载安装 npm install ...
- 用js和jQuery做轮播图
Javascript或jQuery做轮播图 css样式 <style> a{ text-decoration:none; } .naver{ width: 100%; position:r ...
- 用 CSS 做轮播图
对于用 css 实现一个轮播图的缘由,是那时候刚开始接触前端,完全还不懂 js.但是有一个项目(就是一个用来应付面试的作品)需要做一个轮播的效果,当时第一反应就是用 css3 自定义动画 -webki ...
- 用avalon框架怎么做轮播图?
avalon这个框架其实特别的小众,做个轮播图呢?在github上的例子只有一个,而且功能特别的少,有的引入的插件与avalon里面的指令又不兼容,所以找了一个owl-carousel,目前实现了移动 ...
- jQuery做轮播图
这是我自己做的一个简单的轮播图,效果图如下: 我觉得轮播图中最主要的是要理解到图片为什么会滑动,是怎么控制的.上面这个我自己做的,是搭好的一个结构,在无序列表中插入需要的图片.然后在插入图片的后面添加 ...
- tab切换里面做轮播图
这里的轮播图有三页,并且每页的数据有8个,只能将23个数据分割开来,这里要实现5个tab用一个轮播图 <div class="report_detail_class"> ...
- H5制作显示轮播图的方法Swiper
1.需要引入Swiper插件 <!-- swiper插件 --> <link rel="stylesheet" href="https://unpkg. ...
- React 轮播图实现
接到项目, 用react和material-ui实现轮播图. 搜索了一些方法参考, 不论语言/框架的使用,大体上分为两种思路 超宽列表实现法 在原生JS或者JQuery中,轮播图的实现一般是这样子的 ...
随机推荐
- 集合框架map_DAY18
1:map集合(掌握) (1)Map集合存储的是键值对元素.键是唯一的,值可以重复. (2)Map和Collection的区别? A:Map是双列集合,存储的元素键值对,键唯一,值可以重复. B:Co ...
- Json.Net 在.Net Core 2.0 中序列化DataSet 问题
使用Asp.Net Core中自带的版本10.0.1 生成一个简单的DataSet DataSet ds2 = new DataSet(); DataTable table = new DataTab ...
- Google Chrome Native Messaging开发实录(二)Chrome Extension扩展
接上一篇<Google Chrome Native Messaging开发实录(一)背景介绍>的项目背景,话不多说,有关Chrome Extension介绍和文档就不展开了,直接上代码. ...
- Linux的Bash Shell详解
一.Bash Shell概述 1.什么是bash bash是Bourne Again Shell的简称,是从unix系统中的sh发展而来的,是用户和Linux内核交互的工具,用户通过b ...
- 【转】Intellij IDEA使用总结
原文地址:http://totohust.iteye.com/blog/1035550 1. IDEA内存优化 先看看你机器本身的配置而配置. \IntelliJ IDEA 8\bin\idea.ex ...
- unsigned/signed int/char类型表示的数值范围
一个32位的signed int类型整数表示的范围:-2^31~2^31-1 一个32位的unsigned int类型整数表示的范围: 0~2^32-1 一个8位的signed char类型整数表示的 ...
- MyCat不支持的SQL语句
SELECT: Ø 跨分片(实体库)的交叉查询 Ø 跨节点的联合查询 (如用户库的表和平台库的表做联合查询) INSERT: Ø 插入的字段不包含分片字段 (如插入tbl_user_base_info ...
- 【转载】配置文件报错:不允许有匹配 [xX][mM][lL] 的处理指令目标
今天编写代码的时候,不小心给一个xml文件的首行加了一行空格,导致了启动报了如题类似的错误,查到一篇文章,顺藤摸瓜发现了这个失误,文章转载如下: 框架整合 的时候,XML 配置文件大多数情况是从另一个 ...
- Linux内核升级导致无法启动,Kernel panic - not syncing Unable to mount root fs on unknown block(0,0)
问题原因:内核的某次升级,导致系统无法启动. 首先进入recovery模式:引导界面选择-->Ubuntu高级-->出现的选项中选择能够启动的recovery模式(几个内核版本分别试一下) ...
- 装饰器(Decorator)模式
1 装饰模式能够实现动态的为对象添加功能,是从一个对象外部来给对象添加功能.通常给对象添加功能,要么直接修改对象添加相应的功能,要么派生对应的子类来扩展,抑或是使用对象组合的方式.显然,直接修改对应 ...