Spring源码分析:非懒加载的单例Bean初始化过程(下)
上文Spring源码分析:非懒加载的单例Bean初始化过程(上),分析了单例的Bean初始化流程,并跟踪代码进入了主流程,看到了Bean是如何被实例化出来的。先贴一下AbstractAutowireCapableBeanFactory的doCreateBean方法代码:
|
1
2
3
4
5
6
7
8
9
10
11
12
13
14
15
16
17
18
19
20
21
22
23
24
25
26
27
28
29
30
31
32
33
34
35
36
37
38
39
40
41
42
43
44
45
46
47
48
49
50
51
52
53
54
55
56
57
58
59
60
61
62
63
64
65
66
67
68
69
70
71
72
73
74
75
76
77
78
79
80
81
82
83
84
85
86
87
88
89
90
|
protected Object doCreateBean(final String beanName, final RootBeanDefinition mbd, final Object[] args) { // Instantiate the bean. BeanWrapper instanceWrapper = null; if (mbd.isSingleton()) { instanceWrapper = this.factoryBeanInstanceCache.remove(beanName); } if (instanceWrapper == null) { instanceWrapper = createBeanInstance(beanName, mbd, args); } final Object bean = (instanceWrapper != null ? instanceWrapper.getWrappedInstance() : null); Class beanType = (instanceWrapper != null ? instanceWrapper.getWrappedClass() : null); // Allow post-processors to modify the merged bean definition. synchronized (mbd.postProcessingLock) { if (!mbd.postProcessed) { applyMergedBeanDefinitionPostProcessors(mbd, beanType, beanName); mbd.postProcessed = true; } } // Eagerly cache singletons to be able to resolve circular references // even when triggered by lifecycle interfaces like BeanFactoryAware. boolean earlySingletonExposure = (mbd.isSingleton() && this.allowCircularReferences && isSingletonCurrentlyInCreation(beanName)); if (earlySingletonExposure) { if (logger.isDebugEnabled()) { logger.debug("Eagerly caching bean '" + beanName + "' to allow for resolving potential circular references"); } addSingletonFactory(beanName, new ObjectFactory() { public Object getObject() throws BeansException { return getEarlyBeanReference(beanName, mbd, bean); } }); } // Initialize the bean instance. Object exposedObject = bean; try { populateBean(beanName, mbd, instanceWrapper); if (exposedObject != null) { exposedObject = initializeBean(beanName, exposedObject, mbd); } } catch (Throwable ex) { if (ex instanceof BeanCreationException && beanName.equals(((BeanCreationException) ex).getBeanName())) { throw (BeanCreationException) ex; } else { throw new BeanCreationException(mbd.getResourceDescription(), beanName, "Initialization of bean failed", ex); } } if (earlySingletonExposure) { Object earlySingletonReference = getSingleton(beanName, false); if (earlySingletonReference != null) { if (exposedObject == bean) { exposedObject = earlySingletonReference; } else if (!this.allowRawInjectionDespiteWrapping && hasDependentBean(beanName)) { String[] dependentBeans = getDependentBeans(beanName); Set<String> actualDependentBeans = new LinkedHashSet<String>(dependentBeans.length); for (String dependentBean : dependentBeans) { if (!removeSingletonIfCreatedForTypeCheckOnly(dependentBean)) { actualDependentBeans.add(dependentBean); } } if (!actualDependentBeans.isEmpty()) { throw new BeanCurrentlyInCreationException(beanName, "Bean with name '" + beanName + "' has been injected into other beans [" + StringUtils.collectionToCommaDelimitedString(actualDependentBeans) + "] in its raw version as part of a circular reference, but has eventually been " + "wrapped. This means that said other beans do not use the final version of the " + "bean. This is often the result of over-eager type matching - consider using " + "'getBeanNamesOfType' with the 'allowEagerInit' flag turned off, for example."); } } } } // Register bean as disposable. try { registerDisposableBeanIfNecessary(beanName, bean, mbd); } catch (BeanDefinitionValidationException ex) { throw new BeanCreationException(mbd.getResourceDescription(), beanName, "Invalid destruction signature", ex); } return exposedObject;} |
下面继续分析初始化一个Bean的流程,不太重要的流程就跳过了。
属性注入
属性注入的代码比较好找,可以看一下40行,取名为populateBean,即填充Bean的意思,看一下代码实现:
|
1
2
3
4
5
6
7
8
9
10
11
12
13
14
15
16
17
18
19
20
21
22
23
24
25
26
27
28
29
30
31
32
33
34
35
36
37
38
39
40
41
42
43
44
45
46
47
48
49
50
51
52
53
54
55
56
57
58
59
60
61
62
63
64
65
66
67
68
69
70
71
72
73
74
75
|
protected void populateBean(String beanName, AbstractBeanDefinition mbd, BeanWrapper bw) { PropertyValues pvs = mbd.getPropertyValues(); if (bw == null) { if (!pvs.isEmpty()) { throw new BeanCreationException( mbd.getResourceDescription(), beanName, "Cannot apply property values to null instance"); } else { // Skip property population phase for null instance. return; } } // Give any InstantiationAwareBeanPostProcessors the opportunity to modify the // state of the bean before properties are set. This can be used, for example, // to support styles of field injection. boolean continueWithPropertyPopulation = true; if (!mbd.isSynthetic() && hasInstantiationAwareBeanPostProcessors()) { for (BeanPostProcessor bp : getBeanPostProcessors()) { if (bp instanceof InstantiationAwareBeanPostProcessor) { InstantiationAwareBeanPostProcessor ibp = (InstantiationAwareBeanPostProcessor) bp; if (!ibp.postProcessAfterInstantiation(bw.getWrappedInstance(), beanName)) { continueWithPropertyPopulation = false; break; } } } } if (!continueWithPropertyPopulation) { return; } if (mbd.getResolvedAutowireMode() == RootBeanDefinition.AUTOWIRE_BY_NAME || mbd.getResolvedAutowireMode() == RootBeanDefinition.AUTOWIRE_BY_TYPE) { MutablePropertyValues newPvs = new MutablePropertyValues(pvs); // Add property values based on autowire by name if applicable. if (mbd.getResolvedAutowireMode() == RootBeanDefinition.AUTOWIRE_BY_NAME) { autowireByName(beanName, mbd, bw, newPvs); } // Add property values based on autowire by type if applicable. if (mbd.getResolvedAutowireMode() == RootBeanDefinition.AUTOWIRE_BY_TYPE) { autowireByType(beanName, mbd, bw, newPvs); } pvs = newPvs; } boolean hasInstAwareBpps = hasInstantiationAwareBeanPostProcessors(); boolean needsDepCheck = (mbd.getDependencyCheck() != RootBeanDefinition.DEPENDENCY_CHECK_NONE); if (hasInstAwareBpps || needsDepCheck) { PropertyDescriptor[] filteredPds = filterPropertyDescriptorsForDependencyCheck(bw); if (hasInstAwareBpps) { for (BeanPostProcessor bp : getBeanPostProcessors()) { if (bp instanceof InstantiationAwareBeanPostProcessor) { InstantiationAwareBeanPostProcessor ibp = (InstantiationAwareBeanPostProcessor) bp; pvs = ibp.postProcessPropertyValues(pvs, filteredPds, bw.getWrappedInstance(), beanName); if (pvs == null) { return; } } } } if (needsDepCheck) { checkDependencies(beanName, mbd, filteredPds, pvs); } } applyPropertyValues(beanName, mbd, bw, pvs);} |
这段代码层次有点深,跟一下74行的applyPropertyValues方法,最后那个pvs的实现类为MutablePropertyValues,里面持有一个List<PropertyValue>,每一个PropertyValue包含了此Bean属性的属性名与属性值。74行的代码实现为:
|
1
2
3
4
5
6
7
8
9
10
11
12
13
14
15
16
17
18
19
20
21
22
23
24
25
26
27
28
29
30
31
32
33
34
35
36
37
38
39
40
41
42
43
44
45
46
47
48
49
50
51
52
53
54
55
56
57
58
59
60
61
62
63
64
65
66
67
68
69
70
71
72
73
74
75
76
77
78
79
80
81
82
83
84
85
86
87
88
89
|
protected void applyPropertyValues(String beanName, BeanDefinition mbd, BeanWrapper bw, PropertyValues pvs) { if (pvs == null || pvs.isEmpty()) { return; } MutablePropertyValues mpvs = null; List<PropertyValue> original; if (System.getSecurityManager()!= null) { if (bw instanceof BeanWrapperImpl) { ((BeanWrapperImpl) bw).setSecurityContext(getAccessControlContext()); } } if (pvs instanceof MutablePropertyValues) { mpvs = (MutablePropertyValues) pvs; if (mpvs.isConverted()) { // Shortcut: use the pre-converted values as-is. try { bw.setPropertyValues(mpvs); return; } catch (BeansException ex) { throw new BeanCreationException( mbd.getResourceDescription(), beanName, "Error setting property values", ex); } } original = mpvs.getPropertyValueList(); } else { original = Arrays.asList(pvs.getPropertyValues()); } TypeConverter converter = getCustomTypeConverter(); if (converter == null) { converter = bw; } BeanDefinitionValueResolver valueResolver = new BeanDefinitionValueResolver(this, beanName, mbd, converter); // Create a deep copy, resolving any references for values. List<PropertyValue> deepCopy = new ArrayList<PropertyValue>(original.size()); boolean resolveNecessary = false; for (PropertyValue pv : original) { if (pv.isConverted()) { deepCopy.add(pv); } else { String propertyName = pv.getName(); Object originalValue = pv.getValue(); Object resolvedValue = valueResolver.resolveValueIfNecessary(pv, originalValue); Object convertedValue = resolvedValue; boolean convertible = bw.isWritableProperty(propertyName) && !PropertyAccessorUtils.isNestedOrIndexedProperty(propertyName); if (convertible) { convertedValue = convertForProperty(resolvedValue, propertyName, bw, converter); } // Possibly store converted value in merged bean definition, // in order to avoid re-conversion for every created bean instance. if (resolvedValue == originalValue) { if (convertible) { pv.setConvertedValue(convertedValue); } deepCopy.add(pv); } else if (convertible && originalValue instanceof TypedStringValue && !((TypedStringValue) originalValue).isDynamic() && !(convertedValue instanceof Collection || ObjectUtils.isArray(convertedValue))) { pv.setConvertedValue(convertedValue); deepCopy.add(pv); } else { resolveNecessary = true; deepCopy.add(new PropertyValue(pv, convertedValue)); } } } if (mpvs != null && !resolveNecessary) { mpvs.setConverted(); } // Set our (possibly massaged) deep copy. try { bw.setPropertyValues(new MutablePropertyValues(deepCopy)); } catch (BeansException ex) { throw new BeanCreationException( mbd.getResourceDescription(), beanName, "Error setting property values", ex); }} |
之后在第41行~第76行做了一次深拷贝(只是名字叫做深拷贝而已,其实就是遍历PropertyValue然后一个一个赋值到一个新的List而不是Java语义上的Clone,这里使用深拷贝是为了解析Values值中的所有引用),将PropertyValue一个一个赋值到一个新的List里面去,起名为deepCopy。最后执行83行进行复制,bw即BeanWrapper,持有Bean实例的一个Bean包装类,看一下代码实现:
|
1
2
3
4
5
6
7
8
9
10
11
12
13
14
15
16
17
18
19
20
21
22
23
24
25
26
27
28
29
30
31
32
33
34
35
36
37
38
39
40
|
public void setPropertyValues(PropertyValues pvs, boolean ignoreUnknown, boolean ignoreInvalid) throws BeansException { List<PropertyAccessException> propertyAccessExceptions = null; List<PropertyValue> propertyValues = (pvs instanceof MutablePropertyValues ? ((MutablePropertyValues) pvs).getPropertyValueList() : Arrays.asList(pvs.getPropertyValues())); for (PropertyValue pv : propertyValues) { try { // This method may throw any BeansException, which won't be caught // here, if there is a critical failure such as no matching field. // We can attempt to deal only with less serious exceptions. setPropertyValue(pv); } catch (NotWritablePropertyException ex) { if (!ignoreUnknown) { throw ex; } // Otherwise, just ignore it and continue... } catch (NullValueInNestedPathException ex) { if (!ignoreInvalid) { throw ex; } // Otherwise, just ignore it and continue... } catch (PropertyAccessException ex) { if (propertyAccessExceptions == null) { propertyAccessExceptions = new LinkedList<PropertyAccessException>(); } propertyAccessExceptions.add(ex); } } // If we encountered individual exceptions, throw the composite exception. if (propertyAccessExceptions != null) { PropertyAccessException[] paeArray = propertyAccessExceptions.toArray(new PropertyAccessException[propertyAccessExceptions.size()]); throw new PropertyBatchUpdateException(paeArray); }} |
这段代码没什么特别的,遍历前面的deepCopy,拿每一个PropertyValue,执行第12行的setPropertyValue:
|
1
2
3
4
5
6
7
8
9
10
11
12
13
14
15
16
17
18
19
20
21
22
|
public void setPropertyValue(PropertyValue pv) throws BeansException { PropertyTokenHolder tokens = (PropertyTokenHolder) pv.resolvedTokens; if (tokens == null) { String propertyName = pv.getName(); BeanWrapperImpl nestedBw; try { nestedBw = getBeanWrapperForPropertyPath(propertyName); } catch (NotReadablePropertyException ex) { throw new NotWritablePropertyException(getRootClass(), this.nestedPath + propertyName, "Nested property in path '" + propertyName + "' does not exist", ex); } tokens = getPropertyNameTokens(getFinalPath(nestedBw, propertyName)); if (nestedBw == this) { pv.getOriginalPropertyValue().resolvedTokens = tokens; } nestedBw.setPropertyValue(tokens, pv); } else { setPropertyValue(tokens, pv); }} |
找一个合适的BeanWrapper,这里就是自身,然后执行17行的setPropertyValue方法进入最后一步,方法非常长,截取核心的一段:
|
1
2
3
4
5
6
7
8
9
10
11
12
13
14
15
16
17
18
19
20
21
22
23
24
25
26
27
28
29
30
31
32
33
|
final Method writeMethod = (pd instanceof GenericTypeAwarePropertyDescriptor ? ((GenericTypeAwarePropertyDescriptor) pd).getWriteMethodForActualAccess() : pd.getWriteMethod()); if (!Modifier.isPublic(writeMethod.getDeclaringClass().getModifiers()) && !writeMethod.isAccessible()) { if (System.getSecurityManager()!= null) { AccessController.doPrivileged(new PrivilegedAction<Object>() { public Object run() { writeMethod.setAccessible(true); return null; } }); } else { writeMethod.setAccessible(true); } } final Object value = valueToApply; if (System.getSecurityManager() != null) { try { AccessController.doPrivileged(new PrivilegedExceptionAction<Object>() { public Object run() throws Exception { writeMethod.invoke(object, value); return null; } }, acc); } catch (PrivilegedActionException ex) { throw ex.getException(); }}else { writeMethod.invoke(this.object, value);} |
大致流程就是两步:
(1)拿到写方法并将方法的可见性设置为true
(2)拿到Value值,对Bean通过反射调用写方法
这样完成了对于Bean属性值的设置。
Aware注入
接下来是Aware注入。在使用Spring的时候我们将自己的Bean实现BeanNameAware接口、BeanFactoryAware接口等,依赖容器帮我们注入当前Bean的名称或者Bean工厂,其代码实现先追溯到上面doCreateBean方法的42行initializeBean方法:
|
1
2
3
4
5
6
7
8
9
10
11
12
13
14
15
16
17
18
19
20
21
22
23
24
25
26
27
28
29
30
31
32
|
protected Object initializeBean(final String beanName, final Object bean, RootBeanDefinition mbd) { if (System.getSecurityManager() != null) { AccessController.doPrivileged(new PrivilegedAction<Object>() { public Object run() { invokeAwareMethods(beanName, bean); return null; } }, getAccessControlContext()); } else { invokeAwareMethods(beanName, bean); } Object wrappedBean = bean; if (mbd == null || !mbd.isSynthetic()) { wrappedBean = applyBeanPostProcessorsBeforeInitialization(wrappedBean, beanName); } try { invokeInitMethods(beanName, wrappedBean, mbd); } catch (Throwable ex) { throw new BeanCreationException( (mbd != null ? mbd.getResourceDescription() : null), beanName, "Invocation of init method failed", ex); } if (mbd == null || !mbd.isSynthetic()) { wrappedBean = applyBeanPostProcessorsAfterInitialization(wrappedBean, beanName); } return wrappedBean;} |
看一下上面第5行的实现:
|
1
2
3
4
5
6
7
8
9
10
11
|
private void invokeAwareMethods(final String beanName, final Object bean) { if (bean instanceof BeanNameAware) { ((BeanNameAware) bean).setBeanName(beanName); } if (bean instanceof BeanClassLoaderAware) { ((BeanClassLoaderAware) bean).setBeanClassLoader(getBeanClassLoader()); } if (bean instanceof BeanFactoryAware) { ((BeanFactoryAware) bean).setBeanFactory(AbstractAutowireCapableBeanFactory.this); }} |
看到这里判断,如果bean是BeanNameAware接口的实现类会调用setBeanName方法、如果bean是BeanClassLoaderAware接口的实现类会调用setBeanClassLoader方法、如果是BeanFactoryAware接口的实现类会调用setBeanFactory方法,注入对应的属性值。
调用BeanPostProcessor的postProcessBeforeInitialization方法
上面initializeBean方法再看16行其实现:
|
1
2
3
4
5
6
7
8
9
10
11
12
|
public Object applyBeanPostProcessorsBeforeInitialization(Object existingBean, String beanName) throws BeansException { Object result = existingBean; for (BeanPostProcessor beanProcessor : getBeanPostProcessors()) { result = beanProcessor.postProcessBeforeInitialization(result, beanName); if (result == null) { return result; } } return result;} |
遍历每个BeanPostProcessor接口实现,调用postProcessBeforeInitialization方法,这个接口的调用时机之后会总结,这里就代码先简单提一下。
调用初始化方法
initializeBean方法的20行,调用Bean的初始化方法,看一下实现:
|
1
2
3
4
5
6
7
8
9
10
11
12
13
14
15
16
17
18
19
20
21
22
23
24
25
26
27
28
29
30
31
32
33
34
|
protected void invokeInitMethods(String beanName, final Object bean, RootBeanDefinition mbd) throws Throwable { boolean isInitializingBean = (bean instanceof InitializingBean); if (isInitializingBean && (mbd == null || !mbd.isExternallyManagedInitMethod("afterPropertiesSet"))) { if (logger.isDebugEnabled()) { logger.debug("Invoking afterPropertiesSet() on bean with name '" + beanName + "'"); } if (System.getSecurityManager() != null) { try { AccessController.doPrivileged(new PrivilegedExceptionAction<Object>() { public Object run() throws Exception { ((InitializingBean) bean).afterPropertiesSet(); return null; } }, getAccessControlContext()); } catch (PrivilegedActionException pae) { throw pae.getException(); } } else { ((InitializingBean) bean).afterPropertiesSet(); } } if (mbd != null) { String initMethodName = mbd.getInitMethodName(); if (initMethodName != null && !(isInitializingBean && "afterPropertiesSet".equals(initMethodName)) && !mbd.isExternallyManagedInitMethod(initMethodName)) { invokeCustomInitMethod(beanName, bean, mbd); } }} |
看到,代码做了两件事情:
1、先判断Bean是否InitializingBean的实现类,是的话,将Bean强转为InitializingBean,直接调用afterPropertiesSet()方法
2、尝试去拿init-method,假如有的话,通过反射,调用initMethod
因此,两种方法各有优劣:使用实现InitializingBean接口的方式效率更高一点,因为init-method方法是通过反射进行调用的;从另外一个角度讲,使用init-method方法之后和Spring的耦合度会更低一点。具体使用哪种方式调用初始化方法,看个人喜好。
调用BeanPostProcessor的postProcessAfterInitialization方法
最后一步,initializeBean方法的29行:
|
1
2
3
4
5
6
7
8
9
10
11
12
|
public Object applyBeanPostProcessorsAfterInitialization(Object existingBean, String beanName) throws BeansException { Object result = existingBean; for (BeanPostProcessor beanProcessor : getBeanPostProcessors()) { result = beanProcessor.postProcessAfterInitialization(result, beanName); if (result == null) { return result; } } return result;} |
同样遍历BeanPostProcessor,调用postProcessAfterInitialization方法。因此对于BeanPostProcessor方法总结一下:
1、在初始化每一个Bean的时候都会调用每一个配置的BeanPostProcessor的方法
2、在Bean属性设置、Aware设置后调用postProcessBeforeInitialization方法
3、在初始化方法调用后调用postProcessAfterInitialization方法
注册需要执行销毁方法的Bean
接下来看一下最上面doCreateBean方法的第83行registerDisposableBeanIfNecessary(beanName, bean, mbd)这一句,完成了创建Bean的最后一件事情:注册需要执行销毁方法的Bean。
看一下方法的实现:
|
1
2
3
4
5
6
7
8
9
10
11
12
13
14
15
16
17
18
19
20
21
|
protected void registerDisposableBeanIfNecessary(String beanName, Object bean, RootBeanDefinition mbd) { AccessControlContext acc = (System.getSecurityManager() != null ? getAccessControlContext() : null); if (!mbd.isPrototype() && requiresDestruction(bean, mbd)) { if (mbd.isSingleton()) { // Register a DisposableBean implementation that performs all destruction // work for the given bean: DestructionAwareBeanPostProcessors, // DisposableBean interface, custom destroy method. registerDisposableBean(beanName, new DisposableBeanAdapter(bean, beanName, mbd, getBeanPostProcessors(), acc)); } else { // A bean with a custom scope... Scope scope = this.scopes.get(mbd.getScope()); if (scope == null) { throw new IllegalStateException("No Scope registered for scope '" + mbd.getScope() + "'"); } scope.registerDestructionCallback(beanName, new DisposableBeanAdapter(bean, beanName, mbd, getBeanPostProcessors(), acc)); } }} |
其中第3行第一个判断为必须不是prototype(原型)的,第二个判断requiresDestruction方法的实现为:
1 protected boolean requiresDestruction(Object bean, RootBeanDefinition mbd) {2 return (bean != null &&3 (bean instanceof DisposableBean || mbd.getDestroyMethodName() != null ||4 hasDestructionAwareBeanPostProcessors()));5 } |
要注册销毁方法,Bean需要至少满足以下三个条件之一:
(1)Bean是DisposableBean的实现类,此时执行DisposableBean的接口方法destroy()
(2)Bean标签中有配置destroy-method属性,此时执行destroy-method配置指定的方法
(3)当前Bean对应的BeanFactory中持有DestructionAwareBeanPostProcessor接口的实现类,此时执行DestructionAwareBeanPostProcessor的接口方法postProcessBeforeDestruction
在满足上面三个条件之一的情况下,容器便会注册销毁该Bean,注册Bean的方法很简单,见registerDisposableBean方法实现:
1 public void registerDisposableBean(String beanName, DisposableBean bean) {2 synchronized (this.disposableBeans) {3 this.disposableBeans.put(beanName, bean);4 }5 } |
容器销毁的时候,会遍历disposableBeans,逐一执行销毁方法。
流程总结
本文和上篇文章分析了Spring Bean初始化的步骤,最后用一幅图总结一下Spring Bean初始化的流程:
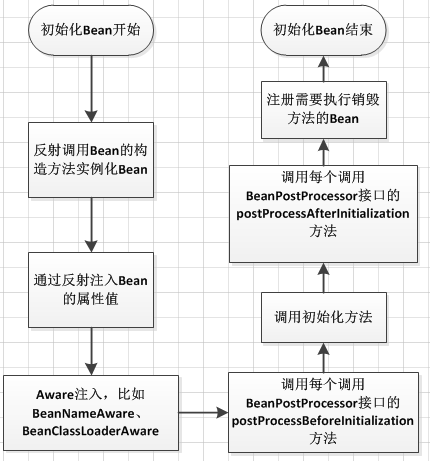
图只是起梳理流程作用,抛砖引玉,具体代码实现还需要网友朋友们照着代码自己去一步一步分析。
Spring源码分析:非懒加载的单例Bean初始化过程(下)的更多相关文章
- 【Spring源码分析】非懒加载的单例Bean初始化过程(下篇)
doCreateBean方法 上文[Spring源码分析]非懒加载的单例Bean初始化过程(上篇),分析了单例的Bean初始化流程,并跟踪代码进入了主流程,看到了Bean是如何被实例化出来的.先贴一下 ...
- 【Spring源码分析】非懒加载的单例Bean初始化过程(上篇)
代码入口 上文[Spring源码分析]Bean加载流程概览,比较详细地分析了Spring上下文加载的代码入口,并且在AbstractApplicationContext的refresh方法中,点出了f ...
- Spring源码分析:非懒加载的单例Bean初始化过程(上)
上文[Spring源码分析]Bean加载流程概览,比较详细地分析了Spring上下文加载的代码入口,并且在AbstractApplicationContext的refresh方法中,点出了finish ...
- 【Spring源码分析】非懒加载的单例Bean初始化前后的一些操作
前言 之前两篇文章[Spring源码分析]非懒加载的单例Bean初始化过程(上篇)和[Spring源码分析]非懒加载的单例Bean初始化过程(下篇)比较详细地分析了非懒加载的单例Bean的初始化过程, ...
- Spring源码分析:非懒加载的单例Bean初始化前后的一些操作
之前两篇文章Spring源码分析:非懒加载的单例Bean初始化过程(上)和Spring源码分析:非懒加载的单例Bean初始化过程(下)比较详细地分析了非懒加载的单例Bean的初始化过程,整个流程始于A ...
- Spring源码分析(十五)获取单例
本文结合<Spring源码深度解析>来分析Spring 5.0.6版本的源代码.若有描述错误之处,欢迎指正. 之前我们讲解了从缓存中获取单例的过程,那么,如果缓存中不存在已经加载的单例be ...
- Spring源码剖析4:懒加载的单例Bean获取过程分析
本文转自五月的仓颉 https://www.cnblogs.com/xrq730 本系列文章将整理到我在GitHub上的<Java面试指南>仓库,更多精彩内容请到我的仓库里查看 https ...
- 【Spring源码分析系列】加载Bean
/** * Create a new XmlBeanFactory with the given input stream, * which must be parsable using DOM. * ...
- 从SpringBoot源码分析 配置文件的加载原理和优先级
本文从SpringBoot源码分析 配置文件的加载原理和配置文件的优先级 跟入源码之前,先提一个问题: SpringBoot 既可以加载指定目录下的配置文件获取配置项,也可以通过启动参数( ...
随机推荐
- jsp中文乱码解决办法
一.JSP页面显示乱码 二.表单提交中文时出现乱码 三.数据库连接 大家在JSP的开发过程中,经常出现中文乱码的问题,可能一至困扰着您,我现在把我在JSP开发中遇到 的中文乱码的问题及解决办法写出来供 ...
- 附加题:将四则运算源代码上传到Github账户上
1.创建仓库用于存储管理本地文件 2.远程添加github上的Blog仓库. 3.获取github中Blog仓库的地址. 4.在Add Remote窗口中填写名字.Location. 5.将本地文件通 ...
- HTTP状态代码列表
httpContext.Response.StatusCode=200 1xx - 信息提示这些状态代码表示临时的响应.客户端在收到常规响应之前,应准备接收一个或多个 1xx 响应. · 100 - ...
- ASP.NET MVC 做的网站项目
感谢博客园团队日夜为广大需要获取知识人们所做的奉献 博客园团队您们辛苦了 ASP.NET MVC 实现有论坛功能的网站(有iis发布网站 这是之前写的... www.lazyfitness.cn 经过 ...
- 背水一战 Windows 10 (41) - 控件(导航类): Frame
[源码下载] 背水一战 Windows 10 (41) - 控件(导航类): Frame 作者:webabcd 介绍背水一战 Windows 10 之 控件(导航类) Frame 示例Controls ...
- “全栈2019”Java多线程第三十四章:超时自动唤醒被等待的线程
难度 初级 学习时间 10分钟 适合人群 零基础 开发语言 Java 开发环境 JDK v11 IntelliJ IDEA v2018.3 文章原文链接 "全栈2019"Java多 ...
- CentOS 7修改yum源为阿里源
1.备份本地源 1 # mv /etc/yum.repos.d/CentOS-Base.repo /etc/yum.repos.d/CentOS-Base.repo_bak 2.获取阿里yum源配置 ...
- 配置kali linux
在7月底的时候,安全加介绍Fireeye出品的 免费恶意软件分析工具FlareVM,还可进行逆向工程和渗透测试 .今天是看到绿盟科技的一篇介绍Kali Linux配置的文章,这个工具也进入了 渗透测试 ...
- Python 读取文件中unicode编码转成中文显示问题
Python读取文件中的字符串已经是unicode编码,如:\u53eb\u6211,需要转换成中文时有两种方式 1.使用eval: eval("u"+"\'" ...
- MySQL utilities介绍&出现 No module named utilities
目录 安装 mysqlreplicate mysqlrplcheck mysqlrplshow mysqlrpladmin mysqlfailover mysqldbcompare 详细介绍 mysq ...