WSDL测试webservice接口记录
收到一个事情,需要对接第三方API,对方给了个service,看了一下,原来是webservices的。
上一次测试webervice的接口,还是至少八九年前的时候了,这种相对比较老旧的也好久不在使用。
于是,简单搞了一下,从搭环境到测试完成,基本花了10来分钟,对比结果花点时间,也抽空简单记录一下。
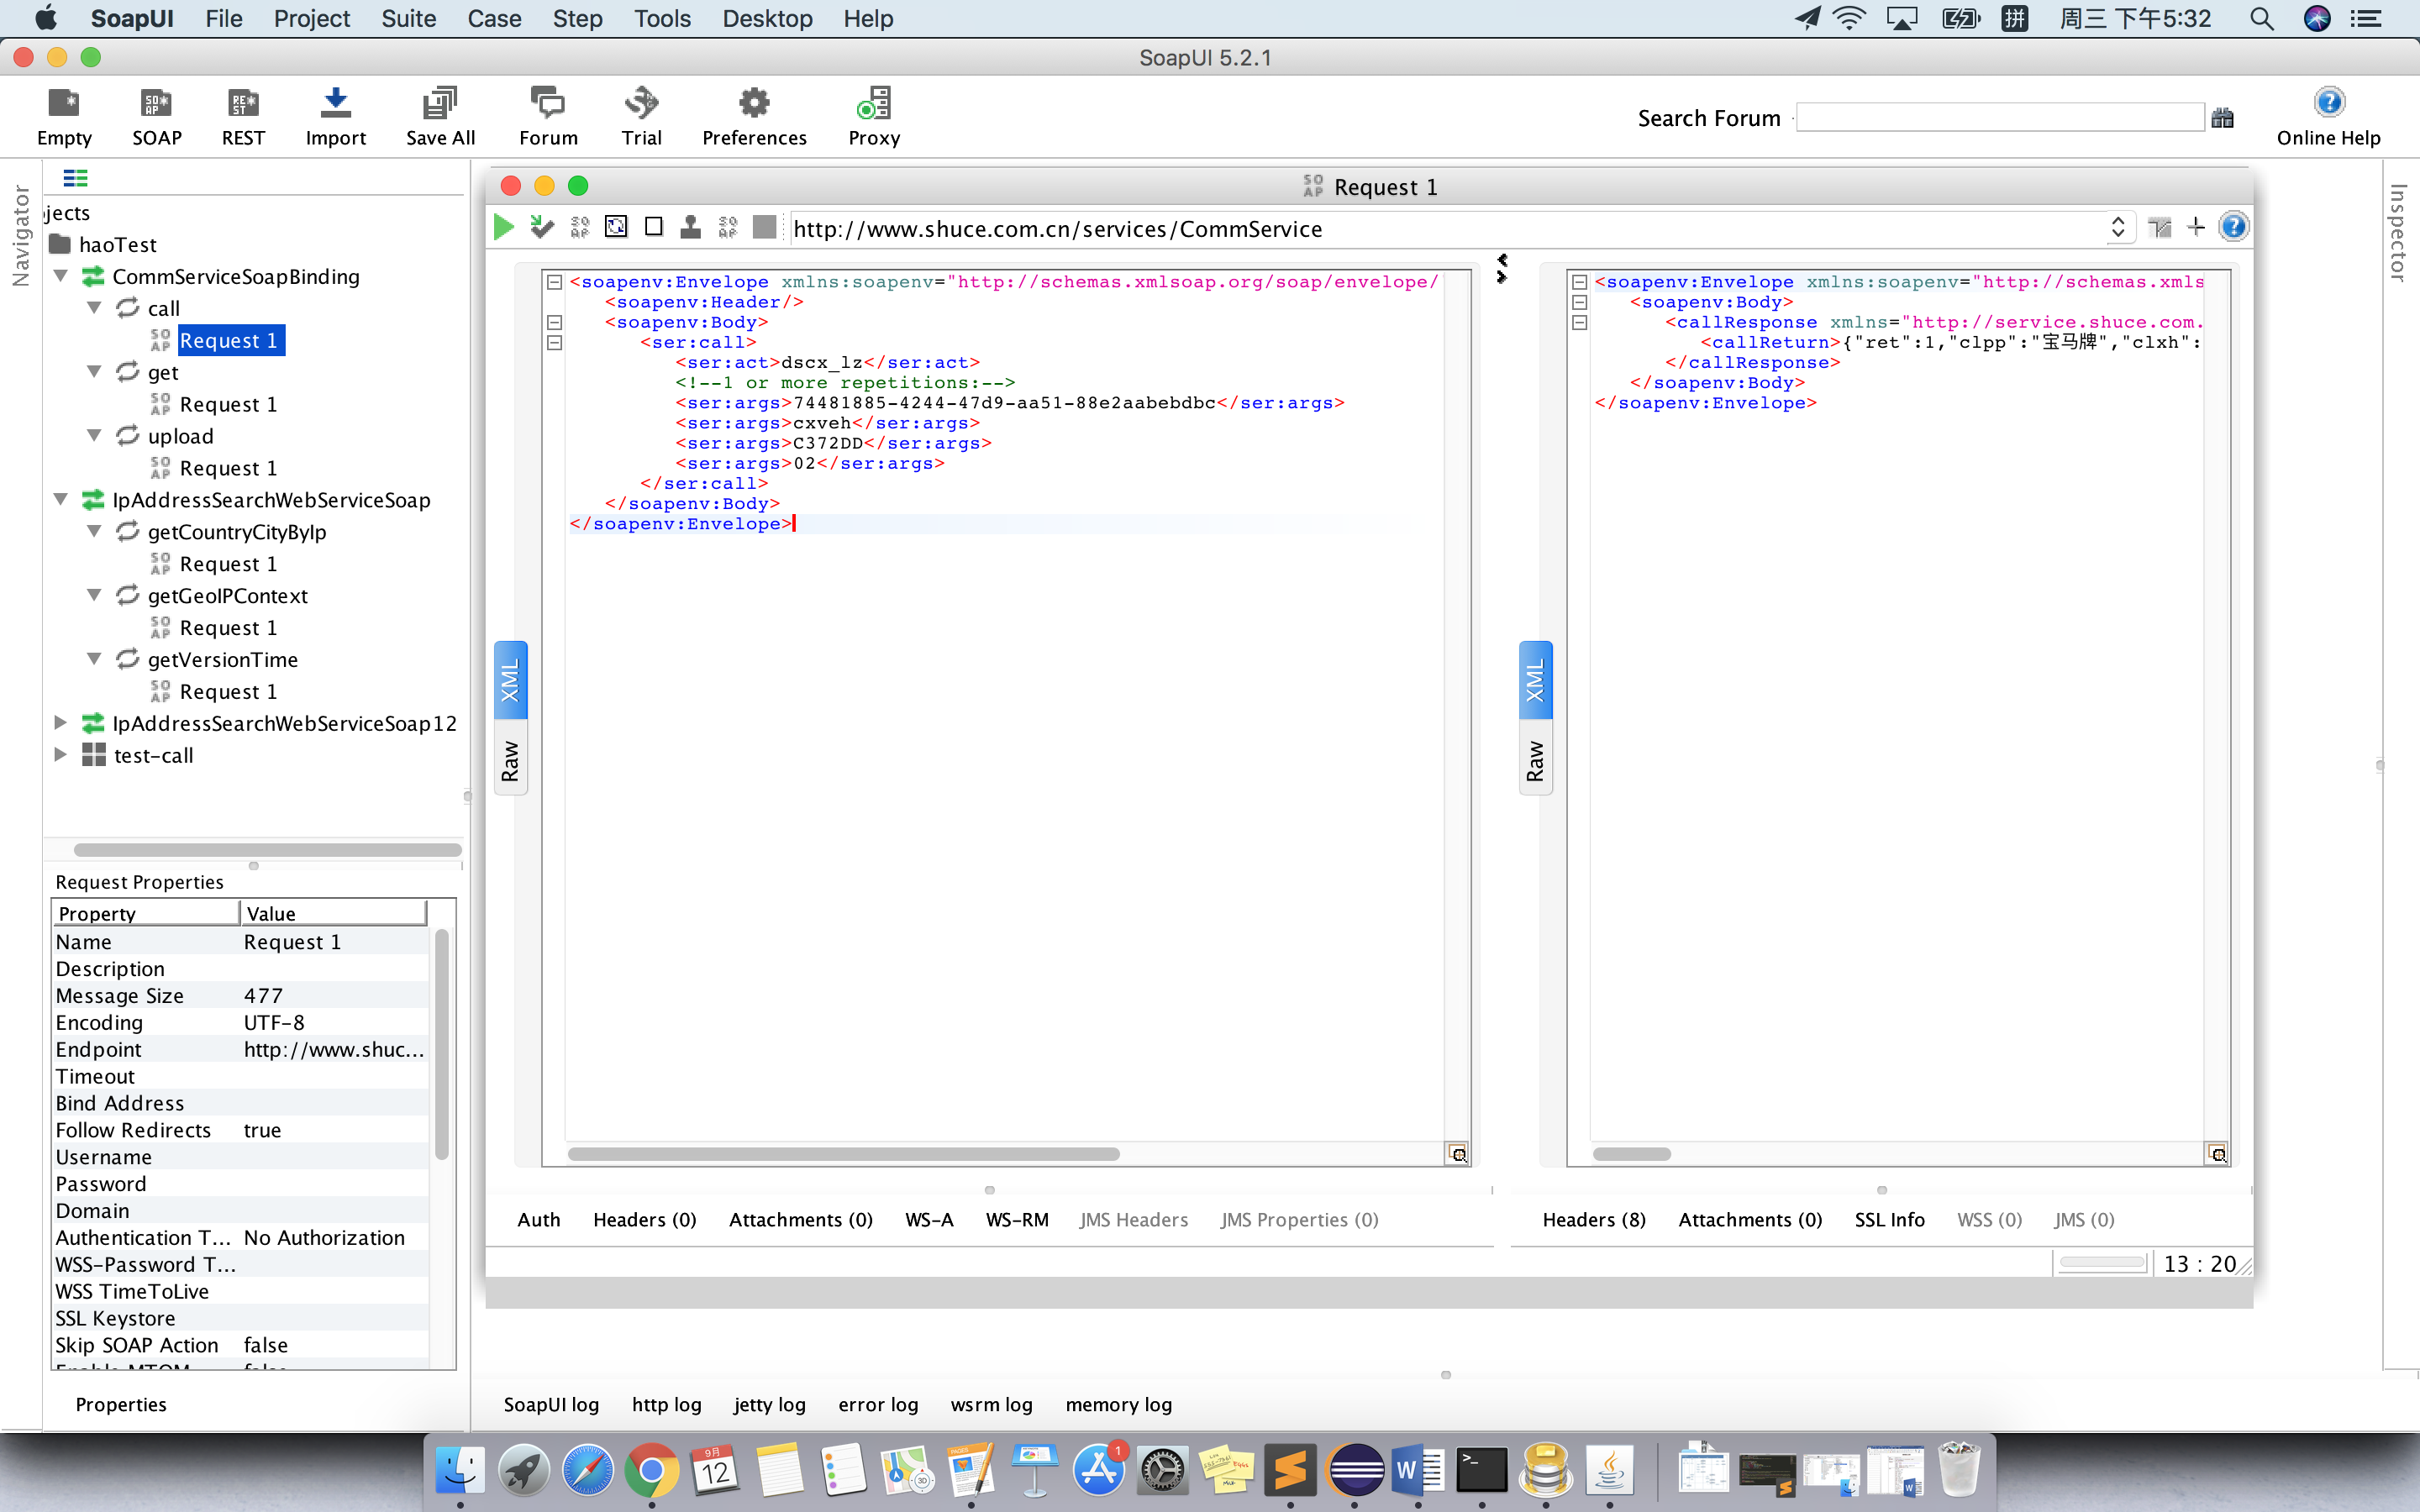
请求:
http://www.shuce.com.cn/services/CommService?wsdl
接口:call
参数:
<soapenv:Envelope xmlns:soapenv="http://schemas.xmlsoap.org/soap/envelope/" xmlns:ser="http://service.shuce.com.cn">

<soapenv:Header/>

<soapenv:Body>

<ser:call>

<ser:act>dscx_lz</ser:act>

<!--1 or more repetitions:-->

<ser:args>74481885-4244-47d9-aa51-88e2aabebdbc</ser:args>

<ser:args>cxveh</ser:args>

<ser:args>C372DD</ser:args>

<ser:args>02</ser:args>

</ser:call>

</soapenv:Body>

</soapenv:Envelope>
返回:
<soapenv:Envelope xmlns:soapenv="http://schemas.xmlsoap.org/soap/envelope/" xmlns:xsd="http://www.w3.org/2001/XMLSchema" xmlns:xsi="http://www.w3.org/2001/XMLSchema-instance">

<soapenv:Body>

<callResponse xmlns="http://service.shuce.com.cn">

<callReturn>{"ret":1,"clpp":"宝马牌","clxh":"BMW7202ES(BMWX1)","gcjk":"国产","zzg":"中国","zzcmc":"华晨宝马汽车有限公司","fdjxh":"N46B20E","hdzk":"5","ckg":"4477*1798*1577","csys":"棕","rlzl":"汽油","pl":"1995","gl":"122","cllx":"小型轿车","syxz":"非营运","ccdjrq":"20130917","zt":"正常","hbdbqk":"GB18352.3-2005(国Ⅳ阶段)","ccrq":"20130522","yxqz":"20190930","qzbfqz":"20991231"}

</callReturn>

</callResponse>

</soapenv:Body>

</soapenv:Envelope>
json格式化结果:
{

"ret": 1,

"clpp": "宝马牌",

"clxh": "BMW7202ES(BMWX1)",

"gcjk": "国产",

"zzg": "中国",

"zzcmc": "华晨宝马汽车有限公司",

"fdjxh": "N46B20E",

"hdzk": "5",

"ckg": "4477*1798*1577",

"csys": "棕",

"rlzl": "汽油",

"pl": "1995",

"gl": "122",

"cllx": "小型轿车",

"syxz": "非营运",

"ccdjrq": "20130917",

"zt": "正常",

"hbdbqk": "GB18352.3-2005(国Ⅳ阶段)",

"ccrq": "20130522",

"yxqz": "20190930",

"qzbfqz": "20991231"

}
其他
后来,我看了一下别的wsdl:
http://www.webxml.com.cn/WebServices/IpAddressSearchWebService.asmx?wsdl
做了一个测试,结果测试OK,简要也记录一下
request:
<soapenv:Envelope xmlns:soapenv="http://schemas.xmlsoap.org/soap/envelope/" xmlns:web="http://WebXml.com.cn/">

   <soapenv:Header/>

   <soapenv:Body>

      <web:getCountryCityByIp>

         <!--Optional:-->

         <web:theIpAddress>115.239.210.27</web:theIpAddress>

      </web:getCountryCityByIp>

   </soapenv:Body>

</soapenv:Envelope>
response:
<soap:Envelope xmlns:soap="http://schemas.xmlsoap.org/soap/envelope/" xmlns:xsi="http://www.w3.org/2001/XMLSchema-instance" xmlns:xsd="http://www.w3.org/2001/XMLSchema">

   <soap:Body>

      <getCountryCityByIpResponse xmlns="http://WebXml.com.cn/">

         <getCountryCityByIpResult>

            <string>115.239.210.27</string>

            <string>浙江省绍兴市 电信</string>

         </getCountryCityByIpResult>

      </getCountryCityByIpResponse>

   </soap:Body>

</soap:Envelope>
...
如果你想要尝试一下,进行一些测试,这里提供了一些wsdl,可以用来测试,可以试试。
所谓授之以鱼,不如授之以渔。这里也补上一些前提和方法:
下载地址:
官网:https://www.soapui.org/professional/soapui-pro.html
文件地址:http://cncspace.onlinedown.net/down/SoapUI-5.2.1-mac-bin.zip
下载地址:http://www.onlinedown.net/soft/177299.htm
下载之后的安装很简单,略过,简要提一下启动。如果用的是mac的话,这样启动:
启动命令:
cd /Users/hao/Downloads/SoapUI-5.2.1-mac-bin/SoapUI-5.2.1/bin

./soapui.sh
haodeMBP:bin hao$ pwd
/Users/hao/Downloads/SoapUI-5.2.1-mac-bin/SoapUI-5.2.1/bin
haodeMBP:bin hao$ ls
SoapUI-Spashscreen.png installationcomplete.sh mockservicerunner.sh soapui-errors.log soapui.sh toolrunner.sh wargenerator.sh
actions listeners securitytestrunner.sh soapui-log4j.xml starter-page.html uninstallactiontrack.sh
ext loadtestrunner.sh soapui-5.2.1.jar soapui.log testrunner.sh updateinstallation.sh
haodeMBP:bin hao$ ./soapui.sh
================================
=
= SOAPUI_HOME = /Users/hao/Downloads/SoapUI-5.2.1-mac-bin/SoapUI-5.2.1
=
================================
Configuring log4j from [/Users/hao/Downloads/SoapUI-5.2.1-mac-bin/SoapUI-5.2.1/bin/soapui-log4j.xml]
16:26:15,406 INFO [DefaultSoapUICore] Creating new settings at [/Users/hao/soapui-settings.xml]
SLF4J: Failed to load class "org.slf4j.impl.StaticLoggerBinder".
SLF4J: Defaulting to no-operation (NOP) logger implementation
SLF4J: See http://www.slf4j.org/codes.html#StaticLoggerBinder for further details.
16:26:16,523 INFO [PluginManager] 0 plugins loaded in 3 ms
16:26:16,523 INFO [DefaultSoapUICore] All plugins loaded
Configuring log4j from [/Users/hao/Downloads/SoapUI-5.2.1-mac-bin/SoapUI-5.2.1/bin/soapui-log4j.xml]
16:26:16,729 INFO [DefaultSoapUICore] Creating new settings at [/Users/hao/soapui-settings.xml]
16:26:16,740 INFO [PluginManager] 0 plugins loaded in 0 ms
16:26:16,740 INFO [DefaultSoapUICore] All plugins loaded
16:26:23,688 INFO [DefaultSoapUICore] Defaulting to native L&F for Mac OS X
16:26:23,740 INFO [SoapUI] Used java version: 1.8.0_181
16:28:17,764 INFO [SchemaUtils] Added default schema from file:/Users/hao/Downloads/SoapUI-5.2.1-mac-bin/SoapUI-5.2.1/bin/soapui-5.2.1.jar!/com/eviware/soapui/resources/xsds/xop.xsd with targetNamespace http://www.w3.org/2004/08/xop/include
16:28:17,781 INFO [SchemaUtils] Added default schema from file:/Users/hao/Downloads/SoapUI-5.2.1-mac-bin/SoapUI-5.2.1/bin/soapui-5.2.1.jar!/com/eviware/soapui/resources/xsds/XMLSchema.xsd with targetNamespace http://www.w3.org/2001/XMLSchema
16:28:17,782 INFO [SchemaUtils] Added default schema from file:/Users/hao/Downloads/SoapUI-5.2.1-mac-bin/SoapUI-5.2.1/bin/soapui-5.2.1.jar!/com/eviware/soapui/resources/xsds/xml.xsd with targetNamespace http://www.w3.org/XML/1998/namespace
16:28:17,782 INFO [SchemaUtils] Added default schema from file:/Users/hao/Downloads/SoapUI-5.2.1-mac-bin/SoapUI-5.2.1/bin/soapui-5.2.1.jar!/com/eviware/soapui/resources/xsds/swaref.xsd with targetNamespace http://ws-i.org/profiles/basic/1.1/xsd
16:28:17,783 INFO [SchemaUtils] Added default schema from file:/Users/hao/Downloads/SoapUI-5.2.1-mac-bin/SoapUI-5.2.1/bin/soapui-5.2.1.jar!/com/eviware/soapui/resources/xsds/xmime200505.xsd with targetNamespace http://www.w3.org/2005/05/xmlmime
可见启动之后,就打开了对应的应用程序窗口。
至于工具的使用,我向来觉得是不用看教程,任何工具拿上来随便点两下,就明白了,这个soapUI也是一样的。
其实方法这里已经写的很清楚了,而且没什么问题。照着操作即可。
以上是原创,下面这一段是摘录的。
测试操作步骤如下:
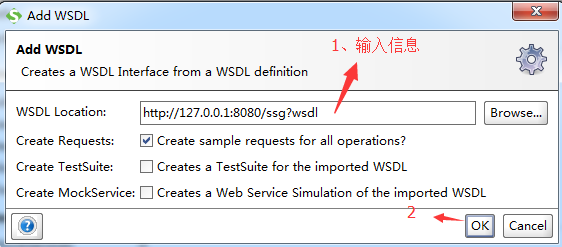
(1)首先找到cxf-webservice.xml配置信息中地址,在浏览器中出入:http://127.0.0.1:8080/ssg?wsdl会生成文档说明,直接给要对接的用户即可
<jaxws:endpoint id="ssg" implementor="cn.exchange.cxf.DataExchangeWebServiceImpl"

      address="http://127.0.0.1:8080/ssg">

 </jaxws:endpoint>
(2)使用soapUI测试接口:
注意:在测试之前,要先开启接口项目
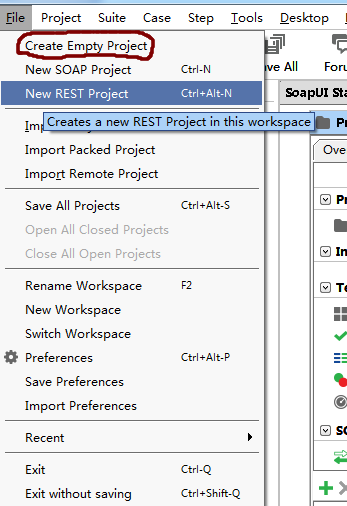
①在接口项目开启之后,打开工具soapUi,新建(file→create empty project),如下图所示:
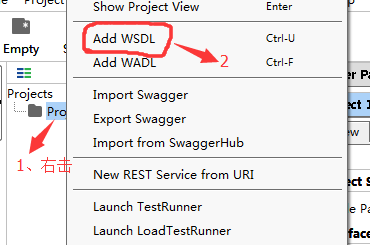
②右击工程project——add wsdl,如下图所示:
打开如下图的页面:
③然后进入如下页面:(修改:应该双击"request1")
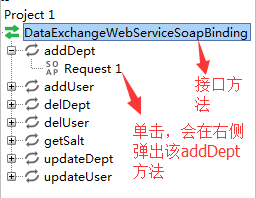
双击"request1"出现如下的窗口:

④在"?"号处输入相关的参数,点击运行,如果右侧空白没有出现错误的信息,说明接口方法可以使用
测试失败,如下所示:(对于不同的项目,可能提示信息有所不同,要视情况而定,这里不是绝对的结果)

测试成功,如下图:(对于不同的项目,可能提示信息有所不同,要视情况而定,这里不是绝对的结果)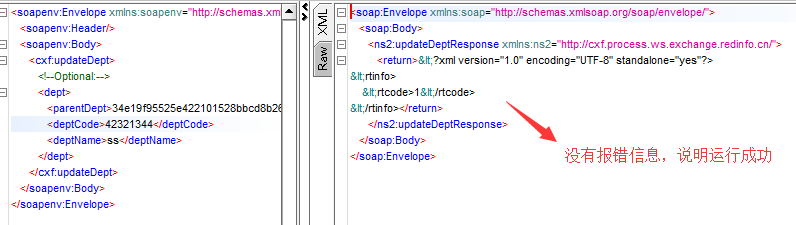
可见,WSDL的测试相对比较简单,如果没接触过的话,花几分钟看下就会明白。
如上。
--20180912 15:49于沪 长宁白猫科技园
WSDL测试webservice接口记录的更多相关文章
- Python之测试webservice接口
前段时间学习了Python操作http接口,觉得挺容易的.最近项目组也有接触webservice接口,心里想想是否Python也可以操作这类接口.于是利用伟大的度娘,花了6个小时研究出来了,所以迫不及 ...
- 【SoapUI、Postman、WebServiceStudio、Jmeter】接口测试工具结合测试webservice接口(发送XML格式参数)
目录: SoapUI测试webservice接口,发送XML格式参数 Postman测试webservice接口,发送XML格式参数 WebServiceStudio.exe测试webservice接 ...
- 『动善时』JMeter基础 — 50、使用JMeter测试WebService接口
目录 1.什么是WebService 2.WebService和SOAP的关系 3.什么是WSDL 4.测试WebService接口前的准备 (1)如何判断是WebService接口 (2)如何获取W ...
- 『动善时』JMeter基础 — 51、使用JMeter测试WebService接口
目录 1.什么是WebService 2.WebService和SOAP的关系 3.什么是WSDL 4.测试WebService接口前的准备 (1)如何判断是WebService接口 (2)如何获取W ...
- 关于python测试webservice接口的视频分享
现在大公司非常流行用python做产品的测试框架,还有对于一些快速原型产品的开发也好,很好地支持OO编程,代码易读.Python的更新挺快的,尤其是第三方库. 对于测试人员,代码基础薄弱,用pytho ...
- 使用PostMan测试WebService接口
使用PostMan测试WebService接口 参考资料: 通过XML请求WebServer https://blog.csdn.net/qq_33933408/article/details/53 ...
- python实现建立soap通信(调用及测试webservice接口)
实现代码如下: #调用及测试webservice接口 import requests class SoapConnect: def get_soap(self,url,data): r = reque ...
- jmeter测试webservice接口
webservice怎样使用jmeter测试呢? 测试样例url=http://www.webxml.com.cn/WebServices/IpAddressSearchWebService.asmx ...
- java 调用wsdl的webservice接口 两种调用方式
关于wsdl接口对于我来说是比较头疼的 基本没搞过.一脸懵 就在网上搜 看着写的都很好到我这就不好使了,非常蓝瘦.谨以此随笔纪念我这半个月踩过的坑... 背景:短短两周除了普通开发外我就接到了两个we ...
随机推荐
- 电信项目java补充类
一.DecimalFormat 1.概述 public class DecimalFormat extends NumberFormat DecimalFormat是格式为十进制数的NumberFor ...
- HDU 3749 Financial Crisis (点双连通+并查集)
<题目连接> 题目大意: 给你一个(保证输入无重边,无自环)无向图,然后有下面Q条询问,每条询问为:问你u点与v点之间有几条(除了首尾两点外,其他点不重复)的路径.如果有0条或1条输出0或 ...
- datatables跳转自定义页面(后端分页)
在后端分页的情况下,怎么做到跳转自定义页面? 0x01 难点: 一. 怎么添加自定义代码? 前提:datatables在整个html加载完毕后,进行datatables数据的渲染,并且把右下角的 “上 ...
- C - Visible Trees HDU - 2841 -莫比乌斯函数-容斥
C - Visible Trees HDU - 2841 思路 :被挡住的那些点(x , y)肯定是 x 与 y不互质.能够由其他坐标的倍数表示,所以就转化成了求那些点 x,y互质 也就是在 1 - ...
- SpringBoot使用Mybatis-Generator
本文介绍如何将Maven和Mybatis-Generator配合使用. 简介 Mybatis-Generator是Mybatis提供的一个便捷型插件,自动可以为项目生产对应的实体类,Mapper,da ...
- 打造利器Qt Creator:代码todo工具的使用
http://blog.csdn.net/maobush/article/details/67636734
- 给json对象去除重复的值
给数组去除重复值 Array.prototype.distinct = function() { var arr = this, result = [], i, j, len = arr.length ...
- [模板][P3803]多项式乘法
Description: FFT真的容易忘,所以就放到上面来了 #include<bits/stdc++.h> using namespace std; const int mxn=4e6 ...
- C++程序设计方法4:成员函数模板
成员函数的模板: 普通类的成员函数,也可以定义为函数模板,如: class normal_class { public: int value; template<typename T> v ...
- 如何修改PHP的memory_limit限制
在运行PHP程序,通常会遇到“Fatal Error: Allowed memory size of xx bytes exhausted”(允许内存大小为 xx 字节耗尽)的错误, 这个意味着PHP ...