docker--container的port映射
使用nginx为例
先运行nginx
[root@localhost ~]# docker run --name web -d nginx

Unable to find image 'nginx:latest' locally

latest: Pulling from library/nginx

0a4690c5d889: Pull complete

9719afee3eb7: Pull complete

44446b456159: Pull complete

Digest: sha256:b4b9b3eee194703fc2fa8afa5b7510c77ae70cfba567af1376a573a967c03dbb

Status: Downloaded newer image for nginx:latest

WARNING: IPv4 forwarding is disabled. Networking will not work.

06537c95ca2e0c1885a93755e9fa92aa1a8c7b98ce169764c3197e0208febf79
[root@localhost ~]# docker container ls
CONTAINER ID        IMAGE               COMMAND                  CREATED             STATUS              PORTS               NAMES
06537c95ca2e        nginx               "nginx -g 'daemon of…"   8 minutes ago       Up 8 minutes        80/tcp              web
19216c85489e        busybox             "/bin/sh -c 'while t…"   About an hour ago   Up About an hour                        test4
cec10f0cd32d        busybox             "/bin/sh -c 'while t…"   6 hours ago         Up 6 hours                              test3
68789fa4dc47        busybox             "/bin/sh -c 'while t…"   19 hours ago        Up 19 hours                             test2
cba625871070        busybox             "/bin/sh -c 'while t…"   24 hours ago        Up 24 hours                             test1
[root@localhost ~]#
查看 IP
[root@localhost ~]# docker network inspect bridge

[

    {

        "Name": "bridge",

        "Id": "4e8172ef8e0169e74285225030d0b5f271494df46c4f7bc3ba38e9ca87a1c6f9",

        "Created": "2019-07-17T06:50:29.144315528-07:00",

        "Scope": "local",

        "Driver": "bridge",

        "EnableIPv6": false,

        "IPAM": {

            "Driver": "default",

            "Options": null,

            "Config": [

                {

                    "Subnet": "172.17.0.0/16",

                    "Gateway": "172.17.0.1"

                }

            ]

        },

        "Internal": false,

        "Attachable": false,

        "Ingress": false,

        "ConfigFrom": {

            "Network": ""

        },

        "ConfigOnly": false,

        "Containers": {

            "06537c95ca2e0c1885a93755e9fa92aa1a8c7b98ce169764c3197e0208febf79": {

                "Name": "web",

                "EndpointID": "8ee4eb75d3551bd76a19790f0bdc9f8bbd555e5674daa69e9b51e96d38deb9f1",

                "MacAddress": "02:42:ac:11:00:04",

                "IPv4Address": "172.17.0.4/16",

                "IPv6Address": ""

            },
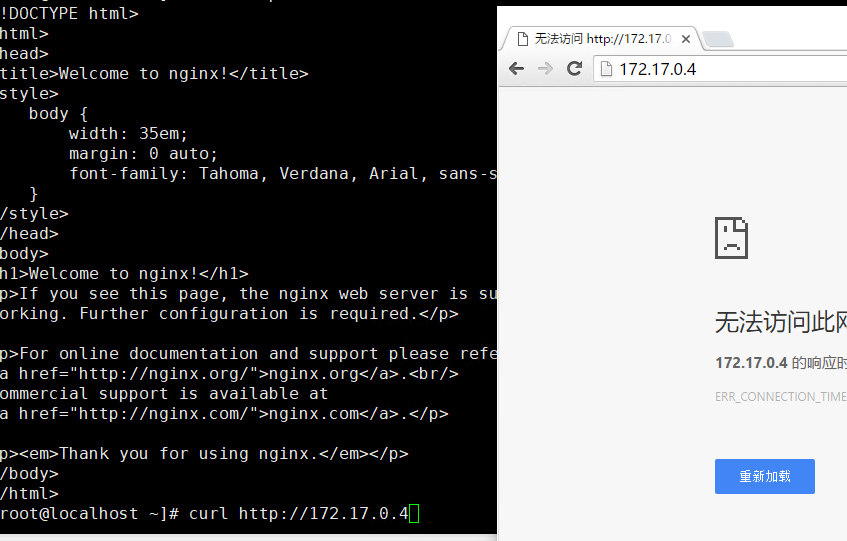
在宿主机能访问nginx
[root@localhost ~]# curl http://172.17.0.4

<!DOCTYPE html>

<html>

<head>

<title>Welcome to nginx!</title>

<style>

    body {

        width: 35em;

        margin:  auto;

        font-family: Tahoma, Verdana, Arial, sans-serif;

    }

</style>

</head>

<body>

<h1>Welcome to nginx!</h1>

<p>If you see this page, the nginx web server is successfully installed and

working. Further configuration is required.</p>

<p>For online documentation and support please refer to

<a href="http://nginx.org/">nginx.org</a>.<br/>

Commercial support is available at

<a href="http://nginx.com/">nginx.com</a>.</p>

<p><em>Thank you for using nginx.</em></p>

</body>

</html>

[root@localhost ~]#
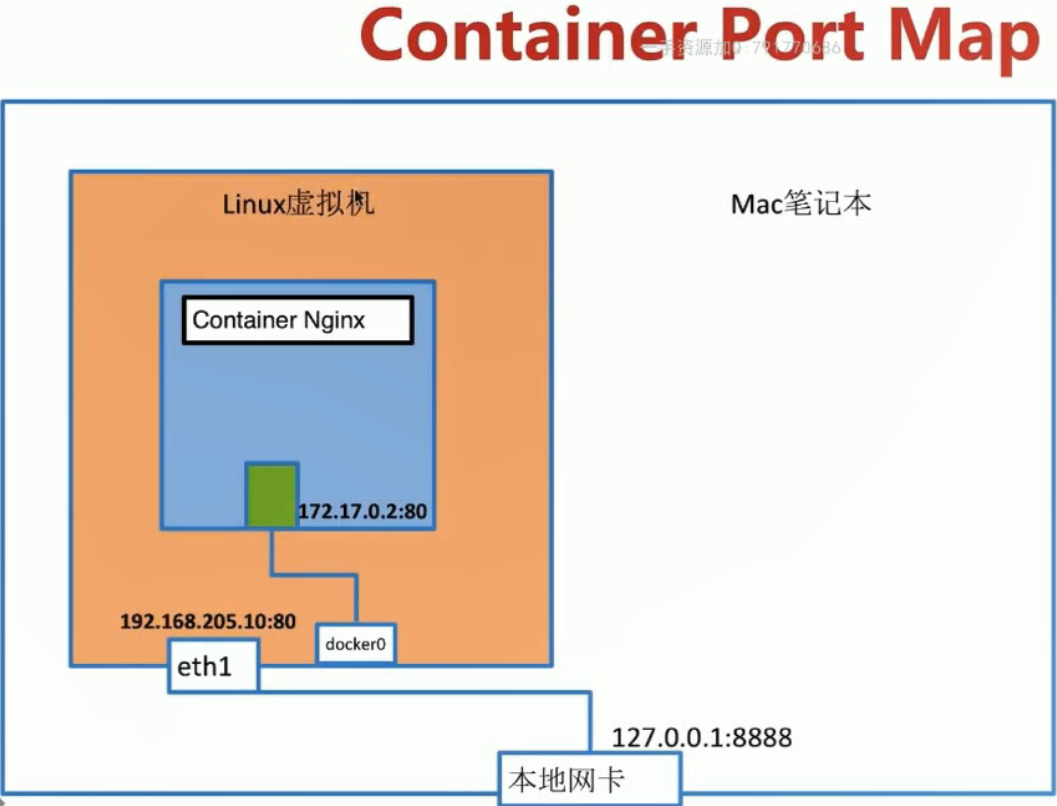
我的宿主机是在VMware虚拟的centos,因为IP是绑定在nginx container网络空间, 想要让nginx能从外面访问,则需要做端口映射,把container上的80端口,映射到宿主机上
 [root@localhost ~]# docker run -d --name web -p : nginx #-p 8080:80 把本地8080端口映射到container 80端口

 c24bf84a9d3bdd46fa33f13032c27bbba22ff4cb24ba9cb2309d2570a41e2853

 [root@localhost ~]# docker container ps

 CONTAINER ID        IMAGE               COMMAND                  CREATED             STATUS              PORTS                  NAMES

 c24bf84a9d3b        nginx               "nginx -g 'daemon of…"    seconds ago      Up  seconds       0.0.0.0:->/tcp   web

 [root@localhost ~]# docker network inspect bridge #查看container IP

 [

     {

         "Name": "bridge",

         "Id": "ac664a242c917c931998806bfc970c0fb3c7c9c5b0cbed7769b5a71978ff9748",

         "Created": "2019-07-19T02:40:37.951941039-07:00",

         "Scope": "local",

         "Driver": "bridge",

         "EnableIPv6": false,

         "IPAM": {

             "Driver": "default",

             "Options": null,

             "Config": [

                 {

                     "Subnet": "172.17.0.0/16",

                     "Gateway": "172.17.0.1"

                 }

             ]

         },

         "Internal": false,

         "Attachable": false,

         "Ingress": false,

         "ConfigFrom": {

             "Network": ""

         },

         "ConfigOnly": false,

         "Containers": {

             "c24bf84a9d3bdd46fa33f13032c27bbba22ff4cb24ba9cb2309d2570a41e2853": {

                 "Name": "web",

                 "EndpointID": "0eab9a9edb82d03bec9193175689159a2c8826ecfa70b183e84227251a5713fe",

                 "MacAddress": "02:42:ac:11:00:02",

                 "IPv4Address": "172.17.0.2/16",

                 "IPv6Address": ""

             }

         },

         "Options": {

             "com.docker.network.bridge.default_bridge": "true",

             "com.docker.network.bridge.enable_icc": "true",

             "com.docker.network.bridge.enable_ip_masquerade": "true",

             "com.docker.network.bridge.host_binding_ipv4": "0.0.0.0",

             "com.docker.network.bridge.name": "docker0",

             "com.docker.network.driver.mtu": ""

         },

         "Labels": {}

     }

 ]

 [root@localhost ~]# curl http://172.17.0.2 #访问container IP可以访问

 <!DOCTYPE html>

 <html>

 <head>

 <title>Welcome to nginx!</title>

 <style>

     body {

         width: 35em;

         margin:  auto;

         font-family: Tahoma, Verdana, Arial, sans-serif;

     }

 </style>

 </head>

 <body>

 <h1>Welcome to nginx!</h1>

 <p>If you see this page, the nginx web server is successfully installed and

 working. Further configuration is required.</p>

 <p>For online documentation and support please refer to

 <a href="http://nginx.org/">nginx.org</a>.<br/>

 Commercial support is available at

 <a href="http://nginx.com/">nginx.com</a>.</p>

 <p><em>Thank you for using nginx.</em></p>

 </body>

 </html>

 [root@localhost ~]# curl http:/127.0.0.1:

 curl: () Could not resolve host: http; Name or service not known

 [root@localhost ~]# curl http://127.0.0.1:8080 #测试宿主机 8080端口

 <!DOCTYPE html>

 <html>

 <head>

 <title>Welcome to nginx!</title>

 <style>

     body {

         width: 35em;

         margin:  auto;

         font-family: Tahoma, Verdana, Arial, sans-serif;

     }

 </style>

 </head>

 <body>

 <h1>Welcome to nginx!</h1>

 <p>If you see this page, the nginx web server is successfully installed and

 working. Further configuration is required.</p>

 <p>For online documentation and support please refer to

 <a href="http://nginx.org/">nginx.org</a>.<br/>

 Commercial support is available at

 <a href="http://nginx.com/">nginx.com</a>.</p>

 <p><em>Thank you for using nginx.</em></p>

 </body>

 </html>

 [root@localhost ~]#
如果本机是公网IP,则可以直接互联网访问,我这是虚拟机,如果虚拟机网络模式是NAT,则在本地可以直接用虚拟机IP:8080访问,如果想用本地IP则需要配置NAT端口转换,比如下面:
配置生效后我可以用本地IP:8081访问 web

docker--container的port映射的更多相关文章
- Docker源码分析(七):Docker Container网络 (上)
1.前言(什么是Docker Container) 如今,Docker技术大行其道,大家在尝试以及玩转Docker的同时,肯定离不开一个概念,那就是“容器”或者“Docker Container”.那 ...
- 如何在查看docker container内进程信息,与宿主机上进程信息的映射关系
docker container内运行的进程,在宿主机上,通过ps也是能够查到的,但是在不熟悉命令的时候,无法快速找到他们的关系. 这里科普一个基础命令 docker top 1. 找到容器的id d ...
- expose a port on a living Docker container
if you have a container that with something running on its port 8000, you can run wget http://contai ...
- docker container(容器)
docker 容器 Docker容器类似于一个轻量级的沙箱,Docker利用容器来运行和隔离应用 容器是从镜像创建的应用运行实例.它可以启动,开始,停止,删除,而这些容器都是彼此相互隔离,互不可见的. ...
- Docker容器内部端口映射到外部宿主机端口的方法小结
转自:https://www.cnblogs.com/kevingrace/p/9453987.html Docker允许通过外部访问容器或者容器之间互联的方式来提供网络服务.容器启动之后,容器中可以 ...
- Docker源码分析(八):Docker Container网络(下)
1.Docker Client配置容器网络模式 Docker目前支持4种网络模式,分别是bridge.host.container.none,Docker开发者可以根据自己的需求来确定最适合自己应用场 ...
- Docker container 集装箱说明
容器操作 使用 docker 命令行操作 docker 容器 启动容器 core@localhost ~ $ docker run Usage: docker run [OPTIONS] IMAGE ...
- docker容器的端口映射
1.创建一个Nginx 容器,先不映射端口 [root@localhost ~]# docker run --name my_nginx -d nginx 7be3673a4c0f8f7ffe79a7 ...
- Docker容器内部端口映射到外部宿主机端口 - 运维笔记
Docker允许通过外部访问容器或者容器之间互联的方式来提供网络服务.容器启动之后,容器中可以运行一些网络应用,通过-p或-P参数来指定端口映射. 注意:宿主机的一个端口只能映射到容器内部的某一个端口 ...
- Docker容器内部端口映射到外部宿主机端口
Docker允许通过外部访问容器或者容器之间互联的方式来提供网络服务.容器启动之后,容器中可以运行一些网络应用,通过-p或-P参数来指定端口映射. 注意:宿主机的一个端口只能映射到容器内部的某一个端口 ...
随机推荐
- Python之获取文件夹中文件列表以及glob与fnmatch模块的使用
获取文件夹中的文件列表 print(os.listdir("../secondPackage")) # ['__init__.py', 'secondCookBook.py', ' ...
- ES5继承模式
果然,感觉有些东西不整理一下还是很容易忘记的,很多时候有需要不断地去复习,感觉JavaScript这门语言总体上不能算是特别难,但是知识点特别杂(坑也特别多...),感觉最好还是能够梳理出一个整体架构 ...
- 2018-8-10-win10-UWP-序列化
title author date CreateTime categories win10 UWP 序列化 lindexi 2018-08-10 19:16:50 +0800 2018-2-13 17 ...
- c++求中位数
#include <iostream> #include <cassert> #include <stack> #include <math.h> us ...
- TMS320C6455BCTZA 原厂订购 原装正品
作为一家科研公司,保证芯片的原厂品质和正规采购渠道是科学严谨的研发工作中重要的一环,更是保证研发产品可靠.稳定的基础.而研发中所遇到的各种不可预测的情况更是每个工程师向技术的山峰攀登中时会遇到的各种难 ...
- MySQL--14 半同步复制
目录 MySQL半同步复制 半同步复制开启方法 测试半同步 MySQL过滤复制 MySQL半同步复制 从MYSQL5.5开始,支持半自动复制.之前版本的MySQL Replication都是异步(as ...
- nginx部署静态资源
第一步.推荐使用EditPlus中ftp工具 安装,然后点击File->FTP->FTPUPLOAD->Settings->add.然后进行配置: 这样只是为了方便编辑Linu ...
- OutOfMemoryError系列(2): GC overhead limit exceeded
原因分析 JVM抛出 java.lang.OutOfMemoryError: GC overhead limit exceeded 错误就是发出了这样的信号: 执行垃圾收集的时间比例太大, 有效的运算 ...
- 【LeetCode】并查集 union-find(共16题)
链接:https://leetcode.com/tag/union-find/ [128]Longest Consecutive Sequence (2018年11月22日,开始解决hard题) 给 ...
- kaildi讲解
转载声明:本文为转载文章 作者:ferb2015 原文地址:https://blog.csdn.net/eqiang8848/article/details/81543599 kaldi是一个开源的语 ...