YOLOV3算法详解
YOLOV3
YOLO3主要的改进有:调整了网络结构;利用多尺度特征进行对象检测;对象分类用Logistic取代了softmax。
新的网络结构Darknet -53
darknet-53借用了resnet的思想,在网络中加入了残差模块,这样有利于解决深层次网络的梯度问题,每个残差模块由两个卷积层和一个shortcut connections,
1,2,8,8,4代表有几个重复的残差模块,整个v3结构里面,没有池化层和全连接层,网络的下采样是通过设置卷积的stride为2来达到的,每当通过这个卷积层之后
图像的尺寸就会减小到一半。而每个卷积层的实现又是包含 卷积+BN+Leaky relu ,每个残差模块之后又要加上一个zero padding,具体实现可以参考下面的一张图。
论文中所给的网络结构如下,由卷积模块和残差模块组成;

模型可视化
具体的全部模型结构可以从这个网站的工具进行可视化分析:
https://lutzroeder.github.io/netron/
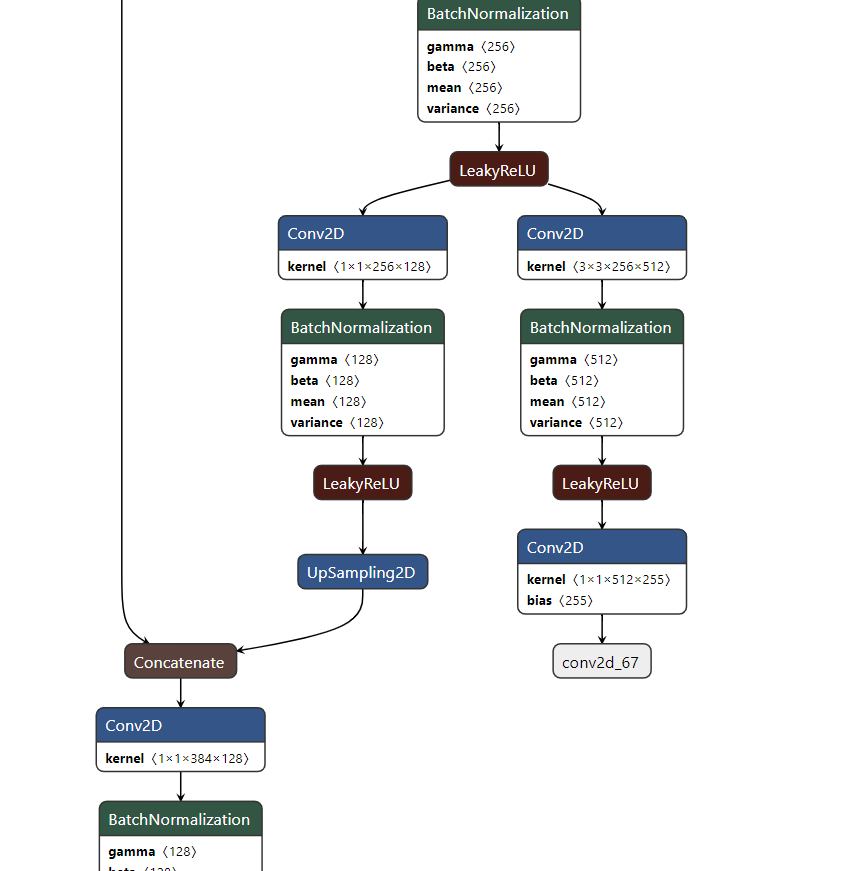
从Yolo的官网上下载yolov3的权重文件,然后通过官网上的指导转化为H5文件,然后可以再这个浏览器工具里直接看yolov3的每一层是如何分布的;类似下边截图是一部分网络(最后的拼接部分);
整体来看Yolov3的输入与输出形式如下:
输入416*416*3的图像,通过darknet网络得到三种不同尺度的预测结果,每个尺度都对应N个通道,包含着预测的信息;
每个网格每个尺寸的anchors的预测结果。
对比下yolov1,有7*7*2个预测;
对比下yolov2,有13*13*5个预测;
YOLOv3共有13*13*3 + 26*26*3 + 52*52*3个预测 。
每个预测对应85维,分别是4(坐标值)、1(置信度分数)、80(coco类别数)

多尺度检测:
对于多尺度检测来说,采用多个尺度进行预测,具体形式是在网络预测的最后某些层进行上采样拼接的操作来达到;对于分辨率对预测的影响如下解释:
分辨率信息直接反映的就是构成object的像素的数量。一个object,像素数量越多,它对object的细节表现就越丰富越具体,也就是说分辨率信息越丰富。这也就是为什么大尺度feature map提供的是分辨率信息了。语义信息在目标检测中指的是让object区分于背景的信息,即语义信息是让你知道这个是object,其余是背景。在不同类别中语义信息并不需要很多细节信息,分辨率信息大,反而会降低语义信息,因此小尺度feature map在提供必要的分辨率信息下语义信息会提供的更好。(而对于小目标,小尺度feature map无法提供必要的分辨率信息,所以还需结合大尺度的feature map)

YOLO3更进一步采用了3个不同尺度的特征图来进行对象检测。能够检测的到更加细粒度的特征。
对于这三种检测的结果并不是同样的东西,这里的粗略理解是不同给的尺度检测不同大小的物体。
网络的最终输出有3个尺度分别为1/32,1/16,1/8;
在第79层之后经过几个卷积操作得到的是1/32 (13*13) 的预测结果,下采样倍数高,这里特征图的感受野比较大,因此适合检测图像中尺寸比较大的对象。
然后这个结果通过上采样与第61层的结果进行concat,再经过几个卷积操作得到1/16的预测结果;它具有中等尺度的感受野,适合检测中等尺度的对象。
91层的结果经过上采样之后在于第36层的结果进行concat,经过几个卷积操作之后得到的是1/8的结果,它的感受野最小,适合检测小尺寸的对象。
concat:张量拼接。将darknet中间层和后面的某一层的上采样进行拼接。拼接的操作和残差层add的操作是不一样的,拼接会扩充张量的维度,而add只是直接相加不会导致张量维度的改变。
使用Kmeans聚类的方法来决定anchors的尺寸大小:
logistic回归用于对anchor包围的部分进行一个目标性评分(objectness score),(用于NMS),即这块位置是目标的可能性有多大。
公式一:
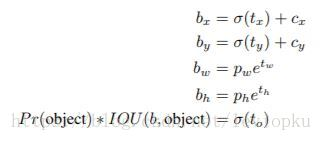
yolo_v3只会对1个prior进行操作,也就是那个最佳prior。而logistic回归就是用来从9个anchor priors中找到objectness score(目标存在可能性得分)最高的那一个。
对象分类softmax改成logistic
预测对象类别时不使用softmax,改成使用logistic的输出进行预测。这样能够支持多标签对象(比如一个人有Woman 和 Person两个标签)。
YOLO的LOSS函数:
 1         # K.binary_crossentropy is helpful to avoid exp overflow.

 2         xy_loss = object_mask * box_loss_scale * K.binary_crossentropy(raw_true_xy, raw_pred[...,0:2], from_logits=True)

 3         wh_loss = object_mask * box_loss_scale * 0.5 * K.square(raw_true_wh-raw_pred[...,2:4])

 4         confidence_loss = object_mask * K.binary_crossentropy(object_mask, raw_pred[...,4:5], from_logits=True)+ \

 5             (1-object_mask) * K.binary_crossentropy(object_mask, raw_pred[...,4:5], from_logits=True) * ignore_mask

 6         class_loss = object_mask * K.binary_crossentropy(true_class_probs, raw_pred[...,5:], from_logits=True)

 7

 8         xy_loss = K.sum(xy_loss) / mf

 9         wh_loss = K.sum(wh_loss) / mf

10         confidence_loss = K.sum(confidence_loss) / mf

11         class_loss = K.sum(class_loss) / mf

12         loss += xy_loss + wh_loss + confidence_loss + class_loss

13         if print_loss:

14             loss = tf.Print(loss, [loss, xy_loss, wh_loss, confidence_loss, class_loss, K.sum(ignore_mask)], message='loss: ')

15     return loss
yolov3再keras中定义的Loss函数如上,基本可以看出,对于回归预测的部分是采用多个mse均方差相加来进行的(类似于上边所提到的v1中的Loss函数),对于分类部分和置信度是采用K.binary_crossentropy来进行的,最后把两种Loss相加得出最终的loss
部分源码分析:
 def yolo_eval(yolo_outputs,

               anchors,

               num_classes,

               image_shape,

               max_boxes=20,

               score_threshold=.6,

               iou_threshold=.5):

     """Evaluate YOLO model on given input and return filtered boxes."""
'''此函数的作用是对于Yolo模型的输出进行筛选,通过yolo_boxes_and_scores来给yolo_outputs打分,
然后通过(box_scores >= score_threshold)来初步把分数较低的预测去掉,再通过NMS操作对每个对象的anchors进行筛选,最终为每个对象得出一个分数最大且不重复的预测结果。'''
     num_layers = len(yolo_outputs)

     anchor_mask = [[6,7,8], [3,4,5], [0,1,2]] if num_layers==3 else [[3,4,5], [1,2,3]] # default setting

     input_shape = K.shape(yolo_outputs[0])[1:3] * 32

     boxes = []

     box_scores = []

     for l in range(num_layers):

         _boxes, _box_scores = yolo_boxes_and_scores(yolo_outputs[l],

             anchors[anchor_mask[l]], num_classes, input_shape, image_shape)

         boxes.append(_boxes)

         box_scores.append(_box_scores)

     boxes = K.concatenate(boxes, axis=0)

     box_scores = K.concatenate(box_scores, axis=0)

     mask = box_scores >= score_threshold
'''设定分数的阈值'''

     max_boxes_tensor = K.constant(max_boxes, dtype='int32')

     boxes_ = []

     scores_ = []

     classes_ = []

     for c in range(num_classes):

         # TODO: use keras backend instead of tf.

         class_boxes = tf.boolean_mask(boxes, mask[:, c])

         class_box_scores = tf.boolean_mask(box_scores[:, c], mask[:, c])

         nms_index = tf.image.non_max_suppression(

             class_boxes, class_box_scores, max_boxes_tensor, iou_threshold=iou_threshold)
'''进行NMS非极大值抑制操作,设置iou_threshold,筛选得出最佳结果;    这里使用的是tensorflow自带的nms方法,pytorch中一般都是自定义的nms'''

         class_boxes = K.gather(class_boxes, nms_index)

         class_box_scores = K.gather(class_box_scores, nms_index)

         classes = K.ones_like(class_box_scores, 'int32') * c

         boxes_.append(class_boxes)

         scores_.append(class_box_scores)

         classes_.append(classes)

     boxes_ = K.concatenate(boxes_, axis=0)

     scores_ = K.concatenate(scores_, axis=0)

     classes_ = K.concatenate(classes_, axis=0)

     return boxes_, scores_, classes_
下面这个函数是加载模型调用上面的yolo_eval函数产生boxes,scores,classes:
     def generate(self):

         model_path = os.path.expanduser(self.model_path)

         assert model_path.endswith('.h5'), 'Keras model or weights must be a .h5 file.'

         # Load model, or construct model and load weights.

         num_anchors = len(self.anchors)

         num_classes = len(self.class_names)

         is_tiny_version = num_anchors==6 # default setting

         try:

             self.yolo_model = load_model(model_path, compile=False)

         except:

             self.yolo_model = tiny_yolo_body(Input(shape=(None,None,3)), num_anchors//2, num_classes) \

                 if is_tiny_version else yolo_body(Input(shape=(None,None,3)), num_anchors//3, num_classes)

             self.yolo_model.load_weights(self.model_path) # make sure model, anchors and classes match

         else:

             assert self.yolo_model.layers[-1].output_shape[-1] == \

                 num_anchors/len(self.yolo_model.output) * (num_classes + 5), \

                 'Mismatch between model and given anchor and class sizes'

         print('{} model, anchors, and classes loaded.'.format(model_path))

         # Generate colors for drawing bounding boxes.

         hsv_tuples = [(x / len(self.class_names), 1., 1.)

                       for x in range(len(self.class_names))]

         self.colors = list(map(lambda x: colorsys.hsv_to_rgb(*x), hsv_tuples))

         self.colors = list(

             map(lambda x: (int(x[0] * 255), int(x[1] * 255), int(x[2] * 255)),

                 self.colors))

         np.random.seed(10101)  # Fixed seed for consistent colors across runs.

         np.random.shuffle(self.colors)  # Shuffle colors to decorrelate adjacent classes.

         np.random.seed(None)  # Reset seed to default.

         # Generate output tensor targets for filtered bounding boxes.

         self.input_image_shape = K.placeholder(shape=(2, ))

         if self.gpu_num>=2:

             self.yolo_model = multi_gpu_model(self.yolo_model, gpus=self.gpu_num)

         boxes, scores, classes = yolo_eval(self.yolo_model.output, self.anchors,

                 len(self.class_names), self.input_image_shape,

                 score_threshold=self.score, iou_threshold=self.iou)

         return boxes, scores, classes
our system only assigns one bounding box prior for each ground truth object.论文原话,v3预测bbox只预测一个最准确的;在训练过程中yolov3是预测9个anchors的,对于loss的计算是找到iou最大的哪个,但是预测的时候只选一个最精确的。
 def preprocess_true_boxes(true_boxes, input_shape, anchors, num_classes):

     '''Preprocess true boxes to training input format

     Parameters

     ----------

     true_boxes: array, shape=(m, T, 5)

         Absolute x_min, y_min, x_max, y_max, class_id relative to input_shape.

     input_shape: array-like, hw, multiples of 32

     anchors: array, shape=(N, 2), wh

     num_classes: integer

     Returns

     -------

     y_true: list of array, shape like yolo_outputs, xywh are reletive value

     '''

     assert (true_boxes[..., 4]<num_classes).all(), 'class id must be less than num_classes'

     num_layers = len(anchors)//3 # default setting

     anchor_mask = [[6,7,8], [3,4,5], [0,1,2]] if num_layers==3 else [[3,4,5], [1,2,3]]

     true_boxes = np.array(true_boxes, dtype='float32')

     input_shape = np.array(input_shape, dtype='int32')

     boxes_xy = (true_boxes[..., 0:2] + true_boxes[..., 2:4]) // 2

     boxes_wh = true_boxes[..., 2:4] - true_boxes[..., 0:2]

     true_boxes[..., 0:2] = boxes_xy/input_shape[::-1]

     true_boxes[..., 2:4] = boxes_wh/input_shape[::-1]

     m = true_boxes.shape[0]

     grid_shapes = [input_shape//{0:32, 1:16, 2:8}[l] for l in range(num_layers)]

     y_true = [np.zeros((m,grid_shapes[l][0],grid_shapes[l][1],len(anchor_mask[l]),5+num_classes),

         dtype='float32') for l in range(num_layers)]

     # Expand dim to apply broadcasting.

     anchors = np.expand_dims(anchors, 0)

     anchor_maxes = anchors / 2.

     anchor_mins = -anchor_maxes

     valid_mask = boxes_wh[..., 0]>0

     for b in range(m):

         # Discard zero rows.

         wh = boxes_wh[b, valid_mask[b]]

         if len(wh)==0: continue

         # Expand dim to apply broadcasting.

         wh = np.expand_dims(wh, -2)

         box_maxes = wh / 2.

         box_mins = -box_maxes

         intersect_mins = np.maximum(box_mins, anchor_mins)

         intersect_maxes = np.minimum(box_maxes, anchor_maxes)

         intersect_wh = np.maximum(intersect_maxes - intersect_mins, 0.)

         intersect_area = intersect_wh[..., 0] * intersect_wh[..., 1]

         box_area = wh[..., 0] * wh[..., 1]

         anchor_area = anchors[..., 0] * anchors[..., 1]

         iou = intersect_area / (box_area + anchor_area - intersect_area)

         # Find best anchor for each true box

         best_anchor = np.argmax(iou, axis=-1)

         '''获取最大Iou的那个anchor'''

         for t, n in enumerate(best_anchor):

             for l in range(num_layers):

                 if n in anchor_mask[l]:

                     i = np.floor(true_boxes[b,t,0]*grid_shapes[l][1]).astype('int32')

                     j = np.floor(true_boxes[b,t,1]*grid_shapes[l][0]).astype('int32')

                     k = anchor_mask[l].index(n)

                     c = true_boxes[b,t, 4].astype('int32')

                     y_true[l][b, j, i, k, 0:4] = true_boxes[b,t, 0:4]

                     y_true[l][b, j, i, k, 4] = 1

                     y_true[l][b, j, i, k, 5+c] = 1

     return y_true
YOLOV3算法详解的更多相关文章
- BM算法 Boyer-Moore高质量实现代码详解与算法详解
Boyer-Moore高质量实现代码详解与算法详解 鉴于我见到对算法本身分析非常透彻的文章以及实现的非常精巧的文章,所以就转载了,本文的贡献在于将两者结合起来,方便大家了解代码实现! 算法详解转自:h ...
- kmp算法详解
转自:http://blog.csdn.net/ddupd/article/details/19899263 KMP算法详解 KMP算法简介: KMP算法是一种高效的字符串匹配算法,关于字符串匹配最简 ...
- 机器学习经典算法详解及Python实现--基于SMO的SVM分类器
原文:http://blog.csdn.net/suipingsp/article/details/41645779 支持向量机基本上是最好的有监督学习算法,因其英文名为support vector ...
- [转] KMP算法详解
转载自:http://www.matrix67.com/blog/archives/115 KMP算法详解 如果机房马上要关门了,或者你急着要和MM约会,请直接跳到第六个自然段. 我们这里说的K ...
- 【转】AC算法详解
原文转自:http://blog.csdn.net/joylnwang/article/details/6793192 AC算法是Alfred V.Aho(<编译原理>(龙书)的作者),和 ...
- KMP算法详解(转自中学生OI写的。。ORZ!)
KMP算法详解 如果机房马上要关门了,或者你急着要和MM约会,请直接跳到第六个自然段. 我们这里说的KMP不是拿来放电影的(虽然我很喜欢这个软件),而是一种算法.KMP算法是拿来处理字符串匹配的.换句 ...
- EM算法详解
EM算法详解 1 极大似然估计 假设有如图1的X所示的抽取的n个学生某门课程的成绩,又知学生的成绩符合高斯分布f(x|μ,σ2),求学生的成绩最符合哪种高斯分布,即μ和σ2最优值是什么? 图1 学生成 ...
- Tarjan算法详解
Tarjan算法详解 今天偶然发现了这个算法,看了好久,终于明白了一些表层的知识....在这里和大家分享一下... Tarjan算法是一个求解极大强联通子图的算法,相信这些东西大家都在网络上百度过了, ...
- 安全体系(二)——RSA算法详解
本文主要讲述RSA算法使用的基本数学知识.秘钥的计算过程以及加密和解密的过程. 安全体系(零)—— 加解密算法.消息摘要.消息认证技术.数字签名与公钥证书 安全体系(一)—— DES算法详解 1.概述 ...
随机推荐
- native-echarts 组件封装
CommunalChart.js /** * 封装 图表组件 */ import React, { Component } from 'react'; import { StyleSheet, Tex ...
- 术语-EDI:EDI
ylbtech-术语-EDI:EDI 电子数据交换(Electronic data interchange,缩写EDI)是指按照同一规定的一套通用标准格式,将标准的经济信息,通过通信网络传输,在贸易伙 ...
- 用Vue来实现音乐播放器(二十):Vuex初始化及歌手数据的配置
state:所有组件的所有状态和数据 放入同一个内存空间去管理 我们把它称为state Vue Components:state里面的数据可以方便的映射到组件上 然后渲染组件 Actions:当组件 ...
- Vue实战:音乐播放器(一) 页面效果
先看一下效果图 首页 歌单详情页 歌手列表 歌手详情页 排行页面 榜单的详情页(排序样式) 搜索页面 搜索结果 播放器内核 歌词自动滚动 播放列表 用户中心
- flask_sqlalchemy和sqlalchemy的区别有哪些?
概要的说: SQLAlchemy是python社区使用最广泛的ORM之一,SQL-Alchmy直译过来就是SQL炼金术. Flask-SQLAlchemy集成了SQLAlchemy,它简化了连接数据库 ...
- 关于 token
用户在浏览器做一系列操作,后台服务怎么判断这些操作是来自同一个用户? 1. seesion 用户登录后,后台生成 sessionid 返回给浏览器,浏览器的每次请求带上 sessionid,后台关联 ...
- Delphi XE2 之 FireMonkey 入门(14) - 滤镜: 概览
相关单元: FMX.Filter FMX.FilterCatBlur FMX.FilterCatGeometry FMX.FilterCatTransition FMX_FilterCatColor ...
- 阶段1 语言基础+高级_1-3-Java语言高级_06-File类与IO流_04 IO字节流_4_字节输出流写入数据到文件
数据由内存写入到硬盘中 构造函数传的路径是一个相对路径.有异常需要捕获异常 释放资源 这三个方法,都有异常 IO异常是父类,所以这里只需要抛出IO异常就可以了. 运行程序.目录内多了个a.txt文件 ...
- http://bbs.csdn.net/topics/340046630 dbgrid怎么获取当前记录值
这根grid无关,当你选中一条记录时,数据集就定位到这条数据上了,你只需要读取数据集中的数据就行了 对我有用[0] 丢个板砖[0] 引用 | 举报| 管理 hongss hongss 本版等级: ...
- 浅谈WebService开发三(动态调用WebService)转
在前两讲里,我已经向大家演示了如何使用WebService.同步, 异步调用WebService,而在实际开发过程中,可能会有多个WebService接口供你选择,而在程序执行过程中才决定使用哪一个 ...