
centos7下安装storm步骤
前言
真是后知后觉,最近忙也要学习,把以前丢的都要拾起来。原理懂不懂也把环境搭起来学习。
环境
centos7
jdk 1.8
zookeeper 3.4.13
storm 1.2.2
安装
1.zookeeper安装
我装了三台虚拟机,配置如下:
jdk配置
vi /etc/profile

#java config

export JAVA_HOME=/opt/jdk/jdk1..0_201

export JRE_HOME=$JAVA_HOME/jre

export CLASSPATH=$JAVA_HOME/lib:$JRE_HOME/lib:$CLASSPATH

export PATH=$JAVA_HOME/bin:$JRE_HOME/bin:$PATH
设置静态ip
vi /etc/sysconfig/network-scripts/ifcfg-ens33

TYPE=Ethernet

PROXY_METHOD=none

BROWSER_ONLY=no

BOOTPROTO=static

DEFROUTE=yes

IPV4_FAILURE_FATAL=no

IPV6INIT=yes

IPV6_AUTOCONF=yes

IPV6_DEFROUTE=yes

IPV6_FAILURE_FATAL=no

IPV6_ADDR_GEN_MODE=stable-privacy

NAME=ens33

UUID=--454f--d09dfde88267

DEVICE=ens33

ONBOOT=yes

IPADDR=192.168.5.201/202/203

GATEWAY=192.168.5.1

DNS1=114.114.114.114

DNS2=8.8.8.8
设置hosts,方便使用
vi /etc/hosts

192.168.5.201 centos01

192.168.5.202 centos02

192.168.5.203 centos03
机器配置好了,我们开始安装zookeeper
vi zoo.cfg

# The number of milliseconds of each tick

tickTime=

# The number of ticks that the initial

# synchronization phase can take

initLimit=

# The number of ticks that can pass between

# sending a request and getting an acknowledgement

syncLimit=

# the directory where the snapshot is stored.

# do not use /tmp for storage, /tmp here is just

# example sakes.

dataDir=/opt/zookeeper/data

# the port at which the clients will connect

clientPort=

# the maximum number of client connections.

# increase this if you need to handle more clients

#maxClientCnxns=

#

# Be sure to read the maintenance section of the

# administrator guide before turning on autopurge.

#

# http://zookeeper.apache.org/doc/current/zookeeperAdmin.html#sc_maintenance

#

# The number of snapshots to retain in dataDir

#autopurge.snapRetainCount=

# Purge task interval in hours

# Set to "" to disable auto purge feature

#autopurge.purgeInterval=

server.=centos01::

server.=centos02::

server.=centos03::
vi /etc/profile

# zookeeper

export ZK_HOME=/opt/zookeeper/zookeeper-3.4.

export PATH=$ZK_HOME/bin:$PATH
2.storm安装
nimbus上的配置
########### These MUST be filled in for a storm configuration

storm.zookeeper.servers:

     - "centos01"

     - "centos02"

     - "centos03"

#

# nimbus.seeds: ["host1", "host2", "host3"]

#

#

# ##### These may optionally be filled in:

storm.local.dir: "/usr/data/storm"

supervisor.slots.ports:

     - 6700

     - 6701

     - 6702

nimbus.host: "centos01"

## List of custom serializations

# topology.kryo.register:

#     - org.mycompany.MyType

#     - org.mycompany.MyType2: org.mycompany.MyType2Serializer

#

## List of custom kryo decorators

# topology.kryo.decorators:

#     - org.mycompany.MyDecorator

#

## Locations of the drpc servers

drpc.servers:

     - "centos01"

#     - "server2"

worker.childopts: "-Xmx2048m"
supervisor上的配置
########### These MUST be filled in for a storm configuration

storm.zookeeper.servers:

     - "centos01"

     - "centos02"

     - "centos03"

#

# nimbus.seeds: ["host1", "host2", "host3"]

#

#

# ##### These may optionally be filled in:

storm.local.dir: "/usr/data/storm"

supervisor.slots.ports:

     - 6700

     - 6701

     - 6702

nimbus.host: "centos01"

## List of custom serializations

# topology.kryo.register:

#     - org.mycompany.MyType

#     - org.mycompany.MyType2: org.mycompany.MyType2Serializer

#

## List of custom kryo decorators

# topology.kryo.decorators:

#     - org.mycompany.MyDecorator

#

## Locations of the drpc servers

drpc.servers:

     - "centos01"

#     - "server2"

worker.childopts: "-Xmx2048m"

## Metrics Consumers

## max.retain.metric.tuples

## whitelist / blacklist

## - you can specify multiple whitelist / blacklist with regular expression

## expandMapType: expand metric with map type as value to multiple metrics

## - set to true when you would like to apply filter to expanded metrics

## - default value is false which is backward compatible value

## - only effective when expandMapType is set to true

# topology.metrics.consumer.register:

     - "centos02"

     - "centos03"

#

# nimbus.seeds: ["host1", "host2", "host3"]

#

#

# ##### These may optionally be filled in:

storm.local.dir: "/usr/data/storm"

supervisor.slots.ports:

     - 6700

     - 6701

     - 6702

nimbus.host: "centos01"

## List of custom serializations

# topology.kryo.register:

#     - org.mycompany.MyType

#     - org.mycompany.MyType2: org.mycompany.MyType2Serializer

#

## List of custom kryo decorators

# topology.kryo.decorators:

#     - org.mycompany.MyDecorator

#

## Locations of the drpc servers

drpc.servers:

     - "centos01"

#     - "server2"

worker.childopts: "-Xmx2048m"
vi /etc/profile

# storm

export STORM_HOME=/opt/apache-storm-1.2.

export PATH=${STORM_HOME}/bin:$PATH
配置好后,我们开始启动吧!
先启动zookeeper
zkServer.sh start

[root@centos03 bin]# zkServer.sh status

ZooKeeper JMX enabled by default

Using config: /opt/zookeeper/zookeeper-3.4./bin/../conf/zoo.cfg

Mode: leader
再启动storm
nimbus上启动

./storm nimbus >> /dev/null &

storm drpc >> /dev/null &

storm ui >> /dev/null &

supervisor上启动

storm supervisor >> /dev/null &
在我实体电脑上访问http://192.168.5.201:8080时找不到网页,是防火墙的事
firewall-cmd --zone=public --add-port=/tcp --permanent
firewall-cmd --reload
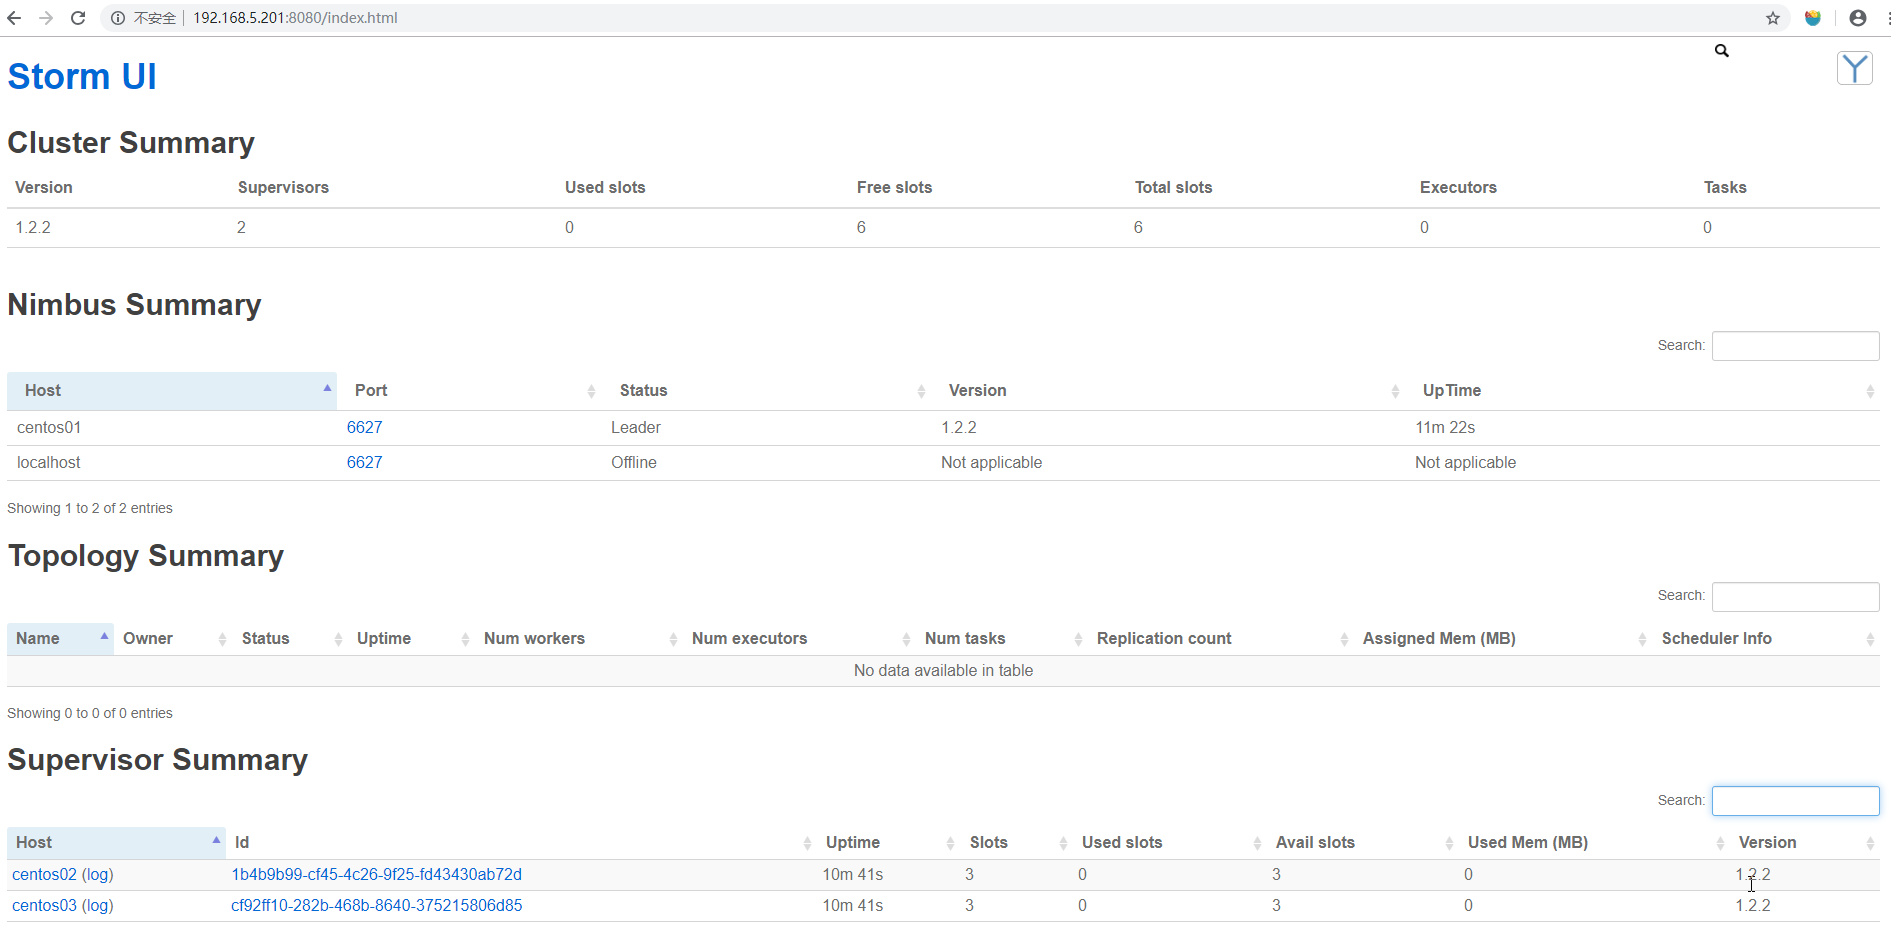
好了!
centos7下安装storm步骤的更多相关文章
- linux系统,在centos7环境下安装jdk步骤
记录一下安装jdk1.8版本的出错过程: 按照这个博客内容安装的,以及修改文件权限博客 [Linux]CentOS7下安装JDK详细过程 [Linux]目录文件权限的查看和修改[转] 1.安装的jdk ...
- centOS7下安装GUI图形界面
1.如何在centOS7下安装GUI图形界面 当你安装centOS7服务器版本的时候,系统默认是不会安装GUI的图形界面程序,这个需要手动安装CentOS7 Gnome GUI包. 2.在系统下使用命 ...
- docker(一) Centos7下安装docker
docker(一) Centos7下安装dockerdocker(二) windows10下安装dockerdocker(三) 镜像和容器常用命令 docker(四) 使用Dockerfile构建镜像 ...
- centos7下安装指定版本mysql5.7.23
现在mysql版本已经到MySQL 8.0(GA)稳定版本了,所以需求是想简单又快速在centos7下安装指定版本例如MySQL 5.7(GA)版本有下面这种方法 首先需要到mysql官网这里下载对应 ...
- CentOS7 下安装 iSCSI Target(tgt) ,使用 Ceph rbd
目录 一.iSCSI 介绍 1. iSCSI 定义 2. 几种常见的 iSCSI Target 3. 优缺点比较 二.安装步骤 1. 关闭防火墙 2. 关闭selinux 3. 通过 yum 安装 t ...
- Docker学习之Centos7下安装
Docker学习之Centos7下安装 centos7 64下直接使用yum安装docker环境,步骤如下: 卸载旧版本docker sudo yum remove docker docker-com ...
- 【python3】——centos7下安装
centos7下安装python3总步骤分三步: 一.依赖解决: 1.安装依赖包: yum install zlib-devel bzip2-devel openssl-devel ncurses-d ...
- centos7下安装zookeeper&zookeeper集群的搭建
一.centos7下安装zookeeper 1.zookeeper 下载地址 https://mirrors.tuna.tsinghua.edu.cn/apache/zookeeper/ 2.安装步骤 ...
- CentOS7 下 安装 supervisor以及使用
CentOS7 下 安装 supervisor 以及使用 手动安装 [注] linux环境必须安装 python 1.获取supervisor包:[https://pypi.python.org/py ...
随机推荐
- 像计算机科学家一样思考python-第2章 变量、表达式和语句
感想: 1.程序出现语义错误时,画状态图是一个很好的调试办法.打印出关键变量在不同代码处理后值的变化,就能发现问题的蛛丝马迹. 2.每当学习新语言特性时,都应当在交互模式中进行尝试,并故意犯下错误,看 ...
- Linux_Bash常用脚本
目录 目录 从用户列表中过滤用户名并创建用户 awktrcut 指令的文本处理 tr指令 cut指令 awk指令 备份文件 测试LFTPServer权限设定 开启Httpd 安装Httpd 批量创建用 ...
- Jquery.extend()和jQuery.fn.extend(object);
摘自: jquery $.fn $.fx是什么意思有什么用_jquery_脚本之家 jQuery.extend(object); 为扩展jQuery类本身.为类添加新的方法. jQuery.fn.ex ...
- delphi 牛逼 了 app (已在软件界掀起波澜)10分钟10行代码做出让人惊叹的程序
(已在软件界掀起波澜)10分钟10行代码做出让人惊叹的程序 http://v.qq.com/x/page/m0328h73bs7.html?ptag=bbs_csdn_net
- hdu6575Budget
Problem Description Avin’s company has many ongoing projects with different budgets. His company rec ...
- 动态规划-递推-HDU2048
传送门:http://acm.hdu.edu.cn/showproblem.php?pid=2048 全错=全不匹配 设当前全错的个数是dp[n] 那么前(n-1)个全错的话,第n个数就可以从前(n- ...
- 关于this、Echarts中的data
this是指当前对象 移除class的jQuery代码:$('ur.nav li:eq(0)').removeClass('active') 添加class的jQuery代码:$('ur.nav li ...
- Windows下通过GitHub+Hexo搭建个人博客的步骤
Windows下通过GitHub+Hexo搭建个人博客的步骤 https://blog.csdn.net/namechenfl/article/details/90442312 https://bl ...
- Kafka、ActiveMQ、RabbitMQ、RocketMQ 都有什么区别,消息队列有什么优点和缺点
面试题 为什么使用消息队列? 消息队列有什么优点和缺点? Kafka.ActiveMQ.RabbitMQ.RocketMQ 都有什么区别,以及适合哪些场景? 面试官心理分析 其实面试官主要是想看看: ...
- 攻防世界--logmein
测试文件:https://adworld.xctf.org.cn/media/task/attachments/a00849bb514c413f8a6526f6bb56c628 1.准备 得到信息 6 ...