【Django】一对多表结构
1.创建project数据库表
INSTALLED_APPS = [

    'django.contrib.admin',

    'django.contrib.auth',

    'django.contrib.contenttypes',

    'django.contrib.sessions',

    'django.contrib.messages',

    'django.contrib.staticfiles',

    'app01',       #新增app

]
配置settings.py
from django.db import models

# Create your models here.

class Business(models.Model):

    # id    系统默认id列,自增,主键

    caption = models.CharField(max_length=32)  # 32表示字符长度

class Host(models.Model):

    nid = models.AutoField(primary_key=True)

    hostname = models.CharField(max_length=64,db_index=True)

    ip = models.GenericIPAddressField(protocol='ipv4',db_index=True)

    port = models.IntegerField()

    b = models.ForeignKey(to='Business',to_field='id')
app01/models.py 创建两个简单的数据库表,通过ForeignKey外键关联
运行:

python manage.py makemigrations

python manage.py migrate
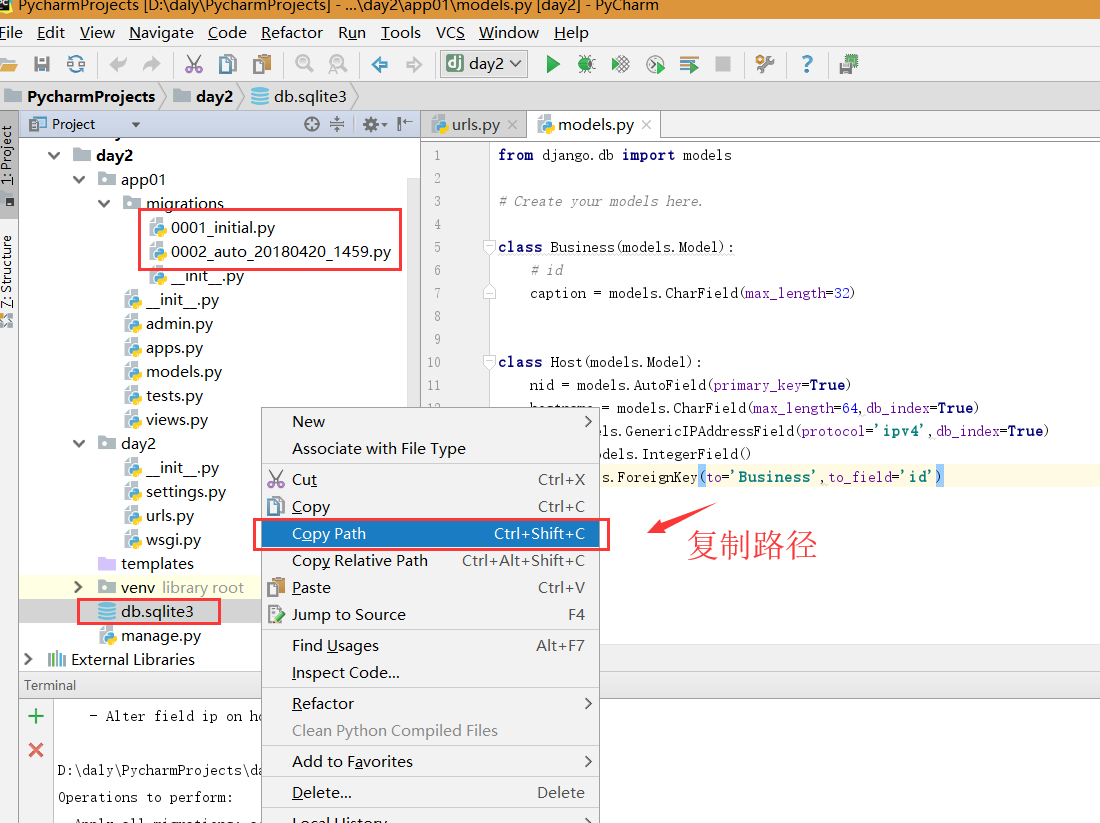
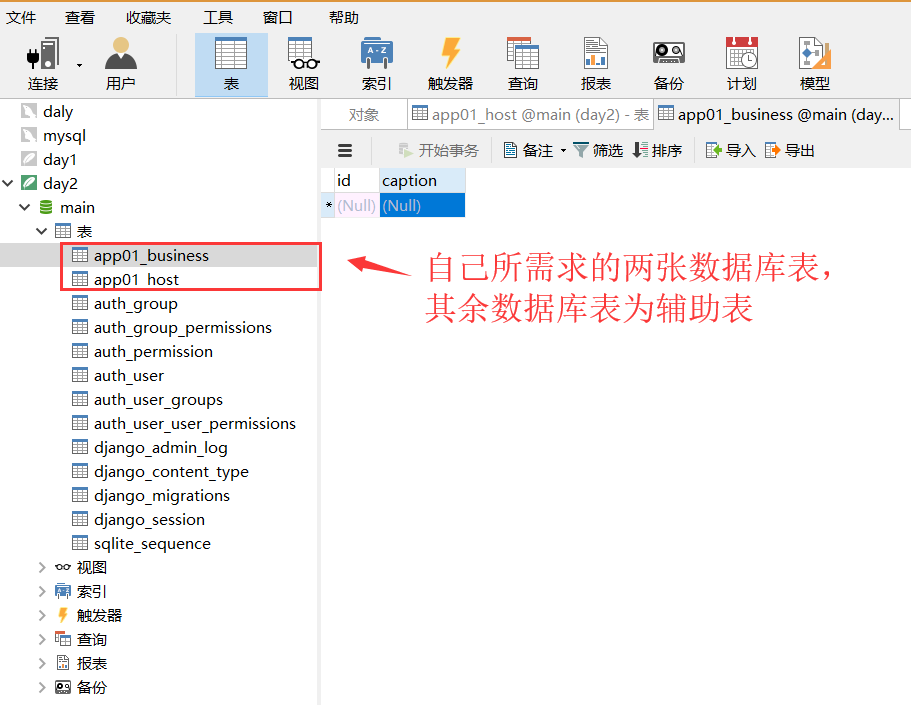
Ok后,使用Navicat Premium软件方可查看!
2.操作数据库表
运行Navicat
点击连接,使用SQLite抓取数据
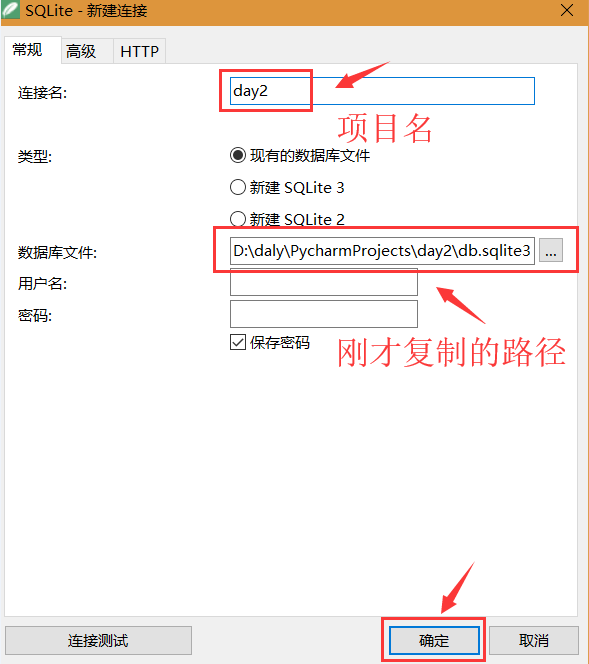
点击确认
获取单表单数据的三种方式
from django.contrib import admin

from django.conf.urls import url

from app01 import views

urlpatterns = [

    url(r'^admin/', admin.site.urls),

    url(r'^business/', views.business),

]
project/urls
from django.shortcuts import render,HttpResponse,redirect

from app01 import models

# Create your views here.

def business(requset):

    v1 = models.Business.objects.all()

    #QuerySet

    #[obj(id,caption,code),obj(id,caption,code),obj(id,caption,code)]

    v2 = models.Business.objects.all().values('id','caption')

    # QuerySet

    # [{'id':1,'caption':'苹果'},{'id':2,'caption':''香蕉},{'id':3,'caption':'菠萝'},{'id':4,'caption':'梨子'}]

    v3 = models.Business.objects.all().values_list('id','caption')

    # QuerySet

    # [(0,苹果),(2,香蕉)]

    return render(requset,'business.html',{'v1':v1,'v2':v2,'v3':v3})
app01/views.py
from django.db import models

# Create your models here.

class Business(models.Model):

    # id

    caption = models.CharField(max_length=32)

    code = models.CharField(max_length=32,null=True,default='apple')
app01/models.py
<!DOCTYPE html>

<html lang="en">

<head>

    <meta charset="UTF-8">

    <title>Title</title>

</head>

<body>

    <h1>业务线列表(列表)</h1>

    <ul>

        {% for row in v1 %}

            <li>{{ row.id }}-{{ row.caption }}-{{ row.code }}</li>

        {% endfor %}

    </ul>

    <h1>业务线列表(字典)</h1>

    <ul>

        {% for row in v2 %}

            <li>{{ row.id }}-{{ row.caption }}</li>

        {% endfor %}

    </ul>

    <h1>业务线列表(元组)</h1>

    <ul>

        {% for row in v3 %}

            <li>{{ row.0 }}-{{ row.1 }}</li>

        {% endfor %}

    </ul>

</body>

</html>
templates/business.html
效果图

一对多跨表操作(第一种)
from django.contrib import admin

from django.conf.urls import url

from app01 import views

# from django.urls import path

urlpatterns = [

    url(r'^admin/', admin.site.urls),

    url(r'^business/', views.business),

    url(r'^host/', views.host),  #在business基础上

]
project/urls.py
from django.db import models

# Create your models here.

class Business(models.Model):

    # id

    caption = models.CharField(max_length=32)

    code = models.CharField(max_length=32,null=True,default='apple')

class Host(models.Model):

    nid = models.AutoField(primary_key=True)

    hostname = models.CharField(max_length=64,db_index=True)

    ip = models.GenericIPAddressField(protocol='ipv4',db_index=True)

    port = models.IntegerField()

    b = models.ForeignKey(to='Business',to_field='id')
app01/models.py
from django.shortcuts import render,HttpResponse,redirect
from app01 import models
# Create your views here. def host(request):
v1 = models.Host.objects.filter(nid__gt=0)
#for row in v1:
#print(row.nid,row.hostname,row.ip,row.port,row.b_id,row.b.id,row.b.caption,row.b.code,sep='\t') # return HttpResponse('戴利祥')
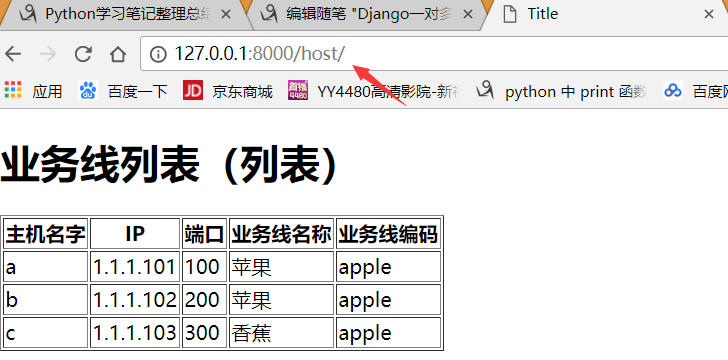
return render(request,'host.html',{'v1': v1})
app01/views.py
<!DOCTYPE html>

<html lang="en">

<head>

    <meta charset="UTF-8">

    <title>Title</title>

</head>

<body>

    <h1>业务线列表(列表)</h1>

    <table border="">

        <thead>

            <tr>

                <th>主机名字</th>

                <th>IP</th>

                <th>端口</th>

                <th>业务线名称</th>

                <th>业务线编码</th>

            </tr>

        </thead>

        <tbody>

            {% for row in v1 %}

                 <tr aa="{{ row.nid }}" ab="{{ row.b.id }}">

                     <td>{{ row.hostname }}</td>

                     <td>{{ row.ip }}</td>

                     <td>{{ row.port }}</td>

                     <td>{{ row.b.caption }}</td>

                     <td>{{ row.b.code }}</td>

                 </tr>

            {% endfor %}

        </tbody>

    </table>

</body>

</html>
templates/host.html
效果图:
一对多跨表操作(第二种,第三种):
def host(request):

    v1 = models.Host.objects.filter(nid__gt=0)

    for row in v1:

        print(row.nid,row.hostname,row.ip,row.port,row.b_id,row.b.id,row.b.caption,row.b.code,sep='\t')

    v2 = models.Host.objects.filter(nid__gt=0).values('nid','hostname','b_id','b__caption') #获取到的值为字典

    # print(v2)

    for row in v2:

        print(row['nid'],row['hostname'],row['b_id'],row['b__caption'])

    v3 = models.Host.objects.filter(nid__gt=0).values_list('nid','hostname','b_id','b__caption') #获取到的值为元组

    # #print(v3)

    for row in v3:

         print(row)

    # return HttpResponse('你好')

    return render(request,'host.html',{'v1': v1, 'v2':v2 ,'v3':v3})
app01/views.py
print输出结果:
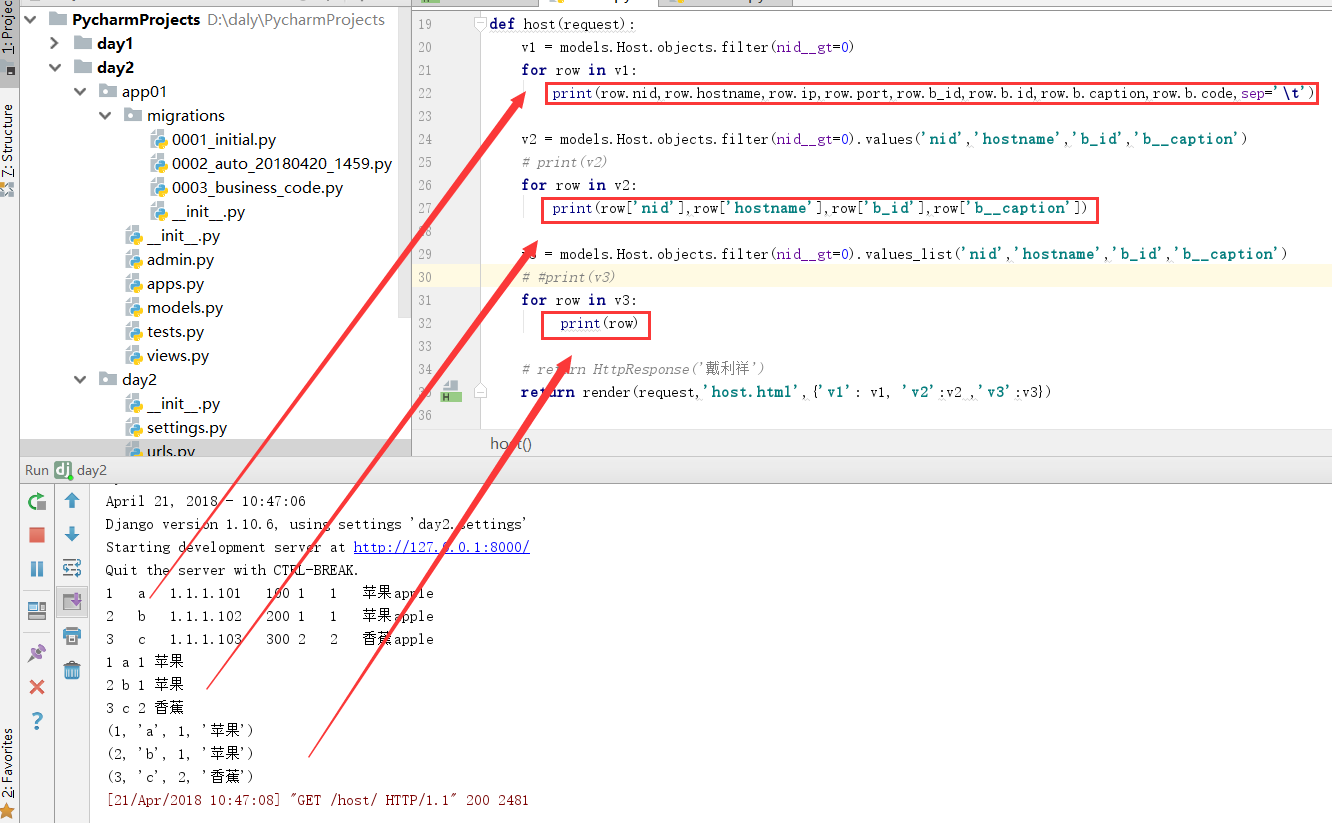
刷新:http://127.0.0.1:8000/host/

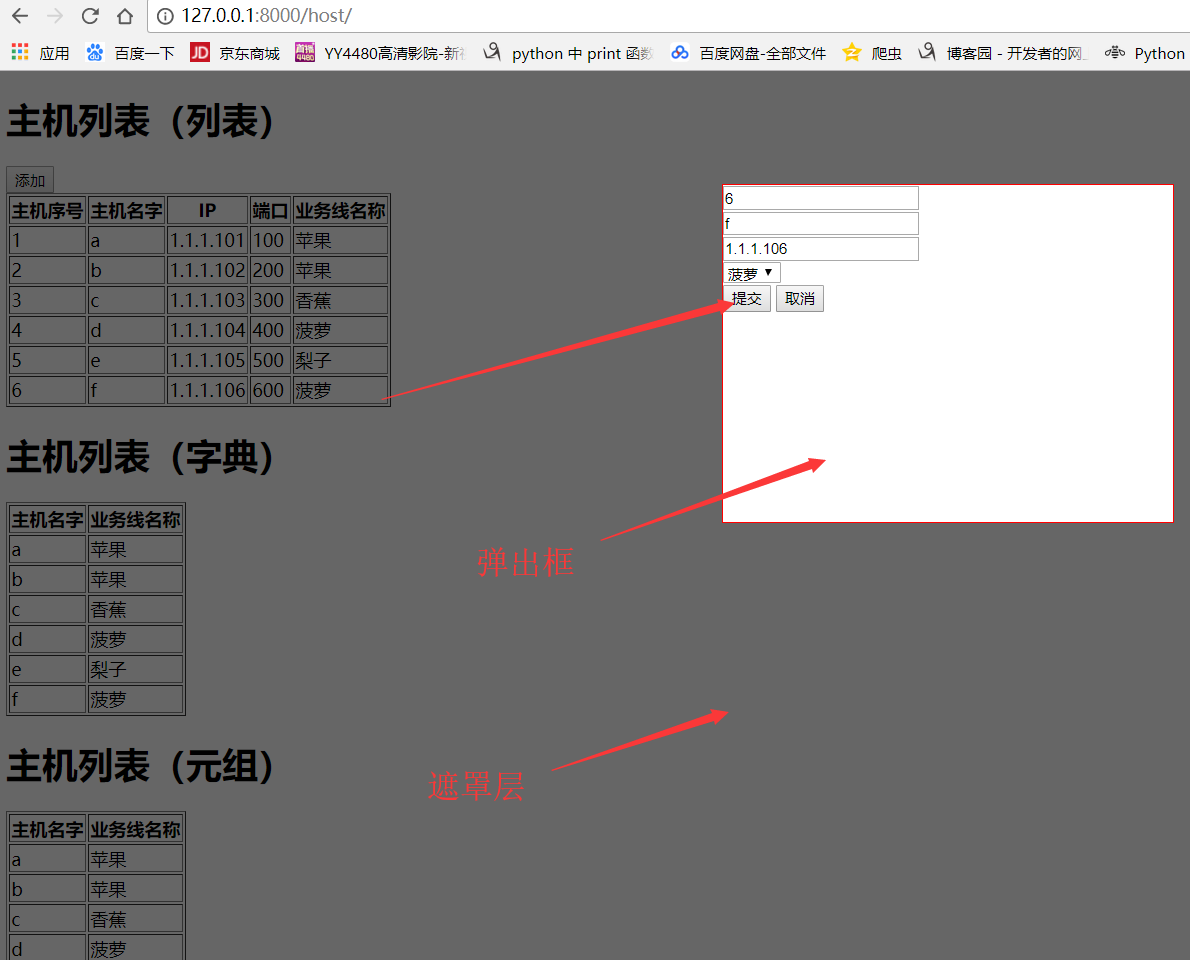
模拟对话框增加一对多数据示例
from django.shortcuts import render,HttpResponse,redirect

from app01 import models

# Create your views here.

def business(requset):

    v1 = models.Business.objects.all()

    #QuerySet

    #[obj(id,caption,code),obj(id,caption,code),obj(id,caption,code)]

    v2 = models.Business.objects.all().values('id','caption')

    # QuerySet

    # [{'id':1,'caption':'苹果'},{'id':2,'caption':''香蕉},{'id':3,'caption':'菠萝'},{'id':4,'caption':'梨子'}]

    v3 = models.Business.objects.all().values_list('id','caption')

    # QuerySet

    # [(0,苹果),(2,香蕉)]

    return render(requset,'business.html',{'v1':v1,'v2':v2,'v3':v3})

def host(request):

    if request.method == 'GET':

        v1 = models.Host.objects.filter(nid__gt=0)

        v2 = models.Host.objects.filter(nid__gt=0).values('nid','hostname','b_id','b__caption')

        v3 = models.Host.objects.filter(nid__gt=0).values_list('nid','hostname','b_id','b__caption')

        b_list= models.Business.objects.all()

        return render(request,'host.html',{'v1': v1, 'v2':v2 , 'v3':v3 ,'b_list':b_list})

    elif request.method == 'POST':

        h = request.POST.get('hostname')

        i = request.POST.get('ip')

        p = request.POST.get('port')

        b = request.POST.get('b_id')

        # models.Host.objects.create(hostname=h,

        #                            ip=i,

        #                            port=p,

        #                            b=models.Business.objects.get(id=b)

        #                            )

        models.Host.objects.create(hostname=h,

                                   ip=i,

                                   port=p,

                                   b_id=b,

                                    )

        return redirect('/host')   #以get分方式重新访问http://127.0.0.1:8000/host/
app01/views.py
<!DOCTYPE html>

<html lang="en">

<head>

    <meta charset="UTF-8">

    <title>Title</title>

    <style>

        .hide{

            display: none;

        }

        .shade{

            position: fixed;

            top: 0;

            right:0 ;

            left: 0;

            bottom: 0;

            background: black;

            opacity: 0.6;

            z-index: 100;

        }

        .add-modal{

            position: fixed;

            height: 300px;

            width: 400px;

            top: 100px;

            left: 50%;

            z-index: 101;

            border: 1px solid red;

            background: white;

            margin-left: -200px;

        }

    </style>

</head>

<body>

    <h1>主机列表(列表)</h1>

    <div>

        <input id="add_host" type="button" value="添加"/>    <!--模态对话框-->

    </div>

    <table border="">

        <thead>

            <tr>

                <th>主机序号</th>

                <th>主机名字</th>

                <th>IP</th>

                <th>端口</th>

                <th>业务线名称</th>

            </tr>

        </thead>

        <tbody>

            {% for row in v1 %}

                <tr aa="{{ row.nid }}" ab="{{ row.b.id }}" ac="{{ row.b.code }}">

                    <td>{{ forloop.counter }}</td>

                    <td>{{ row.hostname }}</td>

                    <td>{{ row.ip }}</td>

                    <td>{{ row.port }}</td>

                    <td>{{ row.b.caption }}</td>

                </tr>

            {% endfor %}

        </tbody>

    </table>

    <h1>主机列表(字典)</h1>

    <table border="">

        <thead>

        <tr>

            <th>主机名字</th>

            <th>业务线名称</th>

        </tr>

        </thead>

        <tbody>

        {% for row in v2 %}

            <tr aa="{{ row.nid }}" ab="{{ row.b__id }}">

                <td>{{ row.hostname }}</td>

                <td>{{ row.b__caption }}</td>

            </tr>

        {% endfor %}

        </tbody>

    </table>

    </table>

    <h1>主机列表(元组)</h1>

    <table border="">

        <thead>

        <tr>

            <th>主机名字</th>

            <th>业务线名称</th>

        </tr>

        </thead>

        <tbody>

        {% for row in v3 %}

            <tr aa="{{ row.0 }}" ab="{{ row.2}}">

                <td>{{ row.1 }}</td>

                <td>{{ row.3 }}</td>

            </tr>

        {% endfor %}

        </tbody>

    </table>

    <div class="shade hide"></div>               <!--遮罩层,全屏-->

    <div class="add-modal hide">                 <!--弹出框-->

        <form method="POST" action="/host/">    <!--编辑弹出框内容-->

            <div class="group">

                <input type="text" placeholder="主机名" name="hostname"/>

            </div>

            <div class="group">

                <input type="text" placeholder="IP" name="ip"/>

            </div>

            <div class="group">

                <input type="text" placeholder="端口" name="port"/>

            </div>

            <div class="group">

                <select name="b_id">

                    {% for op in b_list %}

                    <option value="{{ op.id }}">{{ op.caption }}</option>

                    {% endfor %}

                </select>

            </div>

            <input type="submit" value="提交"/>

            <input id="cancel" type="button" value="取消"/>

        </form>

    </div>

    <script src="/static/jquery-1.12.4.js"></script>    <!--JS文件-->

    <script>

        $(function () {                                     <!--页面框架加载完成-->

            $('#add_host').click(function () {              <!--绑定事件-->

                $('.shade,.add-modal').removeClass('hide'); <!--点击添加按钮,呼出遮罩层与弹出框-->

            });

            $('#cancel').click(function () {

                $('.shade,.add-modal').addClass('hide');

            });

        })

    </script>

</body>

</html>
templates/host.html
新增static/jquery-1.12.4.js 文件
https://files.cnblogs.com/files/dalyday/jquery-1.12.4.js
【Django】一对多表结构的更多相关文章
- django migrate生成表结构DateTimeField 类型加了6位精度别的框架无法调用的问题?
背景介绍 django migrate 生成表结构时,对于DateTimeField 类型的处理是加了6位精度的,只用django处理是没有任何问题的,但是如何别的框架来读取这种字段会读取不到该字段值 ...
- python 全栈开发,Day98(路飞学城背景,django ContentType组件,表结构讲解)
昨日内容回顾 1. 为什么要做前后端分离? - 前后端交给不同的人来编写,职责划分明确. - API (IOS,安卓,PC,微信小程序...) - vue.js等框架编写前端时,会比之前写jQuery ...
- mysql一对多表结构,查询一的信息的同时统计多的数量
res_resource_catalog表对于res_info_item表是一对多, 查询res_resource_catalog信息的同时,统计res_info_item中该条res_resourc ...
- Python - Django - ORM 一对一表结构
当一张表的某一些字段查询的比较频繁,另外一些字段查询的不是特别频繁,可以把不怎么常用的字段 单独拿出来做成一张表,然后用一对一的表关联起来 这样既保证数据都完整的保存下来,又能保证检索更快 model ...
- djangoORM 修改表结构/字段/外键操作
Django支持修改表结构 把max_length=64 改为60 再执行一遍 python manage.py makemigrations python manage.py migrate 如果是 ...
- Django中的Model(表结构)
Model(表设计) 在这里只提经常用到的三种联表结构: 一对多:models.ForeignKey(其他表) 多对多:models.ManyToManyField(其他表) 一对一:models.O ...
- django 表结构
django 表结构 一:查看orm写的sq语句:如果对某个语句不清楚的话可以调用queryset的的query方法来查看sql. 1 obj=Hostinfo.objects.filter(id=v ...
- Django模型系统——ORM表结构对应关系
对于数据库来说一般表结构只会有三种对应关系,分别是一对一.一对多和多对一,下面分别介绍: 1.一对多 何为一对多,例如一个学生只可能有一个班级,一个班级却又多个学生,班级表和学生表就是一对多的关系. ...
- Django models文件模型变更注意事项(表结构的修改)
表结构的修改 1.表结构修改后,原来表中已存在的数据,就会出现结构混乱,makemigrations更新表的时候就会出错 比如第一次建模型,漏了一个字段,后来补上了.(经常遇到模型字段修改) 重新ma ...
随机推荐
- redis数据结构、持久化、缓存淘汰策略
Redis 单线程高性能,它所有的数据都在内存中,所有的运算都是内存级别的运算,而且单线程避免了多线程的切换性能损耗问题.redis利用epoll来实现IO多路复用,将连接信息和事件放到队列中,依次放 ...
- linux 网络基础之IP地址
IP是英文Internet Protocol的缩写,意思是“网络之间互连的协议”,也就是为计算机网络相互连接进行通信而设计的协议. IP地址类型分为:公有地址.私有地址. 公有地址 公有地址(Publ ...
- Delphi - cxGrid添加DB Banded Table
cxGrid添加DB Banded Table 添加操作 1:单击cxGrid Customize... ; 2:右击cxGridLevel1,选择DB Banded Table. 属性设置: 1 ...
- 设置VS2015背景图片(转载)
设置方法很简单:安装扩展ClaudiaIDE 1.在这里下载扩展,https://visualstudiogallery.msdn.microsoft.com/9ba50f8d-f30c-4e33-a ...
- SPSS数据分析方法不知道如何选择
一提到数学,高等数学,线性代数,概率论与数理统计,数值分析,空间解析几何这些数学课程,头疼呀.作为文科生,遇见这些课程时,通常都是各种寻求帮助,班上有位宅男数学很厉害,各种被女生‘围观’,这数学为 ...
- 洛谷 P1514 【引水入城】
题库 :洛谷 题号 :1514 题目 :引水入城 link :https://www.luogu.org/problemnew/show/P1514 思路 :搜索从第一排开始能覆盖最后一排的区间L ~ ...
- HTML(四)图像,表格
HTML 图像 插入动图的语法和静态图的语法是一样的 HTML 图像- 图像标签( )和源属性(Src) 一个来自文件夹中的图像: 一个来自网站的图像: alt 属性用来为图像定义一串预备的可替换的文 ...
- B-generator 1_2019牛客暑期多校训练营(第五场)
题意 给出\(x0,x1,a,b\), \(x_i = a\cdot x_{i-1} + b\cdot x_{i-2}\),问\(x_n取模mod\) 题解 用十进制快速幂,二进制快速幂是每到下一位就 ...
- ACdream1726-A Math game+(DFS+二分)+(DFS+前缀和)
传送门 官方题解:http://acdream.info/topic?tid=4246 参考:https://www.cnblogs.com/nowandforever/p/4492428.html ...
- codeforces 828 D. High Load(思维,水题)
题目链接:http://codeforces.com/contest/828/problem/D 题解:任意去一个点为根然后有几个k就是几个子叶也就是根结点有几个分支然后最好的解法就是贪心,将剩下的点 ...