MongoDB 不在开源了,使用 Homebrew 安装只能玩社区版了
使用了大半年的 mongodb ,最近在公司的新项目中应用,在 mac 上安装 mongodb 时发现始终安装不了,一直在报下面这样的错误:
brew install mongodb
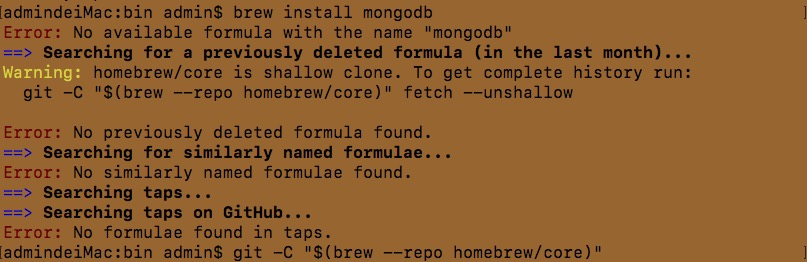
升级 brew 也不行,这个 mac 机上从未安装过 mongodb,但从错误信息中提示却是要卸载它,真是醉了。
从2019年9月2日开始 ,HomeBrew 也从核心仓库 (#43770) 当中移除了mongodb 模块
不过,幸运的是 mongodb 团队还在维护社区版的 Homebrew,最后还是从Stack Overflow 上查找到答案:
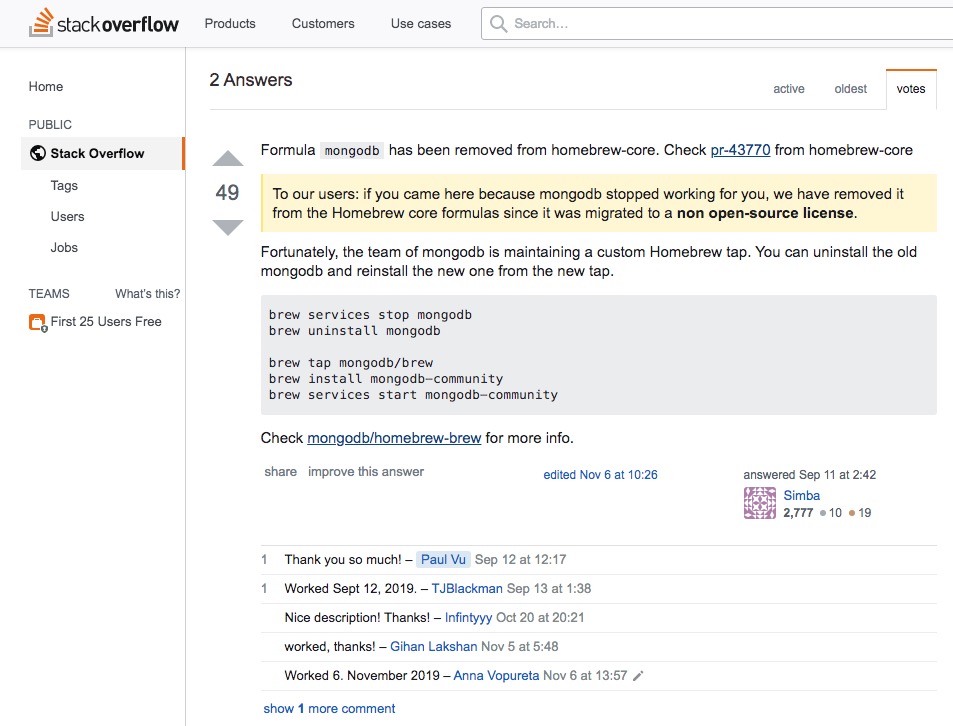
为了搞清楚这些是啥意思,查看了 homebrew-brew gitHub。
- 在安装社区版前要先执行:brew tap mongodb/brew 这个过程有点久,我装过可能需要30分钟左右。
- 安装最新社区版:brew reinstall mongodb-community
- 启动 mongodb-community 服务:
brew services start mongodb-community ,提示 “Service `mongodb-community` already started”,说明服务启动成功
mongodb-community 命令区别 mongodb
- 启动服务:brew services start mongodb-community
- 重启服务: brew services restart mongodb-community
- 停止服务:brew services stop mongodb-community
- 安装某个版本:brew install mongodb-community@x.x.x
- 手动启动服务:mongod --config /usr/local/etc/mongod.conf
文件路径:
-
配置文件:/usr/local/etc/mongod.conf 日志目录路径:/usr/local/var/log/mongodb数据目录路径:/usr/local/var/mongodb
这样 MongoDB 服务就安装和启动好了。
将 MongoDB 下载到本地,mongodb-osx-ssl-x86_64-4.0.13.tgz 我下载的是这个版本,解压后,新建目录,将解压后的文件存放在里面。
我的目录为:/Volumes/code/localhost/node/mongodb/bin
- 创建存储数据库文件
data
在任意盘符根目录下创建一个 data 目录,用来存放数据库文件。 mongoDB 会自动把自己安装位置的盘符根目录下的 data 文件夹作为自己的数据存储目录,这里也可以直接在安装位置所在盘符创建,我是在 bin 目录下创建的 data 目录。
新开一个 shell,指定 db 路径:
进入 /Volumes/code/localhost/node/mongodb/bin 目录 ,输入 mongod,会看到 :
MongoDB starting : pid=942 port=27017 dbpath=/data/db 64-bit
db version v4.2.1
git version: edf6d45851c0b9ee15548f0f847df141764a317e
。。。
说明 db 启动成功了!!
如果 data 目录在其它位置,需要指定 data 目录路径,输入 mongod --dbpath 路径
- 连接数据库 npm run start
在 server.js 中,进行配置:
const mongoose = require('mongoose');

const mongoClient = require('mongodb').MongoClient;

// db

const dburl = "mongodb://127.0.0.1:27017/local";

mongoClient.connect(dburl, (err, db) => {

    if (err) {

        console.log('数据库连接失败!');

        return;

    };

    console.log(db);

});
在 package.json 中,进行配置:
"scripts": {

        "server": "node server.js",

        "start": "nodemon server.js"

},
const dburl = "mongodb://127.0.0.1:27017/local";
默认情况下,db 启动成功后,本地会有三个表 admin / config / local
> show dbs

admin   0.000GB

config  0.000GB

local   0.000GB

>
- 查看 db 配置信息 npm run start ,成功的启动 服务并连接 db
> web@1.0.0 start /Volumes/code/localhost/node/web

> nodemon server.js

[nodemon] 1.19.4

[nodemon] to restart at any time, enter `rs`

[nodemon] watching dir(s): *.*

[nodemon] watching extensions: js,mjs,json

[nodemon] starting `node server.js`

(node:1009) DeprecationWarning: current Server Discovery and Monitoring engine is deprecated, and will be removed in a future version. To use the new Server Discover and Monitoring engine, pass option { useUnifiedTopology: true } to the MongoClient constructor.

Successful! 访问地址为 http://127.0.0.1:3000

MongoClient {

  _events: [Object: null prototype] {},

  _eventsCount: 0,

  _maxListeners: undefined,

  s: {

    url: 'mongodb://127.0.0.1:27017/local',

    options: {

      servers: [Array],

      caseTranslate: true,

      dbName: 'local',

      socketTimeoutMS: 360000,

      connectTimeoutMS: 30000,

      retryWrites: true,

      useRecoveryToken: true,

      readPreference: [ReadPreference],

      promiseLibrary: [Function: Promise]

    },

    promiseLibrary: [Function: Promise],

    dbCache: Map {},

    sessions: Set {},

    writeConcern: undefined,

    namespace: MongoDBNamespace { db: 'admin', collection: undefined }

  },

  topology: Server {

    _events: [Object: null prototype] {

      serverOpening: [Function],

      serverDescriptionChanged: [Function],

      serverHeartbeatStarted: [Function],

      serverHeartbeatSucceeded: [Function],

      serverHeartbeatFailed: [Function],

      serverClosed: [Function],

      topologyOpening: [Function],

      topologyClosed: [Function],

      topologyDescriptionChanged: [Function],

      commandStarted: [Function],

      commandSucceeded: [Function],

      commandFailed: [Function],

      joined: [Function],

      left: [Function],

      ping: [Function],

      ha: [Function],

      authenticated: [Function],

      error: [Function],

      timeout: [Function],

      close: [Function],

      parseError: [Function],

      open: [Function],

      fullsetup: [Function],

      all: [Function],

      reconnect: [Function]

    },

    _eventsCount: 25,

    _maxListeners: Infinity,

    clientInfo: {

      driver: [Object],

      os: [Object],

      platform: 'Node.js v12.11.1, LE'

    },

    s: {

      coreTopology: [Server],

      sCapabilities: null,

      clonedOptions: [Object],

      reconnect: true,

      emitError: true,

      poolSize: 5,

      storeOptions: [Object],

      store: [Store],

      host: '127.0.0.1',

      port: 27017,

      options: [Object],

      sessionPool: [ServerSessionPool],

      sessions: Set {},

      promiseLibrary: [Function: Promise]

    }

  }

}
MongoDB 不在开源了,使用 Homebrew 安装只能玩社区版了的更多相关文章
- centos 7 安装 Docker Engine-CentOS 社区版
获取Docker Engine-CentOS社区: https://docs.docker.com/install/linux/docker-ce/centos/ 1.操作系统要求 1.1 要安装 D ...
- 安装蓝鲸paas社区版
安装蓝鲸paas社区版http://docs.bk.tencent.com/bkce_install_guide/setup/get_ready.html#hostssystemctl stop fi ...
- Ubuntu 安装 Docker CE(社区版)
参考自 https://yeasy.gitbooks.io/docker_practice/install/ubuntu.html#ubuntu-1604- docker-io 是以前早期的版本,版本 ...
- CentOS 7安装Odoo 15社区版的详细操作指南
我之前的文章介绍过在Windows环境下安装Odoo 15,如果您需要在Windows部署,具体可参考我文末的微信号<10分钟教你本机电脑安装Odoo 15,并启用一个内置的项目APP应用> ...
- Docker 镜像安装 GitLab 中文社区版
docker run \ --detach \ --publish : \ --publish : \ --name gitlab \ --restart unless-stopped \ --vol ...
- docker 安装 gitlab 中文社区版
docker pull twang2218/gitlab-ce-zh 创建一个docker 目录 /usr/local/docker/gitlab 创建一个 docker-compose.yml ve ...
- Docker(社区版) centos版 安装
1,总结一下docker的安装,其实官网有很全面的资料了,可以自己上面去看,但都是英文的. https://docs.docker.com/engine/installation/linux/dock ...
- Mac OSX 下用 Homebrew 安装 MongoDB 并配置到 WebStorm 中
1. 安装 Ruby OSX 操作系统内置 Ruby,但如果没有 Ruby,则需先输入以下命令安装能够进行多版本ruby环境安装.管理和切换的命令行工具 RVM. 1.1 安装 RVM 打开终端输入以 ...
- HomeBrew安装MongoDB如何启动
1.先安装HomeBrew 安装(需要 Ruby): ruby -e "$(curl -fsSL https://raw.github.com/Homebrew/homebrew/go/in ...
随机推荐
- 13-Node.js学习笔记-MongoDB
数据库相关概念 在一个数据库软件最终可以包含多个数据仓库,在每个数据仓库中可以包含多个数据集合,每个数据集合中可以包含多条文档(具体的数据) database: 数据库,mongoDB数据库软件中可以 ...
- Pytorch 记录
BCELoss BCEWithLogitsLoss 将sigmoid和BCELoss结合在一起,数据的稳定性更好. torch.nn.functional: binary_cross_entropy_ ...
- webpack动态加载打包chunk命名
最近,遇到复杂h5页面开发,为了优化H5首屏加载速度,想到使用按需加载的方式,减少首次加载的JavaScript文件体积,于是将处理过程在这里记录一下,涉及到的主要是以下三点: 使用Webpack如何 ...
- 通过Ajax的访问zuul的跨域问题解决方案
刚开始在使用jqueryajax跨域请求zuul网关时,在后台发现一直拿不到前台请求的json数据,而前台也一直拿不到后台的响应数据.打开浏览器调试程序发现,本身ajax的POST请求统一都变成了op ...
- C# 调用OpenCVSharp报错“尝试读取或写入受保护的内存。这通常指示其他内存已损坏”
一.描述问题 当托管代码调用非托管代码的时候,经常会出现如下报错:“尝试读取或写入受保护的内存.这通常指示其他内存已损坏”. 二.原因分析 由于非托管代码的内存指针的回收是由非托管代码自身手动完成的, ...
- c#使用CefSharp开发winform——环境搭建
因为nuget在线下载有时候很慢,所以下载nuget包,进行本地安装 登陆nuget官网https://www.nuget.org/下载相关资源 选择对应版本进行下载,同时需要下载相关依赖的包 最 ...
- 为Dynamics 365 USD设置打开调试面板的自定义快捷键
我是微软Dynamics 365 & Power Platform方面的工程师罗勇,也是2015年7月到2018年6月连续三年Dynamics CRM/Business Solutions方面 ...
- AlertDialog创建对话框的测试
AlertDialog的功能是非常强大的,它可以创建各种对话框,它的结构分为:图标区.标题区.内容区.按钮区共四个区域.以这样的思路区创建AlertDialog是非常简单的. 创建AlertDialo ...
- java编译报错: 找不到或无法加载主类 Demo.class 的解决方法
原因:java 命令后面的文件不能有后缀名. 解决方法:运行java时候,后面的文件去掉后缀名.
- 关于实现序列化接口Serializable
关于javabean,是否需要实现序列化接口这个问题,只有当这些javabean需要通过分布式网络传输,磁盘持久化等情况下才有必要,其他情况并非必须.