
二进制mariadb多实例
实验环境:
centos7.6 :IP: 192.168.99.110
1、首先下载二进制的压缩包,解压到一个指定的目录/hx/下
[root@centos7 hx]#tar xf mariadb-10.2.23-linux-x86_64.tar.gz

[root@centos7 hx]#ls

mariadb-10.2.23-linux-x86_64  mariadb-10.2.23-linux-x86_64.tar.gz  mysqld

[root@centos7 hx]#mv mariadb-10.2.23-linux-x86_64 mysql
2、在/usr/local/mysql/目录内新建多实例数据库的几个目录:这里3个实例的端口号为:3344,3355,3366
[root@centos7 local]#mkdir -p ./mysql/{,,}/{etc,bin,log,socket,data,pid}
3、先创建一个系统用户mysql,然后使用二进制目录里的脚本生成各自的数据目录
[root@centos7 hx]#useradd -r -s /sbin/nolgoin -d /data/mysql  mysql

[root@centos7 hx]#getent passwd mysql

mysql:x::::/data/mysql:/sbin/nolgoin
报错:提示缺少一个依赖的库文件,我们使用yum安装一下这个libaio

[root@centos7 hx]#/hx/mysql/scripts/mysql_install_db --user=mysql --datadir=/usr/local/mysql//data/  #第一个实例:指定用户和生成数据库的目录

Installing MariaDB/MySQL system tables in '/usr/local/mysql/3344/data/' ...

OK   #有提示ok就说明成功了,也可以到/data/目录看一下

To start mysqld at boot time you have to copy

support-files/mysql.server to the right place for your system
[root@centos7 hx]#/hx/mysql/scripts/mysql_install_db --user=mysql --datadir=/usr/local/mysql/3344/data/   #第二个实例

Installing MariaDB/MySQL system tables in '/usr/local/mysql/3344/data/' ...

OK

To start mysqld at boot time you have to copy

support-files/mysql.server to the right place for your system
[root@centos7 hx]#/hx/mysql/scripts/mysql_install_db --user=mysql --datadir=/usr/local/mysql/3344/data/  #第三个实例

Installing MariaDB/MySQL system tables in '/usr/local/mysql/3344/data/' ...

OK

To start mysqld at boot time you have to copy

support-files/mysql.server to the right place for your system
4、拷贝/etc/my.cnf配置文件到3个实例下的etc目录
cp /etc/my.cnf /usr/local/mysql//etc/
vim /usr/local/mysql/3344/etc/   #添加一下几行,修改完后再拷贝到其他几个实例的etc目录内

5、准备个简单的启动脚本,修改相应的参数拷贝到实例的bin目录内,并赋予执行权限
#!/bin/bash

#chkconfig:

port=

mysql_user="root"

mysql_pwd="xu"

cmd_path="/hx/mysql/bin/"     #此处设置为二进制mariadb目录的路径

mysql_basedir="/usr/local/mysql/"   #设置三个实例的路径

mysql_sock="${mysql_basedir}/${port}/socket/mysql.sock"    #指定socket文件路径

function_start_mysql()

{

    if [ ! -e "$mysql_sock" ];then

      printf "Starting MySQL...\n"

      ${cmd_path}/mysqld_safe --defaults-file=${mysql_basedir}/${port}/etc/my.cnf  &> /dev/null  &

    else

      printf "MySQL is running...\n"

      exit

    fi

}

function_stop_mysql()

       printf "MySQL is stopped...\n"

       exit

    else

       printf "Stoping MySQL...\n"

       ${cmd_path}/mysqladmin -u ${mysql_user}  -S ${mysql_sock} shutdown

   fi

}

function_restart_mysql()

{

    printf "Restarting MySQL...\n"

    function_stop_mysql

    sleep

    function_start_mysql

}

case $ in

start)

    function_start_mysql

;;

stop)

    function_stop_mysql

;;

restart)

    function_restart_mysql

;;

*)

    printf "Usage: ${mysql_basedir}/${port}/bin/mysqld {start|stop|restart}\n"

esac
6、最后设置一下权限:二进制目录和mysql多实例的目录属主和数组都设置为mysql
通过脚本启动数据库,然后查看端口,3344,3355,3366三个实例都已经启动
[root@centos7 ]#ss -ntl

State       Recv-Q Send-Q         Local Address:Port                        Peer Address:Port

LISTEN                                    *:                                     *:*

LISTEN                            127.0.0.1:                                     *:*

LISTEN                                    :::    ###                           :::*

LISTEN                                   :::                                    :::*

LISTEN                                  :::                                    :::*

LISTEN                                    :::    ###                           :::*

LISTEN                                    :::    ###                           :::*
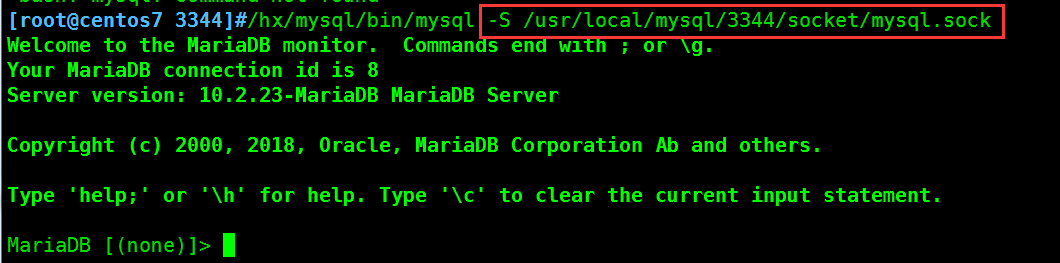
可以把二进制目录下的bin目录加入环境变量里,然后直接使用mysql -S 。 登录数据库时需要加 -S 指定socket文件进行登录,
二进制mariadb多实例的更多相关文章
- 在centos7环境下建立MariaDB多实例
环境全部基于vmware player 12 os: centos7 mariadb: mariadb-10.1.12-linux-x86_64.tar.gz 主要根据MariaDB给出的帮助文档,以 ...
- 将python图片转为二进制文本的实例
https://www.jb51.net/article/155342.htm 写在最前面: 我在研究机器学习的过程中,给的数据集是手写数字图片被处理后的由0,1表达的txt文件,今天写一写关于图片转 ...
- MySQL(mariadb)多实例应用与多实例主从复制
MySQL多实例 mysql多实例,简单理解就是在一台服务器上,mysql服务开启多个不同的端口(如3306.3307,3308),运行多个服务进程.这些 mysql 服务进程通过不同的 socket ...
- mariadb多实例搭建
测试环境基于centos7.2,腾讯云实验室,学习搭建! https://www.qcloud.com/developer 多实例mysql,能更加理解mysql安装的基本过程!及简单使用... ma ...
- MariaDB多实例的安装配置
初始化数据库: mysql_install_db --basedir=/var/lib/mysql --datadir=/data/3306/data --user=mysql mysql_inst ...
- mariadb多实例实现
环境:centos7,yum 安装mariadb5.5 mkdir /mysqldb/{3306,3307.3308}/{etc,socket,pid,log,data} -pv chown -R m ...
- Mariadb多实例启动脚本
#!/bin/bash port=3306 mysql_user="root" mysql_pwd="centos" cmd_path="/app/m ...
- 连接云MariaDB实例
新建实例 MariaDB CVM 内网连接 CVM远程登录测试(同一个VPC下): CVM安装客户端: yum install mysql 连接: mysql -h MariaDB内网ip -u 数据 ...
- MySQL并发复制系列三:MySQL和MariaDB实现对比
http://blog.itpub.net/28218939/viewspace-1975856/ 并发复制(Parallel Replication) 系列三:MySQL 5.7 和MariaDB ...
随机推荐
- ASP.NET Core Razor 视图导入 - ASP.NET Core 基础教程 - 简单教程,简单编程
原文:ASP.NET Core Razor 视图导入 - ASP.NET Core 基础教程 - 简单教程,简单编程 ASP.NET Core Razor 视图导入 上一章节我们介绍了视图起始页,学习 ...
- 算法(algorithm)、模型(model)与框架(framework)
模型对应的数学公式,公式中往往有待学习得到的参数,因此在进行训练或者学习时,首先初始化这部分参数(0 或标准正太分布): 学习之前的初始化:initial model: 学习完成之后的模型:final ...
- MyBatis Generator 详解 专题
idea中有plugin可提高效率: http://www.henryxi.com/use-idea-mybatis-plugin-generate-mapper-files eg: <?xml ...
- Emgu-WPF学习使用-识别二维码的位置
原文:Emgu-WPF学习使用-识别二维码的位置 参考链接:http://blog.csdn.net/gaobobo138968/article/details/47663607 我完全参 ...
- QWidget继承自QPaintDevice,这样就可以直接把QWidget传入QPainter的构造函数,比如QPainter(mylabel),然后设置QWidget的长宽后直接进行作画了
比如用QLabel在主界面上画两条虚线: bool ContentWidget::eventFilter(QObject *obj, QEvent *event) { if(obj == line_l ...
- JavaScript 中的12种循环遍历方法
原文:JavaScript 中的12种循环遍历方法 题目:请介绍 JavaScript 中有哪些循环和遍历的方法,说说它们的应用场景和优缺点? 1.for 循环 let arr = [1,2,3];f ...
- CSS visibility 属性 使元素占位,但不可见
CSS visibility 属性 使元素占位,但不可见 h2 { visibility:hidden; } 浏览器支持 所有主流浏览器都支持 visibility 属性. 注释:任何的版本的 Int ...
- RSACryptoServiceProvider加密解密签名验签和DESCryptoServiceProvider加解密
原文:RSACryptoServiceProvider加密解密签名验签和DESCryptoServiceProvider加解密 C#在using System.Security.Cryptograph ...
- iOS 监听控件某个属性的改变observeValueForKeyPath
创建一个测试的UIButton #import "ViewController.h" @interface ViewController () @property(nonatomi ...
- win10 uwp 如何打包Nuget给其他人
原文:win10 uwp 如何打包Nuget给其他人 本文告诉大家,如果自己有做一些好用的库,如何使用 Nuget 打包之后上传,分享给大家. 首先需要知道一些 Nuget 打包需要知道的,请看 wi ...