Android 软件开发之 PreferenceActivity 中的组件
1.PreferenceActivity 介绍
PreferenceActivity 继承ListActivity 它是以一个列表的形式在展现内容,它最主要的特点是添加Preference可以让控件的状态持久化储存,举个例子 比如用户选中checkbox后 退出应用然后在进入应用,这时用户希望看到的是checkbox被选中,所以软件须要记录用户每次操作的过程并且持久储存,在进入应用的时候须要判断这些 久储存的数据然后将系统控件的状态呈现在UI中。
尤其是软件开发肯定会有一堆设置选项选项,每次进入Activity都去手动的去取储存的数据,这样代码会变得很复杂很麻烦。 这个时候Preference就出来了,它就是专门解决这些特殊的选项保存与读取的显示。用户每次操作事件它会及时的以键值对的形式记录在 SharedPreferences中,Activity每次启动它会自动帮我们完成数据的读取以及UI的显示。
android开发中一共为我们提供了4个组件,分别是CheckBoxPreference组件、EditTextPreference组件、 ListPreference组件、RingtonePreference组件,下面我用一个例子一一向同学们介绍一下。
2.CheckBoxPreference组件
CheckBoxPreference 选中为true 取消选中为false 它的值会以boolean的形式储存在SharedPreferences中。
|
1
2
3
4
5
6
7
8
9
10
11
12
13
14
15
|
<?xml version="1.0" encoding="utf-8"?><PreferenceScreen xmlns:android="http://schemas.android.com/apk/res/android"> <PreferenceCategory android:title="CheckBoxPreference"> <CheckBoxPreference android:key="checkbox_0" android:title="CheckBox_A" android:summary="这是一个勾选框A" > </CheckBoxPreference> <CheckBoxPreference android:key="checkbox_1" android:title="CheckBox_B" android:summary="这是一个勾选框B" > </CheckBoxPreference> </PreferenceCategory></PreferenceScreen> |

|
1
2
3
4
5
6
7
8
9
10
11
12
13
14
15
16
17
18
19
20
21
22
23
24
25
26
27
28
29
30
31
32
33
34
35
36
37
38
39
40
41
42
43
44
45
46
47
48
49
50
51
52
53
54
55
56
57
58
59
60
61
62
63
64
65
66
|
import android.content.Context;import android.os.Bundle;import android.preference.CheckBoxPreference;import android.preference.Preference;import android.preference.PreferenceActivity;import android.preference.Preference.OnPreferenceChangeListener;import android.preference.Preference.OnPreferenceClickListener;import android.widget.Toast; public class CheckBoxActivity extends PreferenceActivity { Context mContext = null; @Override protected void onCreate(Bundle savedInstanceState) { super.onCreate(savedInstanceState); // 从资源文件中添Preferences ,选择的值将会自动保存到SharePreferences addPreferencesFromResource(R.xml.checkbox); mContext = this; //CheckBoxPreference组件 CheckBoxPreference mCheckbox0 = (CheckBoxPreference) findPreference("checkbox_0"); mCheckbox0.setOnPreferenceClickListener(new OnPreferenceClickListener() { @Override public boolean onPreferenceClick(Preference preference) { //这里可以监听到这个CheckBox 的点击事件 return true; } }); mCheckbox0.setOnPreferenceChangeListener(new OnPreferenceChangeListener() { @Override public boolean onPreferenceChange(Preference arg0, Object newValue) { //这里可以监听到checkBox中值是否改变了 //并且可以拿到新改变的值 Toast.makeText(mContext, "checkBox_0改变的值为" + (Boolean)newValue, Toast.LENGTH_LONG).show(); return true; } }); CheckBoxPreference mCheckbox1 = (CheckBoxPreference) findPreference("checkbox_1"); mCheckbox1.setOnPreferenceClickListener(new OnPreferenceClickListener() { @Override public boolean onPreferenceClick(Preference preference) { //这里可以监听到这个CheckBox 的点击事件 return true; } }); mCheckbox1.setOnPreferenceChangeListener(new OnPreferenceChangeListener() { @Override public boolean onPreferenceChange(Preference arg0, Object newValue) { //这里可以监听到checkBox中值是否改变了 //并且可以拿到新改变的值 Toast.makeText(mContext, "checkBox_1改变的值为" + (Boolean)newValue, Toast.LENGTH_LONG).show(); return true; } }); } } |
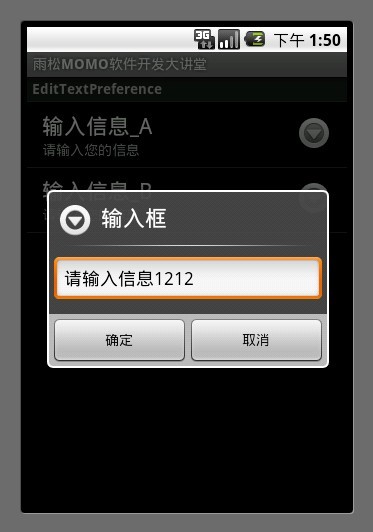
3.EditTextPreference组件
EditTextPreference 点击后会弹出一个输入框,输入的内容会以字符串的的形式储存在SharedPreferences中。
|
1
2
3
4
5
6
7
8
9
10
11
12
13
14
15
16
17
18
19
|
<?xml version="1.0" encoding="utf-8"?><PreferenceScreen xmlns:android="http://schemas.android.com/apk/res/android"> <PreferenceCategory android:title="EditTextPreference"> <EditTextPreference android:key="edit_0" android:title="输入信息_A" android:summary="请输入您的信息" android:defaultValue="请输入信息" android:dialogTitle="输入框"> </EditTextPreference> <EditTextPreference android:key="edit_1" android:title="输入信息_B" android:summary="请输入您的信息" android:defaultValue="请输入信息" android:dialogTitle="输入框"> </EditTextPreference> </PreferenceCategory></PreferenceScreen> |

|
1
2
3
4
5
6
7
8
9
10
11
12
13
14
15
16
17
18
19
20
21
22
23
24
25
26
27
28
29
30
|
import android.content.Context;import android.os.Bundle;import android.preference.EditTextPreference;import android.preference.PreferenceActivity; public class EditTextActivity extends PreferenceActivity { Context mContext = null; @Override protected void onCreate(Bundle savedInstanceState) { super.onCreate(savedInstanceState); // 从资源文件中添Preferences ,选择的值将会自动保存到SharePreferences addPreferencesFromResource(R.xml.edittext); mContext = this; // EditTextPreference组件 EditTextPreference mEditText = (EditTextPreference) findPreference("edit_0"); //设置dialog按钮信息 mEditText.setPositiveButtonText("确定"); mEditText.setNegativeButtonText("取消"); //设置按钮图标 mEditText.setDialogIcon(R.drawable.jay); } } |
4.ListPreference组件
在res/array中先写两个数组,一个用与list的显示内容,一个用户list的选中数值。
|
1
2
3
4
5
6
7
8
9
10
11
12
13
14
15
16
17
|
<?xml version="1.0" encoding="utf-8"?><resources> <string-array name="auto_logout_time_key"> <item>10 mins.</item> <item>20 mins.</item> <item>30 mins.</item> <item>60 mins.</item></string-array> <string-array name="auto_logout_time_value"> <item>600000</item> <item>1200000</item> <item>1800000</item> <item>3600000</item></string-array></resources> |
ListPreference点击后会弹出一个列表框,选中后会将选中的内容(上面数组中的值)会以字符串的的形式储存在SharedPreferences中。
|
1
2
3
4
5
6
7
8
9
10
11
12
13
14
15
16
17
18
19
20
21
|
<?xml version="1.0" encoding="utf-8"?><PreferenceScreen xmlns:android="http://schemas.android.com/apk/res/android"> <PreferenceCategory android:title="ListPreference"> <ListPreference android:key="list_0" android:title="登录设置A" android:dialogTitle="选择在线时间" android:entries="@array/auto_logout_time_key" android:entryValues="@array/auto_logout_time_value" > </ListPreference> <ListPreference android:key="list_0" android:title="登录设置A" android:dialogTitle="选择在线时间" android:entries="@array/auto_logout_time_key" android:entryValues="@array/auto_logout_time_value" > </ListPreference> </PreferenceCategory></PreferenceScreen> |

|
1
2
3
4
5
6
7
8
9
10
11
|
import android.os.Bundle;import android.preference.PreferenceActivity; public class ListActivity extends PreferenceActivity { @Override protected void onCreate(Bundle savedInstanceState) { super.onCreate(savedInstanceState); // 从资源文件中添Preferences ,选择的值将会自动保存到SharePreferences addPreferencesFromResource(R.xml.list); }} |
5.RingtonePreference组件
RingtonePreference点击后会弹出一个系统铃声的列表框,选中后会将选中的内容(uri字符集)会以字符串的的形式储存在SharedPreferences中。
|
1
2
3
4
5
6
7
8
9
10
11
12
13
14
15
16
17
18
19
20
|
<?xml version="1.0" encoding="utf-8"?><PreferenceScreen xmlns:android="http://schemas.android.com/apk/res/android"> <PreferenceCategory android:title="RingtonePreference"> <RingtonePreference android:key="ringtone_0" android:summary="选择系统铃声A" android:title="铃声设置" android:ringtoneType="all" android:showSilent="true" ></RingtonePreference> <RingtonePreference android:key="ringtone_!" android:summary="选择系统铃声B" android:title="铃声设置" android:ringtoneType="all" android:showSilent="true" ></RingtonePreference> </PreferenceCategory></PreferenceScreen> |
android:ringtoneType 系统一共提供了4中响铃模式的类型分别为 铃声(ringtone) 通知( notification) 警告(alarm) 全部(all)
模拟器默认是没有铃声的,下图中的铃声我是将歌曲文件拷贝到SD卡中,设置铃声后才会出现的。如果觉得拷贝麻烦可以使用豌豆荚或者91助手将歌曲文件放入手机SD卡中,在铃声设置那里设置一下在这里就会出现。
|
1
2
3
4
5
6
7
8
9
10
11
|
import android.os.Bundle;import android.preference.PreferenceActivity; public class RingtoneActivity extends PreferenceActivity { @Override protected void onCreate(Bundle savedInstanceState) { super.onCreate(savedInstanceState); // 从资源文件中添Preferences ,选择的值将会自动保存到SharePreferences addPreferencesFromResource(R.xml.ringtone); }} |
5.自定义控件
使用系统的控件在显示方面难免会有些单一,如果想做一个好看的界面就需要使用自定义Preference。下面我简单说明一下如何编写自定义Preference。首先在res/layout中添加preferences文件
|
1
2
3
4
5
6
7
8
9
10
11
12
13
14
15
16
17
18
19
20
21
22
23
24
25
26
27
28
29
30
31
32
33
34
35
36
37
38
39
40
41
42
43
44
45
46
47
48
49
50
51
52
53
54
55
56
|
<?xml version="1.0" encoding="utf-8"?><LinearLayout xmlns:android="http://schemas.android.com/apk/res/android" android:layout_width="fill_parent" android:layout_height="fill_parent" android:background="#00000000"> <LinearLayout android:gravity="center_vertical" android:background="@drawable/preference_mid_background" android:layout_width="fill_parent" android:layout_height="wrap_content" > <ImageView android:focusable="false" android:layout_width="wrap_content" android:layout_height="wrap_content" android:src="@drawable/setting_about_us"> </ImageView> <RelativeLayout android:layout_width="wrap_content" android:layout_height="wrap_content" android:layout_marginLeft="15dip" android:layout_marginTop="6dip" android:layout_marginRight="6dip" android:layout_marginBottom="6dip" android:layout_weight="1" > <TextView android:textSize="15dip" android:textColor="#000000" android:ellipsize="marquee" android:id="@+android:id/title" android:fadingEdge="horizontal" android:layout_width="wrap_content" android:layout_height="wrap_content" android:singleLine="true" > </TextView> <TextView android:textAppearance="?android:attr/textAppearanceSmall" android:textColor="#565656" android:id="@+android:id/summary" android:layout_width="wrap_content" android:layout_height="wrap_content" android:maxLines="4" android:layout_below="@+android:id/title" android:layout_alignLeft="@+android:id/title" > </TextView> </RelativeLayout> <ImageView android:focusable="false" android:layout_width="wrap_content" android:layout_height="wrap_content" android:background="@drawable/preference_arrows"/> </LinearLayout></LinearLayout> |
android:background=”@drawable/preference_mid_background”
通过这一行可以设置这个按钮的点击、选中默认的显示状态,这样可以让你的按钮更加好看。须要在res/drawable中添加xml文件
android:state_facused :为控件选中显示
android:state_pressed:为控件按下显示
最后一个为默认显示
|
1
2
3
4
5
6
7
8
9
10
11
12
13
14
15
16
17
18
19
20
|
<?xml version="1.0" encoding="utf-8"?><selector xmlns:android="http://schemas.android.com/apk/res/android"> <item android:state_focused="true" android:drawable="@drawable/preference_mid_pressed" > </item> <item android:state_pressed="true" android:drawable="@drawable/preference_mid_pressed" > </item> <item android:drawable="@drawable/preference_mid" > </item> </selector> |

|
1
2
3
4
5
6
7
8
9
10
11
12
13
14
15
16
17
18
19
20
21
22
23
24
25
26
27
28
29
30
31
32
33
34
35
36
37
38
39
40
41
42
43
44
45
|
import android.content.Context;import android.os.Bundle;import android.preference.Preference;import android.preference.PreferenceActivity;import android.preference.Preference.OnPreferenceClickListener;import android.widget.Toast; public class AllActivity extends PreferenceActivity { /**自定义布局A**/ Preference preference0 = null; /**自定义布局B**/ Preference preference1 = null; Context mContext = null; @Override protected void onCreate(Bundle savedInstanceState) { super.onCreate(savedInstanceState); // 从资源文件中添Preferences ,选择的值将会自动保存到SharePreferences addPreferencesFromResource(R.xml.all); mContext = this; preference0 = findPreference("pref_key_0"); preference0.setOnPreferenceClickListener(new OnPreferenceClickListener() { @Override public boolean onPreferenceClick(Preference preference) { Toast.makeText(mContext, "自定义布局A被按下", Toast.LENGTH_LONG).show(); return false; } }); preference1 = findPreference("pref_key_1"); preference1.setOnPreferenceClickListener(new OnPreferenceClickListener() { @Override public boolean onPreferenceClick(Preference preference) { Toast.makeText(mContext, "自定义布局B被按下", Toast.LENGTH_LONG).show(); return false; } }); }} |
读取数据
在PreferenceActivity中可以用下面这种方式拿到SharedPreferences中储存的数值,通过 PreferenceManager.getDefaultSharedPreferences(this) 方法拿到控件默认储存的sharedPreferences对象。
|
1
2
|
SharedPreferences prefs =PreferenceManager.getDefaultSharedPreferences(this) ; boolean something = prefs.getBoolean("something",false); |
在模拟起中将SharedPreferences储存内容拷贝出来后,可以清楚的看到通过点击系统控件储存的数值。这里我说一下铃声的储存,它是以一个字符串形式的uri字符集,它所指向的是系统铃声储存的路径。所以根据这个字符集就可以找到这个铃声。
|
1
2
3
4
5
6
7
8
9
10
11
12
|
<?xml version='1.0' encoding='utf-8' standalone='yes' ?><map><string name="ringtone_!">content://media/external/audio/media/1</string><string name="ringtone_0">content://media/external/audio/media/1</string><string name="list_0">1800000</string><string name="edit_1">请输入信息1212</string><string name="list">1200000</string><string name="ringtone">content://settings/system/ringtone</string><boolean name="checkbox_0" value="true" /><boolean name="checkbox_1" value="true" /><string name="edit_0">请输入信息</string></map> |
文章出处:http://blog.csdn.net/xys289187120/article/details/6727334
配套代码:http://www.oschina.net/code/snippet_163910_6457
Android 软件开发之 PreferenceActivity 中的组件的更多相关文章
- 转:Android软件开发之PreferenceActivity中的组件
本文转于 “雨松MOMO的程序世界” 博客,请务必保留此出处http://xys289187120.blog.51cto.com/3361352/656784 1.PreferenceActivity ...
- Android安全开发之WebView中的地雷
Android安全开发之WebView中的地雷 0X01 About WebView 在Android开发中,经常会使用WebView来实现WEB页面的展示,在Activiry中启动自己的浏览器,或者 ...
- android软件开发之webView.addJavascriptInterface循环渐进【二】
本篇文章由:http://www.sollyu.com/android-software-development-webview-addjavascriptinterface-cycle-of-gra ...
- android软件开发之webView.addJavascriptInterface循环渐进【一】
本篇文章由:http://www.sollyu.com/android-software-development-webview-addjavascriptinterface-cycle-of-gra ...
- Android软件开发之ListView 详解【转】
ListView的使用方法 ListView是Android软件开发中非常重要组件之一,基本上是个软件基本都会使用ListView ,今天我通过一个demo来教大家怎么样使用ListView组件 绘 ...
- Android安全开发之WebView中的大坑
0X01 About WebView 在Android开发中,经常会使用WebView来实现WEB页面的展示,在Activiry中启动自己的浏览器,或者简单的展示一些在线内容等.WebView功能强大 ...
- 【Android】Android软件开发之ListView 详解
原创作品,允许转载,转载时请务必以超链接形式标明文章 原始出处 .作者信息和本声明.否则将追究法律责任.http://xys289187120.blog.51cto.com/3361352/65717 ...
- Android软件开发之EditText 详解(八)
原创作品,允许转载,转载时请务必以超链接形式标明文章 原始出处 .作者信息和本声明.否则将追究法律责任.http://xys289187120.blog.51cto.com/3361352/65718 ...
- Android软件开发之EditText 详解
EditText在API中的结构 java.lang.Objectandroid.view.Viewandroid.widget.TextView android.widget.Edit ...
随机推荐
- edX开发部署开篇
edX介绍请参照百度百科 简单的讲,edX是麻省理工和哈佛大学联手创建的开源在线教育平台,任何人都可以在AGPL协议下获取它的源代码,并使用它. 本文的宗旨就是记录安装.使用.开发.维护edX的点点滴 ...
- Java二维数组
package com.test; public class Test { public static void main(String[] args) { // TODO Auto-generate ...
- 【Linux安全】防止任意用户使用 su 切换到 root
防止任意用户使用 su 切换到 root 在终端中输入下列命令 vim /etc/pam.d/su (按 i 进行编辑,qw 保存并推出) 在头部加入行: auth required pam_whee ...
- 【Quick 3.3】资源脚本加密及热更新(二)资源加密
[Quick 3.3]资源脚本加密及热更新(二)资源加密 注:本文基于Quick-cocos2dx-3.3版本编写 一.介绍 在前一篇文章中介绍了代码加密,加密方式是XXTEA.对于资源文件来说,同样 ...
- 学习笔记-[Maven实战]-第三章:Maven使用入门(1)
说明:[Maven实战]一书还介绍了怎么样手工创建Maven工程,学习这本书是为了能尽快在工作中使用,就忽略了手工建工程的部分 如果想了解这部分的内容,可以自己看看书 开始: 1.新建一个maven工 ...
- [Hadoop源码解读](五)MapReduce篇之Writable相关类
前面讲了InputFormat,就顺便讲一下Writable的东西吧,本来应当是放在HDFS中的. 当要在进程间传递对象或持久化对象的时候,就需要序列化对象成字节流,反之当要将接收到或从磁盘读取的字节 ...
- HTML5实现在线抓拍
<!DOCTYPE> <html> <head> <meta http-equiv="Content-Type" content=&quo ...
- 【JS】Intermediate6:jQuery
1.jQuery is far and away the most popular DOM library Used to allow modification and control of the ...
- Java笔记(十三)……面向对象III继承(inheritance)
继承概述 继承概述 多个类中存在相同属性和行为时,将这些内容抽取到单独一个类中,那么多个类无需再定义这些属性和行为,只要继那个类即可. 多个类可以称为子类,单独这个类称为父类或者超类. 子类可以直接访 ...
- 中国区Windows Azure 提供的功能以及与国外的差异
当前中国服务提供的功能 目前,中国服务中包括以下 Azure 功能. 计算 - 虚拟机(用于 IaaS 服务) 计算 - 云服务(用于 PaaS 服务) 计算 - 网站 数据服务 - 存储(用于 Bl ...