OC - 30.如何封装自定义布局
概述
- 对于经常使用的控件或类,通常将其分装为一个单独的类来供外界使用,以此达到事半功倍的效果
- 由于分装的类不依赖于其他的类,所以若要使用该类,可直接将该类拖进项目文件即可
- 在进行分装的时候,通常需要用到代理设计模式
代理设计模式
代理设计模式的组成
客户类(通常作为代理)
- 通常委托这是角色来完成业务逻辑
真实角色
- 将客户类的业务逻辑转化为方法列表,即代理协议
代理协议
- 定义了需要实现的业务逻辑
- 定义了一组方法列表,包括必须实现的方法或选择实现的方法
- 代理协议是代理对象所要遵循一组规则
代理角色
- 若要作为代理,需要遵守代理协议,并且实现必须实现的代理方法
- 代理角色可以通过调用代理协议中的方法完成业务逻辑,也可以附加自己的操作
文字描述通常是抽象的,一下通过图示来阐述代理设计模式

自定义布局类的封装
业务逻辑
如图

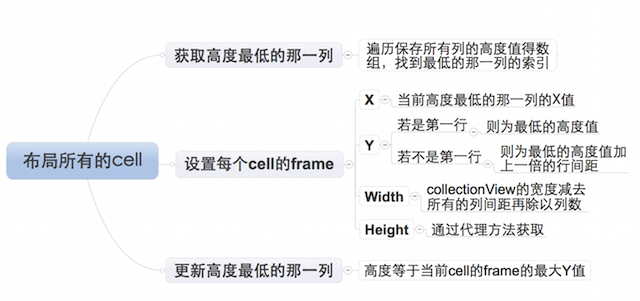
布局每个cell的业务逻辑
由于设置每个cell的布局属性的业务逻辑较复杂,特附上如下思维导图
封装思路
封装需要根据客户类业务逻辑需求来提供接口- 通过代理协议的可选实现的方法获取的属性值的属性,需要设置默认值
- 未提供默认值的且必须使用的属性,需要通过必须实现的方法来获得
自定义布局提供的接口
可选- 列数
- 列之间的间距
- 行之间的间距
- 内边距
自定义布局提供的接口
必选- 每个元素的高度,宽度可以通过列数和列间距计算得到
封装步骤
设置代理协议,提供接口
//声明LYPWaterFlowLayout为一个类

@class LYPWaterFlowLayout;

@protocol LYPWaterFlowLayoutDelegate <NSObject>

//必须实现的方法

@required

/**获取瀑布流每个元素的高度*/

- (CGFloat)waterFlowLayout:(LYPWaterFlowLayout *)waterFlowLayout heightForItemAtIndex:(NSInteger)index itemWith:(CGFloat)itemWith;

//可选实现的方法

@optional

/**获取瀑布流的列数*/

- (NSInteger)columnCountInWaterFlowLayout:(LYPWaterFlowLayout *)waterFlowLayout;

/**获取瀑布流列间距*/

- (CGFloat)columnMarginInWaterFlowLayout:(LYPWaterFlowLayout *)waterFlowLayout;

/**获取瀑布流的行间距*/

- (CGFloat)rowMarginInWaterFlowLayout:(LYPWaterFlowLayout *)waterFlowLayout;

/**获取瀑布流的内边距*/

- (UIEdgeInsets)edgeInsetsInWaterFlowLayout:(LYPWaterFlowLayout *)waterFlowLayout;

@end
设置代理属性
@interface LYPWaterFlowLayout : UICollectionViewLayout

/**代理*/

@property (nonatomic, weak) id<LYPWaterFlowLayoutDelegate> delegate;

@end
设置通过可选代理方法获取属性值的属性的默认值
/**默认的列数*/

static const NSInteger LYPDefaultColumnCount = 3;

/**默认每一列之间的间距*/

static const CGFloat LYPDefaultColumMargin = 10;

/**默认每一行之间的间距*/

static const CGFloat LYPDefaultRowMargin = 10;

/**默认边缘间距*/

static const UIEdgeInsets LYPDefaultEdgeInsets = {10, 10, 10, 10};
设置通过可选代理方法获取属性值的属性的访问方式
若代理提供属性值,则忽略默认值- (NSInteger)columnCount
{
//判断代理是否实现了获取列数的可选方法
if ([self.delegate respondsToSelector:@selector(columnCountInWaterFlowLayout:)])
{
//实现,返回通过代理设置的列数
return [self.delegate columnCountInWaterFlowLayout:self];
}
else
{
//为实现,返回默认的列数
return LYPDefaultColumnCount;
}
}- 注:其他属性值的获取与上述方法几乎完全相同,不再赘述
设置布局
设置需要的成员属性
/**所有cell的布局属性*/

@property (nonatomic, strong) NSMutableArray *attrsArray;

/**所有列的当前高度*/

@property (nonatomic, strong) NSMutableArray *columnHeights;
通过懒加载的方式初始化成员属性
/**--attrsArray--懒加载*/

- (NSMutableArray *)attrsArray

{

    if (_attrsArray == nil)

    {

        _attrsArray = [NSMutableArray array];

    }

    return _attrsArray;

}

/**--columnHeights--懒加载*/

- (NSMutableArray *)columnHeights

{

    if (_columnHeights == nil)

    {

        _columnHeights = [NSMutableArray array];

    }

    return _columnHeights;

}
初始化布局
- (void)prepareLayout

{

    [super prepareLayout];

    /**清除之前跟布局相关的所有属性,重新设置新的布局*/

    //清除之前计算的所有列的高度

    [self.columnHeights removeAllObjects];

    //设置所有列的初始高度

    for (NSInteger i = 0; i<self.columnCount; i++)

    {

        self.columnHeights[i] = @(self.edgeInsets.top);

    }

    //清除之前所有的布局属性

    [self.attrsArray removeAllObjects];

    /**开始创建每一个cell对应的布局属性*/

    NSInteger count = [self.collectionView numberOfItemsInSection:0];

    for (NSInteger i = 0; i<count; i++)

    {

        NSIndexPath *indexPath = [NSIndexPath indexPathForItem:i inSection:0];

        //获取indexPath位置cell对应的布局属性

        UICollectionViewLayoutAttributes *attrs = [self layoutAttributesForItemAtIndexPath:indexPath];

        //将indexPath位置的cell的布局属性添加到所有cell的布局属性数组中

        [self.attrsArray addObject:attrs];

    }

}
返回包含所有cell的布局属性的数组
- (nullable NSArray<UICollectionViewLayoutAttributes *> *)layoutAttributesForElementsInRect:(CGRect)rect

{

    return self.attrsArray;

}
设置每一个cell的布局属性
- (nullable UICollectionViewLayoutAttributes *)layoutAttributesForItemAtIndexPath:(nonnull NSIndexPath *)indexPath

{

    //获取indexPath位置的布局属性

    UICollectionViewLayoutAttributes *attrs = [UICollectionViewLayoutAttributes layoutAttributesForCellWithIndexPath:indexPath];

    /**设置cell布局属性的frame*/

    /***确定cell的尺寸***/

    //获取collectionView的宽度

    CGFloat collectionViewWidth = self.collectionView.frame.size.width;

    //cell宽度

    CGFloat width = ((collectionViewWidth - self.edgeInsets.left - self.edgeInsets.right - (self.columnCount - 1) * self.columMargin)) / self.columnCount;

    //cell高度

    CGFloat height = [self.delegate waterFlowLayout:self heightForItemAtIndex:indexPath.item itemWith:width];

    /***设置cell的位置***/

    NSInteger destColumn = 0;

    CGFloat minColumnHeight = [self.columnHeights[0] doubleValue];

    for (NSInteger i = 1; i<self.columnCount; i++)

    {

        CGFloat columnHeight = [self.columnHeights[i] doubleValue];

        if (minColumnHeight > columnHeight)

        {

            minColumnHeight = columnHeight;

            destColumn = i;

        }

    }

    //计算cell的位置

    CGFloat x = self.edgeInsets.left + destColumn * (width + self.columMargin);

    CGFloat y = minColumnHeight;

    //判断是不是第一行

    if (y != self.edgeInsets.top)

    {

        //若不是第一行,需要加上行间距

        y += self.rowMargin;

    }

    /**给cell的布局属性的frame赋值*/

    attrs.frame = CGRectMake(x, y, width, height);

    //更新最短那列的高度

    self.columnHeights[destColumn] = @(CGRectGetMaxY(attrs.frame));

    /**返回indexPath位置的cell的布局属性*/

    return attrs;

}
设置collectionView内容的尺寸
- (CGSize)collectionViewContentSize

{

    //获取最高的那一列的高度

    CGFloat maxColumnHeight = [self.columnHeights[0] doubleValue];

    for (NSInteger i = 1; i<self.columnCount; i++)

    {

        CGFloat columnHeight = [self.columnHeights[i] doubleValue];

        if (maxColumnHeight < columnHeight)

        {

            maxColumnHeight = columnHeight;

        }

    }

    //返回collectionView的contentSize,高度为最高的高度加上一个行间距

    return CGSizeMake(0, maxColumnHeight + self.rowMargin);

}
OC - 30.如何封装自定义布局的更多相关文章
- OC - 31.通过封装的自定义布局快速实现商品展示
概述 实现效果 设计思路 采用MVC架构,即模型—视图-控制器架构 使用MJExtension框架实现字典转模型 使用MJRefresh框架实现上拉和下拉刷新 上拉刷新,加载新的数据 下拉刷新,加载更 ...
- OC - 29.自定义布局实现瀑布流
概述 瀑布流是电商应用展示商品通常采用的一种方式,如图示例 瀑布流的实现方式,通常有以下几种 通过UITableView实现(不常用) 通过UIScrollView实现(工作量较大) 通过UIColl ...
- Swift - 使用网格(UICollectionView)的自定义布局实现复杂页面
网格UICollectionView除了使用流布局,还可以使用自定义布局.实现自定义布局需要继承UICollectionViewLayout,同时还要重载下面的三个方法: 1 2 3 4 5 6 7 ...
- Collection View 自定义布局(custom flow layout)
Collection view自定义布局 一般我们自定义布局都会新建一个类,继承自UICollectionViewFlowLayout,然后重写几个方法: prepareLayout():当准备开始布 ...
- AcitonBar 自定义布局
Android系统中ActionBar默认的布局不美观且难于控制,通过为ActionBar自定义布局的方式可以灵活控制ActionBar. 自定义Activity主题和ActionBar样式 在新建的 ...
- Xamarin自定义布局系列——瀑布流布局
Xamarin.Forms以Xamarin.Android和Xamarin.iOS等为基础,自己实现了一整套比较完整的UI框架,包含了绝大多数常用的控件,如下图 虽然XF(Xamarin.Forms简 ...
- Flutter自定义布局套路
开始 在Android中我们要实现一个布局需要继承ViewGroup, 重写其中的onLayout和onMeasure方法. 其中onLayout负责给子控件设置布局区域, onMeaseure度量子 ...
- ActionBar 自定义布局定义
ActionBar 自定义布局定义 Android系统中ActionBar默认的布局不美观且难于控制,通过为ActionBar自定义布局的方式可以灵活控制ActionBar. 效果: 工具/原料 ...
- 干货之UIButton的title和image自定义布局
当需要实现一个自定义布局图片和标题的按钮时候,不知道有多少少年直接布局了UIButton,亦或是自定义一个UIView,然后以空白UIButton.UILabel.UIImageVew作为subVie ...
随机推荐
- Android开源项目发现--- 工具类文件处理篇(持续更新)
1.ZIP java压缩和解压库 项目地址:https://github.com/zeroturnaround/zt-zip 文档介绍:https://github.com/zeroturnaroun ...
- Android sqlite数据库存取图片信息
Android sqlite数据库存取图片信息 存储图片:bitmap private byte[] getIconData(Bitmap bitmap){ int size = bitmap.get ...
- 深入浅出Node.js (9) - 玩转进程
9.1 服务模型的变迁 9.1.1 石器时代:同步 9.1.2 青铜时代:复制进程 9.1.3 白银时代:多线程 9.1.4 黄金时代:事件驱动 9.2 多进程架构 9.2.1 创建子进程 9.2.2 ...
- 【JS】JS外联不执行,内联执行
匹配域名http://lb.qq.com 或 http://lb.l.qq.com
- 利用腾讯企业邮箱开放API获取账户未读邮件数初探
公司一直使用腾讯提供的免费企业邮箱服务,今天用管理员帐户登录后发现,原来现在腾讯的企业邮箱也开放了部分API 你可以通过开放接口实现以下功能: 数据同步 数据同步可以帮助你同步部门成员信息,你还可以创 ...
- HTML5 Canvas JavaScript库 Fabric.js 使用经验
首先,表明我的态度:采用 Flash 才是最优方案,不建议使用 HTML 5 的 Canvas 做一些生产/工业级的网页应用. Flash的优势一是浏览器支持好,二是代码成熟稳定.而HTML5 的 C ...
- 使用AppDelegate单例,解决子视图无法给父视图发送消息的问题
关于单例模式,我会在实验过后再开一个博客重点讲单例的使用,这里只是介绍我在PhotoForBingyan的照片滤镜的项目中使用AppDelegate单例的情况. 碰到的问题: 由于这个项目是个多视图的 ...
- MFC去掉win7玻璃效果
在MainFrame的OnCreate中添加以下代码 if (CWnd::OnCreate(lpCreateStruct) == -1) return -1; HINSTANCE hInstance ...
- Drawing Lines - SGU 135(简单递推)
求N条直线最多能把一个平面分成几部分. 代码如下: ========================================================================== ...
- JS代码获取当前日期时支持IE,不兼容FF和chrome,解决这个问题,我们需要把获取时间的getYear()函数换成getFullYear()
以前在页面中获得当前时间的方法如下: function SelectTodayClient() { var d = new Date(); var taday = d.getYear() + &quo ...