idea 搭建 SpringBoot 集成 mybatis
编译器:IDEA2018.2.3
环境:win10,jdk1.8,maven3.4
数据库:mysql 5.7
备注:截图较大,如果看不清,可以在图片上右键=》在新标签页中打开 查看高清大图哦╮(╯▽╰)╭
一、打开IDEA新建项目
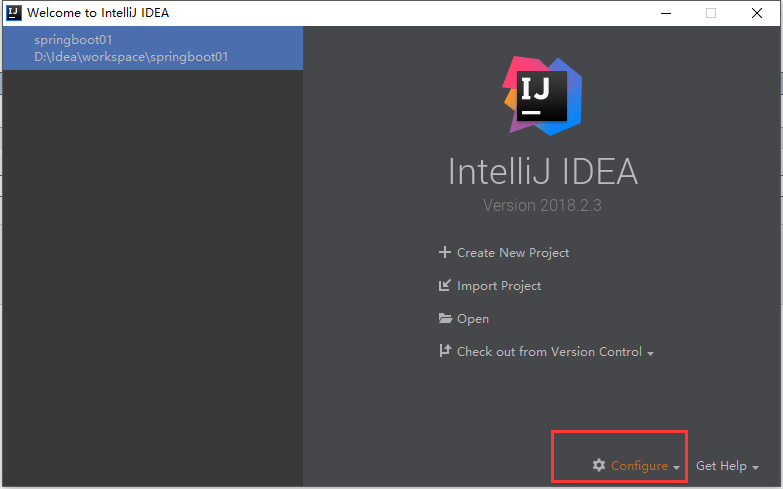
1. 如果你是第一次使用IDEA,那么你需要配置你本地的maven,点击右下角 Configure,如已配置请忽略此步骤
在下拉框中选择setting,然后如下图操作,选择自己本地的maven路径与maven配置文件
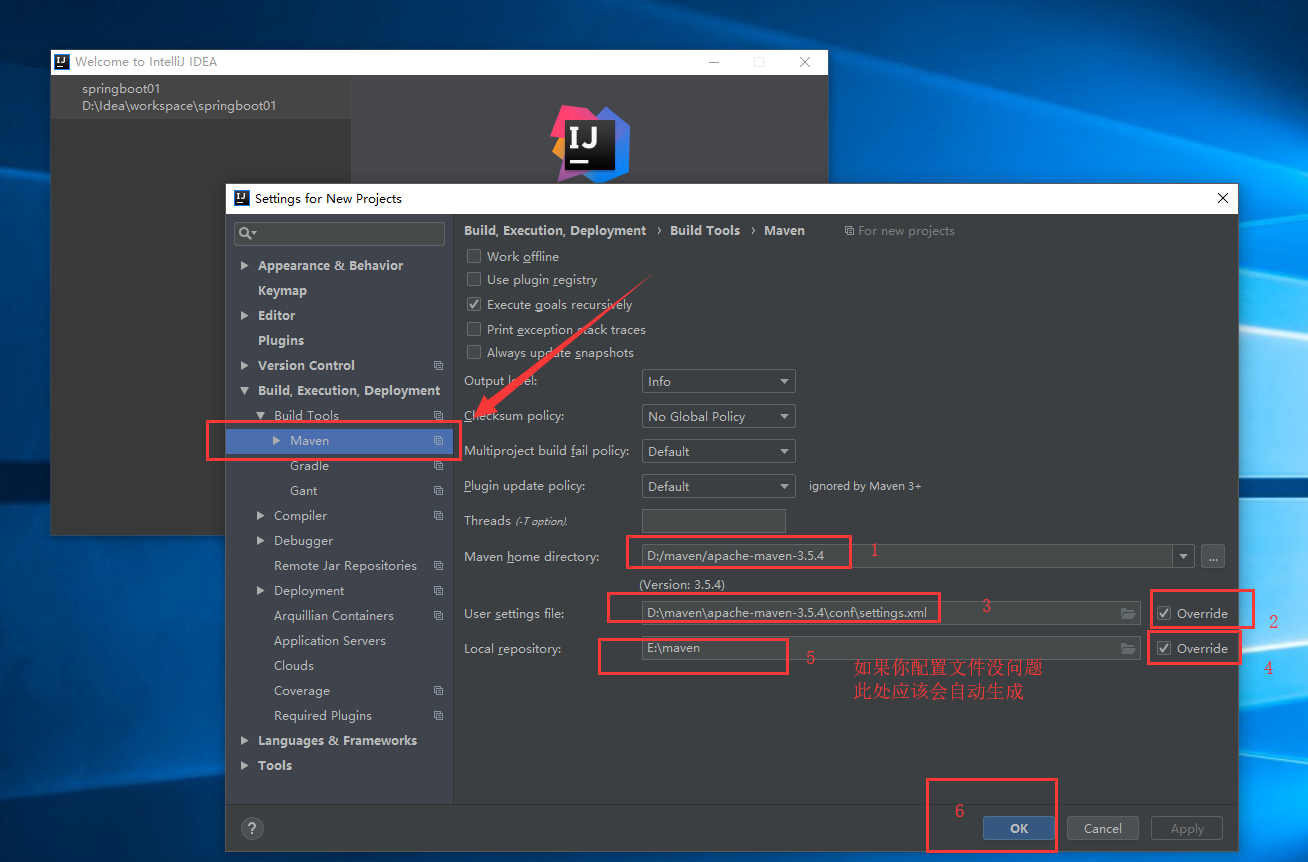
点击OK
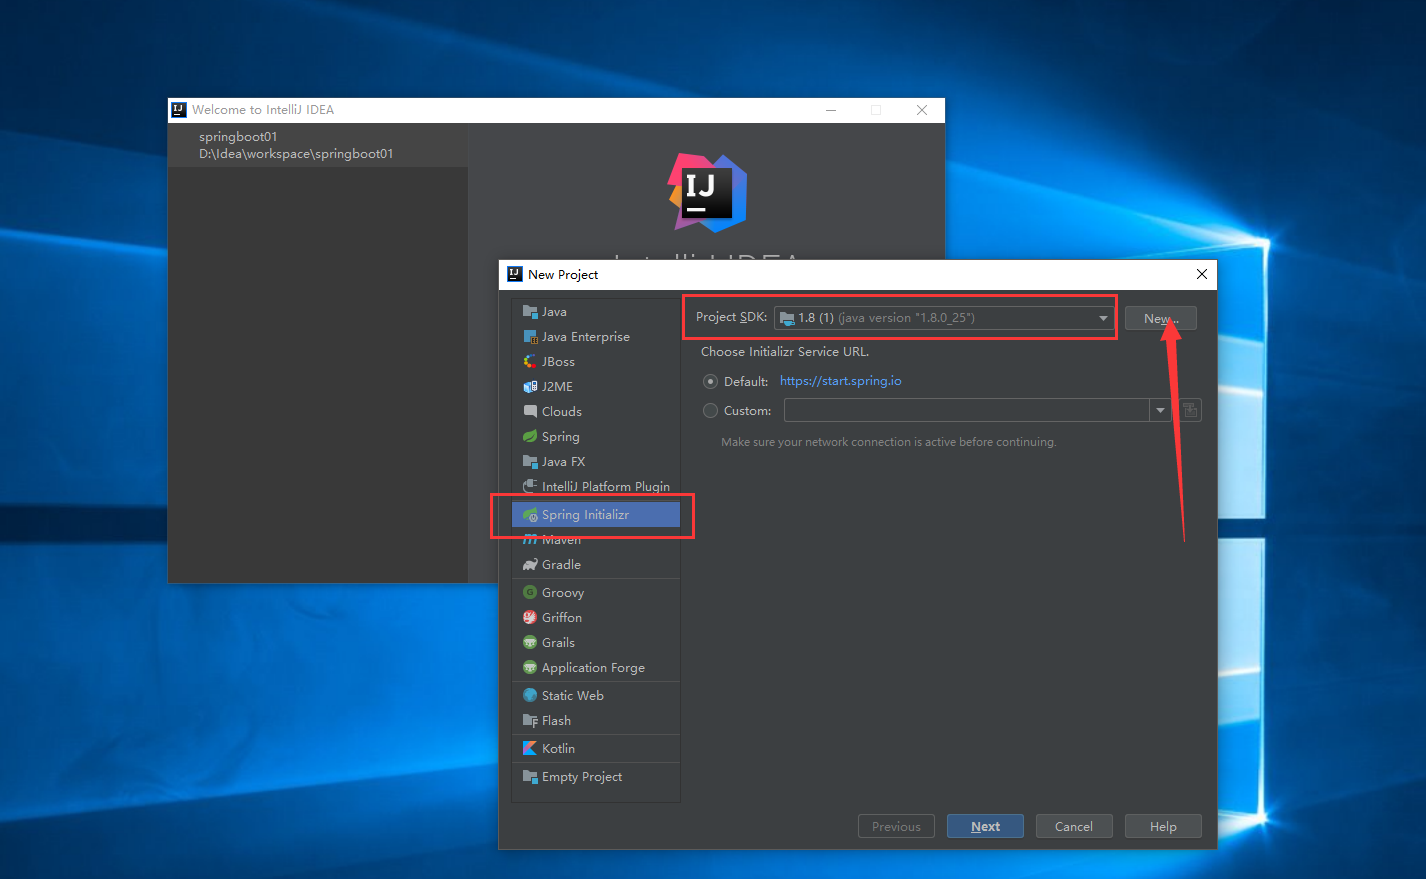
2.新建项目

点击Create New Project 后,弹出如下界面,选择Spring Initializer,然后可以使用编译器自带的JDK,也可以点击New,新建并使用自己本地目录下的JDK环境
当然你也可以选择Maven,使用Maven搭建自己的环境,但相信我,前者更为便捷
完成上述步骤,选择JDK之后,点击next,如下图

这里会提示我们输入一些项目信息,那么作为初学者,显然我们没有必要去较劲,请直接next,之后如下图

这里会为你准备许多开发时你需要用到的组件供你挑选,你尽管挑选你可能会用到的组件,然后打勾✔,编译器会在帮你创建项目时,在pom文件中替你写好这些组件需要用到的jar包,很贴心,有点小感动
如果你只是构建一个SpringBoot,你可以什么都不选直接跳过这一步
由于后期我们要集成mybatis,所以我们勾选mybatis
由于我们的数据库是mysql 5.7,那么我们要勾选mysql
勾选完成后点击next,如下图

此处提示我们输入一些工程信息,那么,作为初学者,点击next就好,不要在意这些细节...
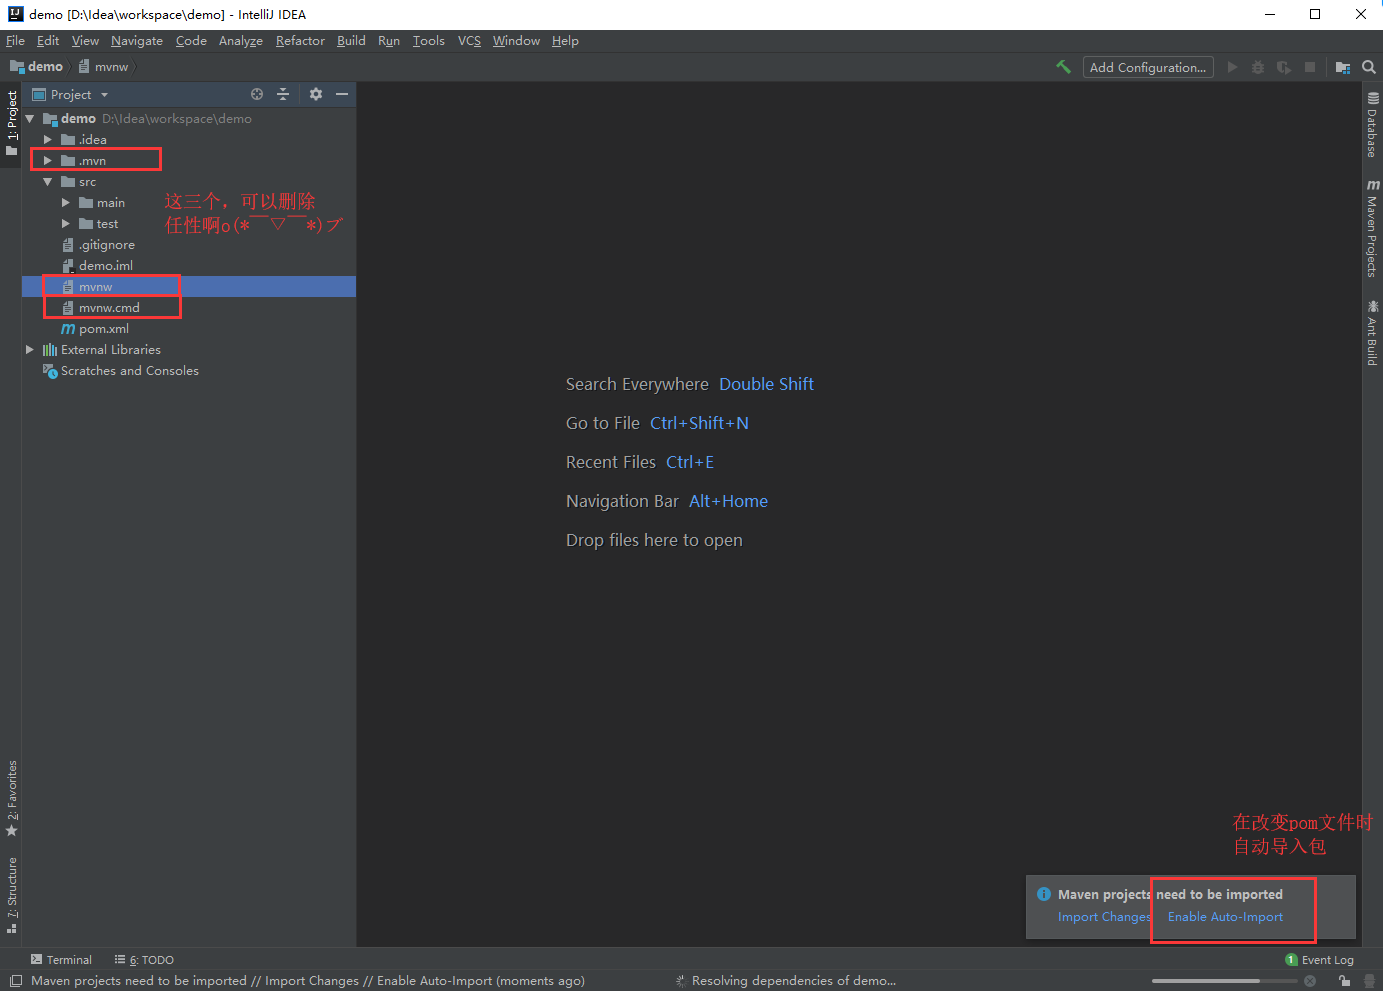
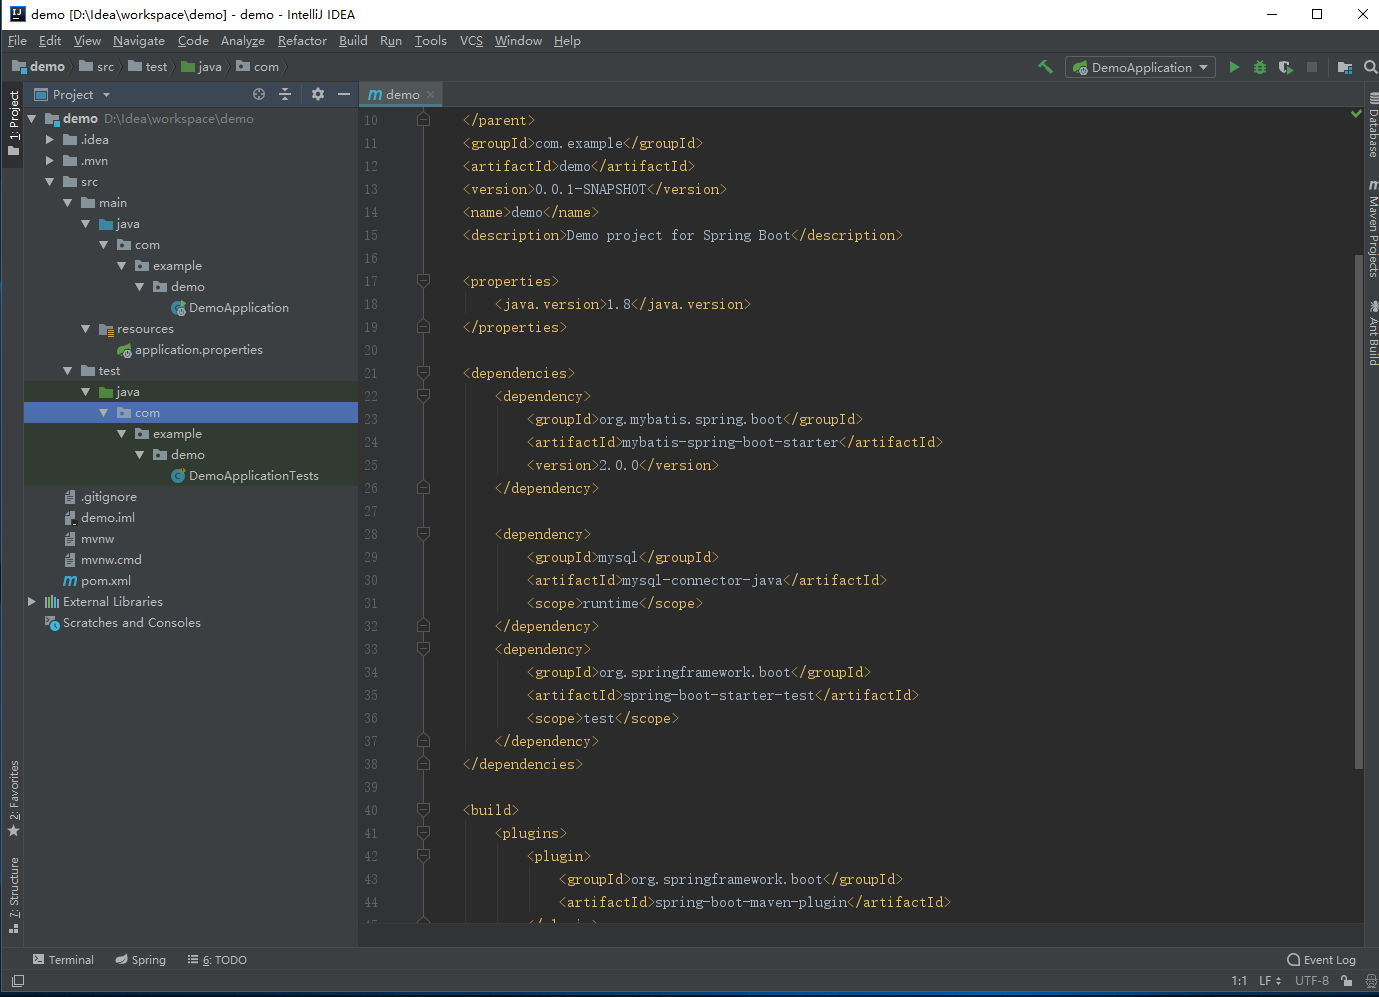
点击之后效果如图,请点击右下角Enable Auto-Import ,允许编译器在你改变pom文件后自动导入包,另外,左侧显示的三处不必要的文件和文件夹可以删除,如图所示
完成上述步骤之后,项目结构及pom文件如下图
至此一个SpringBoot项目构建完成,我们可以编写一个小小的demo来测试SpringBoot
3.SpringBoot 测试
首先在pom文件中添加如下依赖(非常重要的一个依赖)
<dependency>

    <groupId>org.springframework.boot</groupId>

    <artifactId>spring-boot-starter-web</artifactId>

</dependency>
由于我们暂时没有实体类与jdbc连接,所以我们必须要将pom文件中有关mysql与mybatis的pom依赖注释掉,如图

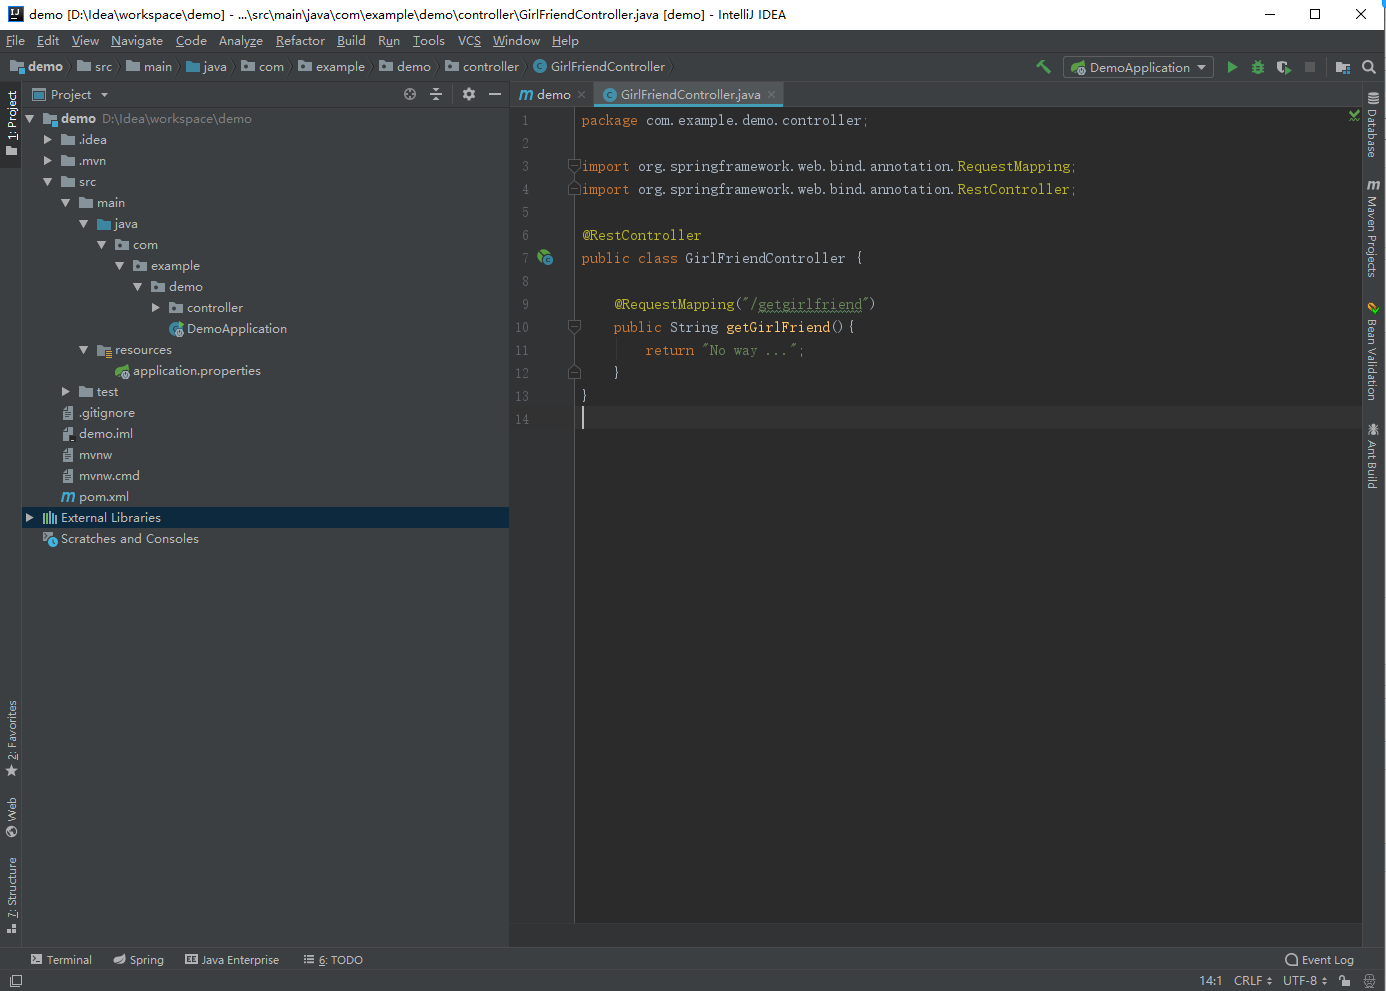
在demo包下,新建controller包,并新建一个类GirlFriendController,程序员有对象真的很容易啊,随手就能new一个...代码如下
package com.example.demo.controller;

import org.springframework.web.bind.annotation.RequestMapping;

import org.springframework.web.bind.annotation.RestController;

@RestController

public class GirlFriendController {

    @RequestMapping("/getgirlfriend")

    public String getGirlFriend(){

        return "No way ...";

    }

}
如图
然后我们找到编译器为我们生成的主类,或者叫入口类,然后点击运行main方法,如图
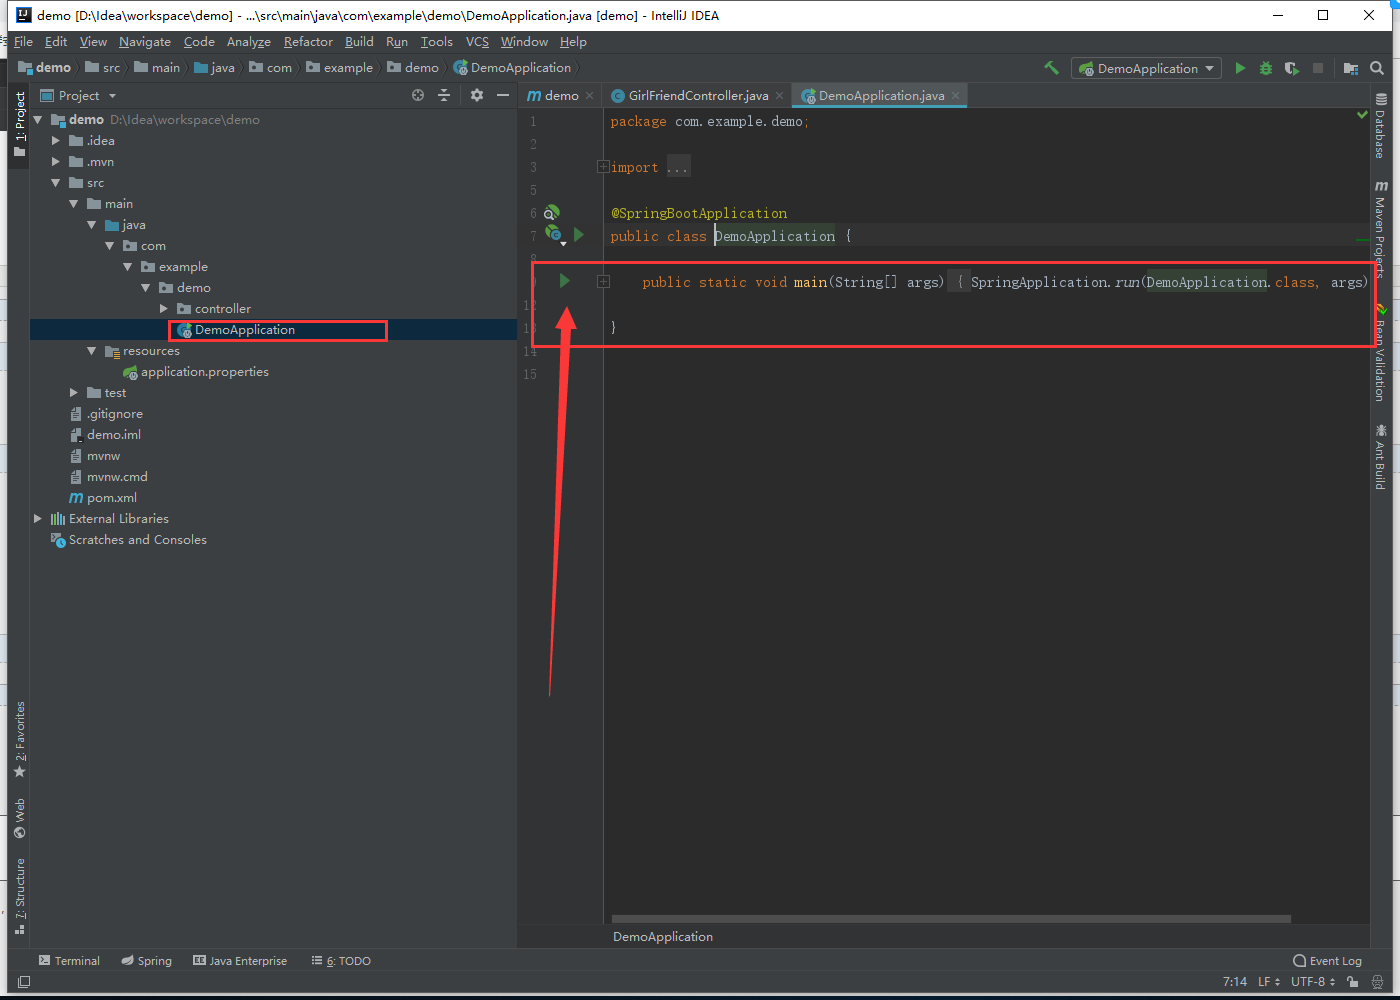
项目成功启动后,我们在浏览器输入 http://localhost:8080/getgirlfriend ,就能返回结果(此处不需要输入项目名称)

至此,SpringBoot框架搭建成功,下一步就是整合mybatis
4.整合mybatis
将我们之前注释掉的pom文件中的依赖放开,将注意力转至mysql数据库与mybatis上
首先,使用navcat打开mysql数据库并建立一张表girlfriend
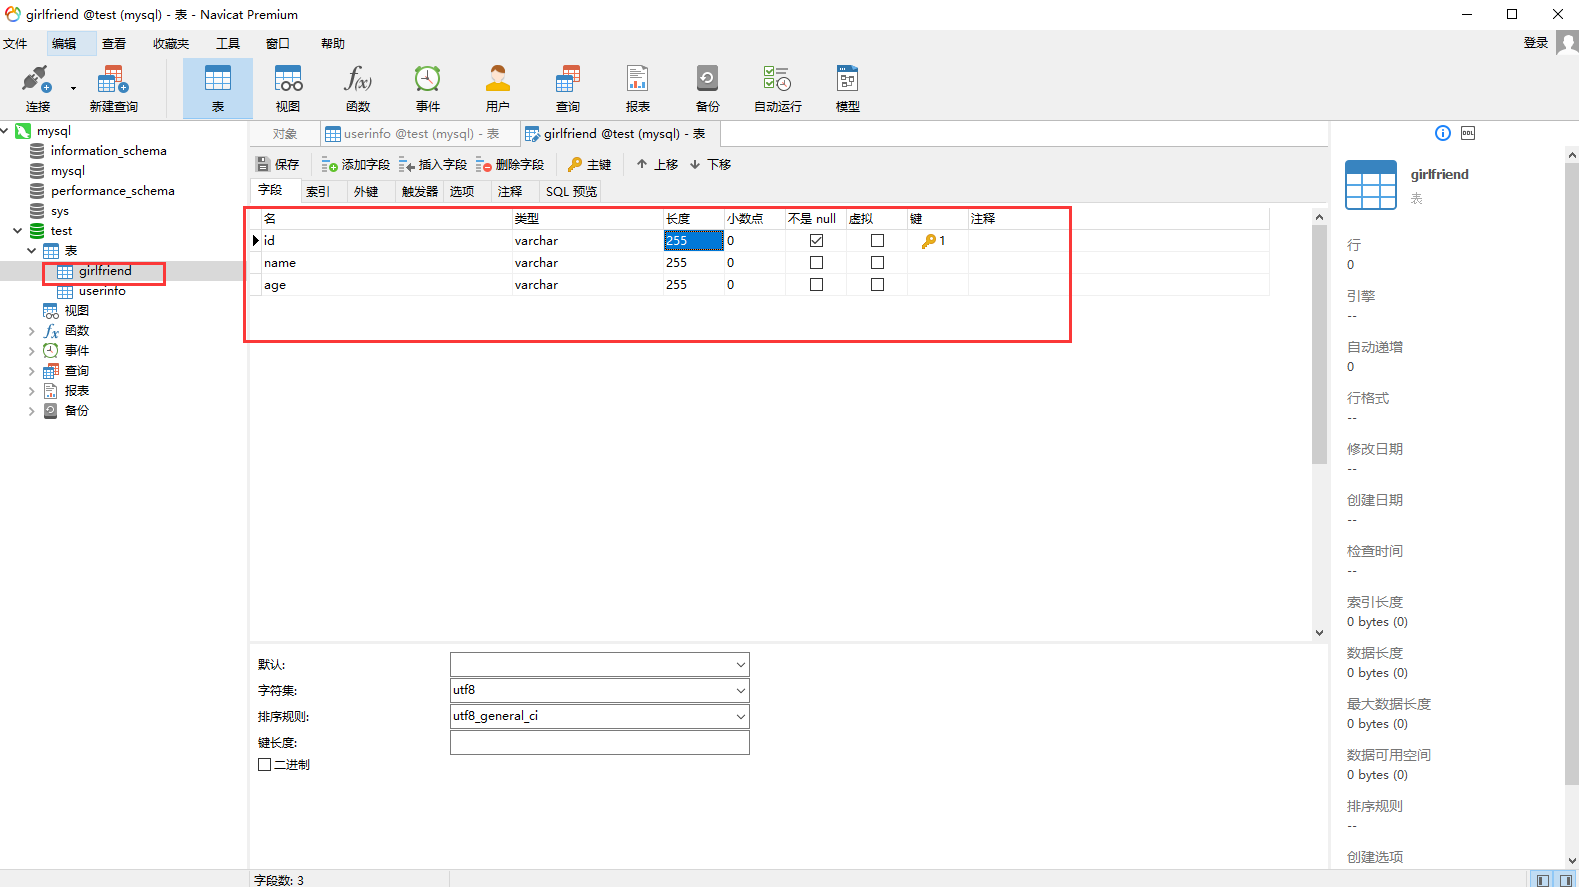
我们插入一条测试数据
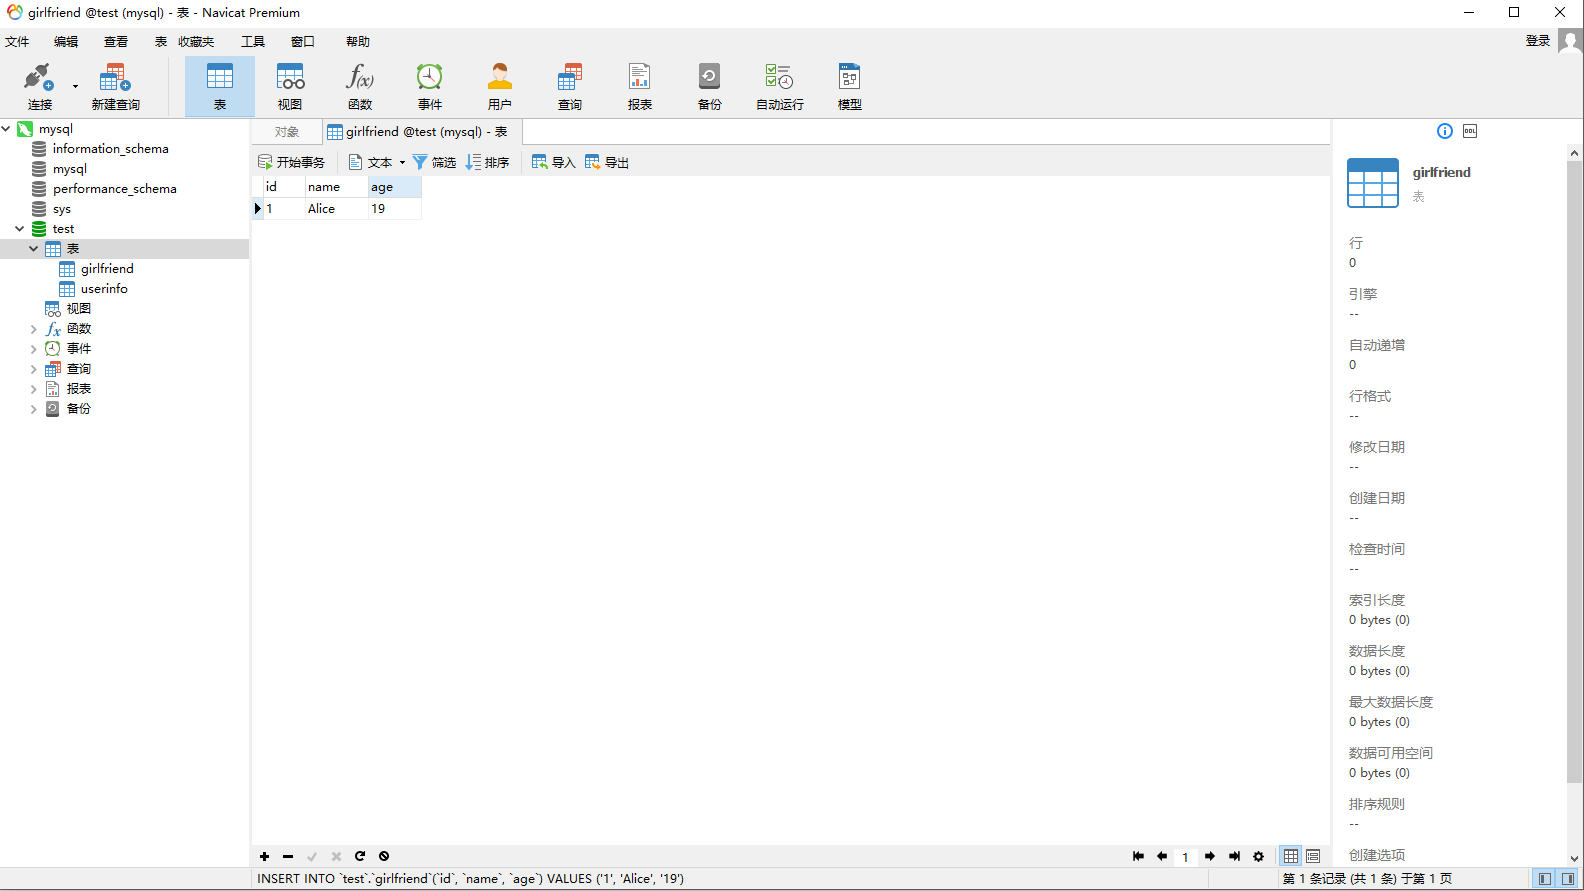
女神艾莉丝,19岁好吧,各位绅士,建表及测试数据脚本如下
SET NAMES utf8mb4;

SET FOREIGN_KEY_CHECKS = 0;

-- ----------------------------

-- Table structure for girlfriend

-- ----------------------------

DROP TABLE IF EXISTS `girlfriend`;

CREATE TABLE `girlfriend`  (

  `id` varchar(255) CHARACTER SET utf8 COLLATE utf8_general_ci NOT NULL,

  `name` varchar(255) CHARACTER SET utf8 COLLATE utf8_general_ci DEFAULT NULL,

  `age` varchar(255) CHARACTER SET utf8 COLLATE utf8_general_ci DEFAULT NULL,

  PRIMARY KEY (`id`) USING BTREE

) ENGINE = InnoDB CHARACTER SET = utf8 COLLATE = utf8_general_ci ROW_FORMAT = Dynamic;

-- ----------------------------

-- Records of girlfriend

-- ----------------------------

INSERT INTO `girlfriend` VALUES ('', 'Alice', '');

SET FOREIGN_KEY_CHECKS = 1;
好的,那么表数据准备完成,下一步准备根据mysql的表实现mybatis相关内容
我们使用工具来生成
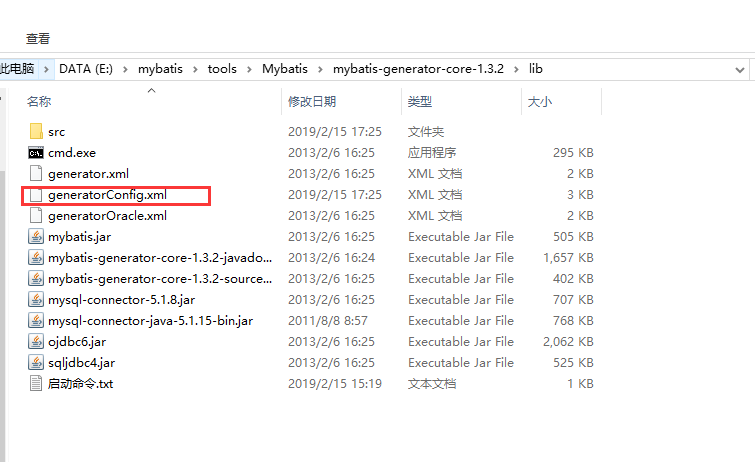
工具下载地址 https://pan.baidu.com/s/1RvwKlsmpKJQ_PJkuNjiPdw
下载后解压,解压后进入 Mybatis\mybatis-generator-core-1.3.2\lib 目录,如图所示
点击进入src目录,删除src目录下的全部文件(这是上次使用产生的实体类与xml,我们不需要)
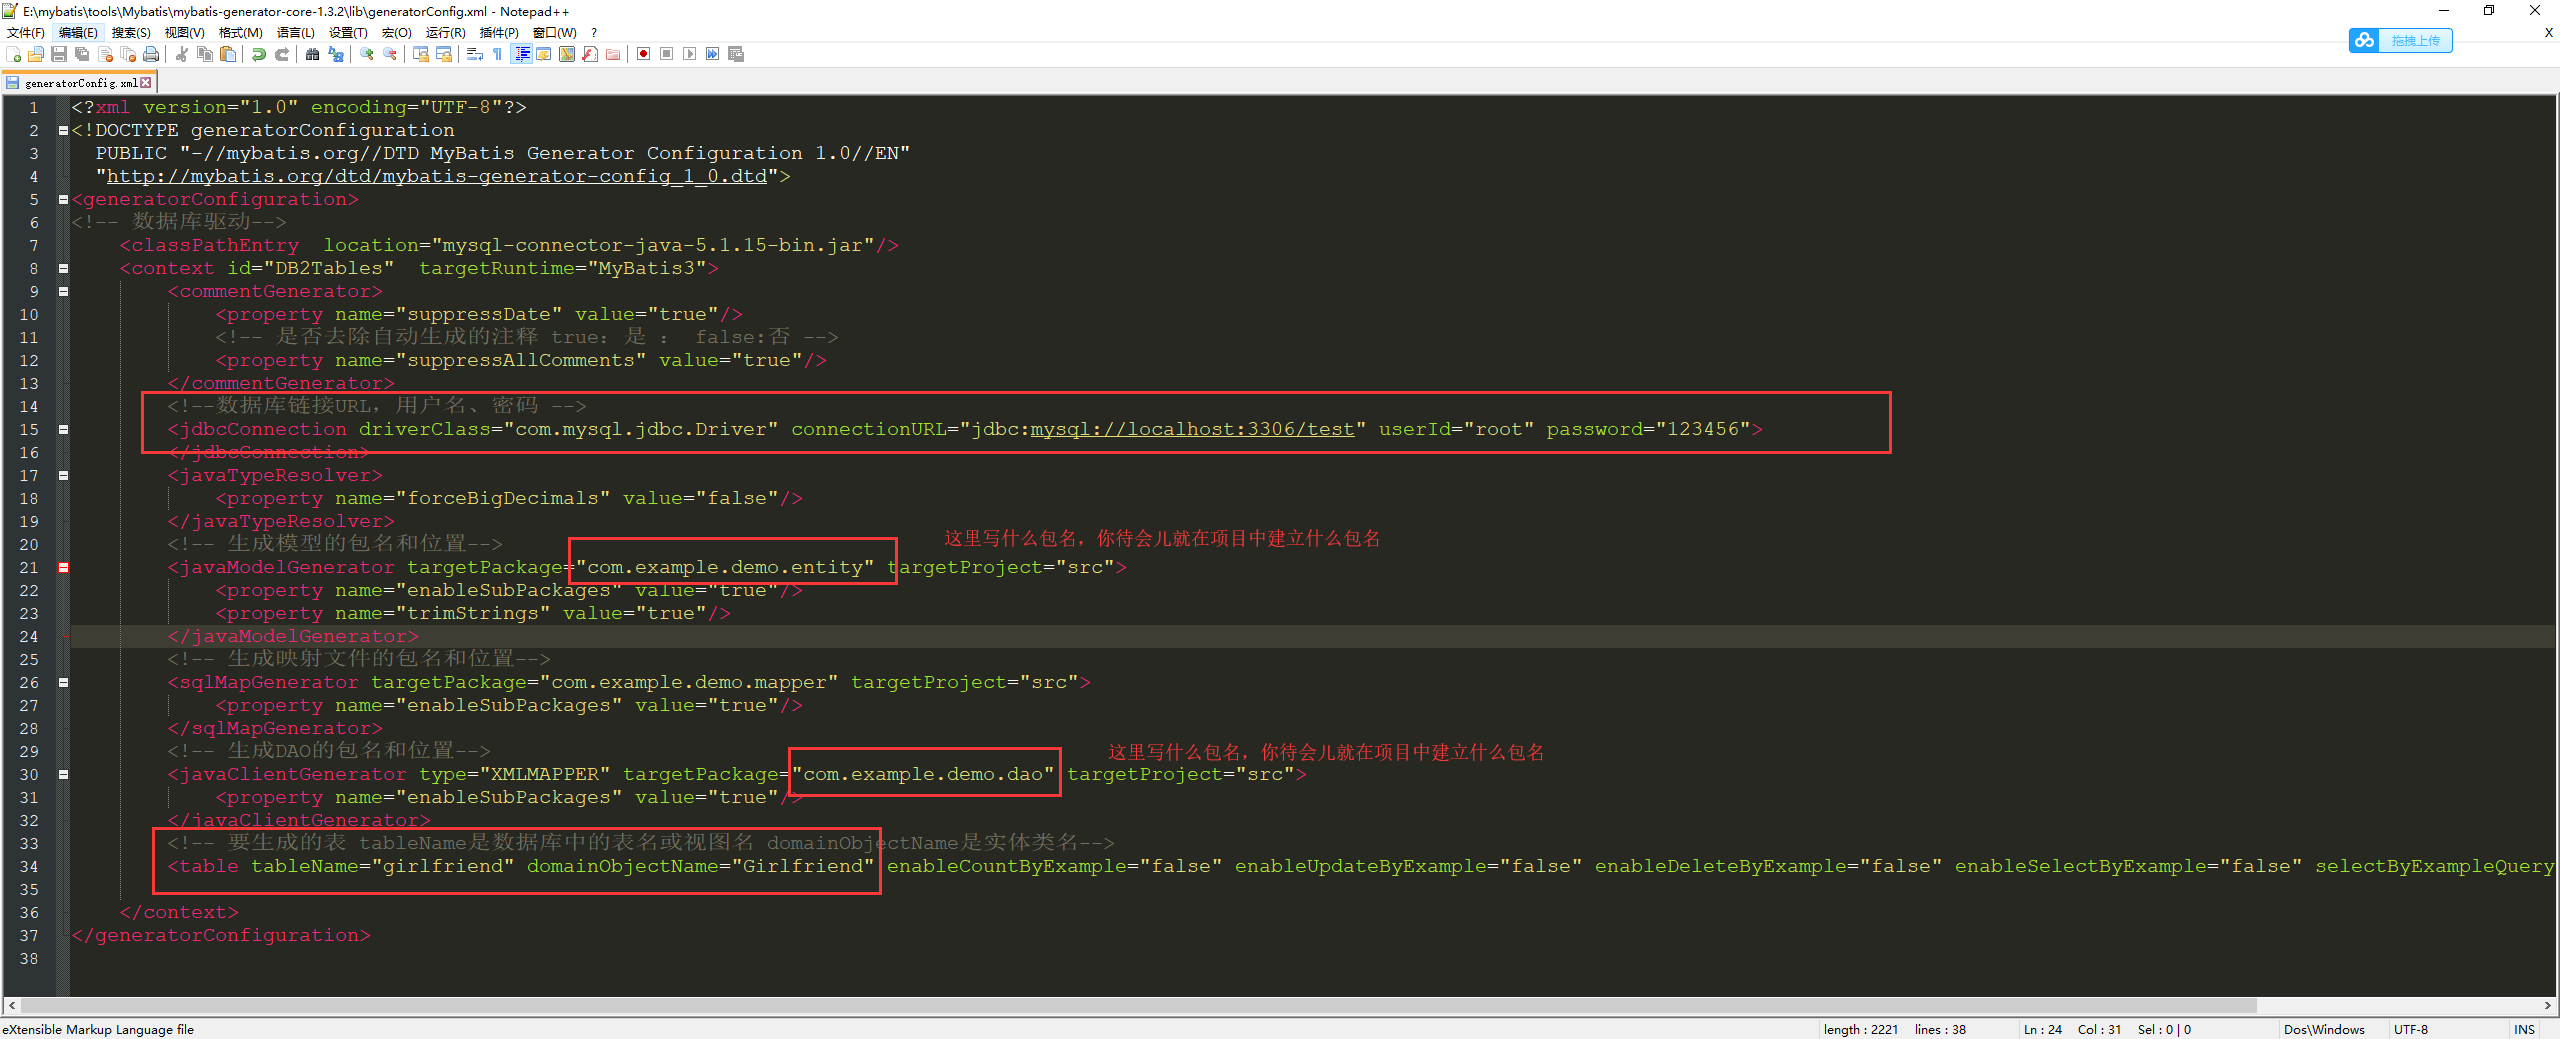
编辑 generatorConfig.xml
编辑完成generatorConfig.xml后,打开启动命令.txt,复制其中第一行或第二行命令,反正都一样...
然后点击cmd.exe
然后输入命令,如图,运行后提示成功信息

打开cmd.exe同目录下的src目录,我们会发现下面多了一些东西,如图

没错,他们就是这款工具帮我们生成的实体类,dao类,与xml文件
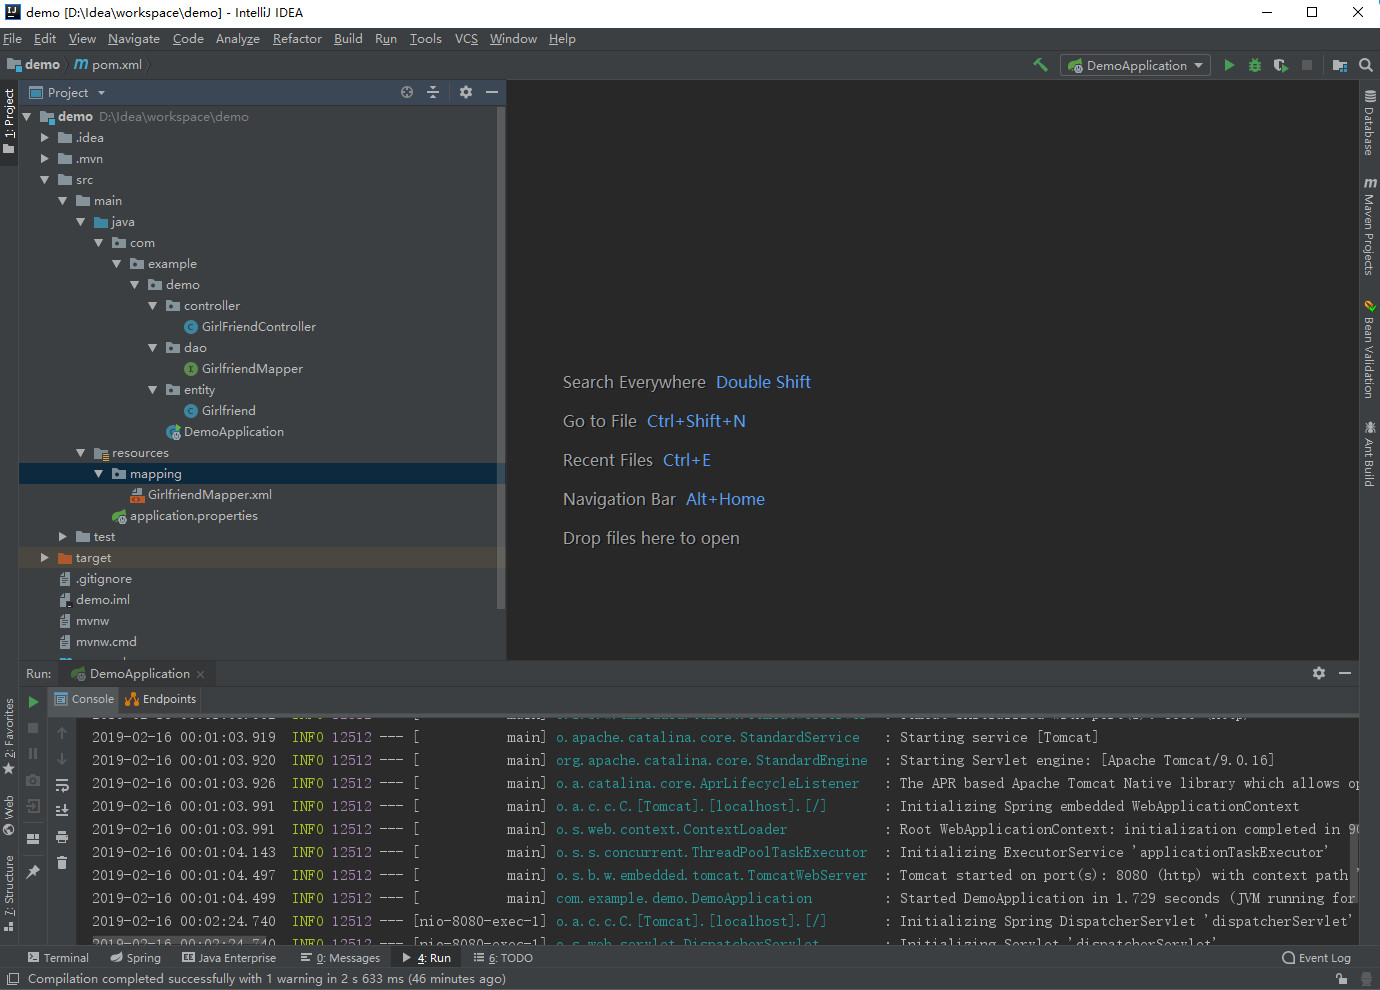
接下来我们在项目目录中新建相应的包、文件夹,并将工具帮我们生成的类与文件拷贝至IDEA新建的包或文件夹中
拷贝完成之后的项目结构如下图所示
然后,我们删除IDEA帮我们创建的 application.properties ,新建 application.yml,如图
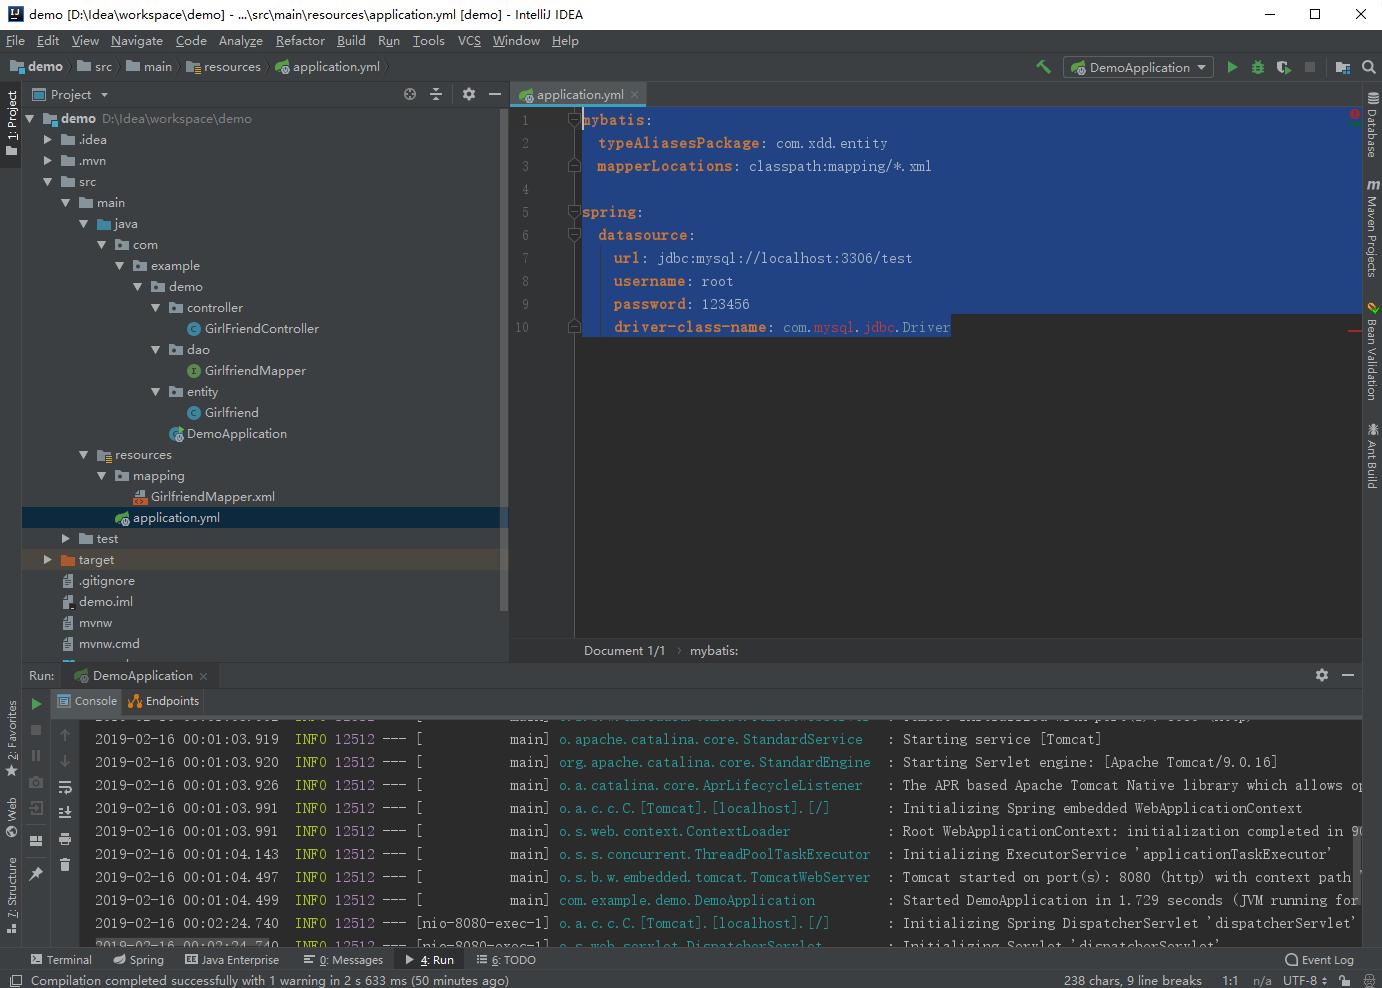
配置代码如下
mybatis:
  typeAliasesPackage: com.xdd.entity
  mapperLocations: classpath:mapping/*.xml

spring:
  datasource:
    url: jdbc:mysql://localhost:3306/test
    username: root
    password: 123456
    driver-class-name: com.mysql.jdbc.Driver

我们新建一个service包与service类,如图

代码如下
package com.example.demo.service;

import com.example.demo.dao.GirlfriendMapper;

import com.example.demo.entity.Girlfriend;

import org.springframework.beans.factory.annotation.Autowired;

@Service

public class GirlFriendService {

    @Autowired

    private GirlfriendMapper girlfriendMapper;

    public Girlfriend getGirlFriendById(String id){

        return girlfriendMapper.selectByPrimaryKey(id);

    }

}
然后我们再改造一下 GirlFriendController ,如图
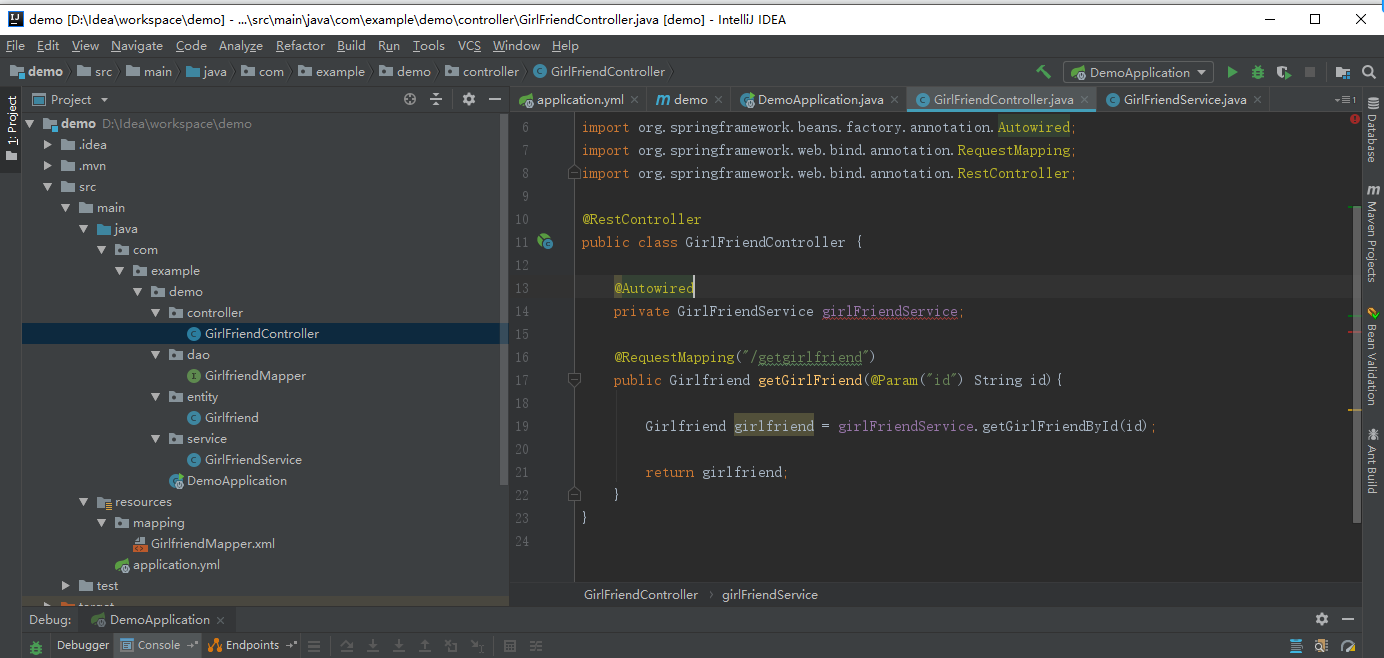
代码如下
package com.example.demo.controller;

import com.example.demo.entity.Girlfriend;

import com.example.demo.service.GirlFriendService;

import org.apache.ibatis.annotations.Param;

import org.springframework.beans.factory.annotation.Autowired;

import org.springframework.web.bind.annotation.RequestMapping;

import org.springframework.web.bind.annotation.RestController;

@RestController

public class GirlFriendController {

    @Autowired

    private GirlFriendService girlFriendService;

    @RequestMapping("/getgirlfriend")

    public Girlfriend getGirlFriend(@Param("id") String id){

        Girlfriend girlfriend = girlFriendService.getGirlFriendById(id);

        return girlfriend;

    }

}
这时我们看到注入的 girlFriendService 在报错,我们打开编译器 file -》Project Structure -》Facets -》Spring ,然后将Spring(demo) 直接右键删除,确定,报错就解决了
然后我们再编辑入口类 DemoApplication ,添加扫描路径,代码如下
package com.example.demo;

import org.mybatis.spring.annotation.MapperScan;

import org.springframework.boot.SpringApplication;

import org.springframework.boot.autoconfigure.SpringBootApplication;

@SpringBootApplication

@MapperScan("com.example.demo.dao")

public class DemoApplication {

    public static void main(String[] args) {

        SpringApplication.run(DemoApplication.class, args);

    }

}
至此大功告成,我们启动项目,在浏览器中输入 http://localhost:8080/getgirlfriend?id=1 ,就在此时,不料报错。。。。。。
Caused by: com.mysql.cj.exceptions.InvalidConnectionAttributeException: The server time zone value 'Öйú±ê׼ʱ¼ä' is unrecognized or represents more than one time zone. You must configure either the server or JDBC driver (via the serverTimezone configuration property) to use a more specifc time zone value if you want to utilize time zone support.

	at sun.reflect.NativeConstructorAccessorImpl.newInstance0(Native Method) ~[na:1.8.0_25]

	at sun.reflect.NativeConstructorAccessorImpl.newInstance(NativeConstructorAccessorImpl.java:62) ~[na:1.8.0_25]

	at sun.reflect.DelegatingConstructorAccessorImpl.newInstance(DelegatingConstructorAccessorImpl.java:45) ~[na:1.8.0_25]

	at java.lang.reflect.Constructor.newInstance(Constructor.java:408) ~[na:1.8.0_25]
百度才知道这是mysql时区设置问题啊,美帝太坏了...
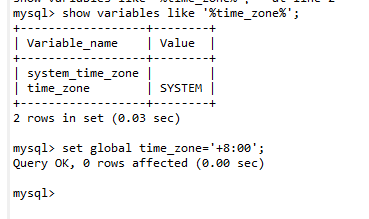
打开mysql命令行输入
show variables like '%time_zone%'

set global time_zone='+8:00';
如图 ,搞定
再次在浏览器中输入 http://localhost:8080/getgirlfriend?id=1 ,效果如图

啊哈~大功告成
至此SpringBoot+mybatis框架搭建完成,希望大家多多点赞多多评论
纯手打,也希望转载能注明出处,感激不尽
由于本人实在困得不行...所以删除、新增与修改的重任,交给各位绅士....good night o(* ̄▽ ̄*)ブ
idea 搭建 SpringBoot 集成 mybatis的更多相关文章
- 搭建springboot集成mybatis
1.new project创建新项目选择spring initializr: 2.选择依赖需要选择web.mybatis.mysql就够了,后续需要其他的直接pom引入依赖就好了: 3.自己在java ...
- SpringBoot 集成MyBatis 中的@MapperScan注解
SpringBoot 集成MyBatis 中的@MapperScan注解 2018年08月17日 11:41:02 文火慢炖 阅读数:398更多 个人分类: 环境搭建 在SpringBoot中集成My ...
- springboot集成mybatis(二)
上篇文章<springboot集成mybatis(一)>介绍了SpringBoot集成MyBatis注解版.本文还是使用上篇中的案例,咱们换个姿势来一遍^_^ 二.MyBatis配置版(X ...
- springboot集成mybatis(一)
MyBatis简介 MyBatis本是apache的一个开源项目iBatis, 2010年这个项目由apache software foundation迁移到了google code,并且改名为MyB ...
- SpringBoot 集成Mybatis 连接Mysql数据库
记录SpringBoot 集成Mybatis 连接数据库 防止后面忘记 1.添加Mybatis和Mysql依赖 <dependency> <groupId>org.mybati ...
- SpringBoot Mybatis整合(注解版),SpringBoot集成Mybatis(注解版)
SpringBoot Mybatis整合(注解版),SpringBoot集成Mybatis(注解版) ================================ ©Copyright 蕃薯耀 2 ...
- SpringBoot集成Mybatis并具有分页功能PageHelper
SpringBoot集成Mybatis并具有分页功能PageHelper 环境:IDEA编译工具 第一步:生成测试的数据库表和数据 SET FOREIGN_KEY_CHECKS=0; ...
- Springboot集成mybatis(mysql),mail,mongodb,cassandra,scheduler,redis,kafka,shiro,websocket
https://blog.csdn.net/a123demi/article/details/78234023 : Springboot集成mybatis(mysql),mail,mongodb,c ...
- BindingException: Invalid bound statement (not found)问题排查:SpringBoot集成Mybatis重点分析
重构代码,方法抛出异常:BindingException: Invalid bound statement (not found) 提示信息很明显:mybatis没有提供某方法 先不解释问题原因和排查 ...
随机推荐
- [React] Style the body element with styled-components and "injectGlobal"
In this lesson, we see how we can apply styles globally with the "injectGlobal" helper met ...
- [Angular] FadeIn and FadeOut animation in Angular
To define an Angular Animation, we using DSL type of language. Means we are going to define few anim ...
- 如何获取用户的地理位置-浏览器地理位置(Geolocation)API 简介
如何获取用户的地理位置-浏览器地理位置(Geolocation)API 简介 一.总结 一句话总结:Geolocation API(地理位置应用程序接口)提供了一个可以准确知道浏览器用户当前位置的方法 ...
- 字符集和编码II: fat/msdos/vfat (文件名乱码的问题)
具体到文件名乱码的问题,需要明确两点 第一,文件名作为一个字符串,需要被编码后存入文件系统: 第二,Linux内核无非是个特殊的应用程序,它读取文件名,再把文件名以编码后的形式传递出去. 但Linux ...
- POJ 2983 Is the Information Reliable? 依旧差分约束
http://poj.org/problem?id=2983 题目大意: 星际大战开始了.你购买了情报,需要判断它的准确性.已知地方的根据地在由南向北排成一条直线.P A B X,表示A在B北面距离X ...
- C语言主要做哪些方面的开发---一个来自“IT技术学习”微信群的问题及答复
近期,在"IT技术学习"微信群中,有同学问了这样一个问题:C语言主要做哪些方面的开发?在这篇文章中,我想结合自身的经验,对这个问题进行下解答. C语言是计算机及其相关专业(如通信. ...
- 搭建MHA问题汇总
1,Can't exec "mysqlbinlog": No such file or directory at /usr/share/perl5/vendor_perl/MHA/ ...
- 4、linux开发中常用指令
1.cat /proc/device 可以查看各个全部字符设备和块设备,在register_chrdev中设置的名字在打印出来的信息中可以看到:2.top 可以看各个应用程序占用CPU量及PID等信息 ...
- Engine工具栏按钮的使用详解
转自原文 Engine自定义控件实现toolbar功能 Engine提供的工具条能够轻易实现各种操作,非常方便,可是不好的地方就是太死板了,toolbar的图标都不能改.因此需要自己做按钮做控件去实现 ...
- 数学之路-python计算实战(5)-初识numpy以及pypy下执行numpy
N .有用的线性代数.傅里叶变换和随机数生成函数.numpy和稀疏矩阵运算包scipy配合使用更加方便.NumPy(Numeric Python)提供了很多高级的数值编程工具,如:矩阵数据类型.矢量处 ...