Face Recognition for the Happy House
Andrew Ng deeplearning courese-4:Convolutional Neural Network
- Convolutional Neural Networks: Step by Step
- Convolutional Neural Networks: Application
- Residual Networks
- Autonomous driving - Car detection YOLO
- Face Recognition for the Happy House
- Art: Neural Style Transfer
Github地址
Face Recognition for the Happy House
Welcome to the first assignment of week 4! Here you will build a face recognition system. Many of the ideas presented here are from FaceNet. In lecture, we also talked about DeepFace.
Face recognition problems commonly fall into two categories:
- Face Verification - "is this the claimed person?". For example, at some airports, you can pass through customs by letting a system scan your passport and then verifying that you (the person carrying the passport) are the correct person. A mobile phone that unlocks using your face is also using face verification. This is a 1:1 matching problem.
- Face Recognition - "who is this person?". For example, the video lecture showed a face recognition video (https://www.youtube.com/watch?v=wr4rx0Spihs) of Baidu employees entering the office without needing to otherwise identify themselves. This is a 1:K matching problem.
FaceNet learns a neural network that encodes a face image into a vector of 128 numbers. By comparing two such vectors, you can then determine if two pictures are of the same person.
In this assignment, you will:
- Implement the triplet loss function
- Use a pretrained model to map face images into 128-dimensional encodings
- Use these encodings to perform face verification and face recognition
In this exercise, we will be using a pre-trained model which represents ConvNet activations using a "channels first" convention, as opposed to the "channels last" convention used in lecture and previous programming assignments. In other words, a batch of images will be of shape \((m, n_C, n_H, n_W)\) instead of \((m, n_H, n_W, n_C)\). Both of these conventions have a reasonable amount of traction among open-source implementations; there isn't a uniform standard yet within the deep learning community.
Let's load the required packages.
from keras.models import Sequential

from keras.layers import Conv2D, ZeroPadding2D, Activation, Input, concatenate

from keras.models import Model

from keras.layers.normalization import BatchNormalization

from keras.layers.pooling import MaxPooling2D, AveragePooling2D

from keras.layers.merge import Concatenate

from keras.layers.core import Lambda, Flatten, Dense

from keras.initializers import glorot_uniform

from keras.engine.topology import Layer

from keras import backend as K

K.set_image_data_format('channels_first')

import cv2

import os

import numpy as np

from numpy import genfromtxt

import pandas as pd

import tensorflow as tf

from fr_utils import *

from inception_blocks_v2 import *

%matplotlib inline

%load_ext autoreload

%autoreload 2

np.set_printoptions(threshold=np.nan)
Using TensorFlow backend.
0 - Naive Face Verification
In Face Verification, you're given two images and you have to tell if they are of the same person. The simplest way to do this is to compare the two images pixel-by-pixel. If the distance between the raw images are less than a chosen threshold, it may be the same person!

Of course, this algorithm performs really poorly, since the pixel values change dramatically due to variations in lighting, orientation of the person's face, even minor changes in head position, and so on.
You'll see that rather than using the raw image, you can learn an encoding \(f(img)\) so that element-wise comparisons of this encoding gives more accurate judgements as to whether two pictures are of the same person.
1 - Encoding face images into a 128-dimensional vector
1.1 - Using an ConvNet to compute encodings
The FaceNet model takes a lot of data and a long time to train. So following common practice in applied deep learning settings, let's just load weights that someone else has already trained. The network architecture follows the Inception model from Szegedy et al.. We have provided an inception network implementation. You can look in the file inception_blocks.py to see how it is implemented (do so by going to "File->Open..." at the top of the Jupyter notebook).
The key things you need to know are:
- This network uses 96x96 dimensional RGB images as its input. Specifically, inputs a face image (or batch of \(m\) face images) as a tensor of shape \((m, n_C, n_H, n_W) = (m, 3, 96, 96)\)
- It outputs a matrix of shape \((m, 128)\) that encodes each input face image into a 128-dimensional vector
Run the cell below to create the model for face images.
FRmodel = faceRecoModel(input_shape=(3, 96, 96))
print("Total Params:", FRmodel.count_params())
Total Params: 3743280
** Expected Output **
By using a 128-neuron fully connected layer as its last layer, the model ensures that the output is an encoding vector of size 128. You then use the encodings the compare two face images as follows:
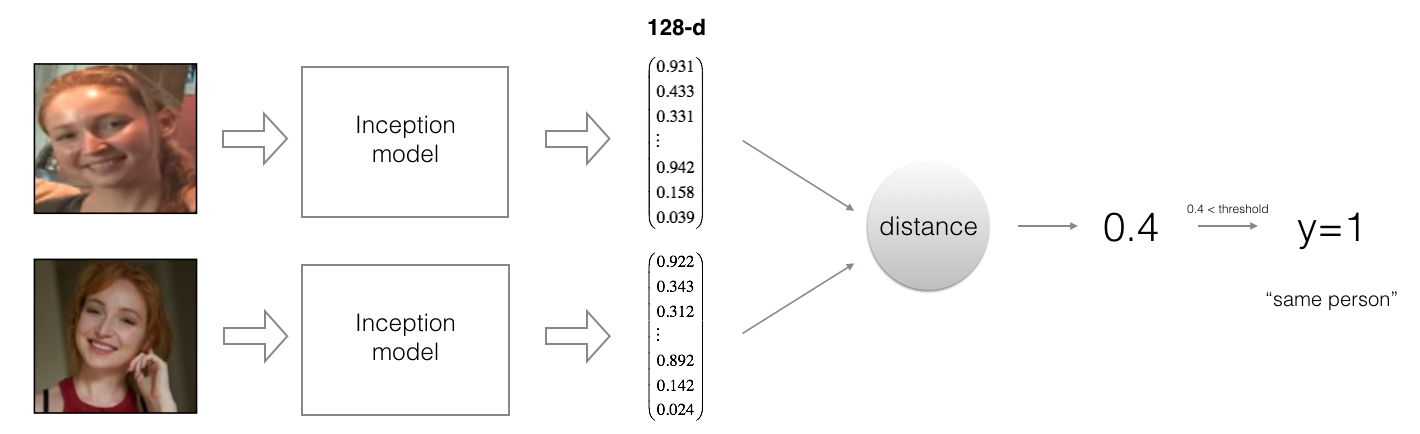
By computing a distance between two encodings and thresholding, you can determine if the two pictures represent the same person
So, an encoding is a good one if:
- The encodings of two images of the same person are quite similar to each other
- The encodings of two images of different persons are very different
The triplet loss function formalizes this, and tries to "push" the encodings of two images of the same person (Anchor and Positive) closer together, while "pulling" the encodings of two images of different persons (Anchor, Negative) further apart.

In the next part, we will call the pictures from left to right: Anchor (A), Positive (P), Negative (N)
1.2 - The Triplet Loss
For an image \(x\), we denote its encoding \(f(x)\), where \(f\) is the function computed by the neural network.

Training will use triplets of images \((A, P, N)\):
- A is an "Anchor" image--a picture of a person.
- P is a "Positive" image--a picture of the same person as the Anchor image.
- N is a "Negative" image--a picture of a different person than the Anchor image.
These triplets are picked from our training dataset. We will write \((A^{(i)}, P^{(i)}, N^{(i)})\) to denote the \(i\)-th training example.
You'd like to make sure that an image \(A^{(i)}\) of an individual is closer to the Positive \(P^{(i)}\) than to the Negative image \(N^{(i)}\)) by at least a margin \(\alpha\):
\]
You would thus like to minimize the following "triplet cost":
\]
Here, we are using the notation "\([z]_+\)" to denote \(max(z,0)\).
Notes:
- The term (1) is the squared distance between the anchor "A" and the positive "P" for a given triplet; you want this to be small.
- The term (2) is the squared distance between the anchor "A" and the negative "N" for a given triplet, you want this to be relatively large, so it thus makes sense to have a minus sign preceding it.
- \(\alpha\) is called the margin. It is a hyperparameter that you should pick manually. We will use \(\alpha = 0.2\).
Most implementations also normalize the encoding vectors to have norm equal one (i.e., \(\mid \mid f(img)\mid \mid_2\)=1); you won't have to worry about that here.
Exercise: Implement the triplet loss as defined by formula (3). Here are the 4 steps:
- Compute the distance between the encodings of "anchor" and "positive": \(\mid \mid f(A^{(i)}) - f(P^{(i)}) \mid \mid_2^2\)
- Compute the distance between the encodings of "anchor" and "negative": \(\mid \mid f(A^{(i)}) - f(N^{(i)}) \mid \mid_2^2\)
- Compute the formula per training example: $ \mid \mid f(A^{(i)}) - f(P^{(i)}) \mid - \mid \mid f(A^{(i)}) - f(N^{(i)}) \mid \mid_2^2 + \alpha$
- Compute the full formula by taking the max with zero and summing over the training examples:
\]
Useful functions: tf.reduce_sum(), tf.square(), tf.subtract(), tf.add(), tf.maximum().
For steps 1 and 2, you will need to sum over the entries of \(\mid \mid f(A^{(i)}) - f(P^{(i)}) \mid \mid_2^2\) and \(\mid \mid f(A^{(i)}) - f(N^{(i)}) \mid \mid_2^2\) while for step 4 you will need to sum over the training examples.
# GRADED FUNCTION: triplet_loss

def triplet_loss(y_true, y_pred, alpha = 0.2):

    """

    Implementation of the triplet loss as defined by formula (3)

    Arguments:

    y_true -- true labels, required when you define a loss in Keras, you don't need it in this function.

    y_pred -- python list containing three objects:

            anchor -- the encodings for the anchor images, of shape (None, 128)

            positive -- the encodings for the positive images, of shape (None, 128)

            negative -- the encodings for the negative images, of shape (None, 128)

    Returns:

    loss -- real number, value of the loss

    """

    anchor, positive, negative = y_pred[0], y_pred[1], y_pred[2]

    ### START CODE HERE ### (≈ 4 lines)

    # Step 1: Compute the (encoding) distance between the anchor and the positive, you will need to sum over axis=-1

    pos_dist = tf.reduce_sum(tf.square(tf.subtract(y_pred[0],y_pred[1])))

    # Step 2: Compute the (encoding) distance between the anchor and the negative, you will need to sum over axis=-1

    neg_dist = tf.reduce_sum(tf.square(tf.subtract(y_pred[0],y_pred[2])))

    # Step 3: subtract the two previous distances and add alpha.

    basic_loss = tf.add(tf.subtract(pos_dist,neg_dist),alpha)

    # Step 4: Take the maximum of basic_loss and 0.0. Sum over the training examples.

    loss =  tf.reduce_sum(tf.maximum(basic_loss,0.0))

    ### END CODE HERE ###

    return loss
with tf.Session() as test:

    tf.set_random_seed(1)

    y_true = (None, None, None)

    y_pred = (tf.random_normal([3, 128], mean=6, stddev=0.1, seed = 1),

              tf.random_normal([3, 128], mean=1, stddev=1, seed = 1),

              tf.random_normal([3, 128], mean=3, stddev=4, seed = 1))

    loss = triplet_loss(y_true, y_pred)

    print("loss = " + str(loss.eval()))
loss = 350.026
Expected Output:
| **loss** | 528.143 |
2 - Loading the trained model
FaceNet is trained by minimizing the triplet loss. But since training requires a lot of data and a lot of computation, we won't train it from scratch here. Instead, we load a previously trained model. Load a model using the following cell; this might take a couple of minutes to run.
FRmodel.compile(optimizer = 'adam', loss = triplet_loss, metrics = ['accuracy'])

load_weights_from_FaceNet(FRmodel)
Here're some examples of distances between the encodings between three individuals:

Example of distance outputs between three individuals' encodings
Let's now use this model to perform face verification and face recognition!
3 - Applying the model
Back to the Happy House! Residents are living blissfully since you implemented happiness recognition for the house in an earlier assignment.
However, several issues keep coming up: The Happy House became so happy that every happy person in the neighborhood is coming to hang out in your living room. It is getting really crowded, which is having a negative impact on the residents of the house. All these random happy people are also eating all your food.
So, you decide to change the door entry policy, and not just let random happy people enter anymore, even if they are happy! Instead, you'd like to build a Face verification system so as to only let people from a specified list come in. To get admitted, each person has to swipe an ID card (identification card) to identify themselves at the door. The face recognition system then checks that they are who they claim to be.
3.1 - Face Verification
Let's build a database containing one encoding vector for each person allowed to enter the happy house. To generate the encoding we use img_to_encoding(image_path, model) which basically runs the forward propagation of the model on the specified image.
Run the following code to build the database (represented as a python dictionary). This database maps each person's name to a 128-dimensional encoding of their face.
database = {}

database["danielle"] = img_to_encoding("images/danielle.png", FRmodel)

database["younes"] = img_to_encoding("images/younes.jpg", FRmodel)

database["tian"] = img_to_encoding("images/tian.jpg", FRmodel)

database["andrew"] = img_to_encoding("images/andrew.jpg", FRmodel)

database["kian"] = img_to_encoding("images/kian.jpg", FRmodel)

database["dan"] = img_to_encoding("images/dan.jpg", FRmodel)

database["sebastiano"] = img_to_encoding("images/sebastiano.jpg", FRmodel)

database["bertrand"] = img_to_encoding("images/bertrand.jpg", FRmodel)

database["kevin"] = img_to_encoding("images/kevin.jpg", FRmodel)

database["felix"] = img_to_encoding("images/felix.jpg", FRmodel)

database["benoit"] = img_to_encoding("images/benoit.jpg", FRmodel)

database["arnaud"] = img_to_encoding("images/arnaud.jpg", FRmodel)

#database["arnaud"] = img_to_encoding("images/camera_0.jpg", FRmodel)
Now, when someone shows up at your front door and swipes their ID card (thus giving you their name), you can look up their encoding in the database, and use it to check if the person standing at the front door matches the name on the ID.
Exercise: Implement the verify() function which checks if the front-door camera picture (image_path) is actually the person called "identity". You will have to go through the following steps:
- Compute the encoding of the image from image_path
- Compute the distance about this encoding and the encoding of the identity image stored in the database
- Open the door if the distance is less than 0.7, else do not open.
As presented above, you should use the L2 distance (np.linalg.norm). (Note: In this implementation, compare the L2 distance, not the square of the L2 distance, to the threshold 0.7.)
# GRADED FUNCTION: verify

def verify(image_path, identity, database, model):

    """

    Function that verifies if the person on the "image_path" image is "identity".

    Arguments:

    image_path -- path to an image

    identity -- string, name of the person you'd like to verify the identity. Has to be a resident of the Happy house.

    database -- python dictionary mapping names of allowed people's names (strings) to their encodings (vectors).

    model -- your Inception model instance in Keras

    Returns:

    dist -- distance between the image_path and the image of "identity" in the database.

    door_open -- True, if the door should open. False otherwise.

    """

    ### START CODE HERE ###

    # Step 1: Compute the encoding for the image. Use img_to_encoding() see example above. (≈ 1 line)

    encoding = img_to_encoding(image_path, model)

    # Step 2: Compute distance with identity's image (≈ 1 line)

    dist = np.linalg.norm(encoding-database[identity])

    # Step 3: Open the door if dist < 0.7, else don't open (≈ 3 lines)

    if dist<0.7:

        print("It's " + str(identity) + ", welcome home!")

        door_open = True

    else:

        print("It's not " + str(identity) + ", please go away")

        door_open = False

    ### END CODE HERE ###

    return dist, door_open
Younes is trying to enter the Happy House and the camera takes a picture of him ("images/camera_0.jpg"). Let's run your verification algorithm on this picture:

verify("images/camera_0.jpg", "younes", database, FRmodel)
It's younes, welcome home!

(0.65939283, True)
Expected Output:
| **It's younes, welcome home!** | (0.65939283, True) |
Benoit, who broke the aquarium last weekend, has been banned from the house and removed from the database. He stole Kian's ID card and came back to the house to try to present himself as Kian. The front-door camera took a picture of Benoit ("images/camera_2.jpg). Let's run the verification algorithm to check if benoit can enter.

verify("images/camera_2.jpg", "kian", database, FRmodel)
It's not kian, please go away

(0.86224014, False)
Expected Output:
| **It's not kian, please go away** | (0.86224014, False) |
3.2 - Face Recognition
Your face verification system is mostly working well. But since Kian got his ID card stolen, when he came back to the house that evening he couldn't get in!
To reduce such shenanigans, you'd like to change your face verification system to a face recognition system. This way, no one has to carry an ID card anymore. An authorized person can just walk up to the house, and the front door will unlock for them!
You'll implement a face recognition system that takes as input an image, and figures out if it is one of the authorized persons (and if so, who). Unlike the previous face verification system, we will no longer get a person's name as another input.
Exercise: Implement who_is_it(). You will have to go through the following steps:
- Compute the target encoding of the image from image_path
- Find the encoding from the database that has smallest distance with the target encoding.
- Initialize the
min_distvariable to a large enough number (100). It will help you keep track of what is the closest encoding to the input's encoding. - Loop over the database dictionary's names and encodings. To loop use
for (name, db_enc) in database.items().- Compute L2 distance between the target "encoding" and the current "encoding" from the database.
- If this distance is less than the min_dist, then set min_dist to dist, and identity to name.
- Initialize the
# GRADED FUNCTION: who_is_it

def who_is_it(image_path, database, model):

    """

    Implements face recognition for the happy house by finding who is the person on the image_path image.

    Arguments:

    image_path -- path to an image

    database -- database containing image encodings along with the name of the person on the image

    model -- your Inception model instance in Keras

    Returns:

    min_dist -- the minimum distance between image_path encoding and the encodings from the database

    identity -- string, the name prediction for the person on image_path

    """

    ### START CODE HERE ###

    ## Step 1: Compute the target "encoding" for the image. Use img_to_encoding() see example above. ## (≈ 1 line)

    encoding = img_to_encoding(image_path, model)

    ## Step 2: Find the closest encoding ##

    # Initialize "min_dist" to a large value, say 100 (≈1 line)

    min_dist = 100

    # Loop over the database dictionary's names and encodings.

    for (name, db_enc) in database.items():

        # Compute L2 distance between the target "encoding" and the current "emb" from the database. (≈ 1 line)

        dist = np.linalg.norm(encoding-db_enc)

        # If this distance is less than the min_dist, then set min_dist to dist, and identity to name. (≈ 3 lines)

        if dist<min_dist:

            min_dist = dist

            identity = name

    ### END CODE HERE ###

    if min_dist > 0.7:

        print("Not in the database.")

    else:

        print ("it's " + str(identity) + ", the distance is " + str(min_dist))

    return min_dist, identity
Younes is at the front-door and the camera takes a picture of him ("images/camera_0.jpg"). Let's see if your who_it_is() algorithm identifies Younes.
who_is_it("images/camera_0.jpg", database, FRmodel)
it's younes, the distance is 0.659393

(0.65939283, 'younes')
Expected Output:
| **it's younes, the distance is 0.659393** | (0.65939283, 'younes') |
You can change "camera_0.jpg" (picture of younes) to "camera_1.jpg" (picture of bertrand) and see the result.
Your Happy House is running well. It only lets in authorized persons, and people don't need to carry an ID card around anymore!
You've now seen how a state-of-the-art face recognition system works.
Although we won't implement it here, here're some ways to further improve the algorithm:
- Put more images of each person (under different lighting conditions, taken on different days, etc.) into the database. Then given a new image, compare the new face to multiple pictures of the person. This would increae accuracy.
- Crop the images to just contain the face, and less of the "border" region around the face. This preprocessing removes some of the irrelevant pixels around the face, and also makes the algorithm more robust.
**What you should remember**:
- Face verification solves an easier 1:1 matching problem; face recognition addresses a harder 1:K matching problem.
- The triplet loss is an effective loss function for training a neural network to learn an encoding of a face image.
- The same encoding can be used for verification and recognition. Measuring distances between two images' encodings allows you to determine whether they are pictures of the same person.
Congrats on finishing this assignment!
References:
- Florian Schroff, Dmitry Kalenichenko, James Philbin (2015). FaceNet: A Unified Embedding for Face Recognition and Clustering
- Yaniv Taigman, Ming Yang, Marc'Aurelio Ranzato, Lior Wolf (2014). DeepFace: Closing the gap to human-level performance in face verification
- The pretrained model we use is inspired by Victor Sy Wang's implementation and was loaded using his code: https://github.com/iwantooxxoox/Keras-OpenFace.
- Our implementation also took a lot of inspiration from the official FaceNet github repository: https://github.com/davidsandberg/facenet
Face Recognition for the Happy House的更多相关文章
- One-Time Project Recognition
Please indicate the source if you need to repost. After implementing NetSutie for serveral companies ...
- 论文阅读(Xiang Bai——【TIP2014】A Unified Framework for Multi-Oriented Text Detection and Recognition)
Xiang Bai--[TIP2014]A Unified Framework for Multi-Oriented Text Detection and Recognition 目录 作者和相关链接 ...
- 论文阅读(Lukas Neuman——【ICDAR2015】Efficient Scene Text Localization and Recognition with Local Character Refinement)
Lukas Neuman--[ICDAR2015]Efficient Scene Text Localization and Recognition with Local Character Refi ...
- 论文阅读(Xiang Bai——【PAMI2017】An End-to-End Trainable Neural Network for Image-based Sequence Recognition and Its Application to Scene Text Recognition)
白翔的CRNN论文阅读 1. 论文题目 Xiang Bai--[PAMI2017]An End-to-End Trainable Neural Network for Image-based Seq ...
- VERY DEEP CONVOLUTIONAL NETWORKS FOR LARGE-SCALE IMAGE RECOGNITION 这篇论文
由Andrew Zisserman 教授主导的 VGG 的 ILSVRC 的大赛中的卷积神经网络取得了很好的成绩,这篇文章详细说明了网络相关事宜. 文章主要干了点什么事呢?它就是在在用卷积神经网络下, ...
- Pattern Recognition And Machine Learning读书会前言
读书会成立属于偶然,一次群里无聊到极点,有人说Pattern Recognition And Machine Learning这本书不错,加之有好友之前推荐过,便发了封群邮件组织这个读书会,采用轮流讲 ...
- Notes on 'Selective Search For Object Recognition'
UijlingsIJCV2013, Selective Search For Object Recognition code 算法思想 利用分割算法将图片细分成很多region, 或超像素. 在这个基 ...
- 自然语言18.1_Named Entity Recognition with NLTK
QQ:231469242 欢迎nltk爱好者交流 https://www.pythonprogramming.net/named-entity-recognition-nltk-tutorial/?c ...
- 自然语言18_Named-entity recognition
https://en.wikipedia.org/wiki/Named-entity_recognition http://book.51cto.com/art/201107/276852.htm 命 ...
- Pattern Recognition and Machine Learning (preface translation)
前言 鉴于机器学习产生自计算机科学,模式识别却起源于工程学.然而,这些活动能被看做同一个领域的两个方面,并且他们同时在这过去的十年间经历了本质上的发展.特别是,当图像模型已经作为一个用来描述和应用概率 ...
随机推荐
- linux 后台运行nohup & ctrl+z
使用Linux时,经常希望有些命令结果不在前台显示,如sh脚本,耗时的命令等.一般情况下,使用 & 将命令结果后台运行,如sh test.sh,脚本后台执行. 有时候命令已经在前台执行了,需要 ...
- MVC开发中的常见错误-07-“System.IO.DirectoryNotFoundException”类型的未经处理的异常在 mscorlib.dll 中发生
“System.IO.DirectoryNotFoundException”类型的未经处理的异常在 mscorlib.dll 中发生 其他信息: 未能找到路径“F:\Users\home\Docume ...
- jvm类加载器以及双亲委派
首先来了解几个概念: 类加载: 概念:虚拟机把描述类的数据从Class文件加载到内存,并对数据进行校验--转换解析--初始化,最终形成能被java虚拟机直接使用的java类型,就是jvm的类加载机制. ...
- SpringBank 开发日志 Mybatis 使用redis 作为二级缓存时,无法通过cacheEnabled=false 将其关闭
<?xml version="1.0" encoding="UTF-8" ?> <!DOCTYPE configuration PUBLIC ...
- day15--JavaScript
上节作业回顾 <style></style>代表的是CSS样式 <script></script>代表的是JavaScript样式 1. ...
- 基于pgrouting的最短路径规划
最近项目上有一个计算两点最短路径的需求,即就是类似于百度地图的路径规划问题,小编研究了一段时间,并参考了相关资料,基于postgresql+postgis+pgrouting实现了简单的路径规划,计算 ...
- URAL - 1427-SMS
题目大意:给你长度为n的字符串(n<=1e6),让你对它进行划分,如果一段里面只有字母和 空格可以包含m(m<=1e5)个,如果有其他字符只能包含n个,问你最少需要分成几段. 思路:划分d ...
- Java jvm 内存参数限制
nohup java -jar -Xms3g -Xmx3g jenkins.war > jenkins.log 2>&1 &
- MySQL存储过程整理
MySQL存储过程 2018-08-15 23:00:06 1.存储过程介绍 (1) 定义:存储过程是存储在数据库目录中的一段声明性SQL语句. 触发器,其他存储过程以及java,python,ph ...
- python selenium-webdriver 元素定位(三)
上两篇的博文中介绍了python selenium的环境搭建和编写的第一个自动化测试脚本,从第二篇的例子中看出来再做UI级别的自动化测试的时候,有一个至关重要的因素,那就是元素的定位,只有从页面上找到 ...