spark storm 反压
因特殊业务场景,如大促、秒杀活动与突发热点事情等业务流量在短时间内剧增,形成巨大的流量毛刺,数据流入的速度远高于数据处理的速度,对流处理系统构成巨大的负载压力,如果不能正确处理,可能导致集群资源耗尽最终集群崩溃,因此有效的反压机制(backpressure)对保障流处理系统的稳定至关重要。
Storm和Spark Streaming都提供了反压机制,实现各不相同
对于开启了acker机制的storm程序,可以通过设置conf.setMaxSpoutPending参数来实现反压效果,如果下游组件(bolt)处理速度跟不上导致spout发送的tuple没有及时确认的数超过了参数设定的值,spout会停止发送数据,这种方式的缺点是很难调优conf.setMaxSpoutPending参数的设置以达到最好的反压效果,设小了会导致吞吐上不去,设大了会导致worker OOM;有震荡,数据流会处于一个颠簸状态,效果不如逐级反压;另外对于关闭acker机制的程序无效;
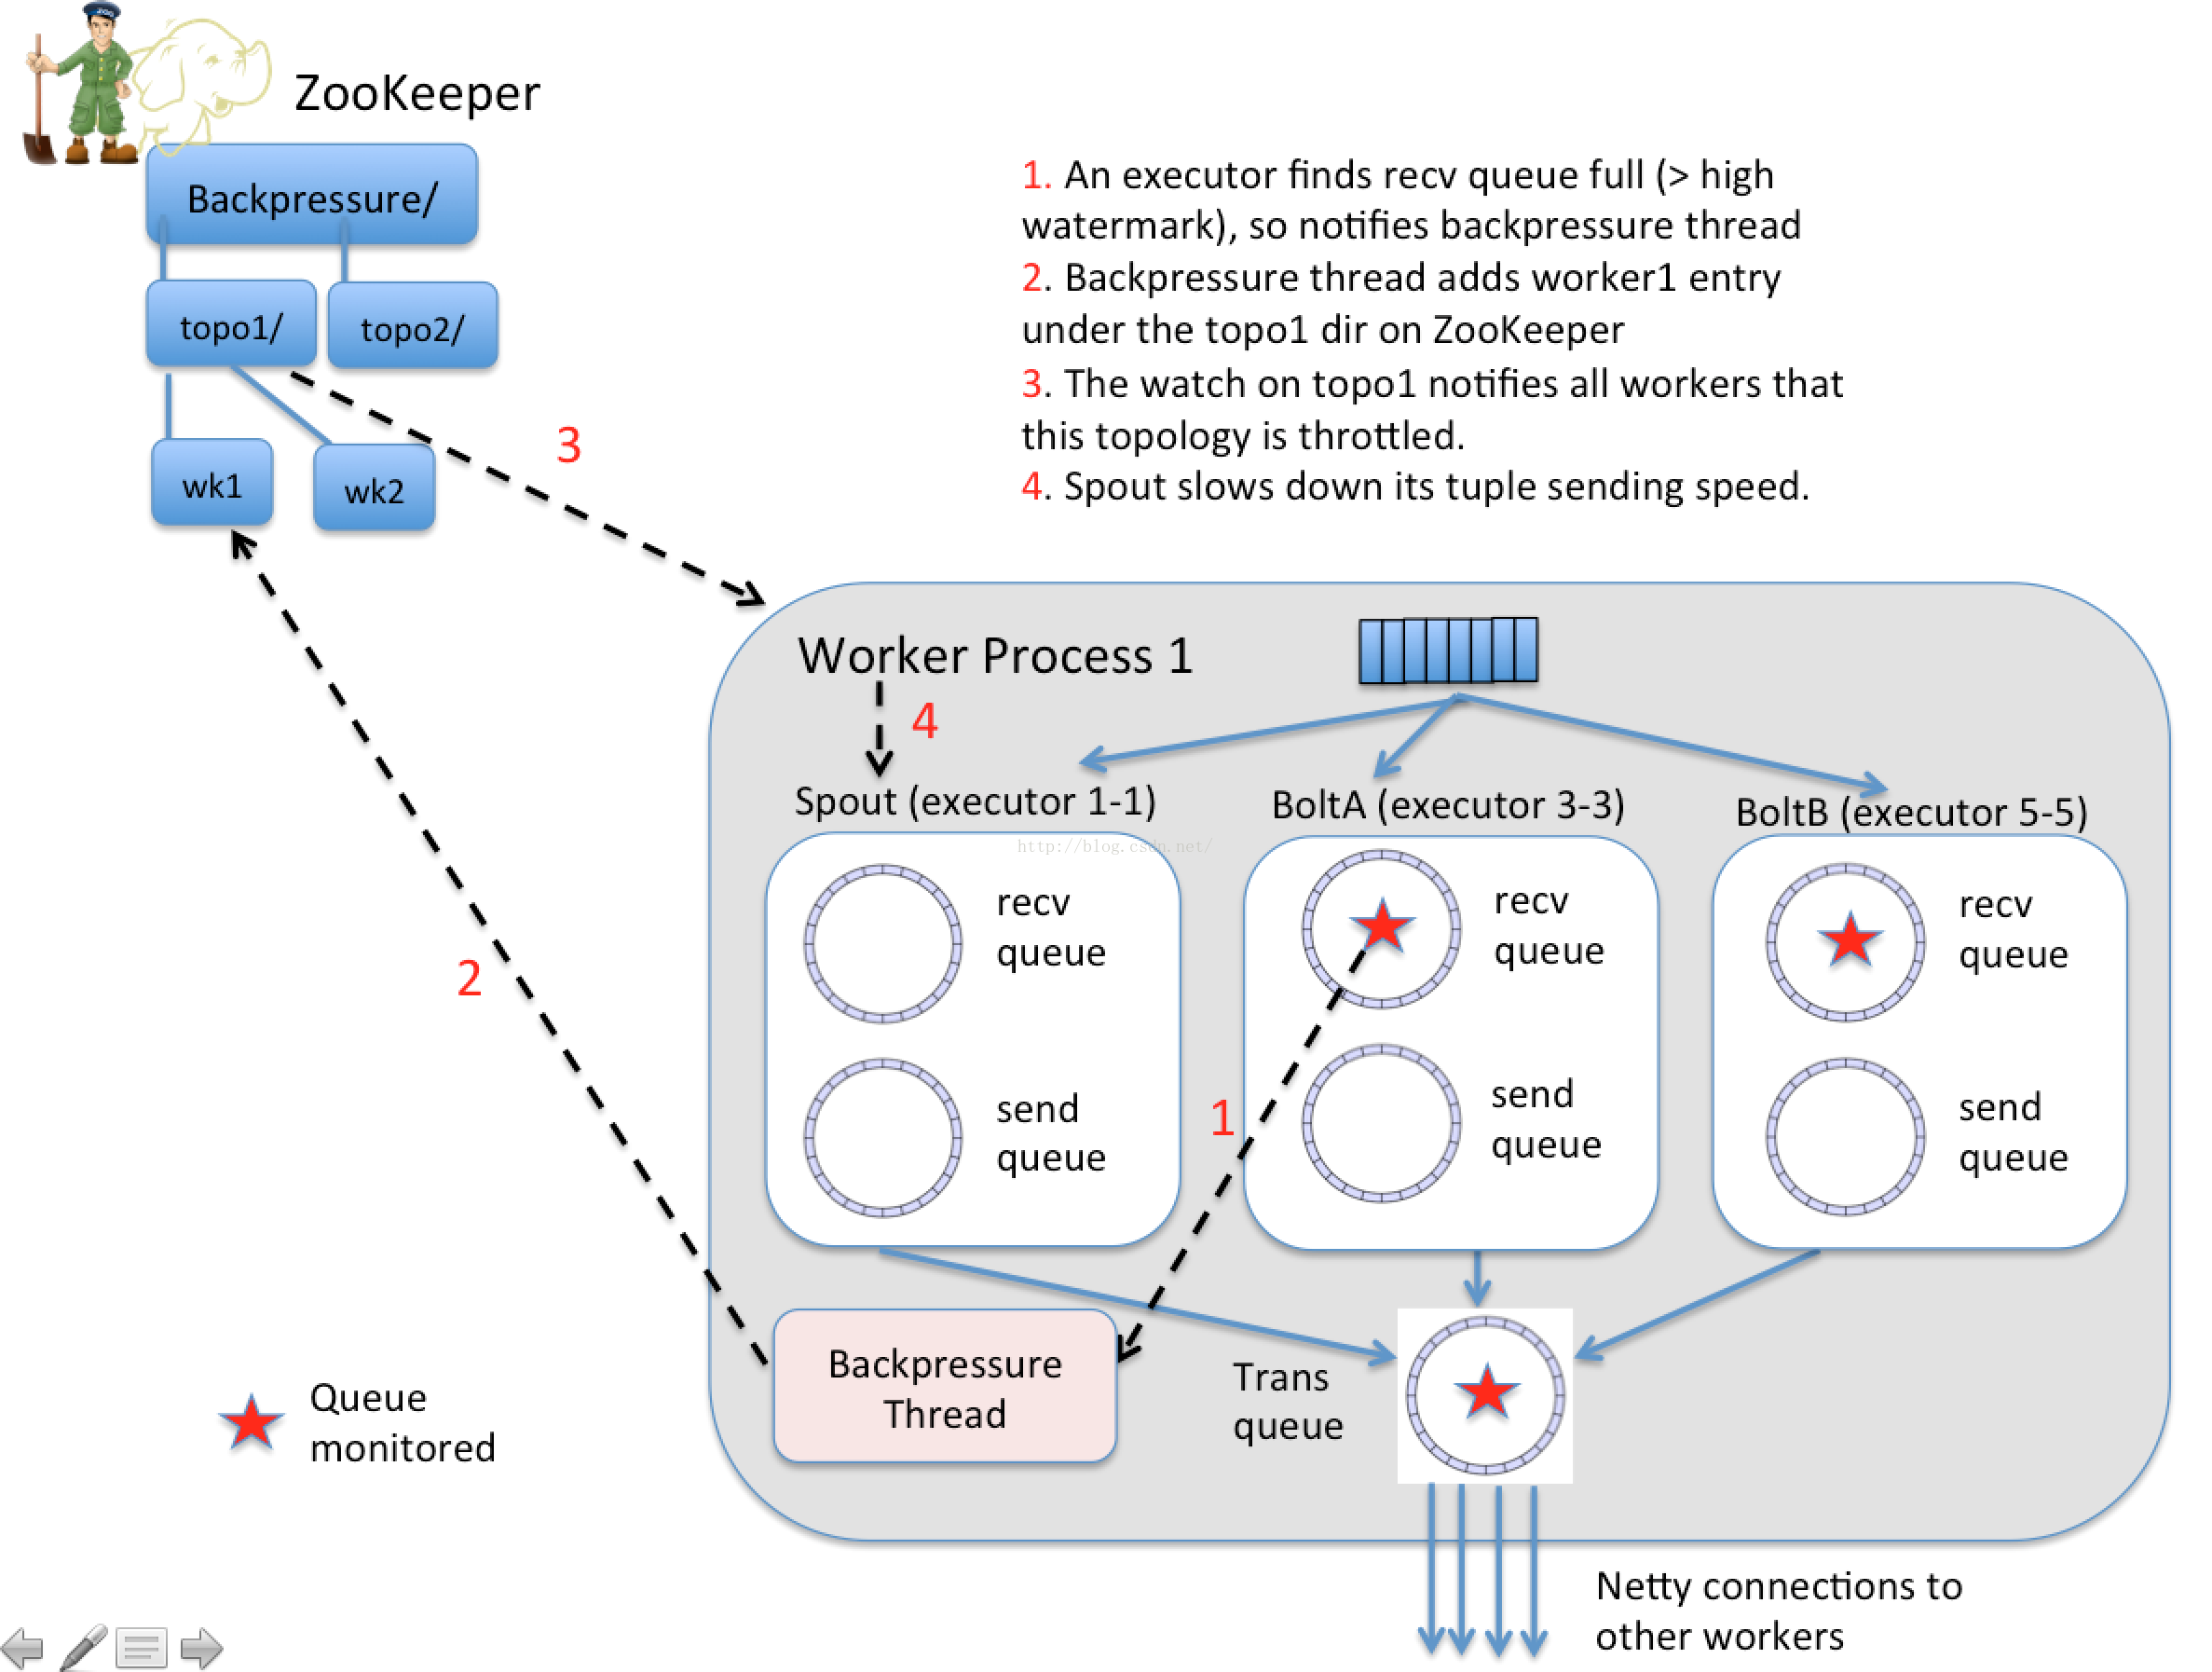
新的storm自动反压机制(Automatic Back Pressure)通过监控bolt中的接收队列的情况,当超过高水位值时专门的线程会将反压信息写到 Zookeeper ,Zookeeper上的watch会通知该拓扑的所有Worker都进入反压状态,最后Spout降低tuple发送的速度。具体实现:
Spark Streaming程序中当计算过程中出现batch processing time > batch interval的情况时,(其中batch processing time为实际计算一个批次花费时间,batch interval为Streaming应用设置的批处理间隔),意味着处理数据的速度小于接收数据的速度,如果这种情况持续过长的时间,会造成数据在内存中堆积,导致Receiver所在Executor内存溢出等问题(如果设置StorageLevel包含disk, 则内存存放不下的数据会溢写至disk, 加大延迟),可以通过设置参数spark.streaming.receiver.maxRate来限制Receiver的数据接收速率,此举虽然可以通过限制接收速率,来适配当前的处理能力,防止内存溢出,但也会引入其它问题。比如:producer数据生产高于maxRate,当前集群处理能力也高于maxRate,这就会造成资源利用率下降等问题。为了更好的协调数据接收速率与资源处理能力,Spark Streaming 从v1.5开始引入反压机制(back-pressure),通过动态控制数据接收速率来适配集群数据处理能力
Spark Streaming Backpressure: 根据JobScheduler反馈作业的执行信息来动态调整Receiver数据接收率。通过属性"spark.streaming.backpressure.enabled"来控制是否启用backpressure机制,默认值false,即不启用
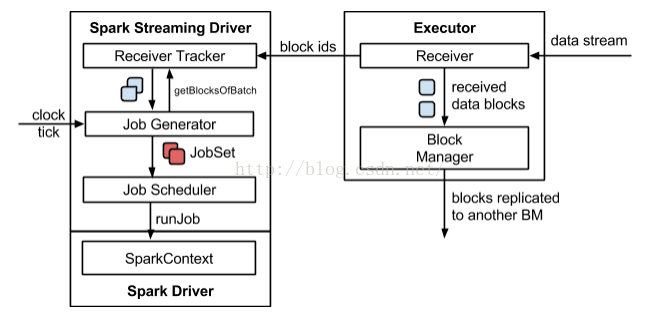
Streaming架构如下图所示:
BackPressure执行过程如下图所示:

本文转至:https://www.cnblogs.com/barrenlake/p/5349949.html
3.1 RateController类体系
RatenController 继承自StreamingListener. 用于处理BatchCompleted事件。核心代码为:
|
1
2
3
4
5
6
7
8
9
10
11
12
13
14
15
16
17
18
19
20
21
22
23
24
25
26
27
28
29
30
31
|
** * A StreamingListener that receives batch completion updates, and maintains * an estimate of the speed at which this stream should ingest messages, * given an estimate computation from a `RateEstimator` */private[streaming] abstract class RateController(val streamUID: Int, rateEstimator: RateEstimator)extends StreamingListener with Serializable {………… /** * Compute the new rate limit and publish it asynchronously. */ private def computeAndPublish(time: Long, elems: Long, workDelay: Long, waitDelay: Long): Unit = Future[Unit] { val newRate = rateEstimator.compute(time, elems, workDelay, waitDelay) newRate.foreach { s => rateLimit.set(s.toLong) publish(getLatestRate()) } } def getLatestRate(): Long = rateLimit.get() override def onBatchCompleted(batchCompleted: StreamingListenerBatchCompleted) { val elements = batchCompleted.batchInfo.streamIdToInputInfo for { processingEnd <- batchCompleted.batchInfo.processingEndTime workDelay <- batchCompleted.batchInfo.processingDelay waitDelay <- batchCompleted.batchInfo.schedulingDelay elems <- elements.get(streamUID).map(_.numRecords) } computeAndPublish(processingEnd, elems, workDelay, waitDelay) }} |
3.2 RateController的注册
JobScheduler启动时会抽取在DStreamGraph中注册的所有InputDstream中的rateController,并向ListenerBus注册监听. 此部分代码如下:
|
1
2
3
4
5
6
7
8
9
10
11
12
13
14
15
16
17
18
19
20
21
22
23
24
|
def start(): Unit = synchronized { if (eventLoop != null) return // scheduler has already been started logDebug("Starting JobScheduler") eventLoop = new EventLoop[JobSchedulerEvent]("JobScheduler") { override protected def onReceive(event: JobSchedulerEvent): Unit = processEvent(event) override protected def onError(e: Throwable): Unit = reportError("Error in job scheduler", e) } eventLoop.start() // attach rate controllers of input streams to receive batch completion updates for { inputDStream <- ssc.graph.getInputStreams rateController <- inputDStream.rateController } ssc.addStreamingListener(rateController) listenerBus.start() receiverTracker = new ReceiverTracker(ssc) inputInfoTracker = new InputInfoTracker(ssc) receiverTracker.start() jobGenerator.start() logInfo("Started JobScheduler") } |
3.3 BackPressure执行过程分析
BackPressure 执行过程分为BatchCompleted事件触发时机和事件处理两个过程
3.3.1 BatchCompleted触发过程
对BatchedCompleted的分析,应该从JobGenerator入手,因为BatchedCompleted是批次处理结束的标志,也就是JobGenerator产生的作业执行完成时触发的,因此进行作业执行分析。
Streaming 应用中JobGenerator每个Batch Interval都会为应用中的每个Output Stream建立一个Job, 该批次中的所有Job组成一个Job Set.使用JobScheduler的submitJobSet进行批量Job提交。此部分代码结构如下所示
|
1
2
3
4
5
6
7
8
9
10
11
12
13
14
15
16
17
18
19
20
21
22
|
/** Generate jobs and perform checkpoint for the given `time`. */private def generateJobs(time: Time) { // Set the SparkEnv in this thread, so that job generation code can access the environment // Example: BlockRDDs are created in this thread, and it needs to access BlockManager // Update: This is probably redundant after threadlocal stuff in SparkEnv has been removed. SparkEnv.set(ssc.env) // Checkpoint all RDDs marked for checkpointing to ensure their lineages are // truncated periodically. Otherwise, we may run into stack overflows (SPARK-6847). ssc.sparkContext.setLocalProperty(RDD.CHECKPOINT_ALL_MARKED_ANCESTORS, "true") Try { jobScheduler.receiverTracker.allocateBlocksToBatch(time) // allocate received blocks to batch graph.generateJobs(time) // generate jobs using allocated block } match { case Success(jobs) => val streamIdToInputInfos = jobScheduler.inputInfoTracker.getInfo(time) jobScheduler.submitJobSet(JobSet(time, jobs, streamIdToInputInfos)) case Failure(e) => jobScheduler.reportError("Error generating jobs for time " + time, e) } eventLoop.post(DoCheckpoint(time, clearCheckpointDataLater = false))} |
其中,sumitJobSet会创建固定数量的后台线程(具体由“spark.streaming.concurrentJobs”指定),去处理Job Set中的Job. 具体实现逻辑为:
|
1
2
3
4
5
6
7
8
9
10
|
def submitJobSet(jobSet: JobSet) { if (jobSet.jobs.isEmpty) { logInfo("No jobs added for time " + jobSet.time) } else { listenerBus.post(StreamingListenerBatchSubmitted(jobSet.toBatchInfo)) jobSets.put(jobSet.time, jobSet) jobSet.jobs.foreach(job => jobExecutor.execute(new JobHandler(job))) logInfo("Added jobs for time " + jobSet.time) }} |
其中JobHandler用于执行Job及处理Job执行结果信息。当Job执行完成时会产生JobCompleted事件. JobHandler的具体逻辑如下面代码所示:
当Job执行完成时,向eventLoop发送JobCompleted事件。EventLoop事件处理器接到JobCompleted事件后将调用handleJobCompletion 来处理Job完成事件。handleJobCompletion使用Job执行信息创建StreamingListenerBatchCompleted事件并通过StreamingListenerBus向监听器发送。实现如下:
|
1
2
3
4
5
6
7
8
9
10
11
12
13
14
15
16
17
18
19
20
21
|
private def handleJobCompletion(job: Job, completedTime: Long) { val jobSet = jobSets.get(job.time) jobSet.handleJobCompletion(job) job.setEndTime(completedTime) listenerBus.post(StreamingListenerOutputOperationCompleted(job.toOutputOperationInfo)) logInfo("Finished job " + job.id + " from job set of time " + jobSet.time) if (jobSet.hasCompleted) { jobSets.remove(jobSet.time) jobGenerator.onBatchCompletion(jobSet.time) logInfo("Total delay: %.3f s for time %s (execution: %.3f s)".format( jobSet.totalDelay / 1000.0, jobSet.time.toString, jobSet.processingDelay / 1000.0 )) listenerBus.post(StreamingListenerBatchCompleted(jobSet.toBatchInfo)) } job.result match { case Failure(e) => reportError("Error running job " + job, e) case _ => } } |
3.3.2、BatchCompleted事件处理过程
StreamingListenerBus将事件转交给具体的StreamingListener,因此BatchCompleted将交由RateController进行处理。RateController接到BatchCompleted事件后将调用onBatchCompleted对事件进行处理。
|
1
2
3
4
5
6
7
8
9
10
|
override def onBatchCompleted(batchCompleted: StreamingListenerBatchCompleted) { val elements = batchCompleted.batchInfo.streamIdToInputInfo for { processingEnd <- batchCompleted.batchInfo.processingEndTime workDelay <- batchCompleted.batchInfo.processingDelay waitDelay <- batchCompleted.batchInfo.schedulingDelay elems <- elements.get(streamUID).map(_.numRecords) } computeAndPublish(processingEnd, elems, workDelay, waitDelay)} |
onBatchCompleted会从完成的任务中抽取任务的执行延迟和调度延迟,然后用这两个参数用RateEstimator(目前存在唯一实现PIDRateEstimator,proportional-integral-derivative (PID) controller, PID控制器)估算出新的rate并发布。代码如下:

  /**

   * Compute the new rate limit and publish it asynchronously.

   */

  private def computeAndPublish(time: Long, elems: Long, workDelay: Long, waitDelay: Long): Unit =

    Future[Unit] {

      val newRate = rateEstimator.compute(time, elems, workDelay, waitDelay)

      newRate.foreach { s =>

        rateLimit.set(s.toLong)

        publish(getLatestRate())

      }

    }
其中publish()由RateController的子类ReceiverRateController来定义。具体逻辑如下(ReceiverInputDStream中定义):
  /**

   * A RateController that sends the new rate to receivers, via the receiver tracker.

   */

  private[streaming] class ReceiverRateController(id: Int, estimator: RateEstimator)

      extends RateController(id, estimator) {

    override def publish(rate: Long): Unit =

      ssc.scheduler.receiverTracker.sendRateUpdate(id, rate)

  }
publish的功能为新生成的rate 借助ReceiverTracker进行转发。ReceiverTracker将rate包装成UpdateReceiverRateLimit事交ReceiverTrackerEndpoint
|
1
2
3
4
5
6
|
/** Update a receiver's maximum ingestion rate */def sendRateUpdate(streamUID: Int, newRate: Long): Unit = synchronized { if (isTrackerStarted) { endpoint.send(UpdateReceiverRateLimit(streamUID, newRate)) }} |
ReceiverTrackerEndpoint接到消息后,其将会从receiverTrackingInfos列表中获取Receiver注册时使用的endpoint(实为ReceiverSupervisorImpl),再将rate包装成UpdateLimit发送至endpoint.其接到信息后,使用updateRate更新BlockGenerators(RateLimiter子类),来计算出一个固定的令牌间隔。
|
1
2
3
4
5
6
7
8
9
10
11
12
13
14
15
16
17
18
19
|
/** RpcEndpointRef for receiving messages from the ReceiverTracker in the driver */private val endpoint = env.rpcEnv.setupEndpoint( "Receiver-" + streamId + "-" + System.currentTimeMillis(), new ThreadSafeRpcEndpoint { override val rpcEnv: RpcEnv = env.rpcEnv override def receive: PartialFunction[Any, Unit] = { case StopReceiver => logInfo("Received stop signal") ReceiverSupervisorImpl.this.stop("Stopped by driver", None) case CleanupOldBlocks(threshTime) => logDebug("Received delete old batch signal") cleanupOldBlocks(threshTime) case UpdateRateLimit(eps) => logInfo(s"Received a new rate limit: $eps.") registeredBlockGenerators.asScala.foreach { bg => bg.updateRate(eps) } } }) |
其中RateLimiter的updateRate实现如下:
|
1
2
3
4
5
6
7
8
9
10
11
12
13
14
|
/** * Set the rate limit to `newRate`. The new rate will not exceed the maximum rate configured by * {{{spark.streaming.receiver.maxRate}}}, even if `newRate` is higher than that. * * @param newRate A new rate in events per second. It has no effect if it's 0 or negative. */ private[receiver] def updateRate(newRate: Long): Unit = if (newRate > 0) { if (maxRateLimit > 0) { rateLimiter.setRate(newRate.min(maxRateLimit)) } else { rateLimiter.setRate(newRate) } } |
setRate的实现 如下:
|
1
2
3
4
5
6
7
8
9
10
|
public final void setRate(double permitsPerSecond) { Preconditions.checkArgument(permitsPerSecond > 0.0 && !Double.isNaN(permitsPerSecond), "rate must be positive"); synchronized (mutex) { resync(readSafeMicros()); double stableIntervalMicros = TimeUnit.SECONDS.toMicros(1L) / permitsPerSecond; //固定间隔 this.stableIntervalMicros = stableIntervalMicros; doSetRate(permitsPerSecond, stableIntervalMicros); } } |
到此,backpressure反压机制调整rate结束。
4.流量控制点
当Receiver开始接收数据时,会通过supervisor.pushSingle()方法将接收的数据存入currentBuffer等待BlockGenerator定时将数据取走,包装成block. 在将数据存放入currentBuffer之时,要获取许可(令牌)。如果获取到许可就可以将数据存入buffer, 否则将被阻塞,进而阻塞Receiver从数据源拉取数据。
|
1
2
3
4
5
6
7
8
9
10
11
12
13
14
15
16
17
18
19
|
/** * Push a single data item into the buffer. */def addData(data: Any): Unit = { if (state == Active) { waitToPush() //获取令牌 synchronized { if (state == Active) { currentBuffer += data } else { throw new SparkException( "Cannot add data as BlockGenerator has not been started or has been stopped") } } } else { throw new SparkException( "Cannot add data as BlockGenerator has not been started or has been stopped") }} |
其令牌投放采用令牌桶机制进行, 原理如下图所示:
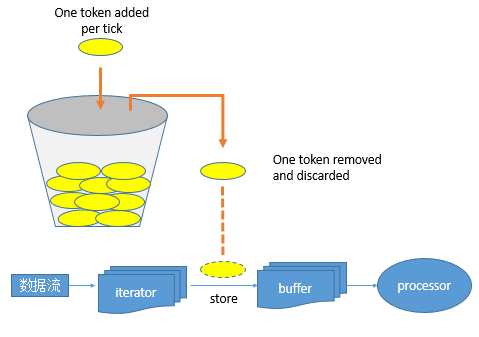
令牌桶机制: 大小固定的令牌桶可自行以恒定的速率源源不断地产生令牌。如果令牌不被消耗,或者被消耗的速度小于产生的速度,令牌就会不断地增多,直到把桶填满。后面再产生的令牌就会从桶中溢出。最后桶中可以保存的最大令牌数永远不会超过桶的大小。当进行某操作时需要令牌时会从令牌桶中取出相应的令牌数,如果获取到则继续操作,否则阻塞。用完之后不用放回。
Streaming 数据流被Receiver接收后,按行解析后存入iterator中。然后逐个存入Buffer,在存入buffer时会先获取token,如果没有token存在,则阻塞;如果获取到则将数据存入buffer. 然后等价后续生成block操作。
本文转自
https://www.cnblogs.com/barrenlake/p/5349949.html
https://blog.csdn.net/zengxiaosen/article/details/72822869
spark storm 反压的更多相关文章
- Spark Streaming反压机制
反压(Back Pressure)机制主要用来解决流处理系统中,处理速度比摄入速度慢的情况.是控制流处理中批次流量过载的有效手段. 1 反压机制原理 Spark Streaming中的反压机制是Spa ...
- 咱们从头到尾讲一次 Flink 网络流控和反压剖析
本文根据 Apache Flink 系列直播整理而成,由 Apache Flink Contributor.OPPO 大数据平台研发负责人张俊老师分享.主要内容如下: 网络流控的概念与背景 TCP的流 ...
- SparkStreaming反压机制
一.背景 在默认情况下,Spark Streaming 通过 receivers (或者是 Direct 方式) 以生产者生产数据的速率接收数据.当 batch processing time > ...
- [转帖]实时流处理系统反压机制(BackPressure)综述
实时流处理系统反压机制(BackPressure)综述 https://blog.csdn.net/qq_21125183/article/details/80708142 2018-06-15 19 ...
- 一文搞懂 Flink 网络流控与反压机制
https://www.jianshu.com/p/2779e73abcb8 看完本文,你能get到以下知识 Flink 流处理为什么需要网络流控? Flink V1.5 版之前网络流控介绍 Flin ...
- 1、flink介绍,反压原理
一.flink介绍 Apache Flink是一个分布式大数据处理引擎,可对有界数据流和无界数据流进行有状态计算. 可部署在各种集群环境,对各种大小的数据规模进行快速计算. 1.1.有界数据流和无界 ...
- Flink 反压 浅入浅出
前言 微信搜[Java3y]关注这个朴实无华的男人,点赞关注是对我最大的支持! 文本已收录至我的GitHub:https://github.com/ZhongFuCheng3y/3y,有300多篇原创 ...
- flink - 反压
http://wuchong.me/blog/2016/04/26/flink-internals-how-to-handle-backpressure/ https://ci.apache.org/ ...
- LCD升压反压驱动电路
在嵌入式系统里,较多场合需要LCD人机界面.分析以下LCD驱动电路. LCD_VIN是3.6~5V,经过DC/DC burst升压得到LCD_AVDD,LCD_AVDD为LCD需要的模拟电压,根据LC ...
随机推荐
- Vue的事件修饰符
转载于:https://www.cnblogs.com/xuqp/p/9406971.html 事件处理 如果需要在内联语句处理器中访问原生DOM事件.可以使用特殊变量$event,把它传入到meth ...
- 如何用for..of.. 遍历一个普通的对象?
如何用for..of.. 遍历一个普通的对象? 首先了解一下for..of..: 它是es6新增的一个遍历方法,但只限于迭代器(iterator), 所以普通的对象用for..of遍历 是会报错的.下 ...
- vue-cil 打包爬坑(解决)
1.打包成功不报错,但是打开页面啥都没有? 解决:文件位置:config目录下index.js文件更改assetsPublicPath属性:文件里面有两个assetsPublicPath属性,也就是 ...
- linux scull 中的读写代码
读和写方法都进行类似的任务, 就是, 从和到应用程序代码拷贝数据. 因此, 它们的原型 相当相似, 可以同时介绍它们: ssize_t read(struct file *filp, char u ...
- P1029 栈的基础操作
题目描述 现在给你一个栈,它一开始是空的,你需要模拟栈的操作.栈的操作包括如下: "push x":将元素 x 放入栈中,其中x是一个int范围内的整数: "pop&qu ...
- JS与JSP分别是什么
JS:JavaScript: JSP:Java Server Pages. jsp:只是servlet的一个变种,方便书写html内容才出现的,servlet是根本,所有jsp能做的,servlet全 ...
- js三大框架出现的意义
解决了原始html,css,js的UI与数据状态之间同步的难题,避免了大量的操作DOM代码. 使用了React,Angular和Vue,我们只需要定义一次 UI 界面,不再需要为每个操作编写特定的 U ...
- dotnet 修复找不到 System.ServiceProcess 定义
本文告诉大家如果复制网上一段代码发现 System.ServiceProcess 提示找不到方法或定义,需要手动添加引用 例如下面一段代码 using System.ServiceProcess; p ...
- Codeforces 293E 点分治+cdq
Codeforces 293E 传送门:https://codeforces.com/contest/293/problem/E 题意: 给你一颗边权一开始为0的树,然后给你n-1次操作,每次给边加上 ...
- Visual Studio Team Services使用教程【3】:默认团队权限说明
2017.4.23之后建议朋友看下面的帖子 TFS2017 & VSTS 实战(繁体中文视频) Visual Studio Team Services(VSTS)与敏捷开发ALM实战关键报告( ...