SpringMVC Spring Mybatis整合篇
1、创建WEB项目
创建项目:(ssmbuild)步骤略........
给项目添加lib文件夹,用于存放jar包:
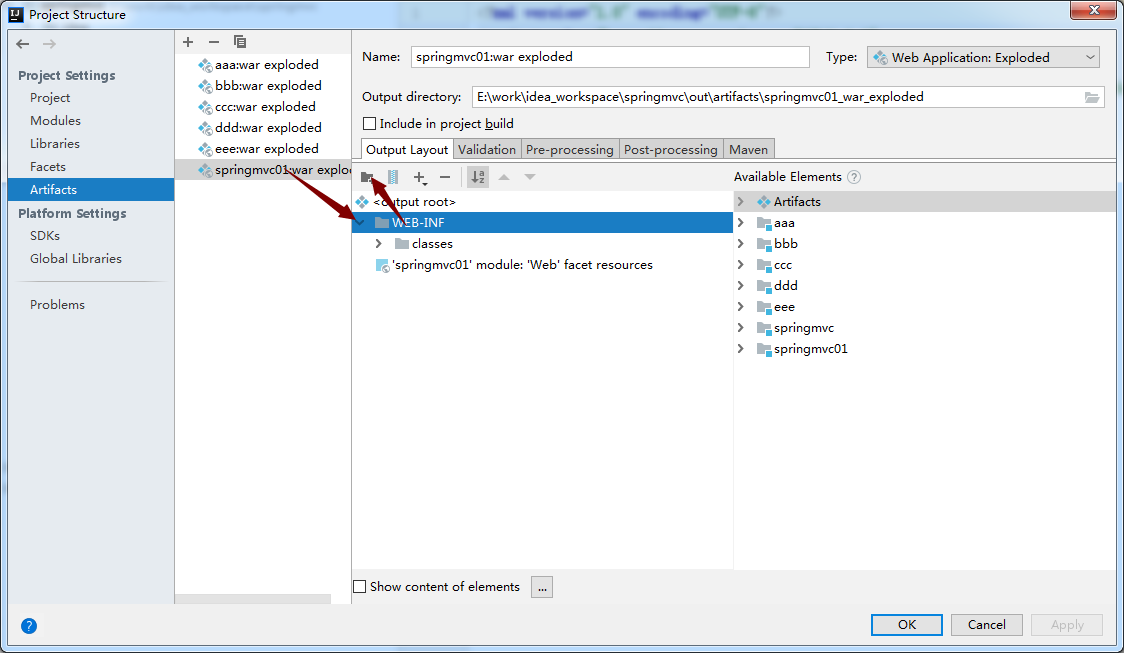
在WEB-INF目录下创建lib文件夹:
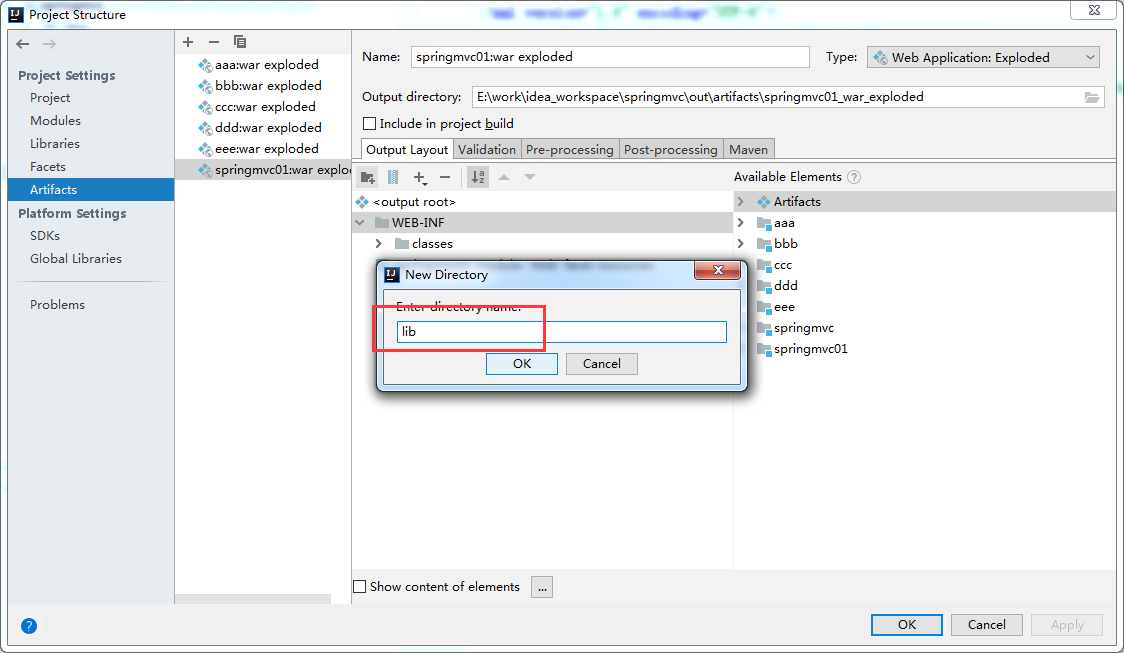
创建完成:运行项目时需要把jar导入到lib目录下

2、pom文件
<?xml version="1.0" encoding="UTF-8"?>

<project xmlns="http://maven.apache.org/POM/4.0.0"

         xmlns:xsi="http://www.w3.org/2001/XMLSchema-instance"

         xsi:schemaLocation="http://maven.apache.org/POM/4.0.0 http://maven.apache.org/xsd/maven-4.0.0.xsd">

    <modelVersion>4.0.0</modelVersion>

    <groupId>com.applesnt</groupId>

    <artifactId>ssmbuild</artifactId>

    <version>1.0-SNAPSHOT</version>

    <!--1.配置jar包-->

    <dependencies>

        <!--Junit-->

        <dependency>

            <groupId>junit</groupId>

            <artifactId>junit</artifactId>

            <version>4.11</version>

        </dependency>

        <!--数据库驱动-->

        <dependency>

            <groupId>mysql</groupId>

            <artifactId>mysql-connector-java</artifactId>

            <version>5.1.47</version>

        </dependency>

        <!-- 数据库连接池 -->

        <dependency>

            <groupId>com.mchange</groupId>

            <artifactId>c3p0</artifactId>

            <version>0.9.5.2</version>

        </dependency>

        <!--Servlet - JSP -->

        <dependency>

            <groupId>javax.servlet</groupId>

            <artifactId>servlet-api</artifactId>

            <version>2.5</version>

        </dependency>

        <dependency>

            <groupId>javax.servlet.jsp</groupId>

            <artifactId>jsp-api</artifactId>

            <version>2.2</version>

        </dependency>

        <dependency>

            <groupId>javax.servlet</groupId>

            <artifactId>jstl</artifactId>

            <version>1.2</version>

        </dependency>

        <!--Mybatis-->

        <dependency>

            <groupId>org.mybatis</groupId>

            <artifactId>mybatis</artifactId>

            <version>3.5.2</version>

        </dependency>

        <dependency>

            <groupId>org.mybatis</groupId>

            <artifactId>mybatis-spring</artifactId>

            <version>2.0.2</version>

        </dependency>

        <!--Spring-->

        <dependency>

            <groupId>org.springframework</groupId>

            <artifactId>spring-webmvc</artifactId>

            <version>5.1.9.RELEASE</version>

        </dependency>

        <!--spring 数据源配置-->

        <dependency>

            <groupId>org.springframework</groupId>

            <artifactId>spring-jdbc</artifactId>

            <version>5.1.9.RELEASE</version>

        </dependency>

        <!--lombok-->

        <dependency>

            <groupId>org.projectlombok</groupId>

            <artifactId>lombok</artifactId>

            <version>1.18.10</version>

        </dependency>

        <!--AOP的jar包-->

        <dependency>

            <groupId>org.aspectj</groupId>

            <artifactId>aspectjweaver</artifactId>

            <version>1.9.4</version>

        </dependency>

        <!--jackson转换json数据-->

        <dependency>

            <groupId>com.fasterxml.jackson.core</groupId>

            <artifactId>jackson-databind</artifactId>

            <version>2.10.2</version>

        </dependency>

    </dependencies>

    <!--2.解决资源过滤问题-->

    <build>

        <resources>

            <resource>

                <directory>src/main/java</directory>

                <includes>

                    <include>**/*.properties</include>

                    <include>**/*.xml</include>

                </includes>

                <filtering>false</filtering>

            </resource>

            <resource>

                <directory>src/main/resources</directory>

                <includes>

                    <include>**/*.properties</include>

                    <include>**/*.xml</include>

                </includes>

                <filtering>false</filtering>

            </resource>

        </resources>

    </build>

</project>
3、配置web.xml
<!--注册乱码filter-->

<filter>

    <filter-name>encoding</filter-name>

    <filter-class>com.applesnt.filter.GenericEncodingFilter</filter-class>

    <init-param>

        <param-name>encoding</param-name>

        <param-value>utf-8</param-value>

    </init-param>

</filter>

<filter-mapping>

    <filter-name>encoding</filter-name>

    <url-pattern>/*</url-pattern>

</filter-mapping>

<!--注册DispatcherServlet-->

<servlet>

    <servlet-name>springmvc</servlet-name>

    <servlet-class>org.springframework.web.servlet.DispatcherServlet</servlet-class>

    <!--关联一个spring配置文件:重点-->

    <init-param>

        <param-name>contextConfigLocation</param-name>

        <param-value>classpath:applicationContext.xml</param-value>

    </init-param>

    <!--启动级别-1-->

    <load-on-startup>1</load-on-startup>

</servlet>

<!--/ 匹配所有的请求;(不包括.jsp)-->

<!--/* 匹配所有的请求;(包括.jsp)-->

<servlet-mapping>

    <servlet-name>springmvc</servlet-name>

    <url-pattern>/</url-pattern>

</servlet-mapping>

<!--session过期时间-->

<session-config>

    <session-timeout>30</session-timeout>

</session-config>
4、创建spring配置文件:applicationContext.xml
<?xml version="1.0" encoding="UTF-8"?>

<beans xmlns="http://www.springframework.org/schema/beans"

       xmlns:xsi="http://www.w3.org/2001/XMLSchema-instance"

       xsi:schemaLocation="http://www.springframework.org/schema/beans

        https://www.springframework.org/schema/beans/spring-beans.xsd">

</beans>
5、创建解决乱码的fileter
com\applesnt\filter\GenericEncodingFilter.java
package com.applesnt.filter;

import javax.servlet.*;

import javax.servlet.http.HttpServletRequest;

import javax.servlet.http.HttpServletRequestWrapper;

import javax.servlet.http.HttpServletResponse;

import java.io.IOException;

import java.io.UnsupportedEncodingException;

import java.util.Map;

public class GenericEncodingFilter implements Filter {

    public void init(FilterConfig filterConfig) throws ServletException {

    }

    public void doFilter(ServletRequest request, ServletResponse response, FilterChain chain) throws IOException, ServletException {

        //处理response的字符编码

        HttpServletResponse myResponse=(HttpServletResponse) response;

        myResponse.setContentType("text/html;charset=UTF-8");

        // 转型为与协议相关对象

        HttpServletRequest httpServletRequest = (HttpServletRequest) request;

        // 对request包装增强

        HttpServletRequest myrequest = new MyRequest(httpServletRequest);

        chain.doFilter(myrequest, response);

    }

    public void destroy() {

    }

    //自定义request对象,HttpServletRequest的包装类

    class MyRequest extends HttpServletRequestWrapper {

        private HttpServletRequest request;

        //是否编码的标记

        private boolean hasEncode;

        //定义一个可以传入HttpServletRequest对象的构造函数,以便对其进行装饰

        public MyRequest(HttpServletRequest request) {

            super(request);// super必须写

            this.request = request;

        }

        // 对需要增强方法 进行覆盖

        @Override

        public Map getParameterMap() {

            // 先获得请求方式

            String method = request.getMethod();

            if (method.equalsIgnoreCase("post")) {

                // post请求

                try {

                    // 处理post乱码

                    request.setCharacterEncoding("utf-8");

                    return request.getParameterMap();

                } catch (UnsupportedEncodingException e) {

                    e.printStackTrace();

                }

            } else if (method.equalsIgnoreCase("get")) {

                // get请求

                Map<String, String[]> parameterMap = request.getParameterMap();

                if (!hasEncode) { // 确保get手动编码逻辑只运行一次

                    for (String parameterName : parameterMap.keySet()) {

                        String[] values = parameterMap.get(parameterName);

                        if (values != null) {

                            for (int i = 0; i < values.length; i++) {

                                try {

                                    // 处理get乱码

                                    values[i] = new String(values[i]

                                            .getBytes("ISO-8859-1"), "utf-8");

                                } catch (UnsupportedEncodingException e) {

                                    e.printStackTrace();

                                }

                            }

                        }

                    }

                    hasEncode = true;

                }

                return parameterMap;

            }

            return super.getParameterMap();

        }

        //取一个值

        @Override

        public String getParameter(String name) {

            Map<String, String[]> parameterMap = getParameterMap();

            String[] values = parameterMap.get(name);

            if (values == null) {

                return null;

            }

            return values[0]; // 取回参数的第一个值

        }

        //取所有值

        @Override

        public String[] getParameterValues(String name) {

            Map<String, String[]> parameterMap = getParameterMap();

            String[] values = parameterMap.get(name);

            return values;

        }

    }

}
6、创建数据库表以及vo对象
CREATE TABLE `books` (

  `bookID` int(10) NOT NULL AUTO_INCREMENT COMMENT '书id',

  `bookName` varchar(100) NOT NULL COMMENT '书名',

  `bookCounts` int(11) NOT NULL COMMENT '数量',

  `detail` varchar(200) NOT NULL COMMENT '描述',

  KEY `bookID` (`bookID`)

) ENGINE=InnoDB AUTO_INCREMENT=4 DEFAULT CHARSET=utf8;

INSERT INTO `books` VALUES ('1', 'Java', '1', '从入门到放弃');

INSERT INTO `books` VALUES ('2', 'MySQL', '10', '从删库到跑路');

INSERT INTO `books` VALUES ('3', 'Linux', '5', '从进门到进牢');
com\applesnt\vo\Books.java
package com.applesnt.vo;

import lombok.AllArgsConstructor;

import lombok.Data;

import lombok.NoArgsConstructor;

@Data

@AllArgsConstructor

@NoArgsConstructor

public class Books {

    private int bookID;

    private String bookName;

    private int bookCounts;

    private String detail;

}
7、创建Mapper接口
com\applesnt\mapper\BooksMapper.java
package com.applesnt.mapper;

import com.applesnt.vo.Books;

import java.util.List;

public interface BooksMapper {

    /*新增一本书*/

    public int addBook(Books books);

    /*删除一本书*/

    public int deleteBook(int id);

    /*修改一本书*/

    public int updateBook(Books books);

    /*查询一本书*/

    public Books queryBookById(int id);

    /*查询所有书*/

    public List<Books> queryBook();

}
8、创建mapper对应的xml
com\applesnt\mapper\BooksMapper.xml
<?xml version="1.0" encoding="UTF-8" ?>

<!DOCTYPE mapper

        PUBLIC "-//mybatis.org//DTD Mapper 3.0//EN"

        "http://mybatis.org/dtd/mybatis-3-mapper.dtd">

<mapper namespace="com.applesnt.mapper.BooksMapper">

    <insert id="addBook" parameterType="Books">

        insert into books(bookName,bookCounts,detail)

        values (#{bookName}, #{bookCounts}, #{detail})

    </insert>

    <delete id="deleteBook" parameterType="int">

        delete from books where bookID = #{id}

    </delete>

    <update id="updateBook" parameterType="Books">

        update books set bookName=#{bookName},bookCounts=#{bookCounts},detail=#{detail}

        where bookID = #{bookID}

    </update>

    <!--resultType:别名-->

    <select id="queryBookById" resultType="books">

        select * from books where bookID = #{id}

    </select>

    <select id="queryBook" resultType="books">

        select * from books

    </select>

</mapper>
9、创建jdbc.properties数据库连接文件
resources\jdbc.properties
jdbc.driver=com.mysql.jdbc.Driver

jdbc.url=jdbc:mysql://ip:3306/my_test?useUnicode=true&characterEncoding=utf8

jdbc.username=root

jdbc.password=xxxxxxxx
10、创建Mybatis主配置文件
resources\mybatis-config.xml
<?xml version="1.0" encoding="UTF-8" ?>

<!DOCTYPE configuration

        PUBLIC "-//mybatis.org//DTD Config 3.0//EN"

        "http://mybatis.org/dtd/mybatis-3-config.dtd">

<configuration>

    <settings>

        <!--打印sql语句-->

        <setting name="logImpl" value="STDOUT_LOGGING" />

        <!-- 全局性设置懒加载 -->

        <setting name="lazyLoadingEnabled" value="true"/>

        <!-- 每个属性都按需加载 -->

        <setting name="aggressiveLazyLoading" value="false"/>

        <!-- 开启驼峰命名 -->

        <setting name="mapUnderscoreToCamelCase" value="true" />

    </settings>

    <!--开启别名-->

    <typeAliases>

        <package name="com.applesnt.vo" />

    </typeAliases>

    <!--mapper文件-->

    <mappers>

        <mapper resource="com/applesnt/mapper/BooksMapper.xml" />

    </mappers>

</configuration>
11、构建DAO层的spring配置文件
resources\spring-mapper.xml
<?xml version="1.0" encoding="UTF-8"?>

<beans xmlns="http://www.springframework.org/schema/beans"

       xmlns:xsi="http://www.w3.org/2001/XMLSchema-instance"

       xsi:schemaLocation="http://www.springframework.org/schema/beans

        https://www.springframework.org/schema/beans/spring-beans.xsd">

    <!--加载jdbc配置文件-->

    <bean class="org.springframework.beans.factory.config.PropertyPlaceholderConfigurer">

        <property name="locations">

            <list>

                <value>classpath:jdbc.properties</value>

            </list>

        </property>

    </bean>

    <!--数据源配置 数据源提供者包括:spring、c3p0、dbcp、druid-->

    <bean id="dataSource" class="org.springframework.jdbc.datasource.DriverManagerDataSource">

        <property name="driverClassName" value="${jdbc.driver}"></property>

        <property name="url" value="${jdbc.url}"></property>

        <property name="username" value="${jdbc.username}"></property>

        <property name="password" value="${jdbc.password}"></property>

    </bean>

    <!--配置得到SqlSessionFactory-->

    <bean id="sqlSessionFactory" class="org.mybatis.spring.SqlSessionFactoryBean">

        <property name="dataSource" ref="dataSource"></property>

        <!--绑定mybatis配置文件-->

        <property name="configLocation" value="classpath:mybatis-config.xml"></property>

    </bean>

    <!--通过MapperScannerConfigurer配置dao接口扫描包 实现动态注入到spring容器中-->

    <bean class="org.mybatis.spring.mapper.MapperScannerConfigurer">

        <!--注入sqlSessionFactory-->

        <property name="sqlSessionFactoryBeanName" value="sqlSessionFactory" />

        <!--要扫描的dao包-->

        <property name="basePackage" value="com.applesnt.mapper" />

    </bean>

</beans>
12、创建Service接口
com\applesnt\service\BooksService.java
package com.applesnt.service;

import com.applesnt.vo.Books;

import java.util.List;

public interface BooksService {

    /*新增一本书*/

    public int addBook(Books books);

    /*删除一本书*/

    public int deleteBook(int id);

    /*修改一本书*/

    public int updateBook(Books books);

    /*查询一本书*/

    public Books queryBookById(int id);

    /*查询所有书*/

    public List<Books> queryBook();

}
13、创建Service接口实现类
com\applesnt\service\impl\BooksServiceImpl.java
package com.applesnt.service.impl;

import com.applesnt.mapper.BooksMapper;

import com.applesnt.service.BooksService;

import com.applesnt.vo.Books;

import org.springframework.beans.factory.annotation.Autowired;

import org.springframework.stereotype.Service;

import java.util.List;

@Service

public class BooksServiceImpl implements BooksService {

    @Autowired

    /*通过class自动注入*/

    private BooksMapper booksMapper;

    public void setBooksMapper(BooksMapper booksMapper) {

        this.booksMapper = booksMapper;

    }

    public int addBook(Books books) {

        return booksMapper.addBook(books);

    }

    public int deleteBook(int id) {

        return booksMapper.deleteBook(id);

    }

    public int updateBook(Books books) {

        return booksMapper.updateBook(books);

    }

    public Books queryBookById(int id) {

        return booksMapper.queryBookById(id);

    }

    public List<Books> queryBook() {

        return booksMapper.queryBook();

    }

}
14、构建Service层的spring配置文件
resources\spring-service.xml
<?xml version="1.0" encoding="UTF-8"?>

<beans xmlns="http://www.springframework.org/schema/beans"

       xmlns:xsi="http://www.w3.org/2001/XMLSchema-instance"

       xmlns:context="http://www.springframework.org/schema/context" xmlns:tx="http://www.springframework.org/schema/tx"

       xmlns:aop="http://www.springframework.org/schema/aop"

       xsi:schemaLocation="http://www.springframework.org/schema/beans

        https://www.springframework.org/schema/beans/spring-beans.xsd

        http://www.springframework.org/schema/context

        https://www.springframework.org/schema/context/spring-context.xsd

        http://www.springframework.org/schema/tx

        http://www.springframework.org/schema/tx/spring-tx.xsd

        http://www.springframework.org/schema/aop

        https://www.springframework.org/schema/aop/spring-aop.xsd">

    <!--注解版扫描包,这个包下面的注解就会生效-->

    <context:component-scan base-package="com.applesnt.service" />

    <!--<bean class="com.applesnt.service.impl.BooksServiceImpl">

        <property name="booksMapper" ref="booksMapper"></property>

    </bean>-->

    <!--配置事务管理器-->

    <bean id="transactionManager" class="org.springframework.jdbc.datasource.DataSourceTransactionManager">

        <property name="dataSource" ref="dataSource"></property>

    </bean>

    <!--配置事务通知-->

    <tx:advice id="txAdvice" transaction-manager="transactionManager">

        <!--给哪些方法配置事务-->

        <tx:attributes>

            <tx:method name="*" propagation="REQUIRED"/>

        </tx:attributes>

    </tx:advice>

    <!--配置事务切入-->

    <aop:config>

        <aop:pointcut id="txpoint" expression="execution(* com.applesnt.mapper.*.*(..))"></aop:pointcut>

        <aop:advisor advice-ref="txAdvice" pointcut-ref="txpoint"></aop:advisor>

    </aop:config>

</beans>
15、创建controller
com\applesnt\controller\BooksController.java
package com.applesnt.controller;

import com.applesnt.service.BooksService;

import com.applesnt.vo.Books;

import org.springframework.beans.factory.annotation.Autowired;

import org.springframework.stereotype.Controller;

import org.springframework.ui.Model;

import org.springframework.web.bind.annotation.PathVariable;

import org.springframework.web.bind.annotation.RequestMapping;

import java.util.List;

@Controller

public class BooksController {

    @Autowired

    /*通过class自动注入*/

    private BooksService booksService;

    /*查询书籍列表*/

    @RequestMapping("/getbooks")

    public String queryBook(Model model){

        List<Books> booksList = this.booksService.queryBook();

        model.addAttribute("booklist",booksList);

        return "books";

    }

    /*跳转至添加书籍页面*/

    @RequestMapping("/toAddBook")

    public String toAddBook(){

        return "addbook";

    }

    /*添加书籍*/

    @RequestMapping("/addBook")

    public String addBook(Books books){

        booksService.addBook(books);

        return "redirect:/getbooks";/*重定向到列表页*/

    }

    /*跳转至修改书籍页面*/

    @RequestMapping("/toUpdateBook/{id}")

    public String toUpdateBook(@PathVariable int id,Model model){

        Books book = booksService.queryBookById(id);

        model.addAttribute("book",book);

        return "updatebook";

    }

    /*修改书籍*/

    @RequestMapping("/updateBook")

    public String toUpdateBook(Books book){

        booksService.updateBook(book);

        return "redirect:/getbooks";/*重定向到列表页*/

    }

    /*删除书籍*/

    @RequestMapping("/deleteBook/{id}")

    public String deleteBook(@PathVariable int id,Model model){

        booksService.deleteBook(id);

        return "redirect:/getbooks";/*重定向到列表页*/

    }

}
16、构建Controller层的spring配置文件
resources\springmvc-servlet.xml
<?xml version="1.0" encoding="UTF-8"?>

<beans xmlns="http://www.springframework.org/schema/beans"

       xmlns:xsi="http://www.w3.org/2001/XMLSchema-instance"

       xmlns:context="http://www.springframework.org/schema/context"

       xmlns:mvc="http://www.springframework.org/schema/mvc"

       xsi:schemaLocation="http://www.springframework.org/schema/beans

        https://www.springframework.org/schema/beans/spring-beans.xsd

        http://www.springframework.org/schema/context

        https://www.springframework.org/schema/context/spring-context.xsd

        http://www.springframework.org/schema/mvc

        https://www.springframework.org/schema/mvc/spring-mvc.xsd">

    <context:component-scan base-package="com.applesnt.controller"/>

    <!-- 让Spring MVC不处理静态资源 -->

    <mvc:default-servlet-handler />

    <!--annotation-driven配置帮助我们完成处理器映射器和处理器适配器-->

    <mvc:annotation-driven />

    <!--视图解析器:DispatcherServlet给他的ModelAndView-->

    <bean id="viewResolver" class="org.springframework.web.servlet.view.InternalResourceViewResolver">

        <property name="prefix" value="/WEB-INF/jsp/"/>

        <property name="suffix" value=".jsp"/>

    </bean>

</beans>
17、把SpringMVC Spring Mybatis配置文件合并
resources\applicationContext.xml
<?xml version="1.0" encoding="UTF-8"?>

<beans xmlns="http://www.springframework.org/schema/beans"

       xmlns:xsi="http://www.w3.org/2001/XMLSchema-instance"

       xsi:schemaLocation="http://www.springframework.org/schema/beans

        https://www.springframework.org/schema/beans/spring-beans.xsd">

    <import resource="spring-mapper.xml"/>

    <import resource="spring-service.xml"/>

    <import resource="springmvc-servlet.xml"/>

</beans>
18、访问测试:
项目涉及到的页面:如下
web\index.jsp
<%@ page contentType="text/html;charset=UTF-8" language="java" %>

<html>

  <head>

    <title>$Title$</title>

  </head>

  <body>

  <h3>

    <a href="${pageContext.request.contextPath}/getbooks">书籍管理</a>

  </h3>

  </body>

</html>
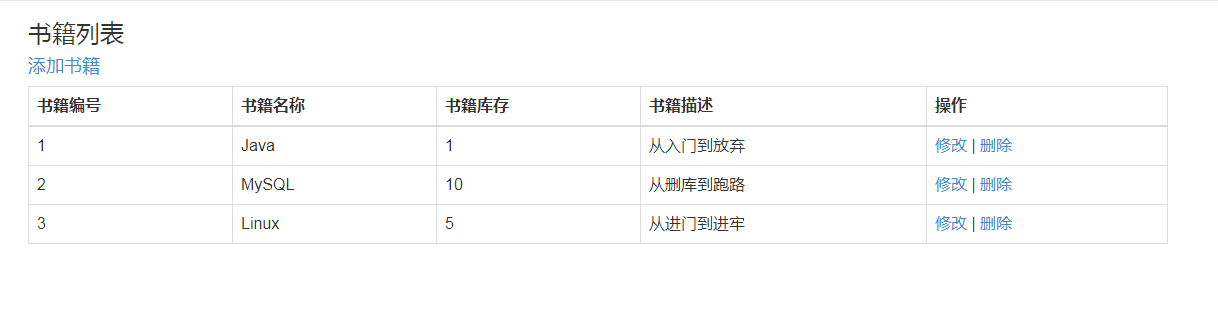
web\WEB-INF\jsp\books.jsp
<%@ taglib prefix="c" uri="http://java.sun.com/jsp/jstl/core" %>

<%@ page contentType="text/html;charset=UTF-8" language="java" %>

<html>

<head>

    <title>Title</title>

    <link href="https://cdn.bootcss.com/twitter-bootstrap/3.0.1/css/bootstrap.min.css" rel="stylesheet">

</head>

<body>

<div class="container">

    <h3>书籍列表</h3><h4><a href="${pageContext.request.contextPath}/toAddBook" >添加书籍</a></h4>

    <div class="row clearfix">

        <div class="col-md-12 column">

            <table class="table table-bordered table-hover">

                <thead>

                <tr>

                    <th>书籍编号</th>

                    <th>书籍名称</th>

                    <th>书籍库存</th>

                    <th>书籍描述</th>

                    <th>操作</th>

                </tr>

                </thead>

                <tbody>

                <c:forEach var="book" items="${booklist}">

                    <tr>

                        <td>${book.bookID}</td>

                        <td>${book.bookName}</td>

                        <td>${book.bookCounts}</td>

                        <td>${book.detail}</td>

                        <td><a href="${pageContext.request.contextPath}/toUpdateBook/${book.bookID}" >修改</a>

                            | <a href="${pageContext.request.contextPath}/deleteBook/${book.bookID}" >删除</a></td>

                    </tr>

                </c:forEach>

                </tbody>

            </table>

        </div>

    </div>

</div>

</body>

</html>
web\WEB-INF\jsp\addbook.jsp
<%@ page contentType="text/html;charset=UTF-8" language="java" %>

<html>

<head>

    <title>Title</title>

    <link href="https://cdn.bootcss.com/twitter-bootstrap/3.0.1/css/bootstrap.min.css" rel="stylesheet">

</head>

<body>

<div class="container">

    <div class="row clearfix">

        <div class="col-md-6 column">

            <form role="form" action="${pageContext.request.contextPath}/addBook" method="post">

                <div class="form-group">

                    <label>书籍名称</label>

                    <input type="text" class="form-control" name="bookName" />

                </div>

                <div class="form-group">

                    <label>书籍库存</label>

                    <input type="text" class="form-control" name="bookCounts" />

                </div>

                <div class="form-group">

                    <label>书籍描述</label>

                    <input type="text" class="form-control" name="detail" />

                </div>

                <button type="submit" class="btn btn-default">添加</button>

            </form>

        </div>

    </div>

</div>

</body>

</html>
web\WEB-INF\jsp\updatebook.jsp
<%@ page contentType="text/html;charset=UTF-8" language="java" %>

<html>

<head>

    <title>Title</title>

    <link href="https://cdn.bootcss.com/twitter-bootstrap/3.0.1/css/bootstrap.min.css" rel="stylesheet">

</head>

<body>

<div class="container">

    <div class="row clearfix">

        <div class="col-md-6 column">

            <form role="form" action="${pageContext.request.contextPath}/updateBook" method="post">

                <div class="form-group">

                    <label>书籍名称</label>

                    <input type="text" class="form-control" name="bookName" value="${book.bookName}"/>

                </div>

                <div class="form-group">

                    <label>书籍库存</label>

                    <input type="text" class="form-control" name="bookCounts" value="${book.bookCounts}"/>

                </div>

                <div class="form-group">

                    <label>书籍描述</label>

                    <input type="text" class="form-control" name="detail" value="${book.detail}"/>

                </div>

                <input type="hidden" name="bookID" value="${book.bookID}">

                <button type="submit" class="btn btn-default">修改</button>

            </form>

        </div>

    </div>

</div>

</body>

</html>
SpringMVC Spring Mybatis整合篇的更多相关文章
- 3.springMVC+spring+Mybatis整合Demo(单表的增删该查,这里主要是贴代码,不多解释了)
前面给大家讲了整合的思路和整合的过程,在这里就不在提了,直接把springMVC+spring+Mybatis整合的实例代码(单表的增删改查)贴给大家: 首先是目录结构: 仔细看看这个目录结构:我不详 ...
- SpringMVC+Spring+Mybatis整合
SpringMVC+Spring+Mybatis整合 导包 配置jdbc.properties.log4j.properties jdbc.driver=com.mysql.jdbc.Driver j ...
- Springmvc+Spring+Mybatis整合开发(架构搭建)
Springmvc+Spring+Mybatis整合开发(架构搭建) 0.项目结构 Springmvc:web层 Spring:对象的容器 Mybatis:数据库持久化操作 1.导入所有需要的jar包 ...
- 2.springMVC+spring+Mybatis整合
前面已经说了,springMVC+spring+Mybatis的整合思路了,现在就照着这个思路来做一下: 在开始之前先来看一下工程的目录结构: config这个目录底下放的都是配置文件: mybati ...
- ztree使用系列三(ztree与springmvc+spring+mybatis整合实现增删改查)
在springmvc+spring+mybatis里整合ztree实现增删改查,上一篇已经写了demo,以下就仅仅贴出各层实现功能的代码: Jsp页面实现功能的js代码例如以下: <script ...
- mybatis学习(十一)——springmvc++spring+mybatis整合
做任何一个项目都以一个需求,这里先定义一下需求:利用三大框架查询酒店列表. 一.搭建开发环境 1.创建一个web项目 我这里用的是 jdk1.8+tomact7.0 2.创建hotel表 CREATE ...
- JavaWeb_(SpringMVC框架)SpringMVC&Spring&MyBatis整合
JavaWeb_(SpringMVC框架)测试SpringMVC&Spring&MyBatis三大整合 传送门 1.整合ssm 3大框架 过程 a)导包 -> spring_Ja ...
- springMVC + Spring + MyBatis 整合
整理下SSM(基于注解)的整合 1. web.xml 配置文件 <?xml version="1.0" encoding="UTF-8"?> < ...
- SpringMVC+Spring+Mybatis整合,使用druid连接池,声明式事务,maven配置
一直对springmvc和mybatis挺怀念的,最近想自己再搭建下框架,然后写点什么. 暂时没有整合缓存,druid也没有做ip地址的过滤.Spring的AOP简单配置了下,也还没具体弄,不知道能不 ...
随机推荐
- Building Applications with Force.com and VisualForce(Dev401)(十八):Visualforce Pages: Introduction to Visualforce
Dev401-020:Visualforce Pages: Introduction to Visualforce Course Objectives1.Understand the benefits ...
- 使用TensorFlow v2张量的一个简单的“hello world”示例
使用TensorFlow v2张量的一个简单的"hello world"示例 import tensorflow as tf # 创建一个张量 hello = tf.constan ...
- 磐创AI GPU租用平台上线,1小时不到1块钱
>> 小白也能看懂的PyTorch从入门到精通系列 << 今天磐创AI GPU租赁平台上线了!!!为大家解决用GPU难的问题!一块10G显存的GPU,1小时租用费用不到1块钱, ...
- vue动态定义图片路径
当我在html模块或者css中引入图片的时候用相对路径,例: <div> <img src="../../assets/img/policeImg/tt.png" ...
- 4 Values whose Sum is 0 POJ - 2785(二分应用)
题意:输入一个数字n,代表有n行a,b,c,d,求a+b+c+d=0有多少组情况. 思路:先求出前两个数字的所有情况,装在一个数组里面,再去求后两个数字的时候二分查找第一个大于等于这个数的位置和第一个 ...
- linux svn 批量添加
近期开始用svn来进行代码版本的维护管理,之前一直用git,两个感觉大同小异.用svn命令行来添加文件的话需要一个一个的选,很是蛋疼,于是就写了个shell脚本,批量添加文件,还在改进中... #!/ ...
- Linux虚拟机-CentOS7常用命令
1.查找虚拟机的ip地址:$ ifconfig ~inet 192.168.68.136
- 20175314薛勐 数据库MySQL(课下作业,必做)
数据库MySQL(课下作业,必做) 要求 下载附件中的world.sql.zip, 参考Intellj IDEA 简易教程:数据库,导入world.sql,提交导入成功截图 编写程序,查询世界上超过& ...
- 【tensorflow2.0】处理图片数据-cifar2分类
1.准备数据 cifar2数据集为cifar10数据集的子集,只包括前两种类别airplane和automobile. 训练集有airplane和automobile图片各5000张,测试集有airp ...
- NKOJ4270 小奇挖矿2
问题描述 [题目背景] 小奇飞船的钻头开启了无限耐久+精准采集模式!这次它要将原矿运到泛光之源的矿石交易市场,以便为飞船升级无限非概率引擎. [问题描述] 现在有m+1个星球,从左到右标号为0到m,小 ...