iOS Mobile Development: Using Xcode Targets to Reuse the Code 使用xcode targets来实现代码复用
In the context of iOS mobile app development, a clone is simply an app that is based off another mobile app. A clone usually has more or less the same code base with probably a slightly different functionality. It’s quite common for this app to have new images, even though most of the UI is the same as the original app.
There are different ways to handle the development of clones. Probably the most common or the one that will first come to mind is using branches.
However, I’m going to talk about a different approach in the form of targets.
1. Targets versus branching
Using branches is not a bad approach by all means. However, there are some serious drawbacks when using them.
Firstly, you may need to go back to your first app to solve bugs the users may have found. Once you’ve fixed those bugs, you will want to merge those fixes in your new branch just to see that you’ll have a bunch of conflicts.
By the time you’ve successfully made the merge, you’ll notice that you’ve spend more time here than doing actual work on the new app.
Fortunately there is a better way that does not require branching. Most IDE’s have some sort of target support (in Android they are called Flavors).
Targets work more like configuration files. You use the same code for all your targets, but each target is configured differently, whether it’s a new app icon or a slight change in logic.
The setup can be tricky but it’s far more powerful than using branches. Let me show you.
2. Adding a new target
We'll be using Xcode 5 for this article and we’ll be using a project that I called MultiTarget.
The first thing you want to do is select the project item in Xcode’s project window which may look a little bit like this: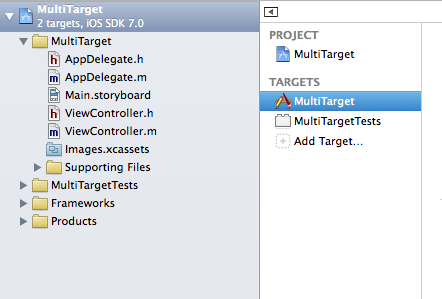
iOS App Development Xcode Adding a new Target
The first step is to duplicate the target like this:
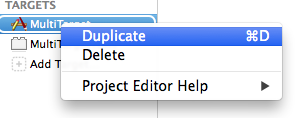
Duplicate target xcode
Change the name of the copy to whatever you want and keep it selected as we need to configure a few things.
Since this is a new app, you probably want a different bundle id for each target. You can do this manually by changing the value Bundle identifier in the Info section of the target, or you can be a bit more flexible by adding a new user defined setting.
This also allows you to have a different bundle id for an app built for Debug or Release.
To do this, select the Build Settings section and go to the Editor menu and select Add User-Defined Setting like this:
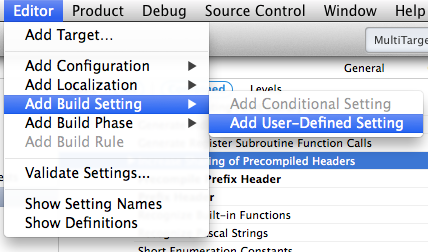
iOS App Development Xcode Using Targets
Give the new user setting a name like APP_BUNDLE_ID and give it a value:

describe the image
And finally tell the Info.plist about this setting and in the Info section change the value of the Bundle identifier to ${APP_BUNDLE_ID}:

bundle identifier xcode
Of course you can add more user settings but remember that to use this setting, you need to use the following syntax: ${YOUR_USER_SETTING}
Note: if your user setting contains spaces you will need to quote it like so: ${“YOUR_USER_SETTING”}
This is useful if your user setting is a path or some string that may contain spaces.
Now if you go to the General section of the target you will see your change reflected:

describe the image
The value here comes from the newly defined user setting and if you’ve defined a different bundle identifier for debug or release, the Bundle identifier here will change too. "Automagically!"
Pretty sweet :) Moving on…
3. Using asset catalogues 使用asset catalogues来添加不同的app icon和launch image
New in Xcode 5 are asset catalogues which are treated as special files in Xcode but are in fact, folders on your hard disk with images inside them.
Not only are asset catalogues great for organizing your image files, but they also tell you if you are missing @2x versions of your images etc…
If you used to previous versions of Xcode, you probably have a resources folder with all your images inside them. Also there are probably some other images outside this folder for your icons and launch images.
So what you need to do is make sure that you are using the asset catalogues first. This is done in the General section of the target. Above the App Icon sub section you have a button that reads: Use Assets Catalogue. Click on it and you’ll have something like this:
Assets Catalogue
In your files list on the left of the project window you’ll also have a file called “Images.xcassets”. Select it and you’ll see that it opens as a kind of an image organizer:
describe the image
注:点击这个xcassets文件然后进入这个文件,可以看到有appicon和launchimage两个文件,单击任何一个就会现实当前的图片资源。选择添加新的appicon后,可以重新命名,
然后单击项目名称可以浏览当前所有的targets,选择需要配置的target然后在general中查找appicon选项选择不同的文件就可以了。
1,这个必须首先全部都加载上图片资源,否则编译会报错找不到合适的资源
2,这个必须提供尺寸合适的图片资源,如果不合适虽然可以浏览但是编译一样会报上面的错误
3,具体的尺寸可以查看相关文档,


The images you see here are from your first app. So you probably want to add the icons and launch images from the new app.
Select the + button at the bottom and select New App Icon. Repeat to make a New Launch Image.

![]()
new app icon xcode
You will want to rename the App Icon and LaunchImage to match the new app name. I did it by adding a prefix to the file name:
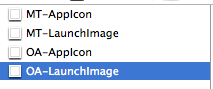
launch image
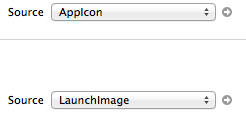
That way you can pick which icons and launch image you want to use for each target. Select them in the General section of the target, as shown here:
![]()
select icons xcode
Finally, you will want to use separate asset catalogues for all the images of your app. In my example project I’m using 3 asset catalogues:
- one used by both targets for the app icon and launch image (the Images.xcassets file)
- one used by the MultiTarget target
- one used by the OtherApp target (ie the second app)

separate asset
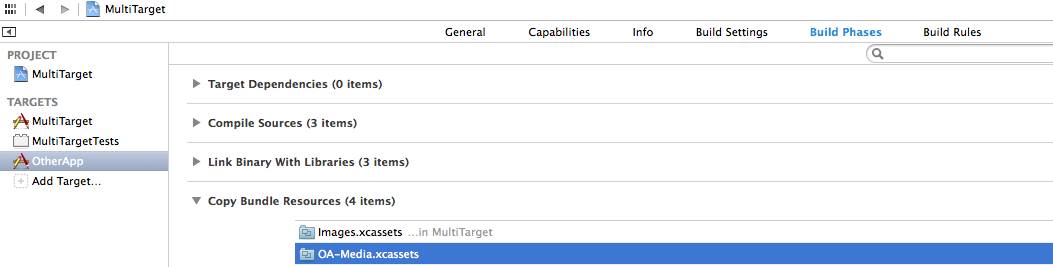
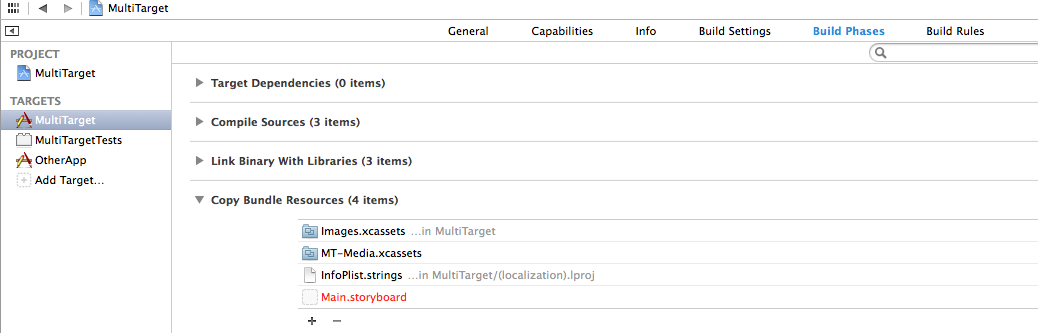
The only thing you need to do is tell each target which asset catalogue you want to use.
You do this in the Build Phases section of the target, under the Copy Bundle Resources subsection:
build phase 1 xcode
describe the image
As you can see from the images above, both targets use the same Images.xcassets file (which holds the app icon and launch images). But the MultiTarget target uses the MT-Media.xcassets and the OtherApp target uses the OA-Media.xcassets.
At this point you’ve successfully separated image assets and some configuration settings while using the same code base.
However, just adding a new skin to the new app is probably not the only change you wanted to make. So let’s talk about changing the logic of the app.
4. The same but different
可以设置预编译宏来区分不同的target来在代码中做不同的处理,在target的build settings中选择Apple LLVM 5.1-Preprocessing 然后填写预编译宏名称 然后代码中只要如下:
#ifdef T2
NSLog(@"TestTarget2-Info.plist");
#elif T1
NSLog(@"TestTarget-Info.plist");
#endif
If we had used branches instead of targets, we would probably have to solve merge conflicts at some point. Even in a world with no conflicts at all, maintaining 2 code bases is not an easy task, even if they are similar.
When using targets we can also organize our code in such a way that it would look as if we had 2 similar code bases and still maintain one big code base at the same time.
However, purists might not consider it to be very elegant.
Enter the world of preprocessor macros. Most C-based languages and its compilers support this feature which allows you to use one part of your code depending on the condition that you supply.
For example, suppose you have this method:
- (void)greet {
NSLog@“Welcome to MultiTarget”);
}
No matter which target you select, the method will always show the same text in the log. This is not what you want of course.
So how can we change this method to be different depending on the selected target? You guessed it, with preprocessor macros.
In Xcode you add preprocessor macros in the Build Settings section of the target. Double click on the right of the text “Preprocessor Macros” and a pop up will show up with a list of all your macros. Add a new macro for each target. For instance for MultiTarget, I added the macro MT and for OtherApp I added the macro OA:
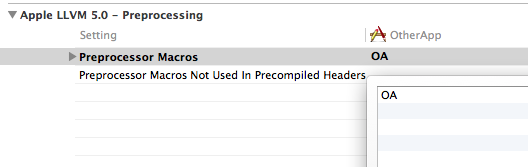
Preprocessor Macros
Now to use these macros, you’ll need to change the code above like this:
- (void)greet {
#ifdef MT
NSLog@“Welcome to MultiTarget”);
#elif OA
NSLog@“Welcome to OtherApp”);
#endif
}
#ifdef simply means “if defined”. In human terms it comes to asking the compiler if the MT or OA macro is available. Since each target has a different macro, one of the 2 macros will always be set (depending on the selected target you used to build the app).
It should be noted that preprocessor macros don’t need to be words alone, they can be something like: DEBUG=1
However, they are used a little differently. In this format you usually are more interested in the value of the macro rather than knowing if the macro is available at all.
So instead of using #ifdef you simply use #if like this:
#if DEBUG == 1
// do something for DEBUG mode
#endif
Please refer to the documentation of the C language for more information on how to use these statements.
5. No more conflicts…
As you can see, the target solution is not that hard to implement and is definitely less messy than if you’d use branches. The process of merging branches specially can be quite hard and could even lead to data loss.
By just separating your assets and adding some statements to select code depending on the target you are able to maintain multiple apps at the same time, so to speak.
And if you use user defined settings and preprocessor macros, you’ll find that this approach is far more flexible than branches.
I hope you can find good use of this tutorial and if you have any questions post them below.
Until next time!
Jesus De Meyer has a Bachelor's degree in Multimedia and Communication Technology from the PIH University in Kortrijk, Belgium. He has 15 years of experience developing software applications for Mac and more than 5 years in iOS mobile app development. He currently works at iTexico as an iOS 7 Mobile App Developer and in his spare time he works on his own mobile apps.
iOS Mobile Development: Using Xcode Targets to Reuse the Code 使用xcode targets来实现代码复用的更多相关文章
- 翻译Beginning iOS 7 Development中文版
不会iOS开发好像真的说只是去,来本中文版的Beginning iOS 7 Development吧. 看了Beginning iOS 7 Development这本书,感觉蛮不错的.全英文的,没有中 ...
- 【转】Xcode概览(Xcode 6版):循序渐进认识Xcode
该系列文章翻译自苹果的Xcode Overview文档,对大部分开发者来说,已经非常熟悉Xcode的功能和特性,不过伴随着iOS 8 SDK的发布,Xcode 6中也有些许调整,所以对该文档进行了翻译 ...
- [iOS] 使用xib做为应用程序入口 with Code
[iOS] 使用xib做为应用程序入口 with Code 前言 开发iOS APP的时候,使用storyboard能够快速并且直觉的建立用户界面.但在多人团队开发的情景中,因为storyboard是 ...
- iOS 个人账号 iOS APP Development 灰色不可选
如图,现在的开发者账号是有几个人共用的,已经 生成了一个Development 的证书,我想再申请一个,出现了这样的情况.网上有说的是申请证书个数到了上限,需要删除已经生成的.因为生成的证书其他人需要 ...
- Launch Google Map in Android / IOS Mobile
<!--This only works in android mobile phone--><a href="geo:0,0?q=myaddress+encode)__&q ...
- iOS开发之--png图片编译时报错 (Command /Applications/Xcode.app/Contents/Developer/usr/bin/copypng failed with exit code 1 )
编译或者运行APP的时候,老是报这个错误:Command /Applications/Xcode.app/Contents/Developer/usr/bin/copypng failed with ...
- 【 Beginning iOS 7 Development《精通iOS7开发》】05 Autorotation and Autosizing
一.旋转后相对位置不变 watermark/2/text/aHR0cDovL2Jsb2cuY3Nkbi5uZXQvZ29nbGVy/font/5a6L5L2T/fontsize/400/fill/I0 ...
- iOS 学习笔记 七 (2015.03.29)code snippet操作
1.code snippet 备份路径:~/Library/Developer/Xcode/UserData/CodeSnippets/
- 加快XCode编译链接速度(200%+)—XCode编译慢液
最近在一个大型项目的开发的时候遇到一个很头疼的问题,由于该项目的代码更,每次建立联系1纪要.浪费时间调试.因此,一些研究如何提高编译链接速度,这里给大家分享. 为了提高编译和链接的是以下三种方式的速度 ...
随机推荐
- debian 7 stable 不能编译android源码
rebuilts/gcc/linux-x86/arm/arm-linux-androideabi-4.8-linaro/bin/arm-linux-androideabi-gcc: /lib/x86_ ...
- Android兼容性测试CTS Verifier-环境搭建、测试执行、结果分析
CTS Verifier算是CTS的一部分,需要手动进行,主要用于测试那些自动测试系统无法测试的功能,比如相机.传感器等.由于硬件配置或其他原因,不同手机上部分测试项目被隐藏,也就是说CTS Veri ...
- python基础学习笔记——面向对象初识
面向对象初识 python中一切皆对象. 类有两种: 新式类:在py3中所有类都是新式类 经典类:在py2中只有类本身继承了object类才叫做新式类,默认是经典类 class Person: cou ...
- 洛谷P1085不高兴的津津
- JS实现——计算两日期之差
在网上找了个js实现的,根据相差天数计算日期和根据两个日期计算相差多少天的示例和代码: 根据相差天数计算日期: 距离: 年 月 日 相差: 天 (输入负数则往前计算) 日期是: 根据日期计算相差天 ...
- linux随笔三
1.ps 结果输出: PID TTY TIME CMD pts/ :: bash pts/ :: ps显示了程序的进程ID,其运行的终端和进程使用的cpu时间
- python学习-- {% csrf_token %}
1.不推荐禁用掉django中的CSRF. 2.我们可以再html页面的form表单中添加csrf_token,带着表单的请求一起发送到服务器去验证. <form enctype=" ...
- NuGet之控制台管理程序包
NuGet作为VS的扩展程序,已经做好了UI,我们可以通过Manage NuGet Packages 的对话框.这里我们主要说说如何通过控制台进行包管理.使用命令行的方式,其实也是有其好处,对 ...
- 九度oj 题目1459:Prime ring problem
题目描述: A ring is compose of n circles as shown in diagram. Put natural number 1, 2, ..., n into each ...
- 简单实用jstl实现代码编写
package com.ceshi; import java.io.IOException; import javax.servlet.jsp.JspException; import javax.s ...