ASP.NET MVC 4.0 学习2-留言板實現
新增專案實現留言板功能,瞭解MVC的運行機制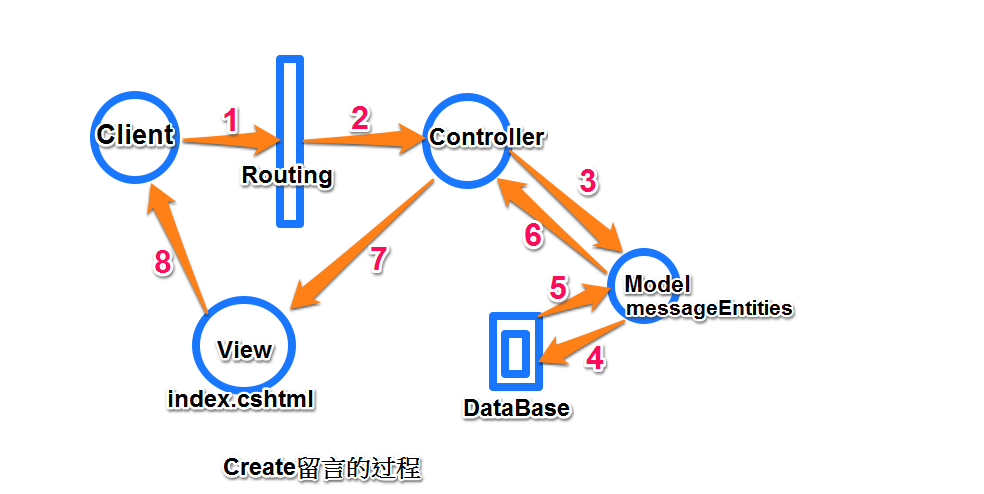
1,新增專案


2,添加數據庫文件message.mdf


Ctrl+W,L 打開資料庫連接,添加存放留言的Atricle表

添加字段,後點擊"更新"後看到新增的Atricle表(Content 應該設置為text)

3,添加ADO.NET實體數據模型 (MVC通過實體數據模型對數據庫中的數據進行增删改查)


 ADO.NET實體數據模型添加完成。
4,建立Service
我們把對Model中message.mdf數據處理的類單獨放在Service文件夾中,這樣更加方便之後的維護同樣也符合MVC耦合度低的特點,這一步是為Controller中的Action方法做準備。新建Service文件夾,添加messageDBService.cs類(Entity實體和Controller的橋樑):


Service類中添加兩個方法,分別實現對數據的讀和寫
- GetData():讀取並返回數據庫中Article中的數據
- DBCreate():把接收的數據存放到Article表中
using System;

using System.Collections.Generic;

using System.Linq;

using System.Web;

using MvcApplication1.Models;  //引用Model命名空間

namespace MvcApplication1.Service

{

    public class messageDBService

    {

        //實例化實體數據

        public Models.messageEntities db=new Models.messageEntities();

        //讀取並返回messageEntity中的數據

        public List<Article> GetData()

        {

            return (db.Article.ToList());

        }

        //把從User接受的數據寫入messageEnitity

        public void DBCreate(string strTitle,string strContent)

        {

            //實例化Artile對象

            Article newData=new Article();

            //給Artile對象的屬性賦值

            newData.Title=strTitle;

            newData.Content=strContent;

            newData.time=DateTime.Now;

            //實體添加到Entity中

            db.Article.Add(newData);

            //保存到數據庫

            db.SaveChanges();

        }

    }

}
4,添加控制器Controller

控制器中的Action實現留言板的添加留言查看留言的功能:
- Index:調用Service中的GetData方法,返回Article列表
- Create:顯示頁面
- Create:方法前有[HttpPost]屬性,只有瀏覽器發送POST請求的時候才會執行此方法,調用Service中的CreateDB方法把數據寫到Article表中
using System;

using System.Collections.Generic;

using System.Linq;

using System.Web;

using System.Web.Mvc;

using MvcApplication1.Models;

using MvcApplication1.Service;

namespace MvcApplication1.Controllers

{

    public class messageController : Controller

    {

        //實例化Service

        messageDBService data = new messageDBService();

        // GET: /message/

        public ActionResult Index()

        {

            //Article列表

            return View(data.GetData());

        }

        public ActionResult Create()

        {

            return View();

        }

        [HttpPost]

        public ActionResult Create(string strAtricle, string strContent)

        {

            //調用Service中的Create方法,把數據寫到數據庫中

            data.DBCreate(strAtricle, strContent);

            //重導向到 Action

            return RedirectToAction("Index");

        }

    }

}
5,添加Action對應的View頁面:

View頁面接收Controller傳遞過來的資料,在User提交按鈕的時候把數據傳給Controller
View Index顯示Article內容,更新View如下:
@model IEnumerable<MvcApplication1.Models.Article>

@{

    ViewBag.Title = "留言板";

}

<div>

    <h2>首頁-留言列表</h2>

    @if (Model != null)

    {

        <table>

            <tbody>

                @foreach (var item in Model)

                {

                    <tr>

                        <td>標題:</td>

                        <td>@item.Title</td>

                    </tr>

                    <tr>

                        <td>留言內容:</td>

                        <td>@item.Content</td>

                    </tr>

                    <tr>

                        <td>時間:</td>

                        <td>@item.time</td>

                    </tr>

                }

            </tbody>

        </table>

    }

</div>

   <br />

<div>

    @Html.ActionLink("點擊新增留言", "Create");

</div>
同樣為 Controller中的 Create Action 添加對應的View:
@model IEnumerable<MvcApplication1.Models.Article>

@{

    ViewBag.Title = "Create";

}

<h2>新增留言</h2>

@using (Html.BeginForm("Create", "Message"))

{

    <div>

        @Html.Label("標題")

        @Html.TextBox("strAtricle")

        <br />

        @Html.Label("內容")

        @Html.TextBox("strContent")

        <br />

        <input type="submit" value="送出留言" />

    </div>

}
在~/Views/Shared/_Layout.cshtml(相當於asp.net中的母版頁Master),中添加留言首頁的連接:
  <ul id="menu">

                        <li>@Html.ActionLink("首頁", "Index", "Home")</li>

                        <li>@Html.ActionLink("關於", "About", "Home")</li>

                        <li>@Html.ActionLink("連絡", "Contact", "Home")</li>

                        <li>@Html.ActionLink("留言", "index", "Message")</li>

                    </ul>
以上完成了一個簡單的留言板。
首頁:

點擊"新增留言", @Html.ActionLink("點擊新增留言", "Create"); 程式根據Routing規則找到對應Controller中的Action
 →
→  →
→ →保存到DB
通過留言板我們看到了MVC項目的運行流程如下:

補充:
按照上面的步驟運行,在新增第二條留言的時候會提示主鍵錯誤
原因:Atricle的ID主鍵沒有設置為 自增長
修正步驟:
1,把ID主鍵設置為自增長後點擊"更新"
2,從資料庫更新Model1.edmx文件

2,

3,運行:

ASP.NET MVC 4.0 学习2-留言板實現的更多相关文章
- ASP.NET MVC 4.0 学习5-ActionResult
一,Controller簡介 Controller擔任了資料傳遞的角色,負責流程控制,決定存取哪個Model以及決定顯示哪個View頁面,即ASP.NET MVC中有關於『傳遞』的任務皆由Contro ...
- ASP.NET MVC 4.0 学习6-Model Binding
一,ViewData,ViewBag與TempData ASP.NET MVC架構中,通過繼承在Controller中的ViewData,ViewBag和TempData和View頁面進行資料的存取, ...
- ASP.NET MVC 4.0 学习1-C#基础语法
1,方法多載,相同的方法名稱,不同的參數類型.數量 class Program { static void Main(string[] args) { Program newObject = new ...
- ASP.NET MVC 4.0 学习4-Code First
之前我們需要用到的數據,通過添加Entity實體數據模型把數據庫中需要的Database拉到項目中如下圖, 而就是Code First就是相對於這種處理數據的方法而言的 Code First更加準確的 ...
- ASP.NET MVC 4.0 学习3-Model
Model負責獲取數據庫中的資料,並對數據庫中的數據進行處理. MVC中有關 數據庫 的任務都由Model來完成,Model中對數據資料進行定義,Controller和View中都會參考到Model, ...
- 从零开始学习ASP.NET MVC 1.0
转自:http://www.cnblogs.com/zhangziqiu/archive/2009/02/27/ASPNET-MVC-1.html <从零开始学习ASP.NET MVC 1.0& ...
- 系列文章--从零开始学习ASP.NET MVC 1.0
从零开始学习ASP.NET MVC 1.0 (一) 开天辟地入门篇 从零开始学习 ASP.NET MVC 1.0 (二) 识别URL的Routing组件 从零开始学习 ASP.NET MVC 1.0 ...
- 2.第一个ASP.NET MVC 5.0应用程序
大家好,上一篇对ASP.NET MVC 有了一个基本的认识之后,这一篇,我们来看下怎么从头到尾创建一个ASP.NET MVC 应用程序吧.[PS:返回上一篇文章:1.开始学习ASP.NET MVC] ...
- Profession ASP.NET MVC 2.0 NerdDinner示例可运行源码
最近一段时间在看JonGalloway等著作的<Profession ASP.NET MVC 2.0>.本书并没有按照常规的大部头书籍那样,按部就班的介绍MVC的概念等,而是在第一章直接引 ...
随机推荐
- 自定义textView的高度
原文地址: http://www.cocoachina.com/ios/20141226/10778.html iOS 8 之后的新特性
- Block(一)基础-备
一.概述 Block是C级别的语法和运行时特性.Block比较类似C函数,但是Block比之C函数,其灵活性体现在栈内存.堆内存的引用,我们甚至可以将一个Block作为参数传给其他的函数或者Block ...
- python 安装 ez_setup.py出现的问题及解决办法
试了网上好几个解决办法. 下面这个办法是最对我胃口的. ~~~~~~~~~~~~~~~~ 安装ez_setup.py时出现了这个问题: UnicodeDecodeError: 'ascii' cod ...
- libeXosip2(1-3) -- How-To send or update registrations.
How-To send or update registrations. The eXtented eXosip stack Initiate a registration To start a re ...
- hadoop的thriftserver配置
说明:hadoop版本:hadoop-1.2.1.tar.gz.linux系统12.04,不过这里跟系统无关,可能安装软件的命令有差别. 一.概述 默认的hbase安装包已经有了thrift服务,使用 ...
- 《Java程序员面试笔试宝典》之 instanceof有什么作用
instanceof是Java语言中的一个二元运算符,它的作用是判断一个引用类型的变量所指向的对象是否是一个类(或接口.抽象类.父类)的实例,即它左边的对象是否是它右边的类的实例,返回boolean类 ...
- boost::asio译文
Christopher Kohlhoff Copyright © 2003-2012 Christopher M. Kohlhoff 以Boost1.0的软件授权进行发布(见附带的LICENS ...
- Makefile 工程管理
Makefile 工程管理 Makefile 规则 --变量 在Makefile中,用户除了可以自己定义变量外,还可以使用存在系统已经定义好的默认变量 $^:代表所有的依赖文件 $@:代表目标 $&l ...
- IoC容器Autofac正篇之类型关联(服务暴露)(七)
类型关联 类型关联就是将类挂载到接口(一个或多个)上去,以方便外部以统一的方式进行调用(看下例). 一.As关联 我们在进行手动关联时,基本都是使用As进行关联的. class Program { s ...
- 细讲encodeURI和encodeURIComponent以及escape的区别与应用
首先,我们都知道这三个东西都是用来编码的 先来说encodeURI()和encodeURIComponent() 这两个是在转换url时候用来编码解码用的. 有编码就会有解码, 解码就是decodeU ...