
基于虚拟用户登录的ftp服务配置
文章结构:
一.使用逻辑卷配置ftp数据存放目录
二.安装和配置vsftpd服务
三.使用不通权限的用户访问ftp服务器
系统环境:

一.使用逻辑卷配置ftp数据存放目录
1.1 配置ftp数据存放目录,此处使用逻辑卷,以便后期添加磁盘。
[root@FTPserver ~]# fdisk /dev/sdb

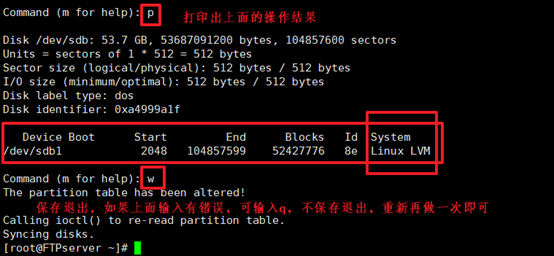
1.2 制作逻辑卷并挂载:
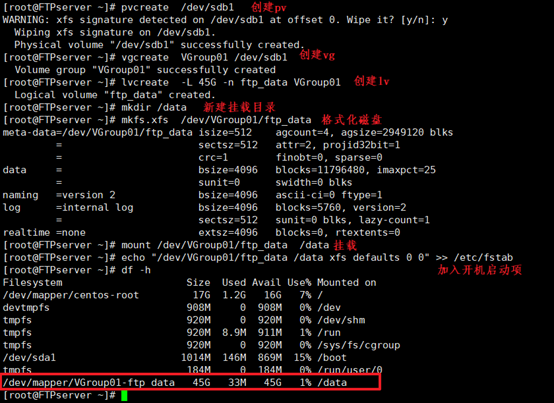
[root@FTPserver ~]# pvcreate /dev/sdb1 #新建pv
[root@FTPserver ~]# vgcreate VGroup01 /dev/sdb1 #新建vg
[root@FTPserver ~]# lvcreate -L 45G -n ftp_data VGroup01 #新建lv
[root@FTPserver ~]# mkfs.xfs /dev/VGroup01/ftp_data #格式化磁盘
[root@FTPserver ~]# mount /dev/VGroup01/ftp_data /data #挂载磁盘
[root@FTPserver ~]# echo "/dev/VGroup01/ftp_data /data xfs defaults 0 0" >> /etc/fstab
二.安装和配置vsftpd服务
[root@FTPserver ~]# yum -y install vsftpd #安装vsftp软件包
[root@FTPserver ~]# yum info vsftpd #查看安装信息

[root@FTPserver ~]# cd /etc/vsftpd/ #进入vsftp配置文件目录

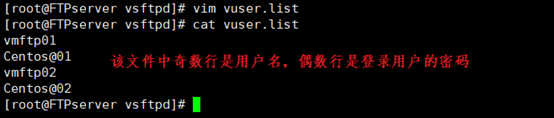
[root@FTPserver vsftpd]# vim vuser.list
#创建虚拟用户和用户密码文件vuser.list,该文件中奇数行为用户,偶数行为用户登录密码
[root@FTPserver vsftpd]# db_load -T -t hash -f vuser.list vuser.db
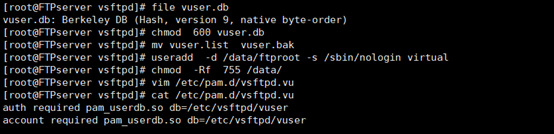
[root@FTPServer ~]# file vuser.db #查看文件类型

[root@FTPServer ~]# chmod 600 vuser.db #给该文件600权限
[root@FTPServer ~]# mv vuser.list vuser.bak #将vuser.list移除或删除,只保留vuser.db
[root@FTPserver vsftpd]# useradd -d /data/ftproot -s /sbin/nologin virtual #添加虚拟用户
[root@FTPServer ~]# chmod -Rf 755 /var/ftproot/ #更改目录权限
[root@FTPServer ~]# vim /etc/pam.d/vsftpd.vu #新建认证文件
auth required pam_userdb.so db=/etc/vsftpd/vuser
account required pam_userdb.so db=/etc/vsftpd/vuser
[root@FTPserver vsftpd]# cp vsftpd.conf vsftpd.conf.bak
[root@FTPserver vsftpd]# > vsftpd.conf
[root@FTPserver vsftpd]# vi vsftpd.conf #将下列配置文件写入vsftpd.conf中
#注意:在重启服务的过程中发现,该配置文件中存在空格会使服务重启失败,若重启过程中报错配置文件中参数有误,可能时该问题引起。
|
#exmple config file /etc/vsftpd/vsftpd.conf # # The default compiled in settings are fairly paranoid. This sample file # loosens things up a bit, to make the ftp daemon more usable. # Please see vsftpd.conf.5 for all compiled in defaults. # # READ THIS: This example file is NOT an exhaustive list of vsftpd options. # Please read the vsftpd.conf.5 manual page to get a full idea of vsftpd's # capabilities. # # Allow anonymous FTP? (Beware - allowed by default if you comment this out). anonymous_enable=NO #禁止匿名用户登录 # # Uncomment this to allow local users to log in. # When SELinux is enforcing check for SE bool ftp_home_dir local_enable=YES #允许本地用户登录 # # Uncomment this to enable any form of FTP write command. #write_enable=YES #允许本地用户拥有写权限 # # Default umask for local users is 077. You may wish to change this to 022, # if your users expect that (022 is used by most other ftpd's) #local_umask=022 #本地用户新建文件或目录的umask值 # # Uncomment this to allow the anonymous FTP user to upload files. This only # has an effect if the above global write enable is activated. Also, you will # obviously need to create a directory writable by the FTP user. # When SELinux is enforcing check for SE bool allow_ftpd_anon_write, allow_ftpd_full_access #anon_upload_enable=YES # # Uncomment this if you want the anonymous FTP user to be able to create # new directories. #anon_mkdir_write_enable=YES # # Activate directory messages - messages given to remote users when they # go into a certain directory. dirmessage_enable=YES # # Activate logging of uploads/downloads. xferlog_enable=YES # # Make sure PORT transfer connections originate from port 20 (ftp-data). connect_from_port_20=YES #连接20端口进行数据传输 # # If you want, you can arrange for uploaded anonymous files to be owned by # a different user. Note! Using "root" for uploaded files is not # recommended! chown_uploads=YES #chown_username=whoever # # You may override where the log file goes if you like. The default is shown # below. #xferlog_file=/var/log/xferlog # # If you want, you can have your log file in standard ftpd xferlog format. # Note that the default log file location is /var/log/xferlog in this case. xferlog_std_format=YES # # You may change the default value for timing out an idle session. #idle_session_timeout=600 # # You may change the default value for timing out a data connection. #data_connection_timeout=120 # # It is recommended that you define on your system a unique user which the # ftp server can use as a totally isolated and unprivileged user. #nopriv_user=ftpsecure # # Enable this and the server will recognise asynchronous ABOR requests. Not # recommended for security (the code is non-trivial). Not enabling it, # however, may confuse older FTP clients. async_abor_enable=YES # # By default the server will pretend to allow ASCII mode but in fact ignore # the request. Turn on the below options to have the server actually do ASCII # mangling on files when in ASCII mode. # Beware that on some FTP servers, ASCII support allows a denial of service # attack (DoS) via the command "SIZE /big/file" in ASCII mode. vsftpd # predicted this attack and has always been safe, reporting the size of the # raw file. # ASCII mangling is a horrible feature of the protocol. ascii_upload_enable=YES ascii_download_enable=YES # # You may fully customise the login banner string: ftpd_banner=Welcome to blah FTP service. # # You may specify a file of disallowed anonymous e-mail addresses. Apparently # useful for combatting certain DoS attacks. #deny_email_enable=YES # (default follows) #banned_email_file=/etc/vsftpd/banned_emails # # You may specify an explicit list of local users to chroot() to their home # directory. If chroot_local_user is YES, then this list becomes a list of # users to NOT chroot(). # (Warning! chroot'ing can be very dangerous. If using chroot, make sure that # the user does not have write access to the top level directory within the # chroot) chroot_local_user=YES #限制在自己的目录中,不能对别人的目录进行操作 #chroot_list_enable=YES # (default follows) #chroot_list_file=/etc/vsftpd/chroot_list # # You may activate the "-R" option to the builtin ls. This is disabled by # default to avoid remote users being able to cause excessive I/O on large # sites. However, some broken FTP clients such as "ncftp" and "mirror" assume # the presence of the "-R" option, so there is a strong case for enabling it. #ls_recurse_enable=YES # # When "listen" directive is enabled, vsftpd runs in standalone mode and # listens on IPv4 sockets. This directive cannot be used in conjunction # with the listen_ipv6 directive. listen=NO # # This directive enables listening on IPv6 sockets. By default, listening # on the IPv6 "any" address (::) will accept connections from both IPv6 # and IPv4 clients. It is not necessary to listen on *both* IPv4 and IPv6 # sockets. If you want that (perhaps because you want to listen on specific # addresses) then you must run two copies of vsftpd with two configuration # files. # Make sure, that one of the listen options is commented !! listen_ipv6=YES pam_service_name=vsftpd.vu #使用的pam文件名称,该文件在上面的步骤中已经新建 userlist_enable=YES tcp_wrappers=YES use_localtime=YES listen_port=10021 #使用10021端口访问ftp服务器 guest_enable=YES #允许虚拟用户登录 guest_username=virtual #虚拟用户使用的本地用户的用户名 user_config_dir=/etc/vsftpd/vuser_dir #虚拟用户使用的文件 virtual_use_local_privs=YES pasv_min_port=40000 #使用被动模式,被动模式使用的端口范围 pasv_max_port=40010 accept_timeout=5 connect_timeout=1 allow_writeable_chroot=YES |
[root@FTPServer ~]# mkdir vuser_dir #新建虚拟用户的权限文件夹,将用户的权限放在各自的文件中,而不是放在配置文件中,这样可以对不同用户的权限进行合理化分配
[root@FTPServer ~]# vim vuser_dir/vmftp01 #vmftp01用户的权限
local_root=/var/data/vmftp01
anon_upload_enable=YES
anon_mkdir_write_enable=YES
anon_other_write_enable=YES
[root@FTPServer ~]# vi vuser_dir/vmftp02 #vmftp02用户的权限
local_root=/var//data/vmftp02
anon_mkdir_write_enable=NO
anon_other_write_enable=NO
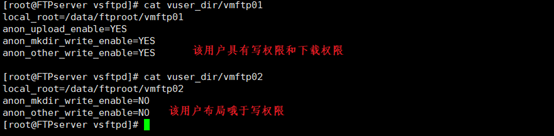
这里还可以设置以下权限:
|
local_root=/home/path #指定用户根目录 write_enable=YES #可写 download_enable=NO #不能下载 anon_umask=022 #用户新建文件和文件夹的umask值 anon_world_readable_only=NO #关闭只可读权限 anon_upload_enable=YES #可上传 anon_mkdir_write_enable=YES #可创建目录权限 anon_other_write_enable=YES #其他写权限,改,删 |
[root@FTPserver vsftpd]# mkdir /data/ftproot/vmftp01 #新建vmftp01用户的数据目录
[root@FTPserver vsftpd]# mkdir /data/ftproot/vmftp02 #新建vmftp02用户的数据目录
[root@FTPserver vsftpd]# echo "welcome" >> /data/ftproot/vmftp01/welcome.txt
[root@FTPserver vsftpd]# echo "welcome" >> /data/ftproot/vmftp02/welcome.txt
[root@FTPserver vsftpd]# chown -R virtual:virtual /data/ftproot/ #该目录下的文件所有者要修改成virtual,若是其他用户则可能存在权限问题,尤其是对已有文件的读和下载时
[root@FTPServer ~]# systemctl start vsftpd #重启服务并加入开机自启动
[root@FTPServer ~]# systemctl enable vsftpd

三.使用不通权限的用户访问ftp服务器
此时就可以使用ftp://192.168.2.123:10021登录ftp服务器了,使用vmftp01登录时:
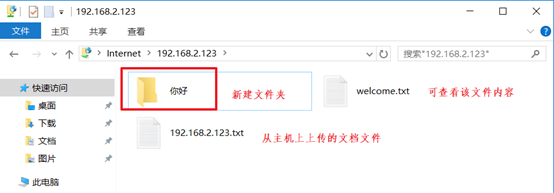
使用vmftp02登录时:

基于虚拟用户登录的ftp服务配置的更多相关文章
- 用户管理和FTP服务配置
批量创建用户 python脚本:creuser.py import osulist=open('usernames','r')for x in ulist: cmd="useradd -g ...
- 如何对CentOS FTP服务配置
根据很多人对CentOS FTP服务的不解,我觉得应该对CentOS FTP服务做出一定的解释. 1.安装 一般在CentOS上都自动安装了vsftd,若没有安装则可以使用以下步骤进行安装yum -y ...
- CentOS FTP基于虚拟用户的配置
详细可以看:http://www.linuxidc.com/Linux/2013-12/94242.htm 所谓虚拟用户就是没有使用真实的帐户,只是通过映射到真实帐户和设置权限的目的.虚拟用户不能登录 ...
- 配置允许匿名用户登录访问vsftpd服务,进行文档的上传下载、文档的新建删除等操作
centos7环境下 临时关闭防火墙 #systemctl stop firewalld 临时关闭selinux #setenforce 0 安装ftp服务 #yum install vsftpd - ...
- CentOS平台部署vsftp(基于虚拟用户)
1. 安装FTP 1 2 [root@task ~]# yum install vsftpd –y [root@task ~]# chkconfig vsftpd on # 配置开机 ...
- 构建基于虚拟用户的vsftpd服务器
安装: [root@server ~]# yum install -y vsftpd [root@server ~]# rpm -ql vsftpd /etc/logrotate.d/vsftpd / ...
- Linux(Centos)配置vsftp使用账号密码(虚拟用户)登录ftp进行文件上传和修改
安装vsftp yum install vsftpd -y 安装完成之后进入vsftp的配置文件夹 cd /etc/vsftpd/ 文件夹内容如下 [root@VM-0-12-centos vsftp ...
- vsftp虚拟用户登录配置详解
一.安装:1.安装Vsftpd服务:# yum install vsftpd 2.安装DB4部件包:这里要特别安装一个db4的包,用来支持文件数据库.# yum install db4-utils 二 ...
- vsftp 基于虚拟用户的ftp服务器 如何做配额
做配额的方法: 1,是用磁盘配额,但是虚拟用户好像没有好办法.只能应用于本地用户.与Vsftpd设置无关 2,文件夹限制大小,是占用的.这和Vsftpd没有关系 所以可以先把用户禁锢在自己工作目录里面 ...
随机推荐
- JavaScript —— 正则表达式元字符
<!DOCTYPE html> <html> <head> <meta charset="utf-8"> <meta http ...
- 本机ip地址怎么查
转自:https://www.192ly.com/basic/local-ip-address-lookup-method.html 百度搜索一下[IP],你就可以轻松看到你的IP地址了,百度出来的 ...
- 2019-9-8-WPF-渲染原理
title author date CreateTime categories WPF 渲染原理 lindexi 2019-9-8 10:40:0 +0800 2018-7-15 16:2:47 +0 ...
- ssh-agent - 认证代理
总览 (SYNOPSIS) ssh-agent [-a bind_address ] [-c | -s ] [-t life ] [-d ] [command [args ... ] ] ssh-ag ...
- c++ ofstream使用方法
ofstream是从内存到硬盘,ifstream是从硬盘到内存,流缓冲即是内存空间. 插入器<< : 向流输出数据. cout << "test!" &l ...
- python之字符串切分
在工作中,经常遇到字符串切分,尤其是操作linux命令,返回一段文本,如下面这种格式 Filesystem Size Used Avail Use% Mounted on /dev/vda1 40G ...
- 输入流之顶层抽象InputStream
该类是所有二进制输入流的的抽象父类 类中主要方法解释说明如下 (1)public abstract int read() throws IOException; 该方法是从输入流中读取下一个字节,返回 ...
- 3 August
P1013 进制位 结论:加法必为 \(n-1\) 进制:\({(n-1)}^1\) 位必为数字 1:\(0+0=0\). 模拟.字符串. #include <cstdio> #inclu ...
- NOIP 考前研究
NOIP 2017 试题研究 D1T1 小凯的疑惑 (45 min) 看到题面,大概是推数学公式. 先打暴力表,观察 \(a,b\) 与 \(n\) 的关系.猜想 \(a×b−a−b\). 引理:对于 ...
- Luogu P1478 陶陶摘苹果
Luogu P1478 陶陶摘苹果(升级版) 题目描述 又是一年秋季时,陶陶家的苹果树结了n个果子.陶陶又跑去摘苹果,这次她有一个a公分的椅子.当他手够不着时,他会站到椅子上再试试. 这次与NOIp2 ...