微信小程序自定义底部导航栏组件+跳转
微信小程序本来封装有底部导航栏,但对于想自定义样式和方法的开发者来说,这并不是很好。
参考链接:https://github.com/ljybill/miniprogram-utils/tree/master/custom-tabbar
首先创建一个底部导航栏组件,名为:navBar
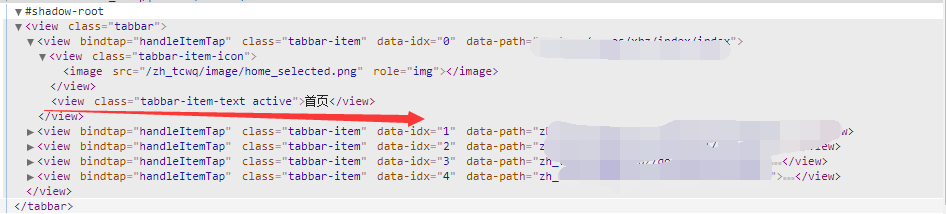
<view class='tabbar'>

  <view wx:if='{{_auth >= item.auth}}' class='tabbar-item' wx:for='{{tabbarList}}' wx:key='{{item.pagePath}}' bindtap='handleItemTap' data-path='{{item.pagePath}}' data-idx='{{index}}'>

    <view class='tabbar-item-icon'>

      <image src='{{activeIdx === index ? item.selectedIconPath : item.iconPath}}'></image>

    </view>

    <view class='tabbar-item-text {{activeIdx === index ? "active" : ""}}'>{{item.text}}</view>

  </view>

</view>
导航栏样式,分为5个按钮,中间为圆形凸起
.tabbar {

  position: fixed;

  bottom: 0;

  left: 0;

  right: 0;

  height: 100rpx;

  border-top: 0.5px solid #d5d5d5;

  display: flex;

  font-size: 0;

  background: #fff;

}

.tabbar-item {

  flex: 1;

  text-align: center;

  overflow: hidden;

  box-sizing: border-box;

  padding: 8rpx 10rpx 0;

  color: #333333;

}

.tabbar-item:nth-child(3){

  position: relative;

  bottom: 50rpx;

  height:150rpx;

  flex: 0.7;

}

.tabbar-item:nth-child(3) .tabbar-item-icon{

  height: 100rpx;

  background: #fff;

  border-radius: 50%;

  border-top: solid 1px gray;

}

.tabbar-item:nth-child(3) .tabbar-item-icon image{

  width: 100rpx;

  height: 106rpx;

  padding-top: 6rpx;

}

.tabbar-item:nth-child(3) .tabbar-item-text{

  line-height: 0;

  font-size: 28rpx;

  margin-top: 8px;

  color: #808080;

}

.tabbar-item-icon {

  margin-bottom: 6rpx;

  height: 56rpx;

}

.tabbar-item-icon image {

  width: 56rpx;

  height: 56rpx;

}

.tabbar-item-text {

  font-size: 28rpx;

  line-height: 20rpx;

  color: #808080;

}

.active {

  color: #23ac38;

}
接下来在app.json中配置导航跳转,由于关于项目,路径自己写
"tabBar": {

    "color": "white",

    "borderStyle": "white",

    "backgroundColor": "white",

    "list": [

      {

        "pagePath": "跳转路径",

        "text": "首页",

        "iconPath": "zh_tcwq/image/home.png",

        "selectedIconPath": "zh_tcwq/image/home_selected.png",

        "auth": 0

      },

      {

        "pagePath": "跳转路径",

        "text": "行业社区",

        "iconPath": "zh_tcwq/image/community.png",

        "selectedIconPath": "zh_tcwq/image/community_selected.png",

        "auth": 0

      },

      {

        "pagePath": "跳转路径",

        "text": "发现",

        "iconPath": "zh_tcwq/image/xbz_logo.png",

        "selectedIconPath": "zh_tcwq/image/close.png",

        "auth": 0

      },

      {

        "pagePath": "跳转路径",

        "text": "项目对接",

        "iconPath": "zh_tcwq/image/docking.png",

        "selectedIconPath": "zh_tcwq/image/docking_selected.png",

        "auth": 0

      },

      {

        "pagePath": "跳转路径",

        "text": "我的",

        "iconPath": "zh_tcwq/image/mine.png",

        "selectedIconPath": "zh_tcwq/image/mine_selected.png",

        "auth": 0

      }

    ]

  }
然后在app.js文件中把app.json配置的导航栏隐藏
onLaunch: function() {

    // 隐藏原生的tabbar

    wx.hideTabBar()

  },
由于要自定义导航栏,所以要自己创建一个导航配置文件
在项目目录下创建一个config文件夹,创建一个router.js的文件
module.exports = [

  {

    "pagePath": "跳转路径",

    "text": "首页",

    "iconPath": "/zh_tcwq/image/home.png",

    "selectedIconPath": "/zh_tcwq/image/home_selected.png",

    "auth": 0

  },

  {

    "pagePath": "跳转路径",

    "text": "行业社区",

    "iconPath": "/zh_tcwq/image/community.png",

    "selectedIconPath": "/zh_tcwq/image/community_selected.png",

    "auth": 0

  },

  {

    "pagePath": "跳转路径",

    "text": "发现",

    "iconPath": "/zh_tcwq/image/xbz_logo.png",

    "selectedIconPath": "/zh_tcwq/image/close.png",

    "auth": 0

  },

  {

    "pagePath": "跳转路径",

    "text": "项目对接",

    "iconPath": "/zh_tcwq/image/docking.png",

    "selectedIconPath": "/zh_tcwq/image/docking_selected.png",

    "auth": 0

  },

  {

    "pagePath": "跳转路径",

    "text": "我的",

    "iconPath": "/zh_tcwq/image/mine.png",

    "selectedIconPath": "/zh_tcwq/image/mine_selected.png",

    "auth": 0

  }

]
接下来在导航栏组件中配置该导航按钮参数
// zh_tcwq/pubcoms/navbar/navbar.js

import tabbarList from "../../../zh_tcwq/config/router.js"

Component({

  /**

   * 组件的属性列表

   */

  properties: {

    activeIdx: {

      type: Number,

      value: 0

    },

    auth: {

      type: Number,

      value: 0,

      observer: 'onAuthChanged'

    }

  },

  /**

   * 组件的初始数据

   */

  data: {

    tabbarList: tabbarList,

    _auth: 0

  },

  /**

   * 组件的方法列表

   */

  methods: {

    handleItemTap(e) {

      const {

        idx,

        path

      } = e.currentTarget.dataset

      if (idx === this.data.activeIdx) {

        this.trigger('refresh')

        return

      }

      wx.switchTab({

        url: `/${path}`,

      })

    },

    onAuthChanged(newVal) {

      wx.setStorageSync('__com-tabbar-auth', newVal)

      this.setData({

        _auth: newVal

      })

    },

    trigger(eventName, value = {}, info) {

      if (!eventName) {

        throw new TypeError('没有自定义事件名')

      }

      this.triggerEvent(eventName, value)

      console.log(`发送 ${eventName} 事件,携带的值为 ${typeof value === 'object' ? JSON.stringify(value) : value} ${info ? '   ---   ' + info : ''}`)

    }

  },

  ready() { },

  /** 权限显示 */

  pageLifetimes: {

    show: function () {

      console.log('show')

      this.setData({

        _auth: wx.getStorageSync('__com-tabbar-auth')

      })

    }

  }

})
关于原作者点击跳转后无法动态激活底部样式的问题,我利用了一个小小的机智,通过组件间的参数传递,判断该参数是否和页面传递的参数一致,一致就显示为active状态
例如:在index页面下引用该组件:
先在json中配置组件:
{

  "usingComponents": {

    "tabbar":"../../../pubcoms/navbar/navbar"

  }

}
在wxml文件中引用
<!-- 底部导航栏--start -->

<tabbar activeIdx="{{activeIdx}}"></tabbar>
<!-- 底部导航栏--end -->
利用activeIdx来传入导航栏组件中,在index.js中声明该参数,因为我的index为第一页,所有我赋值的量为0(数组显示的规则是0,1,2,3,4,五个菜单)
每个引用该组件的页面都配置一下activeIdx,这样在每次加载的时候组件会判断两个参数是否一致,如果一致,就添加active样式。
不知道将的够不够清除,如果有问题的同学可以回复提问。
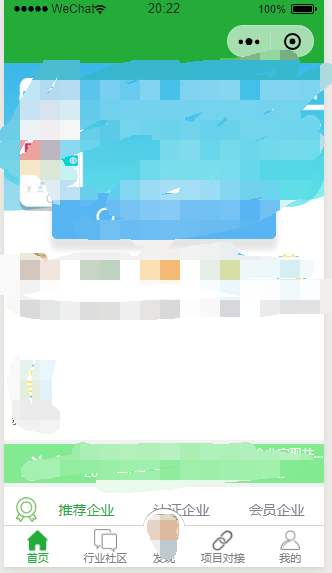
效果图如下,中间是一个圆形凸起的大logo
微信小程序自定义底部导航栏组件+跳转的更多相关文章
- 微信小程序-自定义底部导航
代码地址如下:http://www.demodashi.com/demo/14258.html 一.前期准备工作 软件环境:微信开发者工具 官方下载地址:https://mp.weixin.qq.co ...
- 微信小程序 自定义头部导航栏和导航栏背景图片 navigationStyle
这两天因为要做一个带背景的小程序头,哭了,小程序导航栏有背景也就算了,还得让导航栏上的背景顺下来,心态小崩.现在可以单独设置一个页面的小程序头了,但是前提是要微信7.0以上的版本,考虑到兼容性问题 ...
- 微信小程序自定义头部导航栏
<!--index.wxml--> <view> <navbar id='index_header' background='{{background}}' pageNa ...
- 微信小程序添加底部导航栏
修改 app.json 文件即可 "tabBar": { "selectedColor": "#1296db", "list&qu ...
- 微信小程序~TabBar底部导航切换栏
底部导航栏这个功能是非常常见的一个功能,基本上一个完成的app,都会存在一个导航栏,那么微信小程序的导航栏该怎么实现呢?经过无数的踩坑,终于实现了,好了,先看看效果图. 对于底部导航栏,小程序上给出的 ...
- 微信小程序-自定义菜单导航(实现楼梯效果)
设计初衷 在开发页面时,往往需要实现,点击页面的导航菜单页面滚动到相应位置,滚动页面实现菜单选项的高亮.在html开发中,我们可以用到a标签锚点实现,jq的动画相结合实现类似效果.在框架中vant U ...
- 微信小程序设置底部导航栏目方法
微信小程序底部想要有一个漂亮的导航栏目,不知道怎么制作,于是百度找到了本篇文章,分享给大家. 好了 小程序的头部标题 设置好了,我们来说说底部导航栏是如何实现的. 我们先来看个效果图 这里,我们添加了 ...
- 微信小程序实现navbar导航栏
一.效果图 二.涉及到组件 1.view组件 2.swiper组件 三.原理 整体来讲是比较简单的,顶部的navbar是使用flex进行布局的:下面的内容区域则是使用到swiper组件,使用方式比较简 ...
- 微信小程序自定义顶部导航
注释:自定义导航需要自备相应图片 一.设置自定义顶部导航 Navigation是小程序的顶部导航组件,当页面配置navigationStyle设置为custom的时候可以使用此组件替代原生导航栏. 1 ...
随机推荐
- mysql 恢复数据时中文乱码
mysql恢复数据时中文乱码,解决办法. 用source命令导入mysql数据库怎么设置中文编码 1.导出数据时指定编码在导出mysql sql执行文件的时候,指定一下编码格式: mysqldump ...
- [转帖]华为海思Hi1620芯片发布在即 7nm制程ARM架构最高可达3.0GHz
华为海思Hi1620芯片发布在即 7nm制程ARM架构最高可达3.0GHz https://www.cnbeta.com/articles/tech/850561.htm 中电科旗下的普华软件 支持国 ...
- Zend Framework MVC的结构
The Zend Framework MVC Architecture 一.概述: In this chapter, we will cover the following topics:1. Zen ...
- 记一次有趣的JsonFormat不生效问题
dto中使用了JsonFormat注解,如图 然后再序列化时 objectMapper.writeValueAsString(printReceBillVO) 始终值是一个Long,最后发现是包引用错 ...
- Maven项目的常用jar包
<project xmlns="http://maven.apache.org/POM/4.0.0" xmlns:xsi="http://www.w3.org/20 ...
- Nginx 2.安装与部署配置
转 https://www.cnblogs.com/wcwnina/p/8728430.html > 下载 官方网站:https://nginx.org/en/download.html Win ...
- Redis集群,备份,哨兵机制
原文:https://blog.csdn.net/zy345293721/article/details/87536144 1.集群 先来简单了解下redis中提供的集群策略, 虽然re ...
- HNUSTOJ-1437 无题
1437: 无题 时间限制: 1 Sec 内存限制: 128 MB提交: 268 解决: 45[提交][状态][讨论版] 题目描述 tc在玩一个很无聊的游戏:每一次电脑都会给一个长度不超过10^5 ...
- 工作笔记之20170223:①关于Html5的placeholder属性,②以及input的outline:none的样式问题
关于这边几个样式问题,重点有这么几个: (1)placeholder="请输入密码" (2) color:#BEB6B6; border:0px; border-bottom:1p ...
- npm学习(一)之安装、更新以及管理npm版本
安装npm 安装前须知: npm是在Node中编写的,因此需要安装Node.js才能使用npm.可以通过Node.js网站安装npm,或者安装节点版本管理器NVM. 如果只是想开始探索npm,使用No ...