RGB-D显著性突出物体(学习)
论文阅读:Adaptive Fusion for RGB-D Salient Object Detection
这篇代码的创新点在于使用了SW层,使用SW_logits * img_logits + (1 - SW_logits) * (1 - depth_logits) 来获得最终的预测结果
另外一个关键点是使用了3种loss损失值
第一种损失值,即经过归一化的标签g_t 与 输出的结果logits的sigmoid的损失值
第二种损失值, 即将im_logits进行sigmoid转换为0, 1之间,然后使用sigmoid_im * label + (1 - sigmoid_im) * (1 - label) # 获得标签值与图片值的交叉熵损失值
将计算好的交叉熵损失函数与SW_map 计算-log的交叉熵损失函数,个人认为这个loss存在问题
第三种损失值,即edge_loss即边界的损失值
将预测的结果进行sigmoid操作,转换为(0, 1)
使用tf.reshape(tf.constant([-1, 0, 1], tf.float32), [1, 3, 1, 1]) 构造x方向的边界卷积
使用tf.reshape(x_weight, [3, 1, 1, 1]) # 构造y方向的边界卷积
使用tf.nn.conv2d(g_t, x_weight, [1, 1, 1, 1], 'SAME') 进行标签的x轴方向和y轴方向上的边界卷积
使用tf.nn.conv2d(sigmoid_p, x_weight, [1, 1, 1, 1], 'SAME') 进行预测结果的x轴方向和y轴方向上的边界卷积
最后使用tf.losses.mean_squre_error(xgrad_gt, xgrad_sal) + tf.losses.mean_squre_error(ygrad_gt, ygrad_sal) 获得最终的mse损失函数
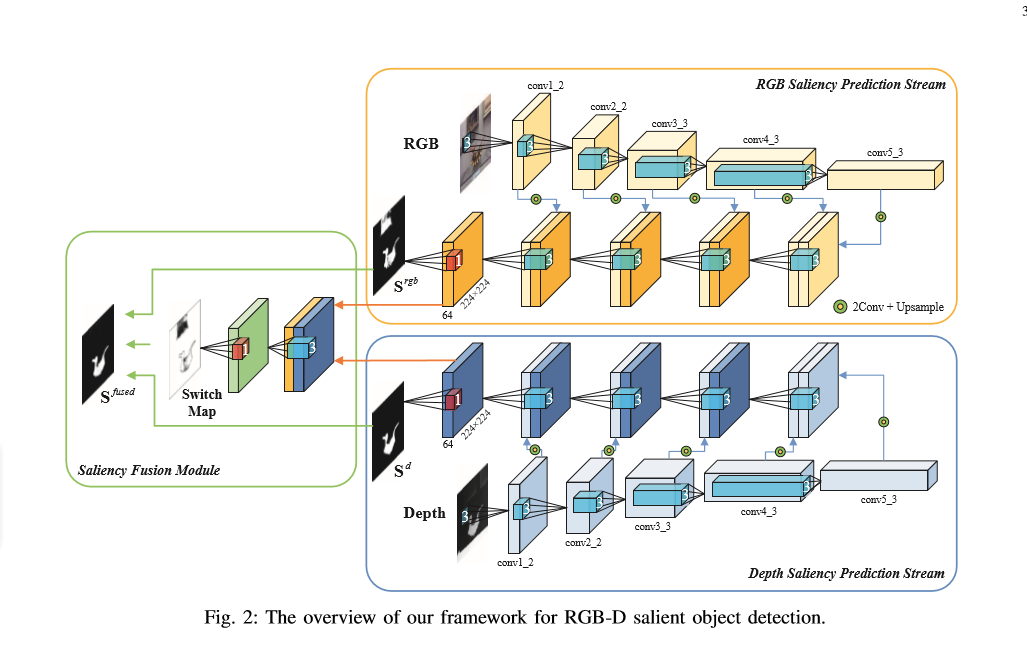
论文中的网络结构图
run_saliency.py 用于执行代码
from __future__ import print_function

import tensorflow as tf

import numpy as np

import scipy.misc as misc

import os

import cv2

from net import *

from loss import *

FLAGS = tf.flags.FLAGS

tf.flags.DEFINE_string('data_dir', './data/', 'path to dataset')

tf.flags.DEFINE_string('ckpt_file', './model/AF-Net', 'checkpoint file')

tf.flags.DEFINE_string('save_dir', './result', 'path to prediction direction')

tf.flags.DEFINE_string('train_data', './train_data/', 'path to train_data')

IMAGE_SIZE = 224

BATCH_SIZE = 1

train_num = 1500

num_epoch = 1000

def _transform(filename, _channels=True):

    image = misc.imread(filename)

    if _channels and len(image.shape) < 3:

        image = np.array([image for _ in range(3)])

    resize_image = misc.imresize(image, [IMAGE_SIZE, IMAGE_SIZE], interp='nearest')

    return image

def main(argv=None, is_training=True):

    image = tf.placeholder(tf.float32, [None, IMAGE_SIZE, IMAGE_SIZE, 3], name='input_image')

    depth_2 = tf.placeholder(tf.float32, [None, IMAGE_SIZE, IMAGE_SIZE], name='input_depth')

    depth = tf.expand_dims(depth_2, axis=3)

    processed_image = image - [123.64, 116.779, 103.939]  # 减去最后一个维度的均值

    gt_2 = tf.placeholder(tf.float32, [None, IMAGE_SIZE, IMAGE_SIZE], name='label')

    gt = tf.expand_dims(gt_2, axis=3)

    net_handler = NetHandler()

    logits, im_logits, SW_map = net_handler.RGBD_SW_net(processed_image, depth)

    pred_annotation = tf.sigmoid(logits)  # 将其转换为0, 1

    # 构造sal损失值

    loss_sal = sigmoid_CEloss(logits, gt)

    # 构造SW损失值

    loss_sw = SW_loss(im_logits, SW_map, gt)

    # 计算边缘损失值

    loss_edge = edge_loss(logits, gt)

    # 计算总的损失值loss

    loss = loss_sal + loss_sw + loss_edge

    # 构造损失值的优化器

    train_op = tf.train.AdamOptimizer(1e-6, beta1=0.5).minimize(loss)

    # 构造执行函数

    sess = tf.Session()

    # 变量初始化

    sess.run(tf.global_variables_initializer())

    # 打印保存的参数的地址

    print('Rreading params from {}'.format(FLAGS.ckpt_file))

    # 如果已经保存了参数就加载

    if tf.train.get_checkpoint_state('model'):

        saver = tf.train.Saver(None)

        saver.restore(sess, FLAGS.ckpt_file)

    # 进行图片结果的保存

    if not os.path.exists(FLAGS.save_dir):

        os.makedirs(FLAGS.save_dir)

    if is_training == False:

        files = os.listdir(os.path.join(FLAGS.data_dir + '/RGB/'))

        test_num = len(files)

        test_RGB = np.array([_transform(os.path.join(FLAGS.data_dir + '/RGB/' + filename), _channels=True) for filename in files])

        # 这里是不对的

        test_depth = np.array([np.expand_dims(_transform(os.path.join(FLAGS.data_dir + '/depth/' + filename), _channels=True) for filename in files)])

        # 进行测试操作

        for k in range(test_num):

            # 进行结果的预测,这里结果的范围为0,1之间

            test_prediction = sess.run(pred_annotation, feed_dict={image:test_RGB[k], depth:test_depth[k]})

            test_origin_RGB = misc.imread(os.path.join(FLAGS.data_dir + '/RGB/' + files[k].split('.')[0] + '.jpg'))

            image_shape = test_origin_RGB.shape

            # 将图片转换为原来的图片的大小

            test_pred = misc.imresize(test_prediction[0, :, :, 0], image_shape, interp='bilinear')

            misc.imsave('{}/{}'.format(FLAGS.save_dir, files[k].split('.')[0] + '.jpg'), test_pred.astype(np.uint8))

        print('Save results in to %s' % (FLAGS.save_dir))

    else:

        iter = 0

        for epoch in range(num_epoch):

            # 载入数据

            for i in range(train_num // BATCH_SIZE):

                deep_img, GT_image, Img_img = read_data_some('train_data.npy', BATCH_SIZE)

                _, _loss = sess.run([train_op, loss], feed_dict={image:Img_img, depth_2:deep_img, gt_2:GT_image})

                if iter % 100 == 0 and iter != 0:

                    print('iter', iter, 'loss', _loss)

                saver = tf.train.Saver()

                if epoch % 10 == 0:

                    saver.save(sess, FLAGS.ckpt_file, write_meta_graph=FLAGS)

                    test_deep, test_GT, test_RGB = read_data_some('test_data.npy', 1)

                    test_prediction = sess.run(pred_annotation, feed_dict={image:test_RGB, depth_2:test_deep, gt_2:test_GT})

                    # 进行图片保存

                    cv2.imwrite('train_result/deep.png', test_deep)

                    cv2.imwrite('train_result/GT.png', test_GT)

                    cv2.imwrite('train_result/RGB.png', test_RGB)

                    cv2.imwrite('train_result/pred.png', test_prediction)

                iter += 1

if __name__ == '__main__':

    tf.app.run()
net.py 网络结构
import tensorflow as tf

import tensorflow.contrib.slim as slim

class NetHandler(object):

    def __int__(self,

                weights_initializer = tf.contrib.layers.xavier_initializer(),

                weight_decay = 0.0001,

                padding='SAME'):

        self.padding = padding

        self.weight_initializer = weights_initializer

        self.weight_decay = weight_decay

    def vgg16_net(self, inputs, depth_suf = ''):

        layers = (

            'conv1_1', 'relu1_1', 'conv1_2', 'relu1_2', 'pool1',

            'conv2_1', 'relu2_1', 'conv2_2', 'relu2_2', 'pool2',

            'conv3_1', 'relu3_1', 'conv3_2', 'relu3_2', 'conv3_3',

            'relu3_3', 'pool3',

            'conv4_1', 'relu4_1', 'conv4_2', 'relu4_2', 'conv4_3', 'relu4_3',

            'pool4',

            'conv5_1', 'relu5_1', 'conv5_2', 'relu5_2', 'conv5_3', 'relu5_3',

            'pool5'

        )

        kernel_size  =  3

        num_outputs = 64

        net = {}

        current = inputs # 当前输入

        for i, name in enumerate(layers):

            if depth_suf == '_d' and i == 0:

                current = slim.conv2d(current, 64, [3, 3],

                                      weights_initializer=self.weight_initializer,

                                      padding=self.padding,

                                      stride=1,

                                      activation_fn=None)

                net[name] = current

                continue

            kind = name[:4]

            if kind == 'conv':

                if name[:5] == 'conv1':

                    num_outputs = 64 # 构造第一个卷积的输出fiter

                elif name[:5] == 'conv2':

                    num_outputs = 128

                elif name[:5] == 'conv3':

                    num_outputs = 256

                elif name[:5] == 'conv4':

                    num_outputs = 512

                elif name[:5] == 'conv5':

                    num_outputs = 512

                _, _, _, c = current.get_shape()

                kernels = tf.get_variable(name=name + '_w' + depth_suf, shape=[kernel_size, kernel_size, c, num_outputs],

                                          initializer=self.weight_initializer,

                                          regularizer=tf.contrib.layers.l2_regularizer(self.weight_decay),

                                          trainable=True)

                _, _, _, bias_size = kernels.get_shape()

                bias = tf.get_variable(name=name + '_b' + depth_suf, shape=[bias_size],

                                       initializer=tf.zeros_initializer(),

                                       trainable=True)

                conv = tf.nn.conv2d(current, kernels, strides=[1, 1, 1, 1], padding=self.padding)

                current = tf.nn.bias_add(conv, bias)

            elif kind == 'relu':

                current = tf.nn.relu(current, name=name)

            elif kind == 'pool':

                current = tf.nn.max_pool(current, kernel_size=[1, 2, 2, 1], strides=[1, 2, 2, 1], padding=self.padding)

            net[name] = current

        return net

    def RGBD_SW_net(self, image, depth):

        image_net = self.vgg16_net(image)

        depth_net = self.vgg16_net(depth, depth_suf='_d')

        conv_5 = image_net['relu5_3']   # 获得第一层到最后一层卷积的结果

        conv_4 = image_net['relu4_3']

        conv_3 = image_net['relu3_3']

        conv_2 = image_net['relu2_2']

        conv_1 = image_net['relu1_2']

        depth_5 = depth_net['relu5_3']

        depth_4 = depth_net['relu4_3']

        depth_3 = depth_net['relu3_3']

        depth_2 = depth_net['relu2_2']

        depth_1 = depth_net['relu1_2']

        with slim.arg_scope([slim.conv2d],

                            weights_initializer=self.weight_initializer,

                            weight_regularizer=slim.l2_regularizer(self.weight_decay),

                            padding=self.padding,

                            stride=1,

                            activation_fn=tf.nn.relu):

            conv5 = slim.repeat(conv_5, 2, slim.conv2d, 64, [3, 3], scope='conv5')  # 2表示进行了两次的卷积操作

            conv4 = slim.repeat(conv_4, 2, slim.conv2d, 64, [3, 3], scope='conv4')  # 进行两次卷积

            conv3 = slim.repeat(conv_3, 2, slim.conv2d, 64, [3, 3], scope='conv3')  #

            conv2 = slim.repeat(conv_2, 2, slim.conv2d, 64, [3, 3], scope='conv2')

            conv1 = slim.repeat(conv_1, 2, slim.conv2d, 64, [3, 3], scope='conv1')

            depth5 = slim.repeat(depth_5, 2, slim.conv2d, 64, [3, 3], scope='depth5')

            depth4 = slim.repeat(depth_4, 2, slim.conv2d, 64, [3, 3], scope='depth4')

            depth3 = slim.repeat(depth_3, 2, slim.conv2d, 64, [3, 3], scope='depth3')

            depth2 = slim.repeat(depth_2, 2, slim.conv2d, 64, [3, 3], scope='depth2')

            depth1 = slim.repeat(depth_1, 2, slim.conv2d, 64, [3, 3], scope='depth1')

            conv5_up = tf.image.resize_images(conv5, [224, 224])

            conv4_up = tf.image.resize_images(conv4, [224, 224])

            conv3_up = tf.image.resize_images(conv3, [224, 224])

            conv2_up = tf.image.resize_images(conv2, [224, 224])

            depth5_up = tf.image.resize_images(depth5, [224, 224])

            depth4_up = tf.image.resize_images(depth4, [224, 224])

            depth3_up = tf.image.resize_images(depth3, [224, 224])

            depth2_up = tf.image.resize_images(depth2, [224, 224])

            # 将卷积层进行维度变化,卷积后的结果输入到下一层

            concat4_im = tf.concat([conv5_up, conv4_up], 3)

            feat4_im = slim.conv2d(concat4_im, 64, [3, 3], scope='feat4_im')

            concat3_im = tf.concat([feat4_im, conv3_up], 3)

            feat3_im = slim.conv2d(concat3_im, 64, [3, 3], scope='feat3_im')

            concat2_im = tf.concat([feat3_im, conv2_up], 3)

            feat2_im = slim.conv2d(concat2_im, 64, [3, 3], scope='feat2_im')

            concat1_im = tf.concat([feat2_im, conv1], 3)

            feat1_im = slim.conv2d(concat1_im, 64, [3, 3], scope='feat1_im')

#           # 同理对深度图做相同的操作

            concat4_d = tf.concat([depth4_up, depth5_up], 3)

            feat4_d = slim.conv2d(concat4_d, 64, [3, 3], scope='feat4_d')

            concat3_d = tf.concat([feat4_d, depth3])

            feat3_d = slim.conv2d(concat3_d, 64, [3, 3], scope='feat3_d')

            concat2_d = tf.concat([feat3_d, depth2])

            feat2_d = slim.conv2d(concat2_d, 64, [3, 3], scope='feat2_d')

            concat1_d = tf.concat([feat2_d, depth])

            feat1_d = slim.conv2d(concat1_d, 64, [3, 3], scope='feat1_d')

            # 进行1*1的卷积, 时期维度变化为1

            conv1_im_logits = slim.conv2d(feat1_im, 1, [1, 1], activation_fn=None, scope='conv1_im_logits')

            conv1_d_logits = slim.conv2d(feat1_d, 1, [1, 1], activation_fn=None, scope='conv1_d_logits')

            # 将图像卷积图与深度卷积图合并

            feat1 = slim.conv2d(tf.concat([feat1_im, feat1_d], 3), 64, [3, 3], scope='feat1')

            SW_map = tf.nn.sigmoid(slim.conv2d(feat1, 1, [1, 1], activation_fn=None, scope='feat1_attn'))

            conv1_fused_logits = SW_map * conv1_im_logits + (1 - SW_map) * conv1_d_logits

            return conv1_fused_logits, conv1_im_logits, SW_map
loss.py 定义的损失值
import tensorflow as tf

def sigmoid_CEloss(logits, gt):

    loss = tf.reduce_mean(

        tf.nn.sigmoid_cross_entropy_with_logits(logits=logits, labels=tf.cast(gt, tf.float32))

    )

def SW_loss(im_logits, SW_map, gt):

    label = tf.cast(gt, tf.float32)

    sigmoid_im = tf.nn.sigmoid(im_logits)

    SW_gt = label * sigmoid_im + (1 - label) * (1 - sigmoid_im)

    cost = -SW_gt * tf.log(tf.clip_by_value(SW_map, 1e-8, 1.0)) \

            - (1 - SW_gt) * tf.log(tf.clip_by_value(1 - SW_map, 1e-8, 1.0))

    return tf.reduce_mean(cost)

# 边缘轮廓的损失值

def edge_loss(logits, gt):

    gt = tf.cast(gt, tf.float32)

    sigmoid_p = tf.nn.sigmoid(logits)

    x_weight = tf.reshape(tf.constant([-1, 0, +1], tf.float32), [1, 3, 1, 1]) # 构造了一个卷积核

    y_weight = tf.reshape(x_weight, [3, 1, 1, 1])  # 构造了卷积核

    # 获得其标签边缘的梯度值,获得x边缘的损失值

    xgrad_gt = tf.nn.conv2d(gt, x_weight, [1, 1, 1, 1], 'SAME')

    ygrad_gt = tf.nn.conv2d(gt, y_weight, [1, 1, 1, 1], 'SAME')

    # 获得输出结果的边缘梯度值

    xgrad_sal = tf.nn.conv2d(sigmoid_p, x_weight, [1, 1, 1, 1], 'SAME')

    ygrad_sal = tf.nn.conv2d(sigmoid_p, y_weight, [1, 1, 1, 1], 'SAME')

    # 计算平方根误差

    loss = tf.losses.mean_squared_error(xgrad_gt, xgrad_sal) + tf.losses.mean_squared_error(ygrad_gt, ygrad_sal)

    return loss
read_data 读取一个batch_size的数据
import numpy as np

import cv2

def read_data_some(path, bacth_size):

    data = np.array(np.load('npy/' + path))

    num = len(data)

    indx = np.random.randint(0, num, bacth_size)

    deep_img, GT_img, Img_imgs = data[indx][:, 0], data[indx][:, 1], data[indx][:, 2]

    deep_imgs = []

    GT_imgs = []

    for i in range(bacth_size):

        deep_imgs.append(cv2.cvtColor(deep_img[i], cv2.COLOR_BGR2GRAY))

        GT_imgs.append(cv2.cvtColor(GT_img[i], cv2.COLOR_BGR2GRAY))

    return deep_imgs, GT_imgs, Img_imgs

if __name__ == '__main__':

    read_train_data(64)
save_data 保存数据为.npy
import random

import os

import cv2

import numpy as np

import glob

def save_data(path):

    data = []

    for root, dirs, files in os.walk(path):

        if len(dirs) != 0:

            file_names = glob.glob(path + dirs[0] + '/*.png')

            for deep_name in file_names:

                GT_name = deep_name.replace('deep', 'GT')

                Img_name = deep_name.replace('deep', 'Img').replace('png', 'jpg')

                # 图片的读取

                deep_img = cv2.imread(deep_name)

                deep_img = cv2.resize(deep_img, (224, 224))

                GT_img = cv2.imread(GT_name)

                GT_img = cv2.resize(GT_img, (224, 224))

                Img_img = cv2.imread(Img_name)

                Img_img = cv2.resize(Img_img, (224, 224))

                data.append((deep_img, GT_img, Img_img))

    # 进行数据的清洗

    random.shuffle(data)

    np.save('npy/' + path[:-1] + '.npy', data)
RGB-D显著性突出物体(学习)的更多相关文章
- V-rep学习笔记:视觉传感器2
视觉传感器的属性设置栏中还有如下几个选项: Ignore RGB info (faster): if selected, the RGB information of the sensor (i.e. ...
- Python学习day45-数据库(总结)
figure:last-child { margin-bottom: 0.5rem; } #write ol, #write ul { position: relative; } img { max- ...
- Python学习day44-数据库(单表及多表查询)
figure:last-child { margin-bottom: 0.5rem; } #write ol, #write ul { position: relative; } img { max- ...
- Python学习day43-数据库(多表关系)
figure:last-child { margin-bottom: 0.5rem; } #write ol, #write ul { position: relative; } img { max- ...
- Python学习day42-数据库的基本操作(1)
figure:last-child { margin-bottom: 0.5rem; } #write ol, #write ul { position: relative; } img { max- ...
- Python学习day41-数据库(1)
figure:last-child { margin-bottom: 0.5rem; } #write ol, #write ul { position: relative; } img { max- ...
- Python学习day40-并发编程(终)
figure:last-child { margin-bottom: 0.5rem; } #write ol, #write ul { position: relative; } img { max- ...
- Python学习day39-并发编程(各种锁)
figure:last-child { margin-bottom: 0.5rem; } #write ol, #write ul { position: relative; } img { max- ...
- Python学习day38-并发编程(线程)
figure:last-child { margin-bottom: 0.5rem; } #write ol, #write ul { position: relative; } img { max- ...
随机推荐
- MyBatis--把SQL带进Java
简单来看软件服务的工作流程:用户端界面操作请求<---->本地处理|远程服务程序拦截转发请求<---->服务端逻辑功能实现<--MyBatis用在这里-->数据库. ...
- deep_learning_Function_LSTM_dynamic_rnn
一. tf.nn.dynamic_rnn的输出 tf.nn.dynamic_rnn的输入参数如下 tf.nn.dynamic_rnn( cell, inputs, sequence_ ...
- jquery判断cookie是否存在
首先请加载jquery库与jquery cookie插件 http://code.jquery.com/jquery-latest.js http://files.cnblogs.com/afish/ ...
- 【CF1187E】Tree Painting
题目大意:给定一棵 N 个点的树,初始全是白点.要求你做 N 步操作,每一次选定一个与一个黑点相隔一条边的白点,将它染成黑点,然后获得该白点被染色前所在的白色联通块大小的权值.第一次操作可以任意选点, ...
- @AutoConfigureBefore
@AutoConfigureBefore(Xxx.class)此注解用在类名上,标识在加载Xxx类前加载该配置类
- http协议和i/o模型
http协议----基于请求报文和响应报文完成一次http事务 应用层协议格式有两种: 文本(开发容易,但交互解析困难如http smtp),二进制(交互解析容易,但理解起来困难memocache) ...
- SQL Server判断表中某字段是否存在【转】
--比如说要判断表A中的字段C是否存在两个方法: 一, IF EXISTS ( FROM SYSOBJECTS T1 INNER JOIN SYSCOLUMNS T2 ON T1.ID=T2.ID W ...
- 直通BAT必考题系列:JVM的4种垃圾回收算法、垃圾回收机制与总结
垃圾回收算法 1.标记清除 标记-清除算法将垃圾回收分为两个阶段:标记阶段和清除阶段. 在标记阶段首先通过根节点(GC Roots),标记所有从根节点开始的对象,未被标记的对象就是未被引用的垃圾对象. ...
- 让IE8一下兼容CSS3选择器
来自英国的网页开发工程师Keith Clark 开发了一个JavaScript方案来使IE支持CSS3选择器.该脚本支持从IE5到IE8的各个版本. 首先,您需要下载DOMAssistant脚本和ie ...
- javascript中的原型和原型链(四)
new运算符工作原理