
Node.js进阶篇-koa、钩子函数、websocket、嵌入式开发
一、简介
koa是由Express原班人马打造的,致力于成为一个更小、更富有表现力、更健壮的Web框架,Koa不定制路由,无冗余的中间件,开发设计方案趋向定制化,所以很适合对业务和技术有灵活要求的web场景。
二、应用
由于restful、加解密、跨域、参数解析、中间件等比较基础,且文档丰富,本小节将直接跳过,侧重于分享以下几点:
1、路由转发时,如何利用钩子函数机制做到controller层业务解耦

2、在socket通信中如何动态加载protobuf进行数据格式交换

3、如何基于websocket绑定相同的端口

4、如何利用c++编写node扩展库
- 2.1 业务解耦
中间件及钩子函数机制皆为业务解耦的有效实现方式,其中中间件模式因其实现方便而应用广泛, 如koa、express、sails中都曾大量用到,
而钩子函数机制在node生态中被大量用到ORM对数据库的操作,如mongoose、waterline,鲜有在controller层的广泛应用,本小节则尝试分享
一个简易的Hooks实现方式,并应用在koa框架中。
编写koa-hooks, 并提交到npm
const hooks = require('hooks')

class ApiHooks {

  constructor(ctx, next, cb) {

    this._ctx = ctx

    this._next = next

    this._cb = cb

    this._listenerTree = {}

    this.addListenerTree()

  }

  addListenerTree() {

    for (let fn in hooks) {

      this[fn] = hooks[fn]

    }

  }

  addHooks(listeners) {

    const self = this

    try {

      listeners.map(listener => {

        const [method, hooksFn] = listener.split('.')

        if(hooksFn.match('before')) self.addFn(method, hooksFn, 'pre')

        if(hooksFn.match('after')) self.addFn(method, hooksFn, 'post')

      })

    } catch (err) {

      console.log('err:', err)

    }

  }

 addFn(method, hooksFn, hook) {

    const self = this

    self[hook](method, async (next) => {

      await self[hooksFn](self._ctx, next, self._cb)

    })

  }

}

module.exports = ApiHooks
编写一个restful风格接口/v1/verb/get,继承ApiHooks, 添加对应的钩子函数beforeVerbCheckLogin实现登录检查
/**

 * Created by Joseph on 18/09/2017.

 */

const Api = require('koa-hooks').Api

const VerbService = require('../../services/verb.js')

class VerbApi extends Api {

  constructor(ctx, next, cb) {

    super(ctx, next, cb)

    this.addHooks([

      'verbGetOnThisRequest.beforeVerbCheckLogin',

      'verbPostOnThisRequest.beforeVerbCheckLogin',

      'verbPutOnThisRequest.beforeVerbCheckLogin',

      'verbDeleteOnThisRequest.beforeVerbCheckLogin',

    ])

  }

  async beforeVerbCheckLogin(ctx, next, cb) {

    const data = await VerbService.beforeVerbCheckLogin(ctx, next)

    data ? cb(ctx, data) : await next()

  }

  async verbGetOnThisRequest(ctx, next, cb) {

    const data = await VerbService.verbGetOnThisTest(ctx, next)

    data ? cb(ctx, data) : await next()

  }

  async verbPostOnThisRequest(ctx, next, cb) {

    const data = await VerbService.verbPostOnThisTest(ctx, next)

    data ? cb(ctx, data) : await next()

  }

  async verbPutOnThisRequest(ctx, next, cb) {

    const data = await VerbService.verbPutOnThisTest(ctx, next)

    data ? cb(ctx, data) : await next()

  }

  async verbDeleteOnThisRequest(ctx, next, cb) {

    const data = await VerbService.verbDeleteOnThisTest(ctx, next)

    data ? cb(ctx, data) : await next()

  }

}

module.exports = (ctx, next, cb) => new VerbApi(ctx, next, cb)
启动服务,请求接口http://127.0.0.1:3000/v1/verb/get,可以发现此钩子函数已经生效

注释掉//'verbGetOnThisRequest.beforeVerbCheckLogin', 再次请求接口,可以发现在需求变动情况对源码修改极少,代码可维护性提升

- 2.2 protobuf数据协议
protobuf是谷歌开源的是一种轻便高效的结构化数据存储格式, 且平台无关、语言无关、可扩展,通常用在tcp编程对数据传输要求较高的场
景,protobuf兼有json的可读性,且传输效率远大于json、xml等,非常适合流式数据交换。
A) 根据文件名及message动态加载protobuf
const protobuf = require('protobufjs')

const protoPath = '/Users/dreamboad/Projects/koa-service/message/'

class Proto {

  async loadByName(protoName, messageName, obj, type) {

    return new Promise((resolve, reject) => {

      protobuf.load(`${protoPath}${protoName}.proto`, (err, root) => {

        if (err) {

          return console.log(err) || resolve()

        }

        const data = root.lookupType(`${protoName}.${messageName}`)

        if (type === 'encode' && data.verify(obj)) {

          return console.log('encode err') || resolve()

        }

        switch (type) {

          case 'decode':

            return resolve(data.toObject(data.decode(obj), { objects: true }))

          case 'encode':

            return resolve(data.encode(data.create(obj) || '').finish())

        }

      })

    })

  }

  async deserialize(protoName, messageName, obj) {

    return await this.loadByName(protoName, messageName, obj, 'decode')

  }

  async serialize(protoName, messageName, obj) {

    return await this.loadByName(protoName, messageName, obj, 'encode')

  }

}

module.exports = new Proto()
B) 编写soket client
/**

 * 1、动态加载protobuf

 * 2、socket数据流断包、粘包处理(TODO)

 * 3、心跳机制、及断线重连

 */

const net = require('net')

const [HOST, PORT] = ['127.0.0.1', 9999]

const client = new net.Socket()

const connection = () => {

  client.connect(PORT, HOST, () => { console.log('CONNECTED TO: ' + HOST + ':' + PORT)})

}

client.on('data', (data) => {

  console.log(`${HOST}:${PORT} CONNECT DATA: `, data)

})

client.on('error', (e) => {

  console.log(`${HOST}:${PORT} CONNECT ERROR: ` + e)

})

client.on('timeout', (e) => {

  console.log(`${HOST}:${PORT} CONNECT TIMEOUT: ` + e)

})

client.on('end', (e) => {

  console.log(`${HOST}:${PORT} CONNECT END: ` + e)

})

client.on('close', (e) => {

  console.log(`${HOST}:${PORT} CONNECT CLOSE: ` + e)

  if (client.destroyed) {

    client.destroy()

  }

  setTimeout(connection, 3000)

})

process.on('exit', () => {

  client.destroy()

  client.on('close', () => {

    console.log('Connection closed')

  })

})

// 连接 客户端

module.exports = { connection, client }
C) 在soket通信中序列化/反序列化json数据
/**

 *  序列化、反序列化

 */

const crypto = require('crypto')

const Proto = require('./protobuf')

class SocketProto {

  async doTranslation(obj, protoName, messageName, operation) {

    try {

      switch (operation) {

        case 'decode':

          return await Proto.deserialize(obj, protoName, messageName)

        case 'encode':

          return await Proto.serialize(obj, protoName, messageName)

      }

    } catch (error) {

      console.log(error)

    }

  }

  async decode(obj, protoName, messageName) {

    return await this.doTranslation(obj, protoName, messageName, 'decode')

  }

  async encode(obj, protoName, messageName) {

    return await this.doTranslation(obj, protoName, messageName, 'encode')

  }

}

module.exports = new SocketProto()
D) 连接服务器,读写流式数据,并用proto解析
const { connection, client } = require('./socket_client')

const SocketProto = require('./socket_protobuf')

const config = require('../config/').msgIdConfig

connection()

const writer = module.exports.writer = async (protoName, messageName, obj) => {

  const w = await SocketProto.encode(protoName, messageName, obj)

  return client.write(w)

}

const reader = module.exports.reader = async (protoName, messageName, obj) => {

  const r = await SocketProto.decode(protoName, messageName, obj)

  return r

}

client.on('data', (buf) => {

  chooseFnByMsg('', 'basemsg', buf)

})

const chooseFnByMsg = (msgId, type, obj) => {

  if (msgId) {

    if (!config[msgId] || !config[msgId].req || !config[msgId].res) {

      return console.log('noting to do: ', msgId)

    }

  }

  switch (type) {

    case 'basemsg':

      return reader(config.head.res.pName, config.head.res.mName, obj)

    case 'write':

      return writer(config[msgId].req.pName, config[msgId].req.mName, obj)

    case 'read':

      return reader(config[msgId].res.pName, config[msgId].res.mName, obj)

    default:

      console.log('noting to do default: ', msgId)

      break

  }

}

chooseFnByMsg(1, 'write', { Field: "String" })

module.exports = chooseFnByMsg
E) server及client分别在终端打印结果


- 2.3 websocket
A) koa server
const app = new Koa()

// web socket

const server = require('http').Server(app.callback())

const io = require('socket.io')(server)

io.on('connection', client => {

  console.log('new connection:')

  client.on('news', (data, cb) => {

    console.log('news:', data)

  })

  client.on('disconnect', () => {

    console.log('disconnect:')

  })

})
B) websocket client
const client = require('socket.io-client').connect('http://localhost:3000')

client.emit('news', "hello world")

- 2.1 C++插件
IO异步及高并发是Node的优势,但若在需要密集计算、集成基于C++的第三方SDK等场景时,Node的劣势则显现出来,此时可以基于node-gyp来嵌入集成C++解决以上等问题。
A) 安装node-gyp
cnpm install -g node-gyp
A) 编辑binding.gyp、C++、Node调用模块
{

  "targets": [

    {

			"target_name": "demo",

			"sources": ["src/demo.cc"]

		},

   	{

			"target_name": "test_params_nocb",

			"sources": ["src/test_params_nocb.cc"]

		},

  	{

			"target_name": "test_function_nocb",

			"sources": ["src/test_function_nocb.cc"]

		},

    {

      "target_name": "test_params_function_nocb",

      "sources": ["src/test_params_function_nocb.cc"]

    }

	]

}
// test_function_nocb.cc

#include <node.h>

namespace demo {

using v8::Function;

using v8::FunctionCallbackInfo;

using v8::Isolate;

using v8::Local;

using v8::Null;

using v8::Object;

using v8::String;

using v8::Value;

void RunCallback(const FunctionCallbackInfo<Value>& args) {

  Isolate* isolate = args.GetIsolate();

  Local<Function> cb = Local<Function>::Cast(args[0]);

  Local<Value> argv[1] = { String::NewFromUtf8(isolate, "hello world") };

  cb->Call(Null(isolate), 1, argv);

}

void Init(Local<Object> exports, Local<Object> module) {

  NODE_SET_METHOD(module, "exports", RunCallback);

}

NODE_MODULE(test_function_nocb, Init)

}  // namespace demo
module.exports.embeddedProxy = (cb, params) => {

  return new Promise((resolve, reject) => {

    try {

      return cb((data) => { resolve(data) }, params)

    } catch (err) {

      return resolve({ data: "调用失败", code: -1 })

    }

  })

}
C) 编译C++
node-gyp configure

node-gyp build


D) 定义路由并调用接口

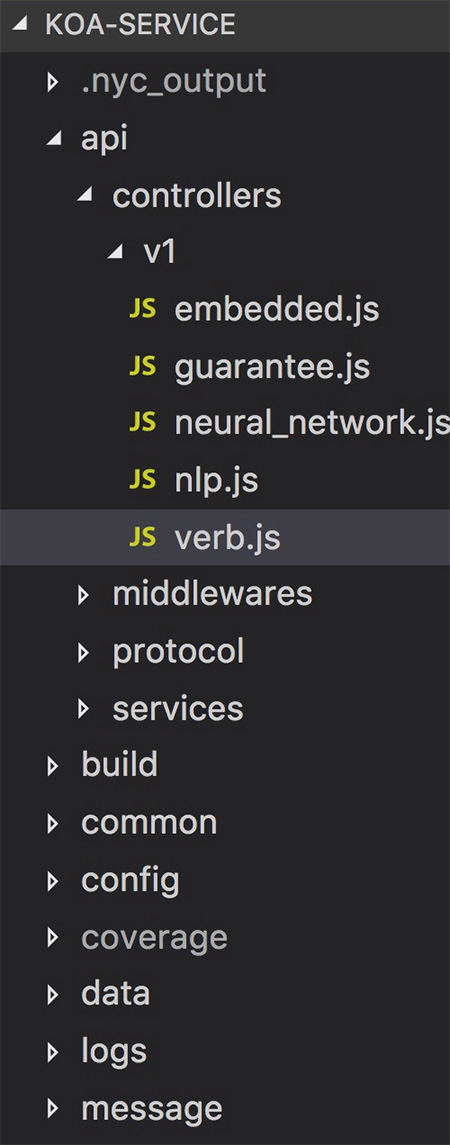
项目文件目录结构截图
三、参考
- 1、koa文档
- 2、protobufjs、npm
- 3、koa-hooks、npm
- 4、Node-gyp
Node.js进阶篇-koa、钩子函数、websocket、嵌入式开发
注:本文著作权归作者,由demo大师代发,拒绝转载,转载需要作者授权
Node.js进阶篇-koa、钩子函数、websocket、嵌入式开发的更多相关文章
- 2. web前端开发分享-css,js进阶篇
一,css进阶篇: 等css哪些事儿看了两三遍之后,需要对看过的知识综合应用,这时候需要大量的实践经验, 简单的想法:把qq首页全屏另存为jpg然后通过ps工具切图结合css转换成html,有无从下手 ...
- web前端开发分享-css,js进阶篇
一,css进阶篇: 等css哪些事儿看了两三遍之后,需要对看过的知识综合应用,这时候需要大量的实践 经验, 简单的想法:把qq首页全屏另存为jpg然后通过ps工具切图结合css转换成html,有无 从 ...
- Node.js学习准备篇
这里写个Node.js 准备篇包含内容有node.js 的安装,命令行运行node.js 文件,使用webStrom 编写 node.js 时有提示功能,并用webStrom 运行 Node.js 其 ...
- js进阶 13 jquery动画函数有哪些
js进阶 13 jquery动画函数有哪些 一.总结 一句话总结: 二.jquery动画函数有哪些 原生JavaScript编写动画效果代码比较复杂,而且还需要考虑兼容性.通过jQuery,我们使用简 ...
- Node.js自学笔记之回调函数
写在前面:如果你是一个前端程序员,你不懂得像PHP.Python或Ruby等动态编程语言,然后你想创建自己的服务,那么Node.js是一个非常好的选择.这段时间对node.js进行了简单的学习,在这里 ...
- Node.js进阶:5分钟入门非对称加密方法
前言 刚回答了SegmentFault上一个兄弟提的问题<非对称解密出错>.这个属于Node.js在安全上的应用,遇到同样问题的人应该不少,基于回答的问题,这里简单总结下. 非对称加密的理 ...
- Node.js 入门篇
Node.js 使用C++开发的. Node.js是一个事件驱动服务端JavaScript环境,只要能够安装相应的模块包,就可以开发出需要的服务端程序,如HTTP服务端程序.Socket程序等. No ...
- 基于Unix Socket的可靠Node.js HTTP代理实现(支持WebSocket协议)
实现代理服务,最常见的便是代理服务器代理相应的协议体请求源站,并将响应从源站转发给客户端.而在本文的场景中,代理服务及源服务采用相同技术栈(Node.js),源服务是由代理服务fork出的业务服务(如 ...
- Node.js系列基础学习-----回调函数,异步
Node.js基础学习 Node.js回调函数 Node.js异步编程的直接体现就是回调,异步编程依托回调来实现,但不是异步.回调函数在完成任务后就会被调用,Node有很多的回调函数,其所有的API都 ...
随机推荐
- PowerDesigner用例图展示设置
powerdesigner用例图显示设置 powerdesigner中的绘图功能真是不敢恭维,折线半天弄不直,直线半天弄不弯. 1.修改显示设置 tools-->display preferen ...
- HDU 1426 Sudoku Killer【DFS 数独】
自从2006年3月10日至11日的首届数独世界锦标赛以后,数独这项游戏越来越受到人们的喜爱和重视. 据说,在2008北京奥运会上,会将数独列为一个单独的项目进行比赛,冠军将有可能获得的一份巨大的奖品— ...
- </2017><2018>
>>> Blog 随笔原始文档及源代码 -> github: https://github.com/StackLike/Python_Note >>> 统计信 ...
- 使用scrapy爬取金庸小说目录和章节url
刚接触使用scrapy的时候,如果一开始就想实现特别复杂的配置,显然是不太现实的,用一些小的例子可以帮助自己理解各个模块. 今天的目标:爬取http://www.luoxia.com/shendiao ...
- 【博弈论】【SG函数】【找规律】Gym - 101147A - The game of Osho
以后这种题还是不能空想,必须打个表看看,规律还是比较好找的……具体是啥看代码.用SG函数暴力的部分就不放了. #include<cstdio> using namespace std; i ...
- 【kmp算法】【Rabin-Karp算法】bzoj2462 [BeiJing2011]矩阵模板
算法就不说了,反正是基于字符串匹配的.这里比较一下kmp和Rabin-Karp算法. <法一>kmp算法. 592788 lizitong 2462 Accepted 4828 kb 68 ...
- 7.3(java学习笔记)网络编程之UDP
一.UDP UDP的全称是User Datagram Protocol(用户数据报协议),是一种无连接的不安全的传输协议, 传输数据时发送方和接收方无需建立连接,所以是不安全的. 发送时不建立连接直接 ...
- Exercise02_01
import java.util.Scanner; public class Out { public static void main(String[] args){ Scanner input = ...
- Bean实例化(三种方法)
(一)构造器实例化Bean 1. Bean1.java package com.inspur.ioc; public class Bean1 { } 2.Beans1.xml <?xml ver ...
- ubuntu下python3及idle3的安装
一.使用以下命令检查自己的系统下是否有python3 python3 --version 如果出现类似“command not found",则说明你需要安装python3.如果能够出现py ...