nodejs利用windows API读取文件属性(dll)
nodejs调用delphi编写的dll中,使用了dll调用windows api转读取文件属性,感觉使用nodejs也可直接调用windows api。
此处需用到windows系统的version.dll,该dll位于C:\WINDOWS\System32\下,是一个32位的dll,故此处直接使用32位版本的node。
一、安装所需模块(node-gyp、ffi、ref、iconv-lite)
npm install node-gyp -g

npm install ffi -- save

npm install ref --save
npm install iconv-lite --save
其中:node-gyp直接全局安装,ffi、ref、iconv-lite安装在项目中即可
PS:
1. ffi与ref的安装需要用到python,需先装好。
2. ffi用来调用dll
3. ref用来设置buffer
4. iconv-lite用来转码GBK字符
二、示例,使用nodejs读取文件属性
const ffi = require('ffi');
const ref = require('ref');
const iconvLite = require('iconv-lite');
// 定义dll
const version = ffi.Library('C://WINDOWS//System32//version', {
'GetFileVersionInfoSizeA': [ 'int', ['string', 'int'] ],
'GetFileVersionInfoA': ['int', ['string', 'int', 'int', ref.refType(ref.types.char)]],
'VerQueryValueA': ['int', [ref.refType(ref.types.char), 'string', ref.refType(ref.types.CString), ref.refType('int')]]
});
const Int16Format4 = function (num) {
const s = '0000';
const f = num.toString(16);
return s.substr(0, 4 - f.length) + f;
};
try {
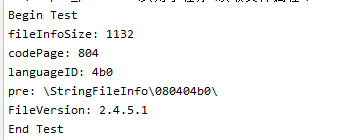
console.log('Begin Test');
// 转码,windows使用AnsiChar,利用iconv-lite使用gbk解码
const file = iconvLite.encode('C:\\Program Files (x86)\\Tencent\\WeChat\\WeChat.exe', 'gbk');
// 获取文件属性大小
const size = version.GetFileVersionInfoSizeA(file, 0);
console.log('fileInfoSize: ' + size);
// 读取文件属性buffer
const buf = new Buffer(size);
buf.type = ref.types.char;
version.GetFileVersionInfoA(file, 0, size, buf);
// 读取文件属性的LanguageID和CodePage,用来合成属性查找标记
const table = ref.alloc('int32').ref(), length = ref.alloc('int');
version.VerQueryValueA(buf, '\\VarFileInfo\\Translation', table, length);
const tableBuf = table.deref(); // 其中tableBuf中的值应为int32
const codePage = tableBuf.readUInt16LE(0); // codePage应取tableBuf的高16位
const languageID = tableBuf.readUInt16LE(2); // languageID应取tableBuf的低16位
console.log('codePage: ' + codePage.toString(16));
console.log('languageID: ' + languageID.toString(16));
// 合成属性查找标记
// 不同的语言地区,该值可能不一样,据我所知,中文"\\StringFileInfo\\080403A8\\"、英文"\\StringFileInfo\\040904E4\\",故需通过该方式合成最可靠
const pre = '\\StringFileInfo\\' + Int16Format4(codePage) + Int16Format4(languageID) + '\\';
console.log('pre: ' + pre);
const versionBuf = new Buffer(1000).ref();
version.VerQueryValueA(buf, pre + 'FileVersion', versionBuf, length);
const infoBuf = versionBuf.deref().slice(0, length.deref());
const info = iconvLite.decode(infoBuf, 'gbk');
console.log('FileVersion: ' + info);
console.log('End Test');
} catch(err) {
console.log(err);
}
运行结果如下:
PS:
1. 传参file最好使用gbk或者gb2312解码,否则如果file中含有中文时,将无法正确读到size、buf
2. versionBuf应尽量给的长一些,再通过length截断,避免数据取值不全
3. pre最好使用这种方式合成得到,否则可能存在读不到属性的情况
三、稍微改写上述代码
 'use strict';

 /**

  *

  *

  * @author Mai

  * @date 2018/7/12

  * @version

  */

 const ffi = require('ffi');

 const ref = require('ref');

 const iconvLite = require('iconv-lite');

 // 定义dll

 const version = ffi.Library('C://WINDOWS//System32//version', {

     'GetFileVersionInfoSizeA': [ 'int', ['string', 'int'] ],

     'GetFileVersionInfoA': ['int', ['string', 'int', 'int', ref.refType(ref.types.char)]],

     'VerQueryValueA': ['int', [ref.refType(ref.types.char), 'string', ref.refType(ref.types.CString), ref.refType('int')]]

 });

 const FileVersion = function () {};

 const proto = FileVersion.prototype;

 // 16进制format(%4.x)

 proto._int16Format4 = function (num) {

     const s = '0000';

     const f = num.toString(16);

     return s.substr(0, 4 - f.length) + f;

 };

 // 根据属性名读取文件属性

 proto._getInfo = function (buf, pre, name) {

     const infoBufPointer = new Buffer(1000).ref(); // 定义指向Buffer地址的指针,Buffer尽量定义长一点

     const length = ref.alloc('int'); // 定义指向整数的指针

     if (version.VerQueryValueA(buf, pre + name, infoBufPointer, length) !== 0) {

         // 根据length,在Buf中截取属性

         const infoBuf = infoBufPointer.deref().slice(0, length.deref() - 1);

         return iconvLite.decode(infoBuf, 'gbk');

     } else {

         return undefined;

     }

 };

 // 获取属性查找标记

 proto._getPre = function (buf) {

     // 读取文件属性的LanguageID和CodePage,用来合成属性查找标记

     const table = ref.alloc('int32').ref(), length = ref.alloc('int');

     version.VerQueryValueA(buf, '\\VarFileInfo\\Translation', table, length);

     const tableBuf = table.deref(); // 其中tableBuf中的值应为int32

     const codePage = tableBuf.readUInt16LE(0); // codePage应取tableBuf的高16位

     const languageID = tableBuf.readUInt16LE(2); // languageID应取tableBuf的低16位

     // 合成属性查找标记

     // 不同的语言,该值不一样,其中英文是"\\StringFileInfo\\080403A8\\",中文是"\\StringFileInfo\\040904E4\\",需通过该方式合成

     return '\\StringFileInfo\\' + this._int16Format4(codePage) + this._int16Format4(languageID) + '\\';

 };

 // 读取文件属性

 proto.getFileVersionInfo = function (path) {

     // 转码,windows使用AnsiChar,利用iconv-lite使用gb2312解码

     const file = iconvLite.encode(path, 'gb2312');

     // 获取文件属性大小

     const size = version.GetFileVersionInfoSizeA(file, 0);

     // 读取文件属性buffer

     const buf = new Buffer(size);

     buf.type = ref.types.char;

     version.GetFileVersionInfoA(file, 0, size, buf);

     // 获取文件属性查找标记

     const pre = this._getPre(buf);

     // 读取文件属性

     const fileVersionInfo = {};

     fileVersionInfo.CompanyName = this._getInfo(buf, pre, 'CompanyName');

     fileVersionInfo.FileDescription = this._getInfo(buf, pre, 'FileDescription');

     fileVersionInfo.FileVersion = this._getInfo(buf, pre, 'FileVersion');

     fileVersionInfo.InternalName = this._getInfo(buf, pre, 'InternalName');

     fileVersionInfo.LegalCopyright = this._getInfo(buf, pre, 'LegalCopyright');

     fileVersionInfo.LegalTrademarks = this._getInfo(buf, pre, 'LegalTrademarks');

     fileVersionInfo.OriginalFilename = this._getInfo(buf, pre, 'OriginalFilename');

     fileVersionInfo.ProductName = this._getInfo(buf, pre, 'ProductName');

     fileVersionInfo.ProductVersion = this._getInfo(buf, pre, 'ProductVersion');

     fileVersionInfo.Comments = this._getInfo(buf, pre, 'Comments');

     return fileVersionInfo;

 };

 module.exports = FileVersion;
测试代码:
const FileVersion = require('./versionInfo');
try {
const fileVersionReader = new FileVersion();
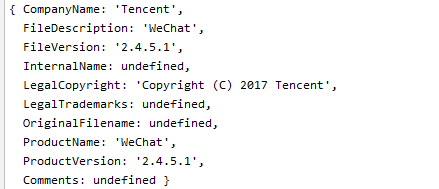
const info = fileVersionReader.getFileVersionInfo('C:\\Program Files (x86)\\Tencent\\WeChat\\WeChat.exe', 'gb2312');
console.log(info);
} catch (err) {
console.log(err);
}
测试结果如下:
参考:
nodejs利用windows API读取文件属性(dll)的更多相关文章
- 利用 Windows API Code Pack 修改音乐的 ID3 信息
朋友由于抠门 SD 卡买小了,结果音乐太多放不下,又不舍得再买新卡,不得已决定重新转码,把音乐码率压低一点,牺牲点音质来换空间(用某些人的话说,反正不是搞音乐的,听不出差别)… 结果千千静听(百度音乐 ...
- Windows API学习---插入DLL和挂接API
插入DLL和挂接API 在Microsoft Windows中,每个进程都有它自己的私有地址空间.当使用指针来引用内存时,指针的值将引用你自己进程的地址空间中的一个内存地址.你的进程不能创建一个其引用 ...
- 利用windows api共享内存通讯
主要涉及CreateFile,CreateFileMapping,GetLastError,MapViewOfFile,sprintf,OpenFileMapping,CreateProcess Cr ...
- C#利用Windows API 实现关机、注销、重启等操作
using System; using System.Text; using System.Diagnostics; using System.Runtime.InteropServices; nam ...
- 【整理】c# 调用windows API(user32.dll)
User32.dll提供了很多可供调用的接口,大致如下(转自http://blog.csdn.net/zhang399401/article/details/6978803) using System ...
- 后端Nodejs利用node-xlsx模块读取excel
后端Nodejs(利用node-xlsx模块) /** * Created by zh on 16-9-14. */ var xlsx = require("node-xlsx") ...
- 【转】c# 调用windows API(user32.dll)
using System; using System.Collections.Generic; using System.Linq; using System.Text; using System.R ...
- Windows API Hooking in Python
catalogue . 相关基础知识 . Deviare API Hook Overview . 使用ctypes调用Windows API . pydbg . winappdbg . dll inj ...
- Windows Dll Injection、Process Injection、API Hook、DLL后门/恶意程序入侵技术
catalogue 1. 引言2. 使用注册表注入DLL3. 使用Windows挂钩来注入DLL4. 使用远程线程来注入DLL5. 使用木马DLL来注入DLL6. 把DLL作为调试器来注入7. 使用c ...
随机推荐
- Android中关于系统Dialog无法全屏的问题(dialog样式)
自定义一个Dialog,继承了系统Dialog的样式.这时候会发现,即使布局文件中写的width和height都是match_parent,依然无法达到全屏的效果. 原因是:系统dialog的样式.默 ...
- activiti基础--0------------------------------生成23张表
1.工作流activiti.cfg.xml配置文件 <beans xmlns="http://www.springframework.org/schema/beans" xm ...
- Java并发之BlockingQueue
一.Queue Queue是队列接口是 Collection的子接口.除了基本的 Collection操作外,队列还提供其他的插入.提取和检查操作.每个方法都存在两种形式:一种抛出异常(操作失败时 ...
- sql把字符数组转换成表
需求:把字符串1,2,3变成表里的行数据 方法:用自定义函数实现 /* 获取字符串数组的 Table */ from sysobjects where id = object_id('Get_StrA ...
- Kattis - triangle 【数学】
题意 求第N个迭代三角形 中 所有黑色三角形的周长的整数部分的位数 思路 该三角形的周长是 3^(n + 1)/ 2 ^ (n) 然后 可以用 long double 存下来 再求位数 就可以 AC ...
- 每天一个Linux命令(29)du命令
du命令是对文件和目录磁盘使用的空间的查看. (1)用法: 用法: du [选项] [文件] (2)功能: 功能: 报告磁盘空间使用情况 (3) ...
- flask初次搭建rest服务笔记
官网中有用的记录一下,太多只是记录了最简单的官网docs:http://flask.pocoo.org/docs/0.12/ 跑起来一个程序 $ export FLASK_APP=hello.py $ ...
- P4455 [CQOI2018]社交网络(矩阵树定理)
题目 P4455 [CQOI2018]社交网络 \(CQOI\)的题都这么裸的吗?? 做法 有向图,指向叶子方向 \(D^{out}(G)-A(G)\) 至于证明嘛,反正也就四个定理,先挖个坑,省选后 ...
- DELPHI-Delphi常用类型及定义单元
DELPHI-Delphi常用类型及定义单元 Type Unit Date SysUtils DeleteFile SysUtils or Windows (different versions) D ...
- linux 下载rpm包到本地,createrepo:创建本地YUM源
如何下载rpm包到本地 设置yum安装时,保留rpm包. 1.编辑 /etc/yum.conf 将keepcache的值设置为1; 这样就可以将yum安装时的rpm包保存在 /var/cache/yu ...