Ionic3 demo TallyBook 实例3
1.准备应用相关组件
echarts--直接 npm install 安装即可
2.home.ts
import { Component,ViewChild,ElementRef } from '@angular/core';
import { IonicPage,NavController,Slides,PopoverController } from 'ionic-angular';
import {SQLiteService} from '../../app/sqlite.service'
import * as echarts from 'echarts'; //引入图表插件
@IonicPage()
@Component({
selector: 'page-home',
templateUrl: 'home.html'
})
export class HomePage {
// @ViewChild(Slides) slides: Slides;
@ViewChild('piecontainer') piecontainer:ElementRef;
monthMoney:number = 0;
dayMoney:number = 0;
yearMoney:number = 0;
optinpielegend : any = [];
strdate:string ='';
strdateMonth:string ='';
stryear:string="";
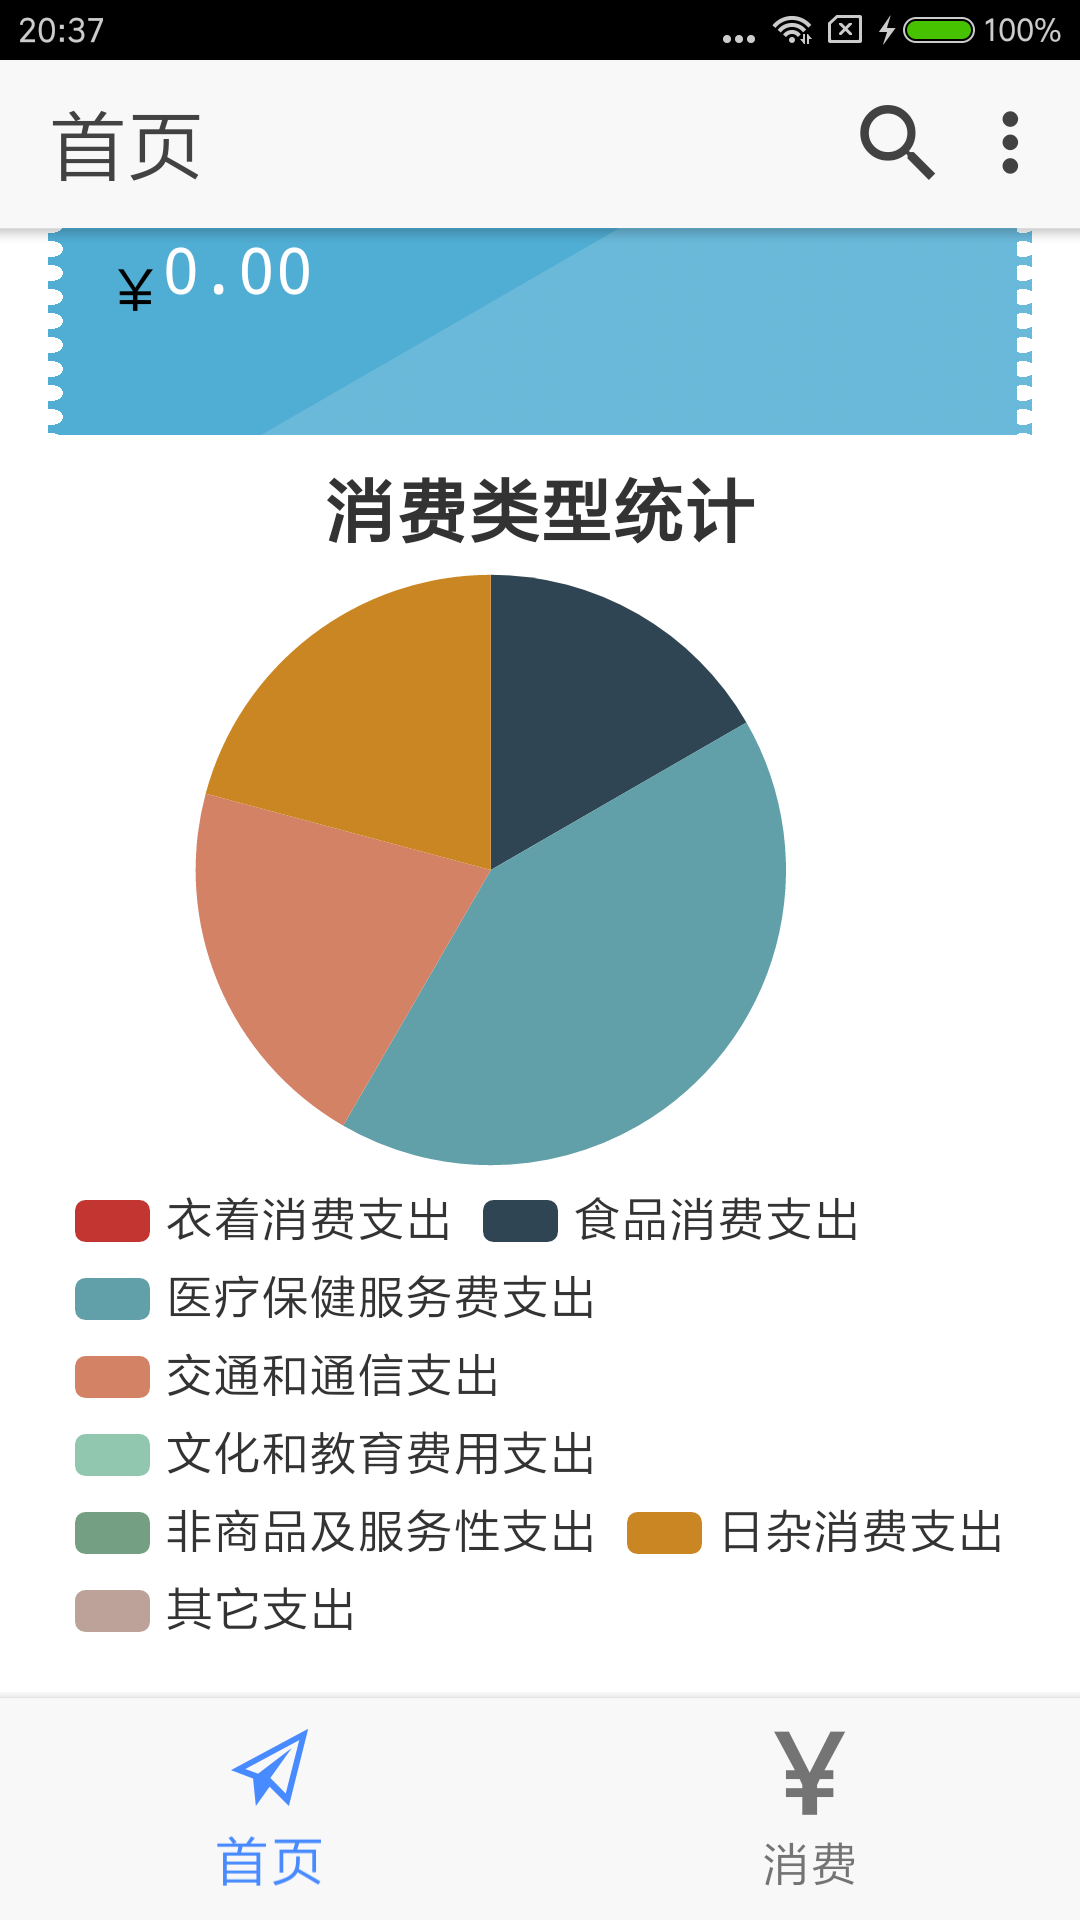
option = {
title : {
text: '消费类型统计',
x:'center'
},
tooltip : {
trigger: 'item',
formatter: "¥{c}({d}%)"
},
legend: {
x:'center',
y:'bottom',
data: []
},
series : [
{
type: 'pie',
radius : '60%',
center: ['45%', '35%'],
data: [],
itemStyle: {
normal: {
label : {
show : false //隐藏标示文字
},
labelLine : {
show : false //隐藏标示线
}
},
emphasis: {
shadowBlur: 10,
shadowOffsetX: 0,
shadowColor: 'rgba(0, 0, 0, 0.5)'
}
}
}
]
};
constructor(public navCtrl: NavController
,private sqlite: SQLiteService,
public popoverCtrl: PopoverController
) {
}
getData(){
// return new Promise((resolve,reject)=>{
this.optinpielegend=[];
this.sqlite.database.executeSql("SELECT A.*,sum(ifnull(B.amount,0)) amount FROM consumType A LEFT OUTER JOIN consum B on A.id=B.type group by A.id ",{}).then(res=>{
for(var i=0; i<res.rows.length; i++) {
this.optinpielegend.push({value:res.rows.item(i).amount,name: res.rows.item(i).name});
}
}).catch(e=>{
console.log(e);
});
let datetime=new Date();
let m=datetime.getMonth()<10?"0"+(datetime.getMonth()+1):(datetime.getMonth()+1).toString();
let d=datetime.getDate()<10?"0"+(datetime.getDate()):(datetime.getDate()).toString();
let date=datetime.getFullYear()+"-"+m+"-"+d;
this.strdate=date;
this.strdateMonth=datetime.getFullYear()+"-"+m;
this.stryear=datetime.getFullYear().toString();
this.sqlite.database.executeSql("select ifnull(sum(amount),0) amount from consum where date=? ",[date]).then(
r=>{
this.dayMoney=r.rows.item(0).amount;
}).catch(e=>{
console.log(e);
});
this.sqlite.database.executeSql("select ifnull(sum(amount),0) amount from consum where strftime('%m',date)=? ",[m.toString()]).then(
r=>{
this.monthMoney=r.rows.item(0).amount;
}).catch(e=>{
console.log(e);
});
this.sqlite.database.executeSql("select ifnull(sum(amount),0) amount from consum where strftime('%Y',date)=? ",[datetime.getFullYear().toString()]).then(
r=>{
this.yearMoney=r.rows.item(0).amount;
}).catch(e=>{
console.log(e);
});
//});
}
ionViewWillEnter() {
//修复轮播手动滑动后不能自动轮播问题
// this.slides.autoplayDisableOnInteraction = false;
let that=this;
setTimeout(()=>{
that.getData();
},1000);
setTimeout(()=>{
let lengend=[],lengenddata=[];
for (var index = 0; index < this.optinpielegend.length; index++) {
var element = this.optinpielegend[index];
lengend.push(element.name);
lengenddata.push({value:element.value, name:element.name});
}
this.option.legend.data=lengend;
this.option.series[0].data=lengenddata;
echarts.init(that.piecontainer.nativeElement).setOption(this.option,true);
},2000);
}
presentPopover(myEvent) {
let popover = this.popoverCtrl.create('AboutPage');
popover.present({
ev: myEvent
});
}
}
home.module.ts
import { NgModule } from '@angular/core';

import { IonicPageModule } from 'ionic-angular';

import { HomePage } from './home';

import { PipesModule } from '../../pipes/pipes.module';

@NgModule({

  declarations: [

    HomePage,

  ],

  imports: [

    PipesModule,

    IonicPageModule.forChild(HomePage),

  ],

})

export class HomePageModule {}
home.html
<ion-header>
<ion-toolbar>
<ion-buttons start>
<button ion-button icon-only color="royal" (tap)="tapSearch($event)">
<ion-icon name="search"></ion-icon>
</button>
</ion-buttons>
<ion-title>首页</ion-title>
<ion-buttons end>
<button ion-button icon-only color="royal" (click)="presentPopover($event)">
<ion-icon name="more" role="img" class="icon icon-ios ion-ios-more" aria-label="more"></ion-icon>
</button>
</ion-buttons>
</ion-toolbar>
</ion-header>
<ion-content padding>
<!-- <div class="slide-wrap">
<ion-slides pager loop="true" autoplay="3000" >
<ion-slide><img src="assets/imgs/100.png" /></ion-slide>
<ion-slide><img src="assets/imgs/102.png" /></ion-slide>
<ion-slide><img src="assets/imgs/103.png" /></ion-slide>
</ion-slides>
</div> --> <div class="stamp stamp01">
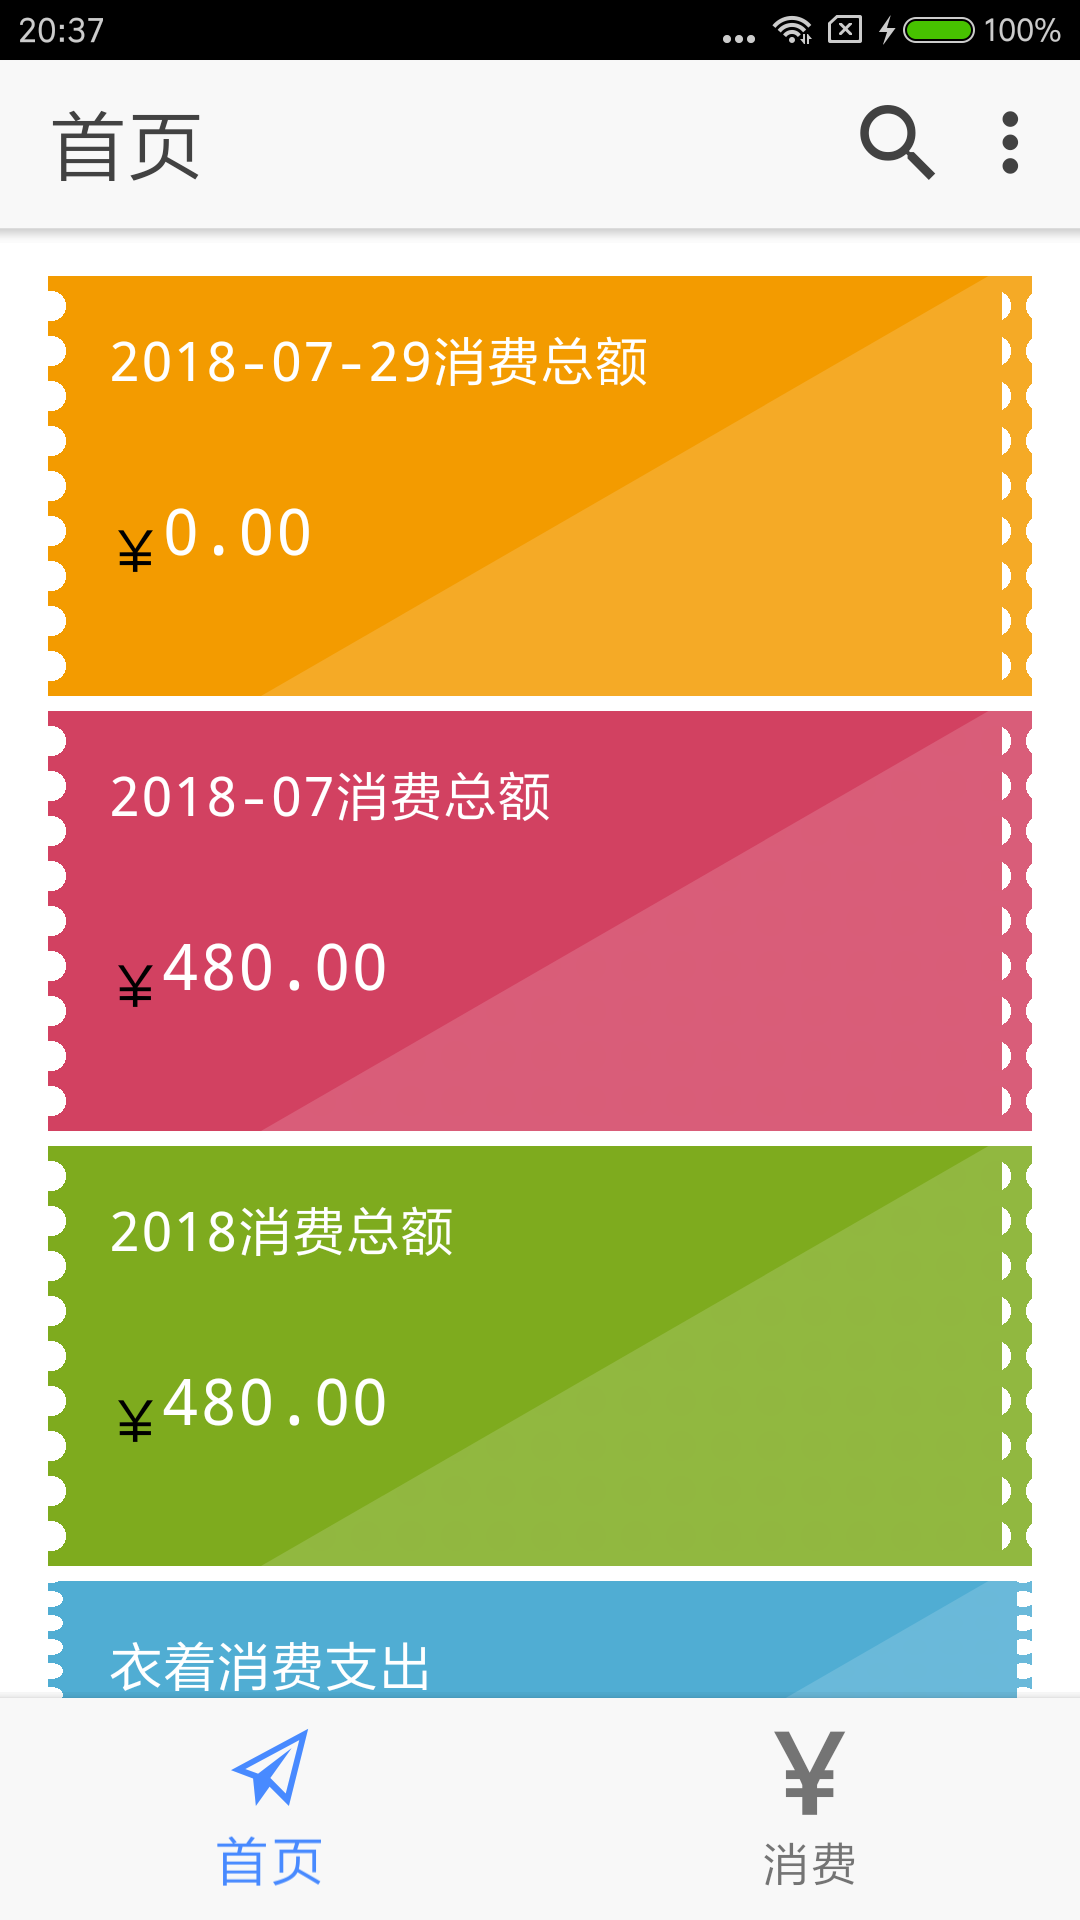
<div class="par"><p>{{strdate}}消费总额</p><sub class="sign">¥</sub><span>{{dayMoney| fmoney:2}}</span></div>
<i></i>
</div> <div class="stamp stamp02">
<div class="par"><p>{{strdateMonth}}消费总额</p><sub class="sign">¥</sub><span>{{monthMoney| fmoney:2}}</span></div>
<i></i>
</div> <div class="stamp stamp03">
<div class="par"><p>{{stryear}}消费总额</p><sub class="sign">¥</sub><span>{{yearMoney | fmoney:2}}</span></div>
<i></i>
</div> <div class="stamp stamp04" *ngFor="let consum of optinpielegend;">
<div class="par"><p>{{consum.name}}</p><sub class="sign">¥</sub><span>{{consum.value | fmoney:2 }}</span></div>
<i></i>
</div>
<div #piecontainer class="echart-pie"></div>
</ion-content>
3.pipes 
import { NgModule } from '@angular/core';

import { FmoneyPipe } from './fmoney/fmoney';

@NgModule({

    declarations: [FmoneyPipe],

    imports: [],

    exports: [FmoneyPipe]

})

export class PipesModule {}
import { Pipe, PipeTransform } from '@angular/core';

/**

 * Generated class for the FmoneyPipe pipe.

 *

 * See https://angular.io/api/core/Pipe for more info on Angular Pipes.

 */

@Pipe({

  name: 'fmoney',

})

export class FmoneyPipe implements PipeTransform {

  /**

   * Takes a value and makes it lowercase.

   */

  transform(value: string, ...args) {

    //return value.toLowerCase();

     /*

     * 参数说明:

     * s:要格式化的数字

     * n:保留几位小数

     * */

    let n = args[0] > 0 &&  args[0] <= 20 ?  args[0] : 2;

    value = parseFloat((value + "").replace(/[^\d\.-]/g, "")).toFixed(n) + "";

    let l = value.split(".")[0].split("").reverse(),

        r = value.split(".")[1];

    let t = "";

    for (let i = 0; i < l.length; i++) {

        t += l[i] + ((i + 1) % 3 == 0 && (i + 1) != l.length ? "," : "");

    }

    return t.split("").reverse().join("") + "." + r;

  }

}
4.修改app.module.ts
5.about.ts
import { Component } from '@angular/core';
import { IonicPage, NavController, NavParams } from 'ionic-angular';
import {SQLiteService} from '../../app/sqlite.service'
import { Toast } from '@ionic-native/toast';
/**
* Generated class for the AboutPage page.
*
* See https://ionicframework.com/docs/components/#navigation for more info on
* Ionic pages and navigation.
*/
@IonicPage()
@Component({
selector: 'page-about',
//templateUrl: 'about.html',
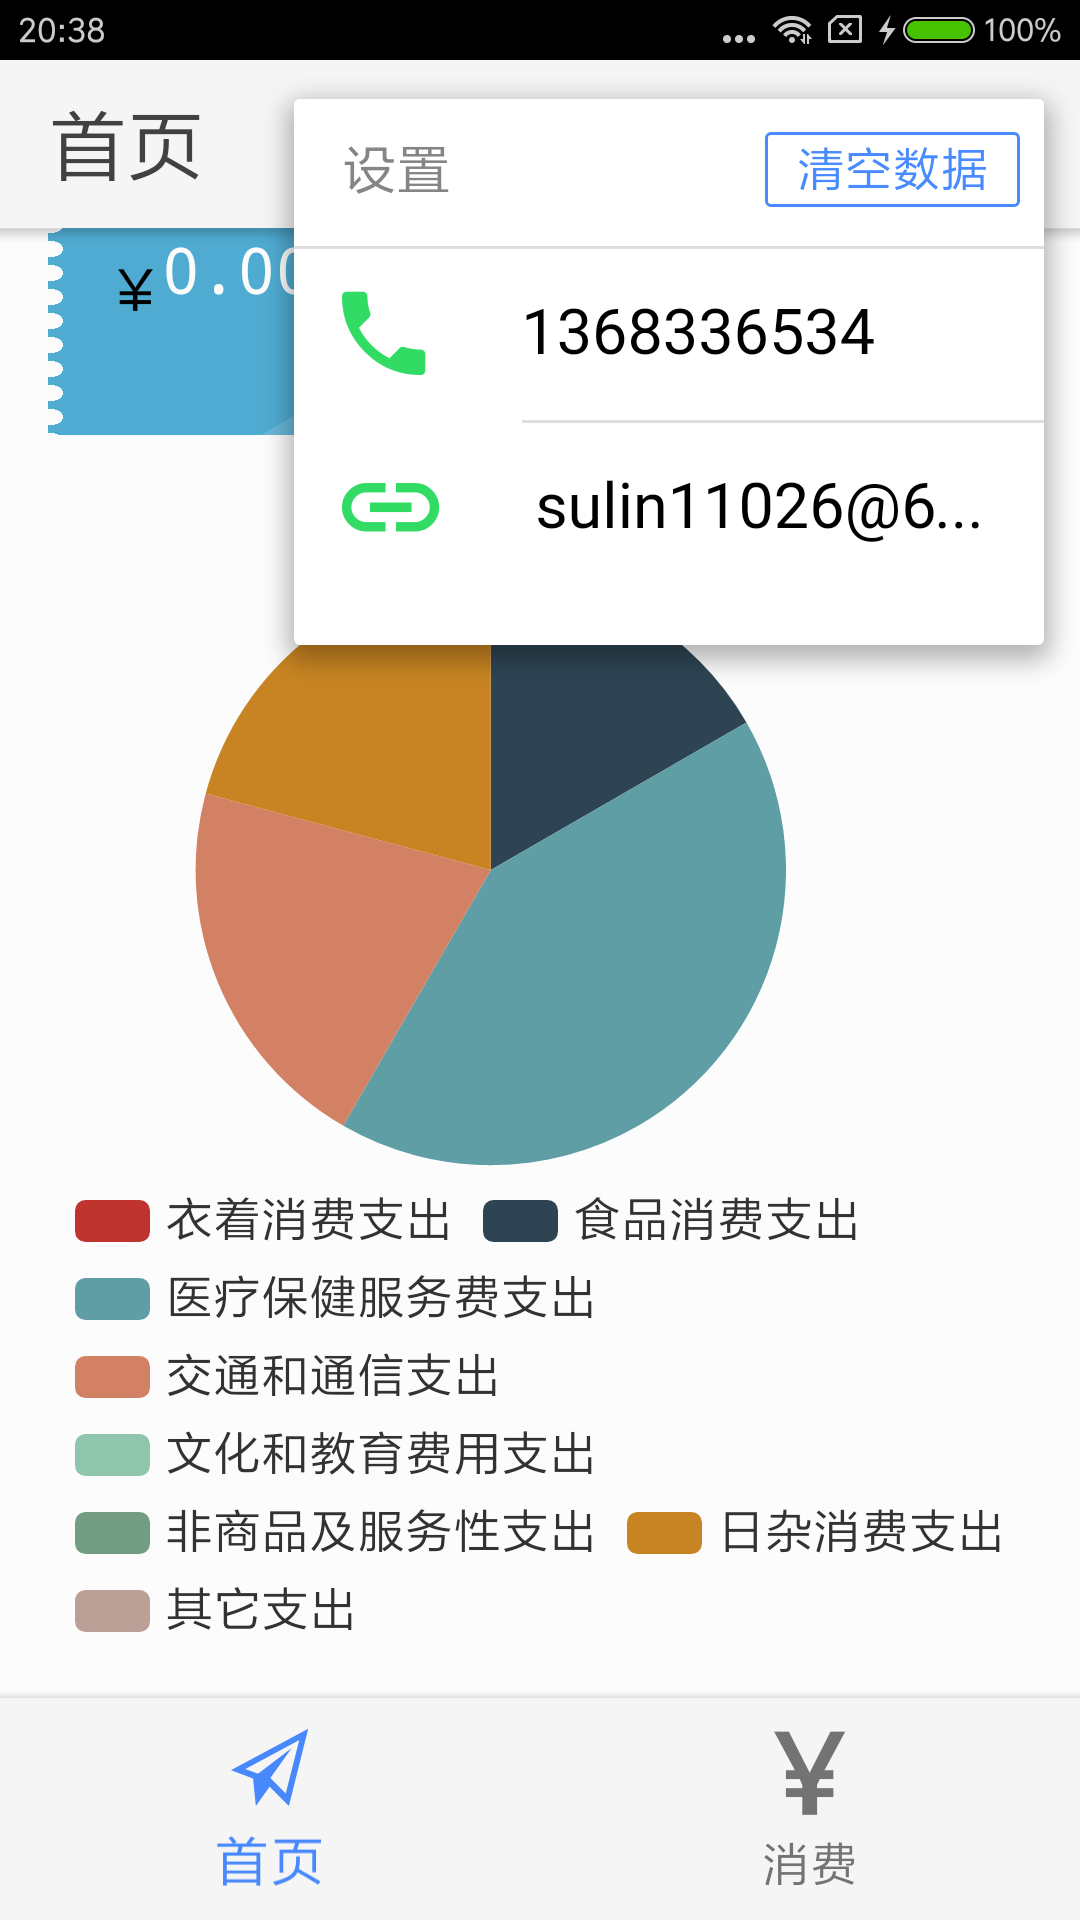
template:`<ion-list class="list list-md">
<ion-item-divider>
<ion-label class="label label-md">
设置
</ion-label>
<button (click)="cleardata()" ion-button="" item-end="" outline="" class=" item-button button button-md button-outline button-outline-md">
<span class="button-inner">清空数据</span>
<div class="button-effect"></div></button>
</ion-item-divider>
<button ion-item (click)="callphone('1368336534')">
<ion-icon name="call" item-start class="icon-md-secondary" ></ion-icon>
<ion-label class="label label-md" id="lbl-5">1368336534</ion-label>
</button>
<button ion-item (click)="callemial('sulin11026@613.com')">
<ion-icon name="link" item-start class="icon-md-secondary"></ion-icon>
<ion-label class="label label-md" id="lbl-5">sulin11026@613.com</ion-label>
</button>
</ion-list>`
})
export class AboutPage {
constructor(public navCtrl: NavController, private sqlite: SQLiteService,
private toast :Toast) {
}
ionViewDidLoad() {
console.log('ionViewDidLoad AboutPage');
}
callphone(phone){
window.location.href = "tel:" + phone;
}
callemial(email){
window.location.href="mailto:"+email;
}
cleardata(){
this.sqlite.database.executeSql("delet from consum ",{}).then(res=>{
this.toast.show("清理成功", '5000', 'center').subscribe(
toast => {
console.log(toast);
}
);
}).catch(e=>{
this.toast.show(e, '5000', 'center').subscribe(
toast => {
console.log(toast);
}
);
});
}
}
6.效果展示
Ionic3 demo TallyBook 实例3的更多相关文章
- Ionic3 demo TallyBook 实例1
1.创建项目 ionic start TallyBook blank 创建一个空的项目 ionic cordova platform add android 添加andorid平台 io ...
- Ionic3 demo TallyBook 实例2
1.添加插件 2.相关页面 消费页面: <ion-header> <ion-navbar> <ion-title> 消费记录 </ion-title> ...
- appium跑demo简单实例讲解
安装appium,设置 demo.pyfrom appium import webdriver #要装webdriver,方法查看http://www.cnblogs.com/sincoolvip/p ...
- react介绍、环境搭建、demo运行实例
React官网:https://reactjs.org/docs/create-a-new-react-app.html cnpm网址:http://npm.taobao.org/ 1.react介绍 ...
- Ionic3 Demo
本文为原创文章,转载请标明出处 最近又开源了一个小 Demo,基于 Ionic 3.9.2.注册登录功能使用的是 WildDog 野狗通信云,大家可以放心的注册登录玩.电影相关数据来源自"某 ...
- js实现『加载更多』功能实例
DEMO : 滚动加载示例 关于如何实现『加载更多』功能,网上有插件可用,例如比较著名的使用iscroll.js实现的上拉加载更多.下拉刷新功能. 但实际用起来却是很麻烦.由于是第三方插件,要按照对方 ...
- nodejs入门demo
demo的实例引用自:http://www.runoob.com/nodejs/nodejs-event.html, 官方文档:https://nodejs.org/dist/latest-v6.x/ ...
- DWR入门实例(二)
DWR(Direct Web Remoting) DWR is a Java library that enables Java on the server and JavaScript in a b ...
- JDBC连接SqlServer数据库(非默认实例)方法
一般我们在连接数据库的时候都是用的默认实例名,今天遇到了用非默认是实例名:连接代码如下(Java): URL=jdbc:microsoft:sqlserver://192.168.1.85//DEMO ...
随机推荐
- CVE-2017-3248简单复现
我是这样操作的 目标跟windows在一个段,linux是另一个段的,我的虚拟机 windows主机上 `java -cp ysoserial.jar ysoserial.exploit.JRMPLi ...
- 安装mongo
版权声明:本文为博主原创文章,遵循CC 4.0 BY-SA版权协议,转载请附上原文出处链接和本声明. 本文链接:https://blog.csdn.net/weixin_40101530/articl ...
- 11-MySQL-Ubuntu-数据表中数据的删除(四)
数据的删除(delete) (1)物理删除(不可逆,公司不会采取这种方法,如现在一般不会出现注销,数据具有无限价值) 删除整张表的数据!!! delete from 表名; 删除部分给定条件的数据: ...
- mac os Catalina beta andriod studio crash
点击菜单 Help - Edit Custom VM Options 添加下面一行-Dsun.font.layoutengine=icu 然后我自己重启了好几下,然后 在重新创建一个新的工程,就好了 ...
- SpringCloud学习笔记《---06 Config 分布式配置中心---》基础篇
- luaj使用 方法签名规则 Cocos2dxLuaJavaBridge
function AndroidHandler:getParamJson() local args = {nil} local ok,ret = luaj.callStaticMeth ...
- BZOJ2152 聪明可可 点分治
题意传送门 思路:基本的点分治思路,num数组记录从u点开始路径长度分别为1或者2或者3的路径长度(取模3意义下),然后做一个简单的容斥就好了. 为了避免计数的麻烦,<u,u>这样的点单独 ...
- BCZM : 1.6
https://blog.csdn.net/kabini/article/details/2311946 题目大意: 水房能容纳饮料的总量是V,有一批饮料,每种饮料单个容量都是2的方幂,每种饮料信息如 ...
- vue-router如何参数传递
1.我们用<router-link>标签中的to属性进行传参,需要您注意的是这里的to要进行一个绑定,写成:to 先来看一下这种传参方法的基本语法: <router-link :to ...
- java字符串简单介绍
String:String对象初始化之后不可变线程安全简单的字符串操作使用String效率更高 StringBuffer:StringBuffer对象初始化之后可改变线程安全频繁的字符串操作可以使用S ...