TensorFlow+实战Google深度学习框架学习笔记(12)------Mnist识别和卷积神经网络LeNet
一、卷积神经网络的简述
卷积神经网络将一个图像变窄变长。原本【长和宽较大,高较小】变成【长和宽较小,高增加】
卷积过程需要用到卷积核【二维的滑动窗口】【过滤器】,每个卷积核由n*m(长*宽)个小格组成,每个小格都有自己的权重值,
长宽变窄:过滤器的长宽决定的
高度变高:过滤器的个数决定的
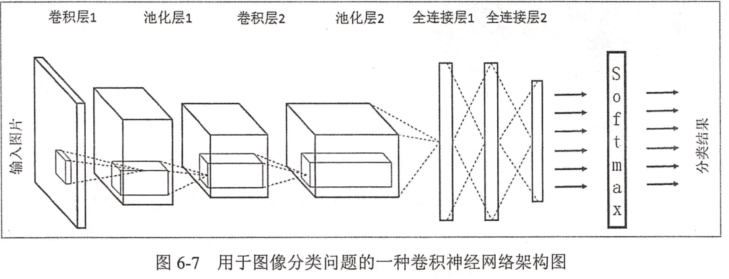
输入:55000 × 784 = 28*28
输出:55000 × 10
lenet:两层卷积层(卷积层 + 池化层)、两层全连接层

二、代码:
1、数据集:
下载好Mnist数据集加压到文件夹'MNIST_data’中。加载数据
import tensorflow.examples.tutorials.mnist.input_data as input_data

mnist = input_data.read_data_sets('MNIST_data',one_hot = True)

#打印数据集大小

print('训练集大小:',mnist.train.num_examples)

print('验证集大小:',mnist.validation.num_examples)

print('测试集大小:',mnist.test.num_examples)

#打印样本

print(mnist.train.images[0])

print(mnist.train.labels[0])
2、卷积层:tf.nn.conv2d
(1)过滤器:【维度大小、权重w、偏正b、padding、stride】
设置过滤器的参数:
tf.nn.conv2d(输入矩阵,权重,strides,padding),其中strides的第一个1和最后一个1必须有,中间为输入矩阵尺寸的x和y的大小。padding有两种值,SAME和VALLD。
- input tensor shape:[batch, in_height, in_width, in_channels]
- filter tensor shape:[filter_height, filter_width, in_channels, out_channels]

#w,b

filter_w = tf.get_variable('weight',[5,5,3,16],initializer = tf.truncated_normal_initializer(stddev = 0.1))

filter_b = tf.get_variable('biases',[16],initializer = tf.constant_initializer(0.1))

#卷积的前向传播:将【32,32,3】输入通过 16个 【5,5,3】的过滤器得到【28,28,16】。w :【5,5,3,16】,b:【16】

conv = tf.nn.conv2d(input,filter_w,strides = [1,1,1,1],padding = 'SAME')

# tf.nn.bias_add表示【5,5,3】个数都要加上biases。

bias = tf.nn.bias_add(conv,biases)

#结果通过Relu激活函数

actived_conv = tf.nn.relu(bias)
3、池化层:可加快计算速度也可防止过拟合。tf.nn.max_pool
卷积层之间加一个池化层,可缩小矩阵的尺寸,减少全连接层中的参数。
tf.nn.max_pool(传入当前层的节点矩阵,ksize = 池化层过滤器的尺寸,strides,padding),ksize的第一维和最后一维必须为1
实现了最大池化层的前向传播过程,参数和conv2d相似。

4、全部代码:
#加载模块和数据
import tensorflow as tf
from tensorflow.examplesamples.tutorials.mnist import input_data
mnist = input_data.read_data_sets("MNIST_data/",one_hot = True) #参数的设置
def weight_variable(shape):
initial = tf.truncated_normal(shape,stddev = 0.1)
return tf.Variable(initial) def biase_variable(shape):
initial = tf.constant(0.1,shape = shape)
return tf.Variable(initial)
def conv2d(x,w):
conv = tf.nn.conv2d(x,w,strides=[1,1,1,1],padding='SAME')
return conv
def max_pool(x):
return tf.nn.max_pool(x,ksize = [1,2,2,1],strides = [1,2,2,1],padding = 'SAME') #训练
def train(mnist):
x = tf.placeholder(tf.float32,[None,784])
y = tf.placeholder(tf.float32,[None,10])
keep_prob = tf.placeholder(tf.float32)
x_image = tf.reshape(x,[-1,28,28,1]) #前向传播
#layer1
with tf.variable_scope('layer1'):
w = weight_variable([5,5,1,32])
b = biase_variable([32])
conv1 = tf.nn.bias_add(conv2d(x_image,w),b)
relu_conv1 = tf.nn.relu(conv1)
pool1 = max_pool(relu_conv1)
with tf.variable_scope('layer2'):
w = weight_variable([5,5,32,64])
b = biase_variable([64])
conv2 = tf.nn.bias_add(conv2d(pool1,w),b)
relu_conv2 = tf.nn.relu(conv2)
pool2 = max_pool(relu_conv2)
with tf.variable_scope('func1'):
w = weight_variable([7*7*64,1024])
b = biase_variable([1024])
pool2_reshape = tf.reshape(pool2,[-1,7*7*64])
func1 = tf.nn.relu(tf.matmul(pool2_reshape,w) + b)
func1_drop = tf.nn.dropout(func1,keep_prob)
with tf.variable_scope('func2'):
w = weight_variable([1024,10])
b = biase_variable([10])
prediction = tf.nn.softmax(tf.matmul(func1_drop,w) + b) #后向传播
cross_entropy = tf.reduce_mean(-tf.reduce_sum(y * tf.log(prediction),
reduction_indices=[1])) # loss
train_step = tf.train.AdamOptimizer(1e-4).minimize(cross_entropy) #会话训练
sess = tf.Session()
if int((tf.__version__).split('.')[1]) < 12 and int((tf.__version__).split('.')[0]) < 1:
init = tf.initialize_all_variables()
else:
init = tf.global_variables_initializer()
sess.run(init)
for i in range(1000):
batch_x, batch_y = mnist.train.next_batch(100)
sess.run(train_step, feed_dict={x: batch_x, y: batch_y, keep_prob: 0.5})
if i % 50 == 0:
correct_prediction = tf.equal(tf.argmax(prediction,1), tf.argmax(y,1))
accuracy = tf.reduce_mean(tf.cast(correct_prediction, tf.float32))
result = sess.run(accuracy, feed_dict={x: mnist.test.images[:1000], y: mnist.test.labels[:1000], keep_prob: 1})
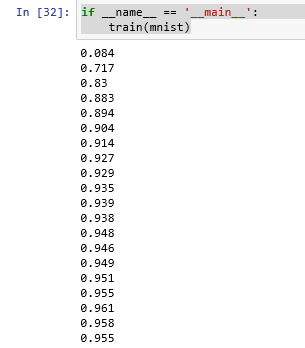
print(result) if __name__ == '__main__':
train(mnist)
训练结果:迭代结束为95%的准确率。
TensorFlow+实战Google深度学习框架学习笔记(12)------Mnist识别和卷积神经网络LeNet的更多相关文章
- [Tensorflow实战Google深度学习框架]笔记4
本系列为Tensorflow实战Google深度学习框架知识笔记,仅为博主看书过程中觉得较为重要的知识点,简单摘要下来,内容较为零散,请见谅. 2017-11-06 [第五章] MNIST数字识别问题 ...
- TensorFlow+实战Google深度学习框架学习笔记(5)----神经网络训练步骤
一.TensorFlow实战Google深度学习框架学习 1.步骤: 1.定义神经网络的结构和前向传播的输出结果. 2.定义损失函数以及选择反向传播优化的算法. 3.生成会话(session)并且在训 ...
- 1 如何使用pb文件保存和恢复模型进行迁移学习(学习Tensorflow 实战google深度学习框架)
学习过程是Tensorflow 实战google深度学习框架一书的第六章的迁移学习环节. 具体见我提出的问题:https://www.tensorflowers.cn/t/5314 参考https:/ ...
- 学习《TensorFlow实战Google深度学习框架 (第2版) 》中文PDF和代码
TensorFlow是谷歌2015年开源的主流深度学习框架,目前已得到广泛应用.<TensorFlow:实战Google深度学习框架(第2版)>为TensorFlow入门参考书,帮助快速. ...
- TensorFlow实战Google深度学习框架10-12章学习笔记
目录 第10章 TensorFlow高层封装 第11章 TensorBoard可视化 第12章 TensorFlow计算加速 第10章 TensorFlow高层封装 目前比较流行的TensorFlow ...
- TensorFlow实战Google深度学习框架5-7章学习笔记
目录 第5章 MNIST数字识别问题 第6章 图像识别与卷积神经网络 第7章 图像数据处理 第5章 MNIST数字识别问题 MNIST是一个非常有名的手写体数字识别数据集,在很多资料中,这个数据集都会 ...
- TensorFlow实战Google深度学习框架1-4章学习笔记
目录 第1章 深度学习简介 第2章 TensorFlow环境搭建 第3章 TensorFlow入门 第4章 深层神经网络 第1章 深度学习简介 对于许多机器学习问题来说,特征提取不是一件简单的事情 ...
- 《TensorFlow实战Google深度学习框架》笔记——TensorFlow入门
一.Tensorflow计算模型:计算图 计算图是Tensorflow中最基本的一个概念,Tensorflow中的所有计算都被被转化为计算图上的节点. Tensorflow是一个通过计算图的形式来描述 ...
- TensorFlow实战Google深度学习框架-人工智能教程-自学人工智能的第二天-深度学习
自学人工智能的第一天 "TensorFlow 是谷歌 2015 年开源的主流深度学习框架,目前已得到广泛应用.本书为 TensorFlow 入门参考书,旨在帮助读者以快速.有效的方式上手 T ...
随机推荐
- WordPress TinyMCE 编辑器增强技巧大全
说到WordPress自带的TinyMCE 编辑器,有些国人总是不太满意.针对这个情况,倡萌已经介绍了一些增强或替代的方法: WordPress编辑器增强插件:TinyMCE Advanced Wor ...
- (12)Spring Boot改变JDK编译版本【从零开始学Spring Boot】
Spring Boot在编译的时候,是有默认JDK版本的,如果我们期望使用我们要的JDK版本的话,那么要怎么配置呢? 这个只需要修改pom.xml文件的<build> -- <plu ...
- 【ACM】hdu_1092_A+BIV_201307261630
A+B for Input-Output Practice (IV)Time Limit: 2000/1000 MS (Java/Others) Memory Limit: 65536/3276 ...
- hdoj--3488--Tour(KM)
Tour Time Limit: 3000/1000 MS (Java/Others) Memory Limit: 65535/65535 K (Java/Others) Total Submi ...
- 第6章 Spring MVC的数据转换、格式化和数据校验
使用ConversionService转换数据 <%@ page language="java" contentType="text/html; charset=U ...
- php Aes 128位算法
<?php class Mcrypt { private static $key = "fsdjfojojodjiovjojgfosdjfiojio"; private st ...
- php pdo操作
PDO(PHP Data Object) 是PHP 5 中加入的东西,是PHP 5新加入的一个重大功能,因为在PHP 5以前的php4/php3都是一堆的数据库扩展来跟各个数据库的连接和处理,什么 p ...
- golang互斥锁和读写锁
一.互斥锁 互斥锁是传统的并发程序对共享资源进行访问控制的主要手段.它由标准库代码包sync中的Mutex结构体类型代表.sync.Mutex类型(确切地说,是*sync.Mutex类型)只有两个公开 ...
- DDL:对表___table___的相关操作
1) 增加列 语法: alter table 表名 add 列名 类型(长度) 约束; 2) 修改现有列类型.长度和约束 语法:alter table 表名 modify 列名 类型(长度) 约束; ...
- Fail2ban + firewalld 防护doss攻击
系统环境:centos7.3 用途:利用fail2ban+Firewalld来防CC攻击和SSH爆破 准备工作: 1.检查Firewalld是否启用 #如果您已经安装iptables建议先关闭 ser ...