OpenCV实战之文档扫描判卷
import cv2
import numpy as np #图像显示
def cv_show(imgname,img):
cv2.imshow(imgname,img)
cv2.waitKey(0)
cv2.destroyAllWindows() #排序坐标函数
def order_pts(pts):
rect=np.zeros((4,2),dtype='float32') s = np.sum(pts,axis=1)
rect[0] = pts[np.argmin(s)]
rect[2] = pts[np.argmax(s)]
n = np.diff(pts,axis=1)
rect[1] = pts[np.argmin(n)]
rect[3] = pts[np.argmax(n)] return rect #透视变换
def four_pts_change(img,pts):
points = order_pts(pts)
(tl,tr,bl,br) = points widthA = np.sqrt(((tr[1]-tl[1])**2)+((tr[0]-tl[0])**2))
widthB = np.sqrt(((br[1] - bl[1]) ** 2) + ((br[0] - bl[0]) ** 2))
width = max(int(widthA),int(widthB)) lengthA = np.sqrt(((tr[1]-br[1])**2)+((tr[0]-br[0])**2))
lengthB = np.sqrt(((tl[1] - bl[1]) ** 2) + ((tl[0] - bl[0]) ** 2))
length = max(int(lengthA),int(lengthB)) #输出图坐标
dst = np.array([
(0,0),
(width-1,0),
(width-1,length-1),
(0,length)
],dtype='float32') M = cv2.getPerspectiveTransform(points,dst)
wraped = cv2.warpPerspective(img,M,(width,length))
return wraped
#正确答案
ANSWER_KEY={0:1,1:4,2:0,3:3,4:1}
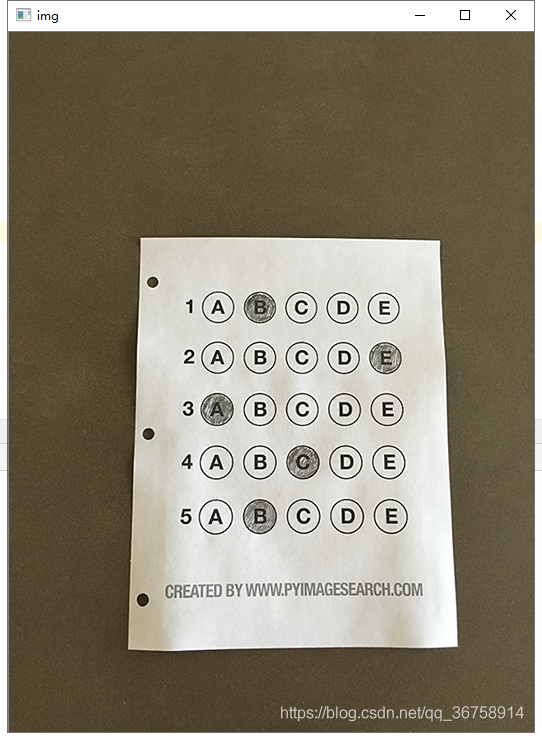
# ANSWER_KEY = {0:1,1:3,2:0,3:4,4:1} img = cv2.imread('./textcard.png')
cv_show('img',img)
orig = img.copy()
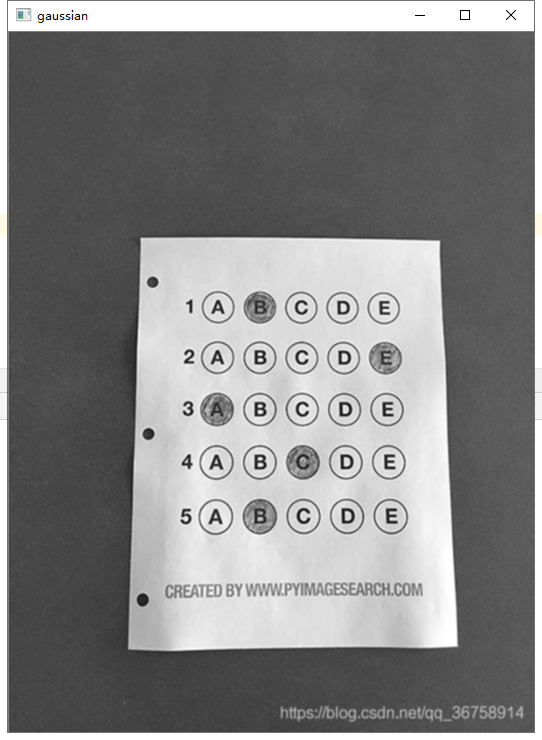
gray = cv2.cvtColor(img,cv2.COLOR_BGR2GRAY)
#高斯模糊
gaussian = cv2.GaussianBlur(gray,(3,3),0)
cv_show('gaussian',gaussian)
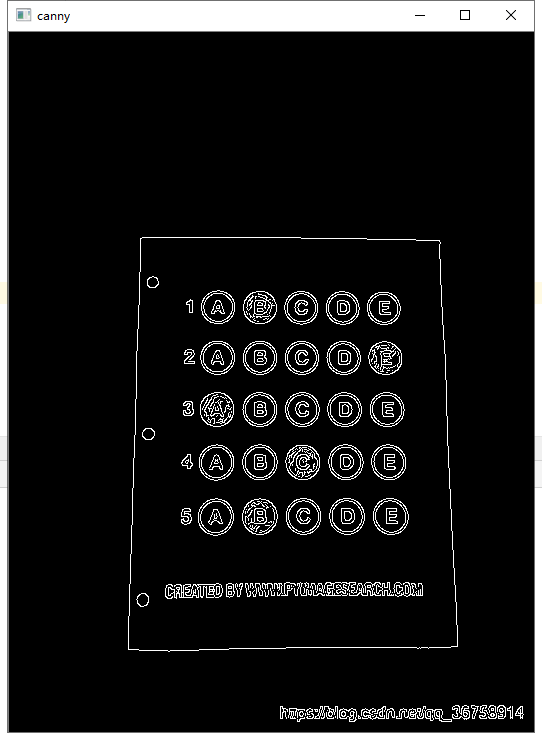
#边缘检测
canny = cv2.Canny(gaussian,70,150)
cv_show('canny',canny)
#轮廓检测
cnts = cv2.findContours(canny,cv2.RETR_EXTERNAL,cv2.CHAIN_APPROX_SIMPLE)[0]
cnts = sorted(cnts,key=cv2.contourArea,reverse=True)
# cv2.drawContours(orig,cnts,-1,(149,32,190),2)
# cv_show('orig',orig)
for i in cnts:
perix = cv2.arcLength(i,True)
approx = cv2.approxPolyDP(i,0.01*perix,True)
if len(approx)==4:
screen = approx
break
cv2.drawContours(orig,[screen],-1,(149,32,190),2)
# cv_show('orig',orig)
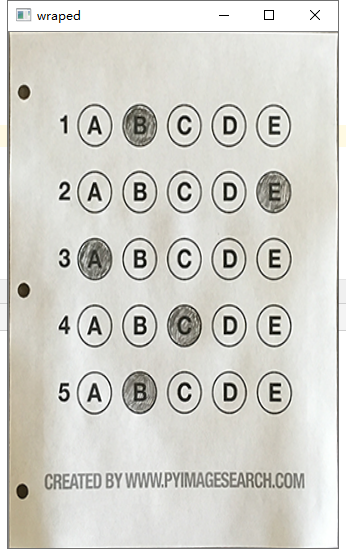
#透视变换
wraped = four_pts_change(img,screen.reshape(4,2))
cv_show('wraped',wraped)
wraped_gray = cv2.cvtColor(wraped,cv2.COLOR_BGR2GRAY)
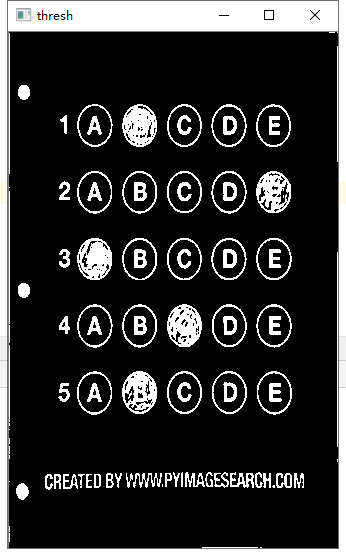
#阈值处理
thresh = cv2.threshold(wraped_gray,0,255,cv2.THRESH_BINARY_INV|cv2.THRESH_OTSU)[1]
cv_show('thresh',thresh) #检测轮廓
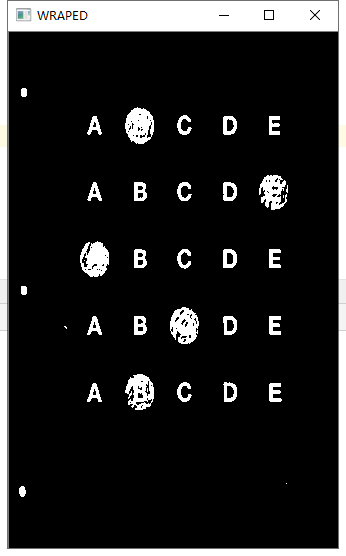
thresh_cnts=thresh.copy()
cnts1 = cv2.findContours(thresh_cnts,cv2.RETR_EXTERNAL,cv2.CHAIN_APPROX_SIMPLE)[0]
#白色填充轮廓
cv2.drawContours(thresh_cnts,cnts1,-1,(0,0,0),3)
cv_show('WRAPED',thresh_cnts)
#检测圆形
questions = []
for cnt in cnts1:
(x,y,w,h) = cv2.boundingRect(cnt)
# print((x,y,w,h))
arc = w/float(h)
if w>20 and h>20 and arc >0.6 and arc<1.1:
questions.append(cnt)
print('一共有{}个选项'.format(len(questions)))
# print(questions) #从上到下排序
boundingBox =[ cv2.boundingRect(i) for i in questions]
(questionCnts,boundingBox) = zip(*sorted(zip(questions,boundingBox),key=lambda b:b[1][1],reverse=False)) correct =0
#每行遍历
for (i,c) in enumerate(np.arange(0,len(questions),5)): #遍历每一行的第一个 返回值是[(1,0),(2,5),(3,10),(4,15),(5,20)]
boundingBox = [cv2.boundingRect(a) for a in questionCnts[c:c+5]] #框出每一行的每个圆
(cnts,boundingBox) = zip(*sorted(zip(questionCnts[c:c+5],boundingBox),key=lambda b:b[1][0],reverse=False)) #每一行的圆的轮廓和框框按从左到右的顺序排列
bubble = None
for (j,q) in enumerate(cnts):
mask = np.zeros_like(thresh)
cv2.drawContours(mask,[q],-1,255,-1) #白色填充圆
# cv_show('mask', mask)
mask = cv2.bitwise_and(thresh,thresh,mask=mask) #抠出每一个选项
# cv_show('mask',mask)
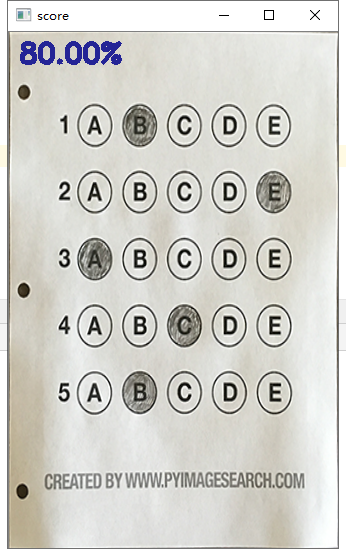
total = cv2.countNonZero(mask)
if bubble is None or total>bubble[0]:
bubble = (total,j)
k = ANSWER_KEY[i]
if k == bubble[1]:
correct +=1 score = (correct/5)*100
print('[INFO]score : {:.2f}%'.format(score))
cv2.putText(wraped,'{:.2f}%'.format(score),(10,30),cv2.FONT_HERSHEY_SIMPLEX,0.9,(123,123,123),2)
cv_show('score',wraped)
OpenCV实战之文档扫描判卷的更多相关文章
- 深入学习OpenCV文档扫描及OCR识别(文档扫描,图像矫正,透视变换,OCR识别)
如果需要处理的原图及代码,请移步小编的GitHub地址 传送门:请点击我 如果点击有误:https://github.com/LeBron-Jian/ComputerVisionPractice 下面 ...
- [实战]MVC5+EF6+MySql企业网盘实战(23)——文档列表
写在前面 上篇文章实现了图片列表,这篇文章实现文档列表将轻车熟路,因为逻辑基本相似,只是查询条件的不同.这里将txt,doc,docx,ppt,pptx,xls,xlsx的文件都归为文档列表中. 系列 ...
- JavaEE实战——XML文档DOM、SAX、STAX解析方式详解
原 JavaEE实战--XML文档DOM.SAX.STAX解析方式详解 2016年06月22日 23:10:35 李春春_ 阅读数:3445 标签: DOMSAXSTAXJAXPXML Pull 更多 ...
- 分布式架构--Dubbo项目实战学习文档
安装Dubbo注册中心(Zookeeper-3.4.6) 安装Dubbo管理控制台 Tomcat中部署web应用 ---- Dubbo服务消费者Web应用war包的部署 Dubbo监控中心的介绍与简易 ...
- Hapi+MySql项目实战自动化文档生成(四)
自动化生成swagger文档 使用hapi插件hapi-swagger,简单配置下插件,先修改下plugin_config.js文件: //plugin_config.js const Swagger ...
- 工程师泄露5G核心技术文档 被判有期徒刑三年缓刑四年
2002 年至 2017 年 1 月,黄某瑜就职于中兴通讯公司,担任过射频工程师.无线架构师等职务.2008 年 4 月至 2016 年 10 月,王某就职于中兴通讯公司西安研究所,担任过 RRU 部 ...
- Node.js+Web TWAIN,实现Web文档扫描和图像上传
目录(?)[+] 通过Dynamic Web TWAIN SDK和Node.js的组合,只需要几行代码就可以实现在浏览器中控制扫描仪,获取图像后上传到远程服务器. 原文:Document Imag ...
- Sping源码+Redis+Nginx+MySQL等七篇实战技术文档,阿里大佬推荐
JVM JVM是Java Virtual Machine(Java虚拟机)的缩写,JVM是一种用于计算设备的规范,它是一个虚构出来的计算机,是通过在实际的计算机上仿真模拟各种计算机功能来实现的. 引入 ...
- 编译OpenCV文档
概述 使用OpenCV的过程中经常查看文档,每次都去官网查看,不过国内访问速度很慢,有一份本地的文档就好了.本文列出了在Linux(Fedora)系统上从OpenCV源码编译出documentatio ...
- opencv 离线文档下载地址在哪里?
OpenCV 官方离线文档下载地址:http://docs.opencv.org/ 如何生成离线文档? http://docs.opencv.org/master/d4/db1/tutorial_do ...
随机推荐
- 2023-03-03 js map 双重嵌套
恩..其实也没啥要记录的,记住关键一点就是必须要有return,不管是几重,比如: arr.map((item, index) => { return ( item.ar ...
- 是时候开始写总结了-今日总结-vue单页面制作
今天哥给了我一个页面,让做出类似的. <h2>就直接说下页面用到的知识点吧</h2> 首先说下该页面使用的是vue2+less 直接写 导入模块时就只导入了cnpm i l ...
- ASP.NET中maxRequestLength和maxAllowedContentLength的区别;上传大文件设置IIS7文件上传的最大大小
https://blog.csdn.net/qq_23663693/article/details/89920039 maxRequestLength表示ASP支持的最大请求大小,而maxAllowe ...
- Linux装cudnn
https://stackoverflow.com/questions/66977227/could-not-load-dynamic-library-libcudnn-so-8-when-runni ...
- Influxdb客户端使用
Influxdb客户端使用 1. 简介 Influxdb在网络上可以搜索到一个叫InfluxdbStudio的工具,但只能在window下使用,有时在其他系统下做简单数据查询时就比较麻烦,下面以Inf ...
- C# List间的交集并集差集
一.简单类型List的交集并集差集 1.先定义两个简单类型的List List<int> listA = new List<int>() { 1, 2, 3, 4, 5, 6, ...
- [js函数] shallowEqual
const isBasicType = (t: any) => { return t === "number" || t === "string" || ...
- ubuntu添加新硬盘进行分区,并挂载到/home
ubuntu添加新硬盘,进行分区,并挂载到/home目录. 1.查看已有的磁盘,可以看到sdb还没有分区. > sudo fdisk -l 可以看到各个硬盘的设备名,一般以sda.sdb.sdc ...
- go 更新依赖库到最新版本
go 怎么更新依赖库到最新版本 遇到这么一个问题:我自己的一个程序依赖自己写的一个库,然后修改了库,程序这边想要更新库,却怎么也更新不上 删除mod.sum文件里相关库的信息 使用find / -na ...
- StatefulWidget 有状态组件 、 页面上绑定数据、改变页面数据
一.Flutter 中自定义有状态组件 在 Flutter 中自定义组件其实就是一个类,这个类需要继承 StatelessWidget/StatefulWidget. StatelessWidget ...