
[vue]组件的导入
参考: http://vue2.mmxiaowu.com/article/584a3957fc007e72b0f576d9
vue组件的注册
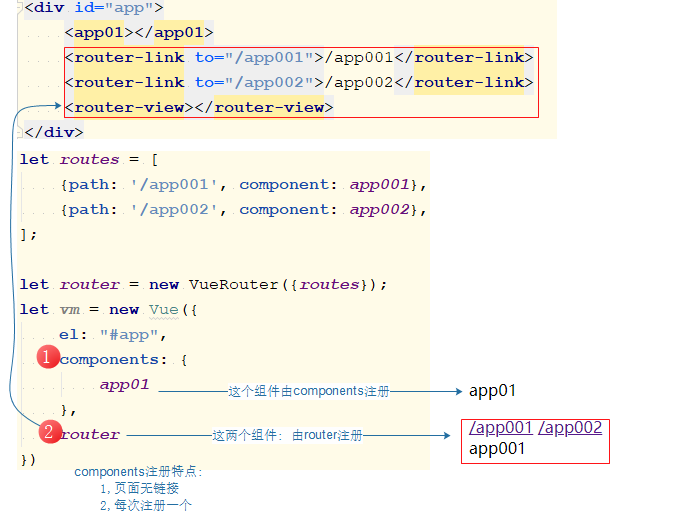
1.通过components方式注册
2.通过router方式注册(两者可以并行存在).
3.如果是render+router方式, 那么router只能写在render的组件template里.

<!DOCTYPE html>

<html lang="en">

<head>

    <meta charset="UTF-8">

    <title>Title</title>

</head>

<body>

<div id="app">

    <app01></app01>

    <router-link to="/app001">/app001</router-link>

    <router-link to="/app002">/app002</router-link>

    <router-view></router-view>

</div>

<template id="app01">

    <div>

        <p>app01</p>

    </div>

</template>

<template id="app001">

    <div>app001</div>

</template>

<template id="app002">

    <div>app002</div>

</template>

<script src="node_modules/vue/dist/vue.js"></script>

<script src="node_modules/vue-router/dist/vue-router.js"></script>

<script>

    let app01 = {

        name:'app01',

        template: "#app01",

    };

    let app001 = {

        name:'app001',

        template: "#app001",

    };

    let app002 = {

         name:'app002',

        template: "#app002",

    };

    let routes = [

        {path: '/app001', component: app001},

        {path: '/app002', component: app002},

    ];

    let router = new VueRouter({routes});

    let vm = new Vue({

        el: "#app",

        components: {

            app01

        },

        router

    })

</script>

</body>

</html>
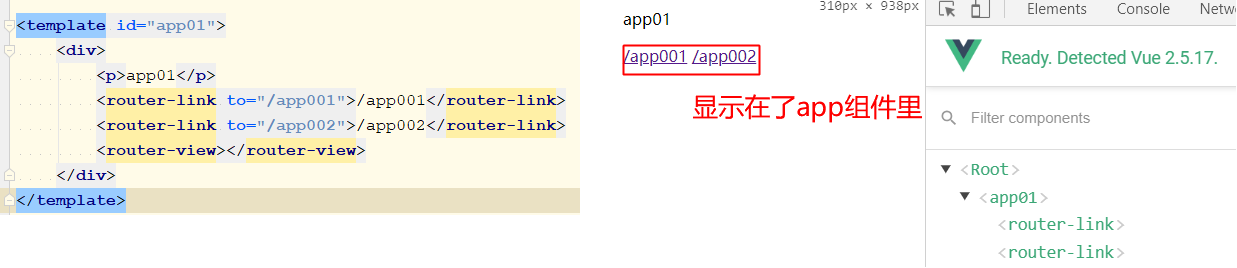
router方式灵活,可以作为components注册组件的子组件存在
作为谁的子, 取决于router-link和router-view写在谁下了.
<!DOCTYPE html>

<html lang="en">

<head>

    <meta charset="UTF-8">

    <title>Title</title>

</head>

<body>

<div id="app">

    <app01></app01>

</div>

<template id="app01">

    <div>

        <p>app01</p>

        <router-link to="/app001">/app001</router-link>

        <router-link to="/app002">/app002</router-link>

        <router-view></router-view>

    </div>

</template>

<template id="app001">

    <div>app001</div>

</template>

<template id="app002">

    <div>app002</div>

</template>

<script src="node_modules/vue/dist/vue.js"></script>

<script src="node_modules/vue-router/dist/vue-router.js"></script>

<script>

    let app01 = {

        template: "#app01",

    };

    let app001 = {

        template: "#app001",

    };

    let app002 = {

        template: "#app002",

    };

    let routes = [

        {path: '/app001', component: app001},

        {path: '/app002', component: app002},

    ];

    let router = new VueRouter({routes});

    let vm = new Vue({

        el: "#app",

        components: {

            app01

        },

        router

    })

</script>

</body>

</html>
render方式注册组件
上面这个链接里说了: render+router

方法1:
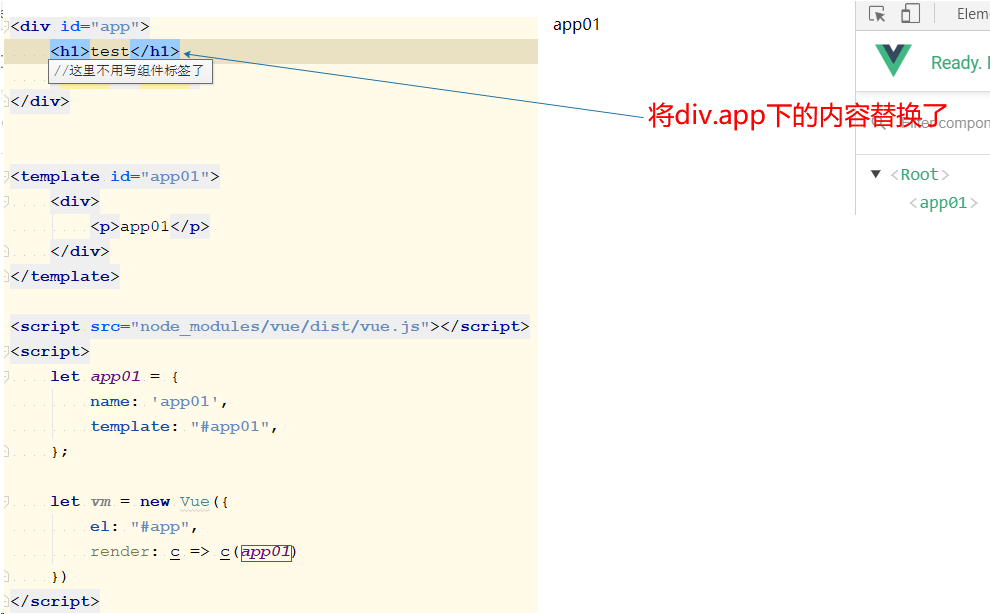
render: c => c(app01)作用:
0,注册组件
1.生成标签
2.自动插入标签
特点: 会覆盖div.app下的内容
方法2:
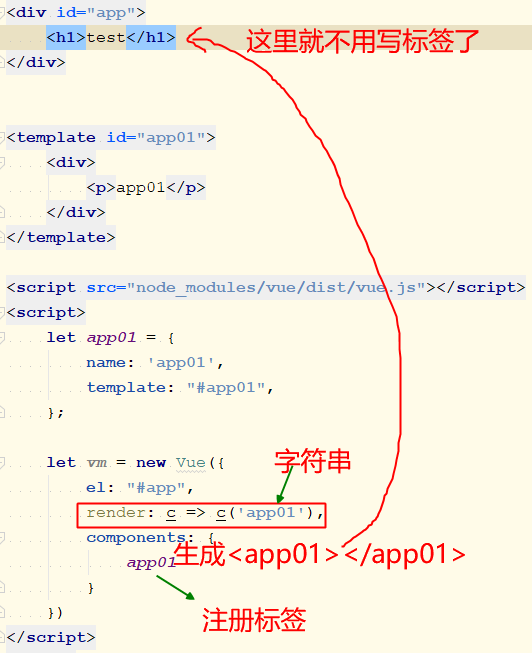
render: c => c('app01')作用:
1.生成标签
2.自动插入标签
特点: 会覆盖div.app下内容
document的的创建标签方法
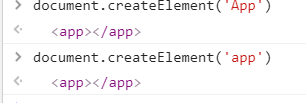
方法3: template
template: '' 作用:
1,生成标签
2,插入标签
特点: 会覆盖app下内容
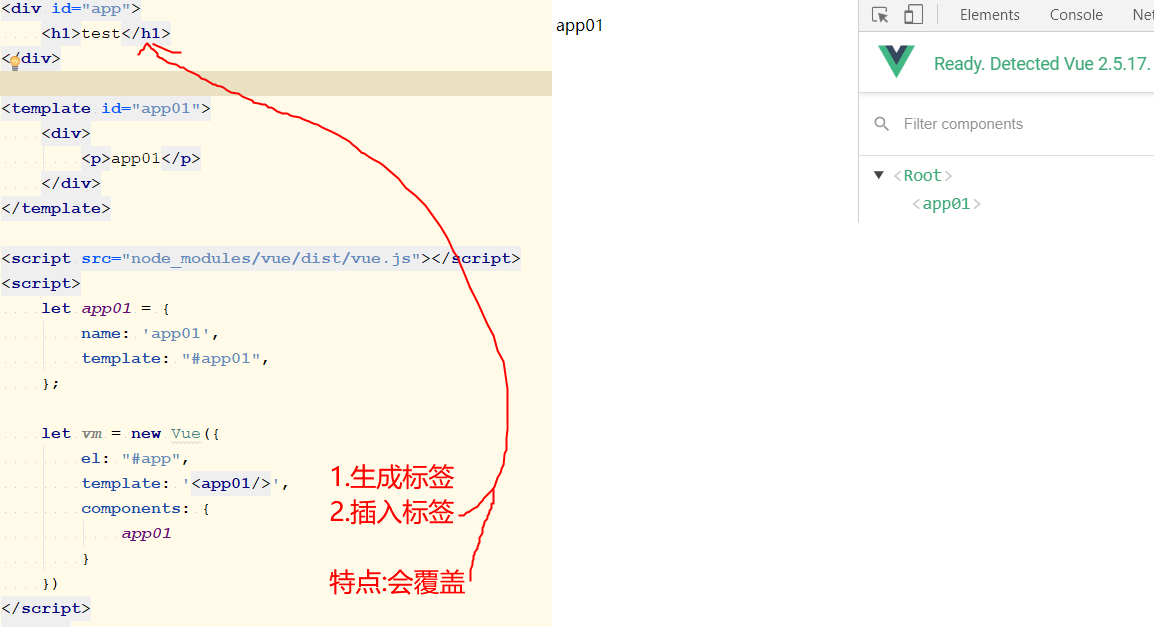
<!DOCTYPE html>

<html lang="en">

<head>

    <meta charset="UTF-8">

    <title>Title</title>

</head>

<body>

<div id="app">

    <h1>test</h1>

</div>

<template id="app01">

    <div>

        <p>app01</p>

    </div>

</template>

<script src="node_modules/vue/dist/vue.js"></script>

<script>

    let app01 = {

        name: 'app01',

        template: "#app01",

    };

    let vm = new Vue({

        el: "#app",

        template: '<app01/>',

        components: {

            app01

        }

    })

</script>

</body>

</html>
小结:
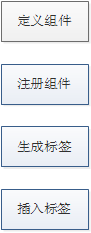
| render: c => c('app01') | template: '' |
|---|---|
| 1.生成标签 | 1.生成标签 |
| 2.插入标签 | 2.插入标签 |
| 覆盖app下的内容 | 覆盖app下的内容 |
| 配合runtime用 | 配合vue.js用 |
| 局部组件 | 全局组件 |
|---|---|
| 1.创建 | 1,创建 |
| 2.注册 | - |
| 3.使用 | 3,使用 |
第二栏是 template: '<app01/>'
webpack: 使用render+runtime-only方式
- 方法1
new Vue({

    el: '#app',

    render: creatElment => creatElment(App),

});
- 方法2
通过render渲染一个元素, 然后把 App 当组件来用
new Vue({

    el: '#app',

    render: c => c('App'),

    components: {

        App

    }

});
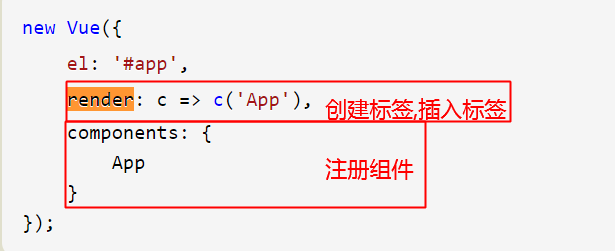
注意: 这种情况下, App 组件并不是根组件
webpack: 使用vue.js
- 方法3:
<div id="app">

    <App></App>

</div>
import Vue from '../node_modules/vue/dist/vue.js'

import App from "./App.vue";

new Vue({

    el: '#app',

    components: {

        App

    }

});
- 方法4:
import Vue from '../node_modules/vue/dist/vue.js'

import App from './App.vue'

new Vue({

    el: '#app',

    template: '<App/>',

    components: {

        App

    }

});
webpack: vue-cli使用的方式
vue-cli默认使用的是../node_modules/vue/dist/vue.js,而非runtime.

import Vue from '../node_modules/vue/dist/vue.js'

import App from './App.vue'

import login from './components/login.vue';

import register from './components/register.vue';

import VueRouter from 'vue-router';

Vue.use(VueRouter);

let routes = [

    {path: '/login', component: login},

    {path: '/register', component: register},

];

let router = new VueRouter({routes});

new Vue({

    el: '#app',

    template: '<App/>',

    components: {App},

    router

});
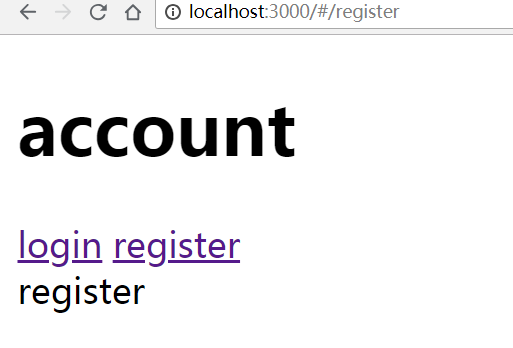
- 将login和register直接导入App.vue
- 将login和register先导入account.vue, 在将account.vue导入App.vue/
router方式导入
./components/login.vue
<template>

    <div>login</div>

</template>

<script>

    export default {

        name: "login"

    }

</script>

<style scoped>

</style>
./components/register.vue
<template>

    <div>register</div>

</template>

<script>

    export default {

        name: "register"

    }

</script>

<style scoped>

</style>
./components/account.vue
<template>

    <div>

        <router-link to="/account/login">/account/login</router-link>

        <router-link to="/account/register">/account/register</router-link>

        <router-view></router-view>

    </div>

</template>

<script>

    export default {

        name: "account"

    }

</script>

<style scoped>

</style>
App.vue
<template>

    <div id="app">

        <router-link to="/account">/account</router-link>

        <router-view></router-view>

    </div>

</template>

<script>

    export default {

        name: 'app',

    }

</script>

<style>

</style>
import 方式实现
./components/login.vue
<template>

    <div>login</div>

</template>

<script>

    export default {

        name: "login"

    }

</script>

<style scoped>

</style>
./components/register.vue
<template>

    <div>register</div>

</template>

<script>

    export default {

        name: "register"

    }

</script>

<style scoped>

</style>
./components/account.vue
<template>

    <div>

        <p>account</p>

        <login></login>

        <register></register>

    </div>

</template>

<script>

    import login from './login.vue';

    import register from './register.vue';

    export default {

        name: "account",

        components: {

            login,

            register

        }

    }

</script>

<style scoped>

</style>
App.vue
<template>

    <div id="app">

        <account></account>

    </div>

</template>

<script>

    import account from './components/account.vue'

    export default {

        name: 'app',

        components: {

            account

        }

    }

</script>

<style>

</style>

[vue]组件的导入的更多相关文章
- 自己封装 vue 组件 和 插件
vue 组件 一.组件的创建,两种方法.(本质上是1.2两种,vue文件,只是创建了一个 组件选项对象,仅是一个js对象)1.定义组件:Vue.component('button-counter', ...
- 基于vue项目的组件中导入mui框架初始化滑动等效果时需移除严格模式的问题
基于vue项目的组件中导入mui框架初始化滑动等效果时,控制台报错:Uncaught TypeError: 'caller', 'callee', and 'arguments' properties ...
- Vue (三) --- Vue 组件开发
------------------------------------------------------------------好心情,会让你峰回路转. 5. 组件化开发 5.1 组件[compo ...
- vue2.0 如何自定义组件(vue组件的封装)
一.前言 之前的博客聊过 vue2.0和react的技术选型:聊过vue的axios封装和vuex使用.今天简单聊聊 vue 组件的封装. vue 的ui框架现在是很多的,但是鉴于移动设备的复杂性,兼 ...
- vue 组件开发、vue自动化工具、axios使用与router的使用(3)
一. 组件化开发 1.1 组件[component] 在网页中实现一个功能,需要使用html定义功能的内容结构,使用css声明功能的外观样式,还要使用js定义功能的特效,因此就产生了一个功能先关的代码 ...
- 如何把一个vue组件改为ionic/angular组件
同是mvvm框架,他们之间是很相似的,如何你已经熟悉其中的一个,那么另一个也就基本上也就会的差不多了. 一.动态属性.值.事件绑定 vue中使用v-bind:或者之间分号:进行绑定 ng中左括号[]进 ...
- storybook构建vue组件
最近在研究业务型组件的使用,因为在单独开发组件的时候需要调试,所以为每一个组件都编写一个webpack开发环境,然后上传上去为了其他人可以直接使用又把webpack上传上去,这样会有两个问题: 1:每 ...
- VUE组件汇总
内容 UI组件 开发框架 实用库 服务端 辅助工具 应用实例 Demo示例 UI组件 element ★13489 - 饿了么出品的Vue2的web UI工具套件 Vux ★8133 - 基于Vue和 ...
- vue 组件发布记录
好久没做独立的 vue 组件了,最近突然想把一个常用的 vue 组件打成一个 npm 包,方便使用.好久不用,发现已经忘记环境怎么搭建.翻看以前的组件,才慢慢回想起来,中间还出现些错误.在这记录下开发 ...
随机推荐
- Qt编写守护程序保证程序一直运行(开源)
没有任何人敢保证自己写的程序没有任何BUG,尤其是在商业项目中,程序量越大,复杂度越高,出错的概率越大,尤其是现场环境千差万别,和当初本地电脑测试环境很可能不一样,有很多特殊情况没有考虑到,如果需要保 ...
- 使用SpringContextHolder获取bean实例
public static IConstantFactory me(){ return SpringContextHolder.getBean(beanName:"constantFacto ...
- ubuntu安装使用ffmpeg
环境:ubuntu 12.04 LTS (1)到http://www.ffmpeg.org/download.html下载最新版ffmpeg 也可以用这个命令: git clone git://sou ...
- ARM Linux Oops使用小结(转)
出现Oops消息的大部分错误时因为对NULL指针取值或者因为用了其他不正确的指针值. Oops如何产生的解释如下: 由于处理器使用的地址几乎都是虚拟地址,这些地址通过一个被称为“页表”的结构被 ...
- PAT甲级1013-1014-1015
题目:1013 Battle Over Cities 思路:城市数也就1000, 对于每次询问暴力bfs一下看一下有多少连通块就行了.答案就是联通块数减一. #include<stdio.h&g ...
- Codeforces 219C - Color Stripe - [DP]
题目链接:http://codeforces.com/problemset/problem/219/C 题意: 给你 $n$ 个方块排成水平一排,每个方块都涂上 $k$ 种颜色中的一种.要求对尽量少的 ...
- CCPC-Wannafly Winter Camp Day1 Div1 - 爬爬爬山 - [最短路][堆优化dijkstra]
题目链接:https://zhixincode.com/contest/3/problem/F?problem_id=39 样例输入 1 4 5 1 1 2 3 4 1 2 1 1 3 1 1 4 ...
- 9 tips to improve spoken english
https://www.youtube.com/watch?v=FUW_FN8uzy0 1. don't translate everything into your native language ...
- Boost 常用的库
boost是一系列C++模板库组成的免费,可移植,开源的程序库.网络上关于boost的文章已经很多. 这里摘记一些库的信息,供自己日后参考. 0.foreach - BOOST_FOREACH ...
- DBCHART直方图顶端显示数字
双击DBCHART-->选SERIES选项卡-->选MARKS-->选STYLE值为VALUE