Elasticsearch -- Head插件安装
安装Head插件
由于head插件本质上还是一个nodejs的工程,因此需要安装node,使用npm来安装依赖的包。
<1>安装Node.js
下载解压
wget https://nodejs.org/dist/v6.10.2/node-v6.10.2-linux-x64.tar.xz
xz –d node-v6.10.2-linux-x64.tar.xz

tar xvf node-v6.10.2-linux-x64.tar

mv node-v6.10.2-linux-x64 /usr/local/node
配置并生效
vim /etc/profile

export NODE_HOME=/usr/local/node

export PATH=$PATH:$NODE_HOME/bin

source /etc/profile
查看版本验证
[elsearch@imok bin]$ node -v

v6.10.2

[elsearch@imok bin]$ npm -v

3.10.10
<2>下载head插件
如果未安装git ,则先安装git工具
yum install –y git

git clone https://github.com/mobz/elasticsearch-head.git
<3>安装grunt
cd elasticsearch-head

npm install -g grunt --registry=https://registry.npm.taobao.org
<4>安装插件
npm install --unsafe-perm
在elasticsearch-head目录下node_modules/grunt下如果没有grunt二进制程序,需要执行:
npm install grunt --save
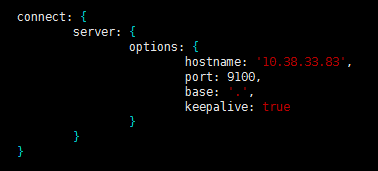
<5>修改配置 elasticsearch-head下Gruntfile.js文件
修改connect配置节点
修改 _site/app.js 修改http://localhost:9200字段到本机ES端口与IP

<6>修改 elasticsearch配置文件
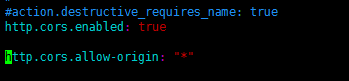
修改elasticsearch.yml文件加入以下内容:
# 是否支持跨域

http.cors.enabled: true

# *表示支持所有域名

http.cors.allow-origin: "*"
<7>启动head插件服务(后台运行)
/elasticsearch-head/node_modules/grunt/bin/grunt server &

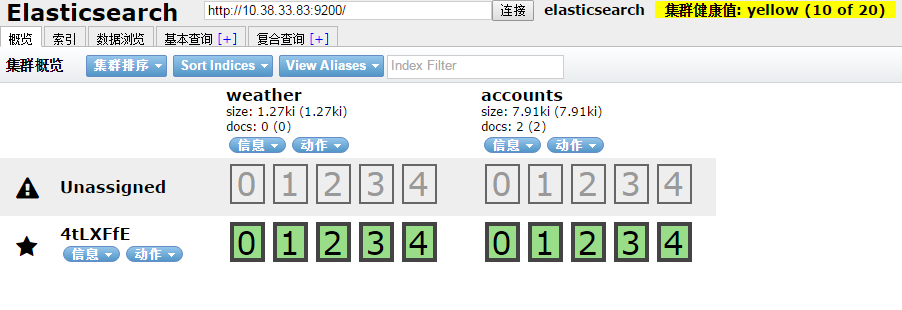
<8>查看
如下图说明安装OK
安装中文分词器
中文分词器的版本和elasticsearch的版本要一致。随笔中安装的是6.3.2版本
$ ./bin/elasticsearch-plugin install https://github.com/medcl/elasticsearch-analysis-ik/releases/download/v6.3.2/elasticsearch-analysis-ik-6.3.2.zip
安装OK后重启elasticsearch服务
安装过程遇到的问题:
[1]: max file descriptors [4096] for elasticsearch process is too low, increase to at least [65536]
解决:vim /etc/security/limits.conf ,在文件末尾添加以下参数 (* 要带上)

* soft nofile 65536

* hard nofile 131072

* soft nproc 2048

* hard nproc 4096
ulimit -n查看进程数
[2]: max virtual memory areas vm.max_map_count [65530] is too low, increase to at least [262144]
解决:修改 /etc/sysclt.conf配置
vi /etc/sysctl.conf
添加一下配置参数
vm.max_map_count=655360
执行命令
sysctl -p
重启elasticsearch服务即可。
参考:
https://www.cnblogs.com/hunttown/p/6723286.html
https://www.cnblogs.com/lizichao1991/p/7809156.html
Elasticsearch -- Head插件安装的更多相关文章
- ELK 学习笔记之 elasticsearch head插件安装
elasticsearch head插件安装: 准备工作: 安装nodejs和npm https://nodejs.org/en/download/ node-v6.11.2-linux-x64.ta ...
- Elasticsearch入门教程(一):Elasticsearch及插件安装
原文:Elasticsearch入门教程(一):Elasticsearch及插件安装 版权声明:本文为博主原创文章,遵循CC 4.0 BY-SA版权协议,转载请附上原文出处链接和本声明. 本文链接:h ...
- ElasticSearch head 插件安装
head 客户端可以很方便在上面创建索引,类型,文档,还有查询,使用它管理elasticsearch 提高效率. 在安装head 客户端之前必须安装node.js 环境,因为它是用node.js 编写 ...
- Elasticsearch 监控插件安装(elasticsearch-head与Kibana)
摘要 安装Elasticsearch插件Head与Kibana 版本 elasticsearch版本: elasticsearch-2.3.4 elasticsearch-head版本: 2.x(支持 ...
- Elasticsearch安装(四), elasticsearch head 插件安装和使用。
安装方式如下: 一.安装Elasticsearch-Head 1.插件安装方式(推荐) #在Elasticsearch目录下 $/bin/plugin -install mobz/elasticsea ...
- 新版elasticsearch的插件安装
安装 yum localinstall elasticsearch-6.1.1.rpm -y mkdir -p /elk/{data,logs} && chown -R elastic ...
- elasticsearch的插件安装
目前使用的是2.4.5版本的es 安装的时候注意以下几点 : 1.如果想所有的ip都能访问es,需要修改config下的elasticsearch.yml.修改如下 network.host=0.0. ...
- ElasticSearch head插件安装与配置
下载 下载地址:https://github.com/mobz/elasticsearch-head 安装 1. 下载到本地 git clone 2. 安装 grunt npm install -g ...
- ElasticSearch及其插件安装配置
elasticsearch安装使用 .安装步骤: 1.下载elasticsearch的rpm包: wget https://artifacts.elastic.co/downloads/elastic ...
随机推荐
- HTML5 FormData方法介绍
详细见链接 转载说明:转自CSDN上“诗渊”的博客
- liunx 安装mysql数据库
yum 安装rz/sz yum install -y lrzsz 卸载Mariadb数据库 查询所安装的MariaDB组件: [root@localhost logs]# rpm -qa | gr ...
- Vue调用百度接口做百度搜索
这两天由于学习需要,需要用vue来调用api接口,但是以前没怎么接触过用vue来调用接口,不会没关系,发挥我们强大的学习能力,都不是事,学习了半天基本也就可以初级上手了,写篇随笔记录下来,方便以后回顾 ...
- 如何发布自己的node模块
一.注册自己的npm账户 在 npm 官网 https://www.npmjs.org 申请一个账号,并且进行必要的验证,需要填写用户名.密码和邮箱.并且注册成功后会向邮箱发一封邮件,需要进行验证. ...
- 【阅读笔记】《C程序员 从校园到职场》第八章 算法和协议(Part 2)
原文链接: 让你提前认识软件开发(19):C语言中的协议及单元测试示例 CSDN博客 https://blog.csdn.net/zhouzhaoxiong1227/article/details/2 ...
- AC Challenge(状压dp)
ACM-ICPC 2018 南京赛区网络预赛E: 题目链接https://www.jisuanke.com/contest/1555?view=challenges Dlsj is competing ...
- 【未解决】对于使用Windows的IDEA进行编译的文件,但无法在Linux系统中统计代码行数的疑问
在我学习使用Windows的IDEA的过程中,将代码文件转移到Linux虚拟机当中,但无法在Linux系统中统计代码行数. 注意:拷贝进虚拟机的文件均能编译运行. 具体过程如下: root@yogil ...
- 51单片机数据类型int,float,指针所占字节数
1.int===2个字节 2.sfr===特殊功能寄存器,也是一种扩充数据类型,占用1个内存单元,利用它可以访问51单片机内的所有特殊功能寄存器. sfr P1 = 0x90;/////////这一句 ...
- case语法
一.文件系统访问列表 FACL :Filesystem Access Control List 文件系统访问列表 利用文件扩展保存额外的访问控制权限. setfacl: -m:设定访问控制权限 ...
- yuan的第二次随笔
第一题: 计算两数的和与差 设计思路: 1:看题目:主函数与函数声明,知道它要你干什么 2:理解与分析:在main中,定义两个实数a,b;要你求两数的和与差 3:解答:通过调用函数sum_diff,指 ...