k8s-生产环境部署django项目k8s-dashboard管理系统
1. k8s-生产环境部署django项目k8s-dashboard管理系统
部署架构
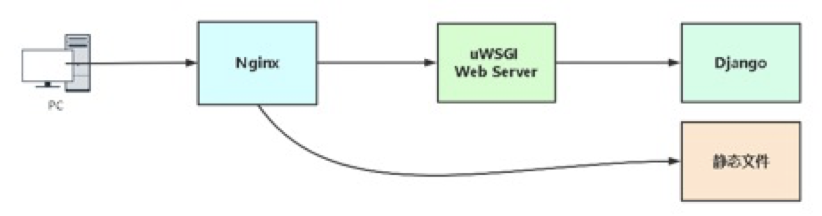
nginx 前端web服务,接收到动态请求通过uwsgi模块将请求转发给uwsgi服务器,uwsgi服务器通过django处理完后返回给Nginx,Nginx返回用户浏览器展示。
既然uwsgi是一个可以独立部署的服务器,为什么还用Nginx代理?
- Nginx作为入口可配置安全策略,并且可以为uwsgi提供负载均衡。
- Nginx处理静态资源能力强
2. 将本地开发的项目打包
2.1 导入依赖模块列表
pip freeze > ~/requirements.txt
是用pip工具导出安装的pip list的显示的包
2.2 修改数据库为mysql
# devops_orm/settings.py

DATABASES = {

	'default': {

        'ENGINE': 'django.db.backends.mysql',

        'NAME': 'k8s',

        'USER': 'k8s',

        'PASSWORD': '12345678',

        'HOST': '192.168.0.78',

        'PORT': '3306',

	}

}
关闭debug模式和白名单
# SECURITY WARNING: don't run with debug turned on in production!

DEBUG = False     # 关闭调试模式

# 开启用户访问IP

ALLOWED_HOSTS = ['*']     # 白名单,只允许列表中的ip访问,*代表所有
3. 服务器环境准备
3.1 安装python3
安装依赖包
yum -y install zlib-devel bzip2-devel openssl-devel ncurses-devel sqlite-devel readline-devel tk-devel gdbm-devel db4-devel libpcap-devel xz-devel libffi-devel
第一种方式用yum安装
Linux安装:
yum install python36 -y
一条命令完成安装。
3.2 安装依赖模块列表
- 压缩本地代码和导出的模块依赖列表

压缩为zip包,方便后面上传

上传压缩到服务器
[root@k8s-master ~]# rz

rz waiting to receive.

Starting zmodem transfer.  Press Ctrl+C to cancel.

Transferring k8s.zip...

  100%    1267 KB    1267 KB/sec    00:00:01       0 Errors

[root@k8s-master ~]# ll

total 1272

drwxr-xr-x 2 root root    4096 Jul  4 21:07 k8s-tools

-rw-r--r-- 1 root root 1297880 Jul  4 21:04 k8s.zip
这里通过rz命令上传的,可以使用sftp等
解压压缩包
[root@k8s-master ~]# yum install unzip -y

[root@k8s-master ~]# unzip k8s.zip

[root@k8s-master ~]# ll

total 1284

drwxr-xr-x 3 root root    4096 Jul  5 14:28 devops

drwxr-xr-x 2 root root    4096 Jul  4 21:07 k8s-tools

-rw-r--r-- 1 root root 1297880 Jul  4 21:04 k8s.zip

drwxr-xr-x 2 root root    4096 Jul  4 21:37 __MACOSX

-rw-r--r-- 1 root root      58 Jul  4 21:46 requirements.txt

[root@k8s-master ~]# mkdir -p /opt/k8s

[root@k8s-master ~]# mv devops/* /opt/k8s/
安装依赖包
[root@k8s-master ~]# pip3 install -r requirements.txt -i http://mirrors.aliyun.com/pypi/simple --trusted-host mirrors.aliyun.com
[root@k8s-master ~]# cat requirements.txt

Django

kubernetes

PyMySQL

channels

channels-redis

PyYAML
3.3 安装数据库
mysql安装
[root@k8s-master ~]# docker run -d --name db -p 3306:3306 -v mysqldata:/var/lib/mysql -e MYSQL_ROOT_PASSWORD=123456 mysql:5.7 --character-set-server=utf8

[root@k8s-master ~]# docker exec  -it db bash

root@f992b2375c5d:/# mysql -uroot -p$MYSQL_ROOT_PASSWORD

mysql: [Warning] Using a password on the command line interface can be insecure.

Welcome to the MySQL monitor.  Commands end with ; or \g.

Your MySQL connection id is 2

Server version: 5.7.34 MySQL Community Server (GPL)

Copyright (c) 2000, 2021, Oracle and/or its affiliates.

Oracle is a registered trademark of Oracle Corporation and/or its

affiliates. Other names may be trademarks of their respective

owners.

Type 'help;' or '\h' for help. Type '\c' to clear the current input statement.

mysql> create database k8s;

Query OK, 1 row affected (0.00 sec)
安装redis:
[root@k8s-master ~]# docker run --name redis -d -p 6379:6379 redis:3
3.4 启动开发环境
启动程序,验证依赖模块
[root@k8s-master devops]# python3 manage.py runserver 0.0.0.0:8000

Watching for file changes with StatReloader

Performing system checks...

System check identified no issues (0 silenced).

You have 18 unapplied migration(s). Your project may not work properly until you apply the migrations for app(s): admin, auth, contenttypes, sessions.

Run 'python manage.py migrate' to apply them.

July 05, 2021 - 11:36:44

Django version 3.2.5, using settings 'devops.settings'

Starting ASGI/Channels version 3.0.3 development server at http://0.0.0.0:8000/
测试没有问题,同步数据库
[root@k8s-master devops]# python3 manage.py migrate

Operations to perform:

  Apply all migrations: admin, auth, contenttypes, sessions

Running migrations:

  Applying contenttypes.0001_initial... OK

  Applying auth.0001_initial... OK

  Applying admin.0001_initial... OK

  Applying admin.0002_logentry_remove_auto_add... OK

  Applying admin.0003_logentry_add_action_flag_choices... OK

  Applying contenttypes.0002_remove_content_type_name... OK

  Applying auth.0002_alter_permission_name_max_length... OK

  Applying auth.0003_alter_user_email_max_length... OK

  Applying auth.0004_alter_user_username_opts... OK

  Applying auth.0005_alter_user_last_login_null... OK

  Applying auth.0006_require_contenttypes_0002... OK

  Applying auth.0007_alter_validators_add_error_messages... OK

  Applying auth.0008_alter_user_username_max_length... OK

  Applying auth.0009_alter_user_last_name_max_length... OK

  Applying auth.0010_alter_group_name_max_length... OK

  Applying auth.0011_update_proxy_permissions... OK

  Applying auth.0012_alter_user_first_name_max_length... OK

  Applying sessions.0001_initial... OK
3.4 安装与配置uwsgi
Centos7 服务器安装依赖包
[root@k8s-master devops]# yum -y install gcc gcc-c++ gd cmake patch automakemake autoconf libjpeg libjpeg-devel libpng libpng-devel freetype freetype-devellibxml2 libxml2-devel zlib zlib-devel glibc glibc-devel glib2 glib2-devel bzip2bzip2-devel ncurses ncurses-devel curl curl-devel e2fsprogs e2fsprogs-develkrb5 krb5-devel libidn libtools-libs libidn-devel openssl openssl-developenldap openldap-devel nss_ldap openldap-clients openldap-servers pcre-devel libmcrypt-devel readline-devellibcap-devel ntpdate vim tree wget python3-devel.x86_64
uWSGI是一个Web服务器,也是Python的一个模块,直接pip安装即可:
[root@k8s-master devops]# pip3 install uwsgi -i http://mirrors.aliyun.com/pypi/simple --trusted-host mirrors.aliyun.com
创建uwsgi配置文件,路径任意,
[root@k8s-master ~]# mkdir -p /opt/uwsgi

[root@k8s-master ~]# cd /opt/uwsgi

[root@k8s-master uwsgi]# vim uwsgi.ini

[root@k8s-master uwsgi]# cat uwsgi.ini

[uwsgi]

# 项目目录

chdir = /opt/k8s

# 指定sock的文件路径

socket = /opt/k8s/uwsgi.sock

# 指定监听端口

http = 0.0.0.0:8080

# 静态资源

static-map = /static=/opt/k8s/static

# wsgi文件(django入口)

wsgi-file=devops/wsgi.py

# 进程个数

processes = 1

# 指定项目的应用

# module = devops.wsgi

# 进程pid

pidfile = /opt/k8s/uwsgi.pid

# 日志路径

daemonize = /opt/k8s/uwsgi.log
启动
[root@k8s-master uwsgi]# uwsgi --ini uwsgi.ini

[uWSGI] getting INI configuration from uwsgi.ini

[uwsgi-static] added mapping for /static => /opt/k8s/static
验证服务启动
[root@k8s-master uwsgi]# ss -antp |grep 8080

LISTEN     0      100          *:8080                     *:*                   users:(("uwsgi",pid=4871,fd=3),("uwsgi",pid=4870,fd=3))
3.5 安装nginx
安装nginx
[root@k8s-master uwsgi]# yum localinstall http://nginx.org/packages/centos/7/noarch/RPMS/nginx-release-centos-7-0.el7.ngx.noarch.rpm

[root@k8s-master uwsgi]# yum -y install nginx

[root@k8s-master uwsgi]# service nginx start

Redirecting to /bin/systemctl start nginx.service

[root@k8s-master uwsgi]# systemctl enable nginx.service

Created symlink from /etc/systemd/system/multi-user.target.wants/nginx.service to /usr/lib/systemd/system/nginx.service.
配置nginx
[root@k8s-master uwsgi]# cd /etc/nginx/

[root@k8s-master nginx]# ll

total 76

drwxr-xr-x 2 root root 4096 Jun  2 08:24 conf.d

drwxr-xr-x 2 root root 4096 Jun  2 08:24 default.d

-rw-r--r-- 1 root root 1077 Jun  2 08:24 fastcgi.conf

-rw-r--r-- 1 root root 1077 Jun  2 08:24 fastcgi.conf.default

-rw-r--r-- 1 root root 1007 Jun  2 08:24 fastcgi_params

-rw-r--r-- 1 root root 1007 Jun  2 08:24 fastcgi_params.default

-rw-r--r-- 1 root root 2837 Jun  2 08:24 koi-utf

-rw-r--r-- 1 root root 2223 Jun  2 08:24 koi-win

-rw-r--r-- 1 root root 5231 Jun  2 08:24 mime.types

-rw-r--r-- 1 root root 5231 Jun  2 08:24 mime.types.default

-rw-r--r-- 1 root root 2336 Jun  2 08:23 nginx.conf

-rw-r--r-- 1 root root 2656 Jun  2 08:24 nginx.conf.default

-rw-r--r-- 1 root root  636 Jun  2 08:24 scgi_params

-rw-r--r-- 1 root root  636 Jun  2 08:24 scgi_params.default

-rw-r--r-- 1 root root  664 Jun  2 08:24 uwsgi_params

-rw-r--r-- 1 root root  664 Jun  2 08:24 uwsgi_params.default

-rw-r--r-- 1 root root 3610 Jun  2 08:24 win-utf

[root@k8s-master nginx]# cd conf.d/

[root@k8s-master conf.d]# vim k8s-dashboard.conf

[root@k8s-master conf.d]# cat k8s-dashboard.conf

server {

        listen       80;

        server_name  k8s-dashboard.scajy.cn;

        location / {

           include     uwsgi_params;  # 导入模块用于与uwsgi通信

           uwsgi_pass unix:/opt/k8s/uwsgi.sock;

        }

        # 静态文件目录

        location /static {

           alias /opt/k8s/static;

        }

}
重启nginx
[root@k8s-master conf.d]# nginx -t

nginx: the configuration file /etc/nginx/nginx.conf syntax is ok

nginx: configuration file /etc/nginx/nginx.conf test is successful

[root@k8s-master conf.d]# nginx -s reload
域名解析
这个根据自己域名进行配置域名解析
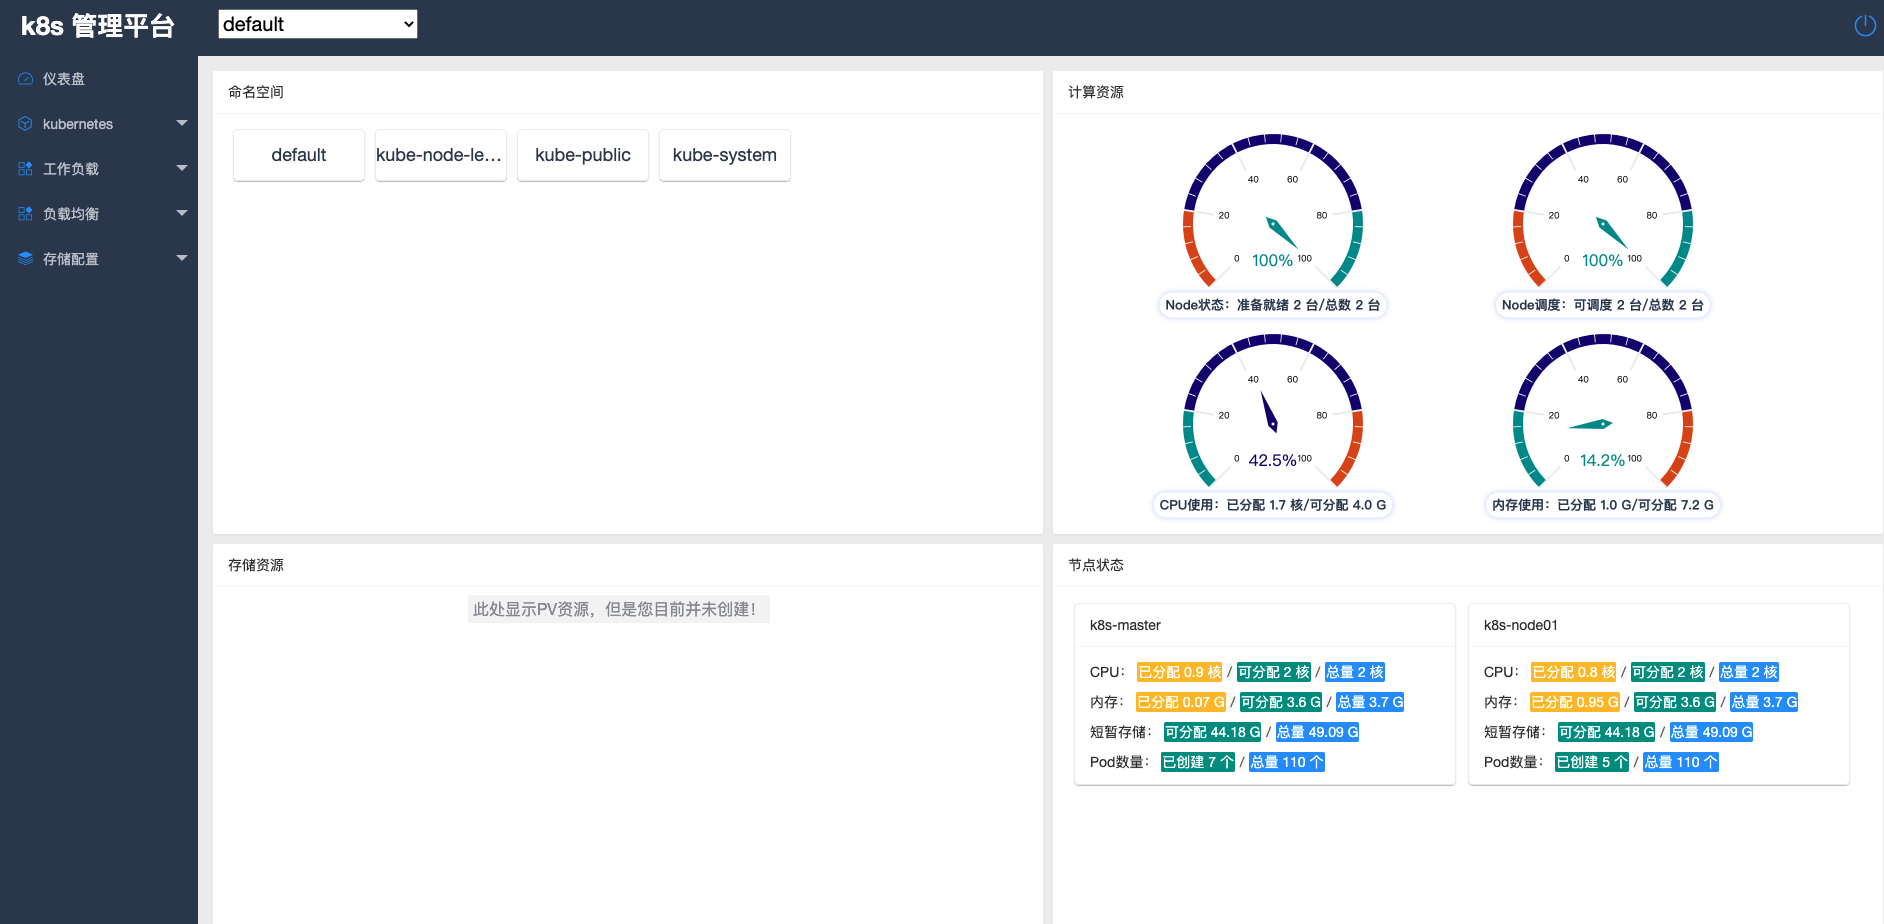
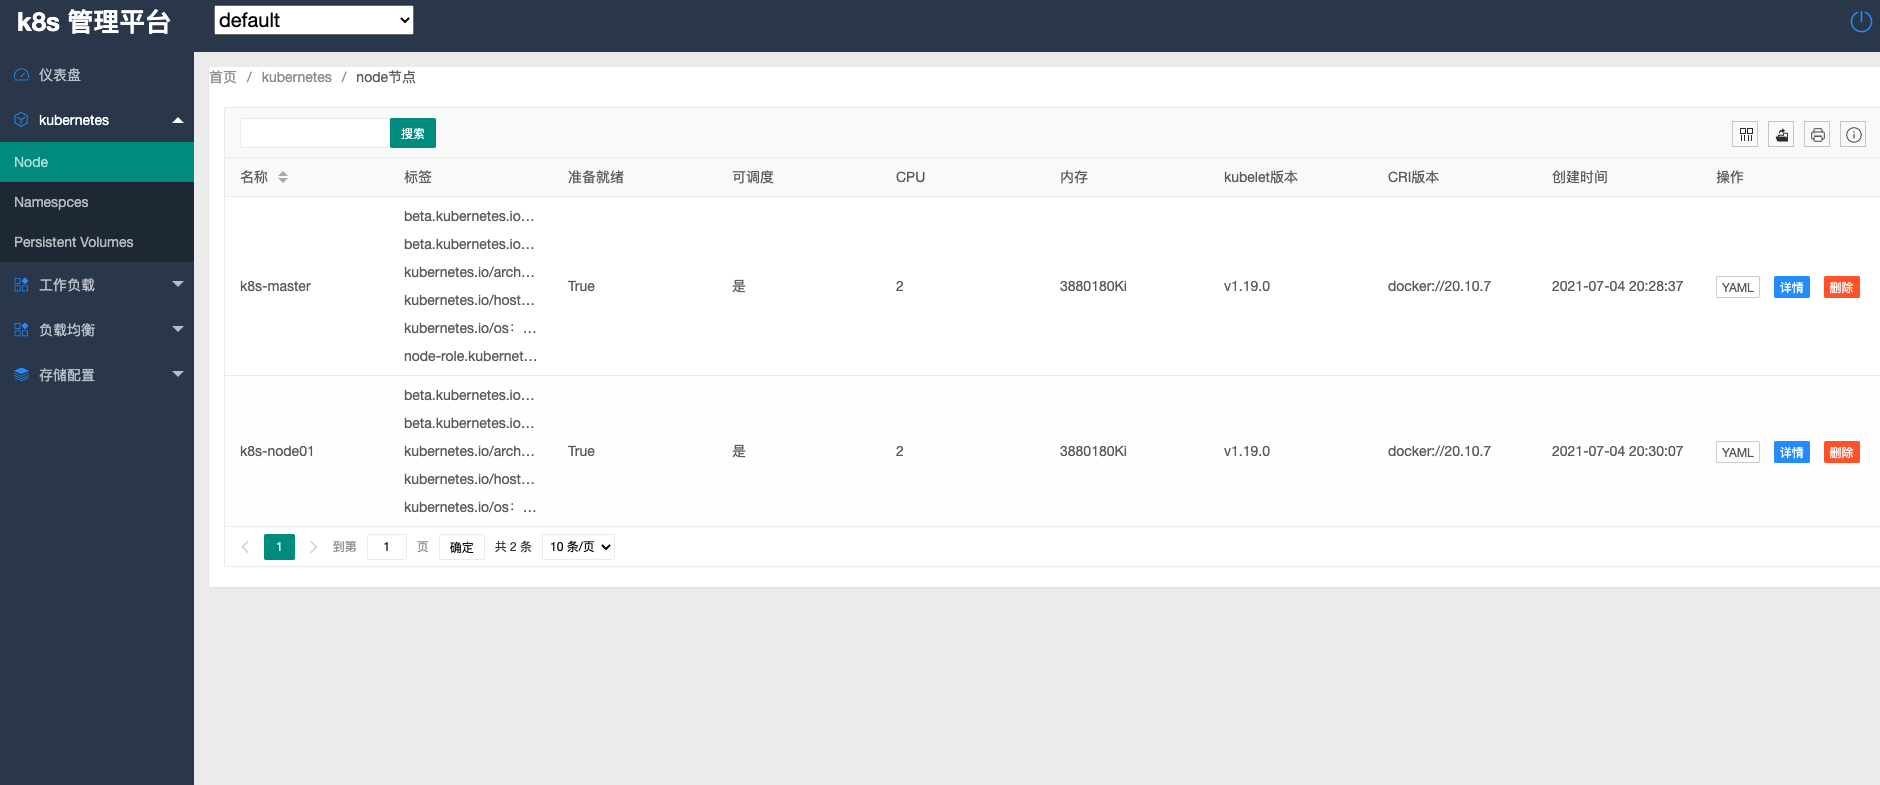
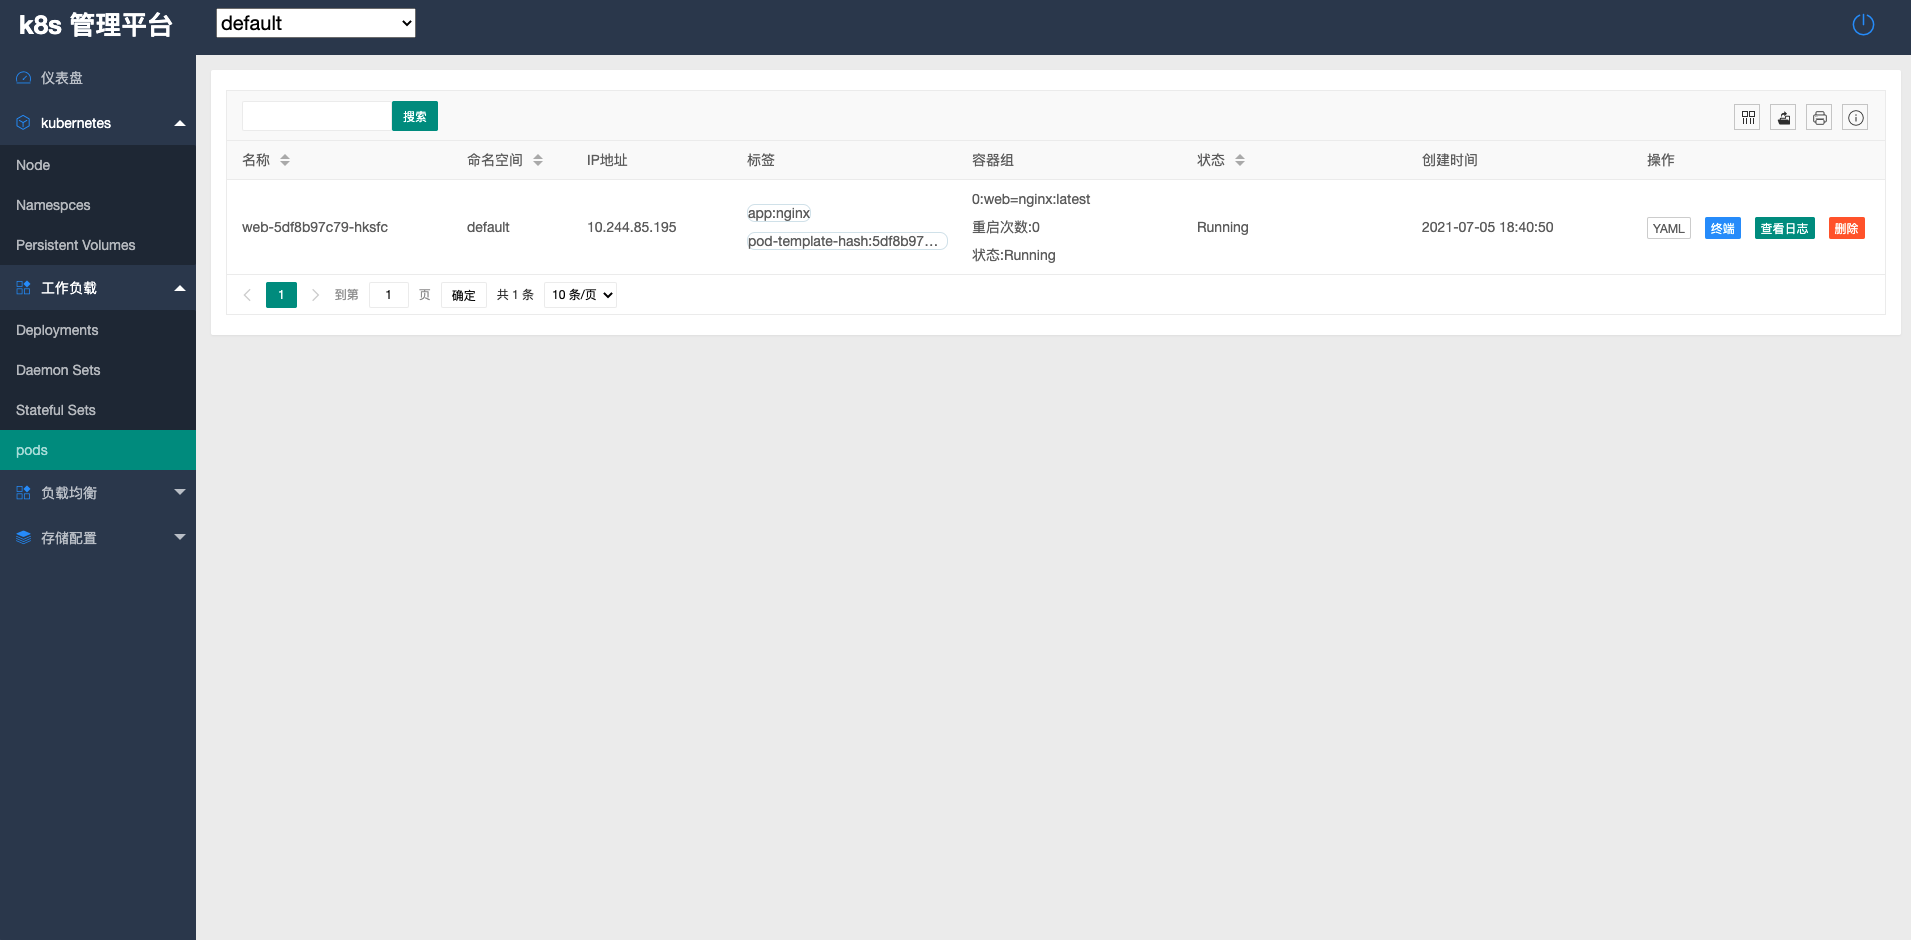
4. 浏览器访问
k8s-生产环境部署django项目k8s-dashboard管理系统的更多相关文章
- 生产环境部署Django项目
生产环境部署Django项目 1. 部署架构 IP地址 安装服务 172.16.1.251 nginx uwsgi(sock方式) docker mysql5.7 redis5 Nginx 前端We ...
- k8s生产环境部署
建议配置: 服务器 900G*2 SSD 安装操作系统 CPU 16核心*2 40G网卡*2 RAM 64G*8 操作系统建议:Centos7.4/Centos 7.6 不建议使用CentOS8 分布 ...
- Django + Uwsgi + Nginx 的生产环境部署
使用runserver可以使我们的django项目很便捷的在本地运行起来,但这只能在局域网内访问,如果在生产环境部署django,就要多考虑一些问题了.比如静态文件处理,安全,效率等等,本篇文章总结归 ...
- ubuntu Django + Uwsgi + Nginx 的生产环境部署
一.概述 使用runserver可以使我们的django项目很便捷的在本地运行起来,但这只能在局域网内访问,如果在生产环境部署django,就要多考虑一些问题了.比如静态文件处理,安全,效率等等,本篇 ...
- 学习项目部署Django+uwsgi+Nginx生产环境部署
绪论 项目生产环境部署,是很重的一个知识点.第一,Django自带的服务器很简陋,由于测试和开发环境尚可,无法用于生产环境,保障安全性和可靠性.以及性能.此外,学习部署方式,还有利于了解生产部署后的项 ...
- 第四百零二节,Django+Xadmin打造上线标准的在线教育平台—生产环境部署,uwsgi安装和启动,nginx的安装与启动,uwsgi与nginx的配置文件+虚拟主机配置
第四百零二节,Django+Xadmin打造上线标准的在线教育平台—生产环境部署,uwsgi安装和启动,nginx的安装与启动,uwsgi与nginx的配置文件+虚拟主机配置 软件版本 uwsgi- ...
- 10: Django + Uwsgi + Nginx 的生产环境部署
1.1 一些重要概念 1.Web协议介绍 Web协议出现顺序: CGI -> FCGI -> WSGI -> uwsgi 1. CGI: 最早的协议 2. FCGI: 比CGI快 ...
- Django + Uwsgi + Nginx 的生产环境部署实战
目录 Django + Uwsgi + Nginx 的生产环境部署实战 安装Uwsgi 一.使用命令来启动django项目 二.使用配置文件来启动我们的Django项目 安装Nginx 配置Nginx ...
- 11: Django + gunicorn + Nginx 的生产环境部署
1.1 gunicorn介绍 1.Gunicorn 1. Gunicorn是使用Python实现的WSGI服务器, 直接提供了http服务, 并且在woker上提供了多种选择, gevent, e ...
随机推荐
- [bug] HDFS:hdfs missing blocks. The following files may be corrupted
原因 HDFS数据块丢失,需要删除丢失块的元信息 bin/hadoop fsck / -delete 参考 https://blog.csdn.net/lixgjob/article/details/ ...
- Linux单用户模式(修改密码、运行级别)方法详解
很多新手当面对"忘记 root 账户密码导致无法登陆系统"这个问题时,直接选择重新系统.其实大可不必,我只需要进入 emergency mode(单用户模式)更新 root 账户的 ...
- python-dict和list常用方法
1 # *********-list-********* 2 # 创建一个list 3 list1 = [1, 2, '力气,', 'afd'] 4 print(type(list1)) 5 prin ...
- 攻防世界(九)PHP2
攻防世界系列:PHP2 1.打开什么信息也没有. 尝试各种首页index.php index.html 加 [F12]没有结果,最后发现是index.phps .phps文件是什么? phps文件就 ...
- 测试 USB 存储设备读写性能(Mb/s),平均读写速度等
1.将U盘(USB3.0)插入被测试机器,假定识别设备为sdc2.创建vfat文件系统分区/dev/sdb1分区容量大于30GBumount /dev/sdc1mkfs -t vfat /dev/sd ...
- IT菜鸟之VTP应用项目
项目拓扑 项目要求 PC0和PC2能通信,PC1和PC3能通信,其余不能通信. 项目分析 可以通过vlan来实现相同网段不能通信:而相同vlan可以通信,不同vlan不能通信:同时需要用到trunk封 ...
- 【odoo】【知识点】视图的继承逻辑
背景:同一个模块,两组开发人员对同一个模型的form视图进行了二开.在没有指定外部ID的情况下,odoo是如何选择展示展示哪个视图呢? 上干货 odoo在加载视图的时候,首先调用的models.py中 ...
- 根据swagger.json生成flutter model,暂无空安全支持
一般的服务端类型都有泛型支持,对于flutter来说虽然也支持泛型,但是在序列化这里却始终存在问题,flutter不允许用反射,对于flutter项目的开发来说除了画页面,可能最烦人的就是跟服务端打交 ...
- 解决idea查不到插件
http://127.0.0.1:1080
- Scrapy爬虫返回302重定向问题解决方法
scrapy爬虫遇到爬取页面时302重定向导致response页面与实际需要爬取的页面信息不一致,导致无法正常获取信息,查看日志存在 scrapy.downloadermiddlewares.redi ...