Cesium中级教程3 - Camera - 相机(摄像机)
Cesium中文网:http://cesiumcn.org/ | 国内快速访问:http://cesium.coinidea.com/
Camera
CesiumJS中的Camera控制场景的视图。有很多方法可以操作Camera,如旋转(rotate)、缩放(zoom)、平移(pan)和飞到目的地(flyTo)。CesiumJS有鼠标和触摸事件用来处理与Camrea的交互,还有API来以编程方式操作摄像机。了解如何使用Camera API和自定义相机控制(Camera controls)。
默认Camera行为
打开Sandcastle中的Hello World样例用来体验默认的相机控制。默认操作方式如下:
| 鼠标操作 | 3D | 2D | Columbus视角 |
|---|---|---|---|
| Left click + drag | Rotate around the globe | Translate over the map | Translate over the map |
| Right click + drag | Zoom in and out | Zoom in and out | Zoom in and out |
| Middle wheel scrolling | Zoom in and out | Zoom in and out | Zoom in and out |
| Middle click + drag | Tilt the globe | No action | Tilt the map |
| 鼠标操作 | 3D | 2D | Columbus视角 |
|---|---|---|---|
| 左键 + 拖拽 | 旋转地球 | 在地图上移动 | 在地图上移动 |
| 右键 + 拖拽 | 缩放 | 缩放 | 缩放 |
| 中键滚轮 | 缩放 | 缩放 | 缩放 |
| 中键 + 拖拽 | 倾斜地球 | 无操作 | 倾斜地球 |
使用setView函数设置Camera的位置和方向。destination可以是Cartesian3或Rectangle,orientation可以是heading/pitch/roll或direction/up。航向角、俯仰角和横滚角以弧度定义。航向角是从正角度向东增加的局部北向旋转。俯仰角是指从局部的东北平面开始的旋转。正俯仰角在平面上方。负俯仰角在平面以下。很滚叫是围绕局部东轴应用的第一个旋转。
camera.setView({

    destination : new Cesium.Cartesian3(x, y, z),

    orientation: {

        heading : headingAngle,

        pitch : pitchAngle,

        roll : rollAngle

    }

});
viewer.camera.setView({

    destination : Cesium.Rectangle.fromDegrees(west, south, east, north),

    orientation: {

        heading : headingAngle,

        pitch : pitchAngle,

        roll : rollAngle

    }

});
上述的所有参数都是可选的。如果未指定,参数值将被设为默认值用户当前Camera的位置和方向。
自定义Camera鼠标或者键盘事件
创建我们自己的事件控制,根据鼠标的朝向用于控制Camera的朝向,键盘的按键控制Camera向前、向左、向右、向上,以及向下。首先从禁用默认事件操作开始。在(javascript var viewe=...)之后添加下列代码:
var scene = viewer.scene;

var canvas = viewer.canvas;

canvas.setAttribute('tabindex', '0'); // needed to put focus on the canvas

canvas.onclick = function() {

    canvas.focus();

};

var ellipsoid = viewer.scene.globe.ellipsoid;

// disable the default event handlers

scene.screenSpaceCameraController.enableRotate = false;

scene.screenSpaceCameraController.enableTranslate = false;

scene.screenSpaceCameraController.enableZoom = false;

scene.screenSpaceCameraController.enableTilt = false;

scene.screenSpaceCameraController.enableLook = false;
创建变量记录当前鼠标位置,然后标记并跟随Camera移动轨迹:
var startMousePosition;

var mousePosition;

var flags = {

    looking : false,

    moveForward : false,

    moveBackward : false,

    moveUp : false,

    moveDown : false,

    moveLeft : false,

    moveRight : false

};
添加一个事件控制用户设置标记,当鼠标左键被点击的时候,用于记录当前鼠标的位置:
var handler = new Cesium.ScreenSpaceEventHandler(canvas);

handler.setInputAction(function(movement) {

    flags.looking = true;

    mousePosition = startMousePosition = Cesium.Cartesian3.clone(movement.position);

}, Cesium.ScreenSpaceEventType.LEFT_DOWN);

handler.setInputAction(function(movement) {

    mousePosition = movement.endPosition;

}, Cesium.ScreenSpaceEventType.MOUSE_MOVE);

handler.setInputAction(function(position) {

    flags.looking = false;

}, Cesium.ScreenSpaceEventType.LEFT_UP);
创建键盘事件控制用户切换Camera移动标记。我们为下列按键和行为设置了标记:
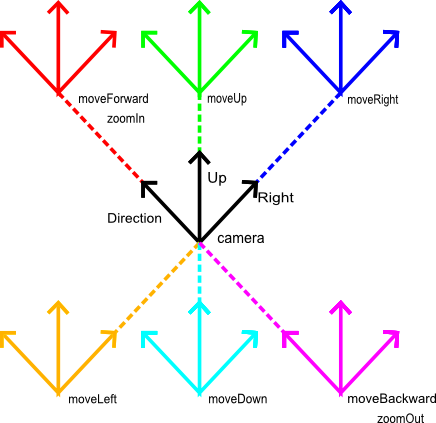
- w Camera向前。
- s Camera向后。
- a Camera向左。
- d Camera向右。
- q Camera向上。
- e Camera向下。
function getFlagForKeyCode(keyCode) {

    switch (keyCode) {

    case 'W'.charCodeAt(0):

        return 'moveForward';

    case 'S'.charCodeAt(0):

        return 'moveBackward';

    case 'Q'.charCodeAt(0):

        return 'moveUp';

    case 'E'.charCodeAt(0):

        return 'moveDown';

    case 'D'.charCodeAt(0):

        return 'moveRight';

    case 'A'.charCodeAt(0):

        return 'moveLeft';

    default:

        return undefined;

    }

}

document.addEventListener('keydown', function(e) {

    var flagName = getFlagForKeyCode(e.keyCode);

    if (typeof flagName !== 'undefined') {

        flags[flagName] = true;

    }

}, false);

document.addEventListener('keyup', function(e) {

    var flagName = getFlagForKeyCode(e.keyCode);

    if (typeof flagName !== 'undefined') {

        flags[flagName] = false;

    }

}, false);
现在当标记表明事件发生为true是,我们更新(update)camera。我们新增**onTick的监听事件在clock中:
viewer.clock.onTick.addEventListener(function(clock) {

    var camera = viewer.camera;

});
接下来,我们让Camera指向鼠标指向的方向。在变量声明之后添加下列代码到事件监听函数:
if (flags.looking) {

    var width = canvas.clientWidth;

    var height = canvas.clientHeight;

    // Coordinate (0.0, 0.0) will be where the mouse was clicked.

    var x = (mousePosition.x - startMousePosition.x) / width;

    var y = -(mousePosition.y - startMousePosition.y) / height;

    var lookFactor = 0.05;

    camera.lookRight(x * lookFactor);

    camera.lookUp(y * lookFactor);

}
lookRight和lookUp只需要一个角度参数用于表示旋转的角度。我们将鼠标坐标转换为范围(-1.0,1.0),坐标(0.0,0.0)位于画布的中心。鼠标距中心的距离决定了旋转的速度。靠近中心的位置移动Camera的速度较慢,而远离中心的位置移动Camera的速度较快。
最后,添加代码用于移动Camera的位置。然后添加下列代码到事件响应函数:
// Change movement speed based on the distance of the camera to the surface of the ellipsoid.

var cameraHeight = ellipsoid.cartesianToCartographic(camera.position).height;

var moveRate = cameraHeight / 100.0;

if (flags.moveForward) {

    camera.moveForward(moveRate);

}

if (flags.moveBackward) {

    camera.moveBackward(moveRate);

}

if (flags.moveUp) {

    camera.moveUp(moveRate);

}

if (flags.moveDown) {

    camera.moveDown(moveRate);

}

if (flags.moveLeft) {

    camera.moveLeft(moveRate);

}

if (flags.moveRight) {

    camera.moveRight(moveRate);

}
moveForward、moveBackward、moveUp、moveDown、moveLeft和moveRight方法只需要一个距离参数(米)用于移动Camera的距离。当每一个按键被按下时,Camera就会在球体表面移动固定的距离。Camera离地面越近,移动的速度就越慢。
完整的代码如下:
var viewer = new Cesium.Viewer('cesiumContainer');

var scene = viewer.scene;

var canvas = viewer.canvas;

canvas.setAttribute('tabindex', '0'); // needed to put focus on the canvas

canvas.onclick = function() {

    canvas.focus();

};

var ellipsoid = viewer.scene.globe.ellipsoid;

// disable the default event handlers

scene.screenSpaceCameraController.enableRotate = false;

scene.screenSpaceCameraController.enableTranslate = false;

scene.screenSpaceCameraController.enableZoom = false;

scene.screenSpaceCameraController.enableTilt = false;

scene.screenSpaceCameraController.enableLook = false;

var startMousePosition;

var mousePosition;

var flags = {

    looking : false,

    moveForward : false,

    moveBackward : false,

    moveUp : false,

    moveDown : false,

    moveLeft : false,

    moveRight : false

};

var handler = new Cesium.ScreenSpaceEventHandler(canvas);

handler.setInputAction(function(movement) {

    flags.looking = true;

    mousePosition = startMousePosition = Cesium.Cartesian3.clone(movement.position);

}, Cesium.ScreenSpaceEventType.LEFT_DOWN);

handler.setInputAction(function(movement) {

    mousePosition = movement.endPosition;

}, Cesium.ScreenSpaceEventType.MOUSE_MOVE);

handler.setInputAction(function(position) {

    flags.looking = false;

}, Cesium.ScreenSpaceEventType.LEFT_UP);

function getFlagForKeyCode(keyCode) {

    switch (keyCode) {

    case 'W'.charCodeAt(0):

        return 'moveForward';

    case 'S'.charCodeAt(0):

        return 'moveBackward';

    case 'Q'.charCodeAt(0):

        return 'moveUp';

    case 'E'.charCodeAt(0):

        return 'moveDown';

    case 'D'.charCodeAt(0):

        return 'moveRight';

    case 'A'.charCodeAt(0):

        return 'moveLeft';

    default:

        return undefined;

    }

}

document.addEventListener('keydown', function(e) {

    var flagName = getFlagForKeyCode(e.keyCode);

    if (typeof flagName !== 'undefined') {

        flags[flagName] = true;

    }

}, false);

document.addEventListener('keyup', function(e) {

    var flagName = getFlagForKeyCode(e.keyCode);

    if (typeof flagName !== 'undefined') {

        flags[flagName] = false;

    }

}, false);

viewer.clock.onTick.addEventListener(function(clock) {

    var camera = viewer.camera;

    if (flags.looking) {

        var width = canvas.clientWidth;

        var height = canvas.clientHeight;

        // Coordinate (0.0, 0.0) will be where the mouse was clicked.

        var x = (mousePosition.x - startMousePosition.x) / width;

        var y = -(mousePosition.y - startMousePosition.y) / height;

        var lookFactor = 0.05;

        camera.lookRight(x * lookFactor);

        camera.lookUp(y * lookFactor);

    }

    // Change movement speed based on the distance of the camera to the surface of the ellipsoid.

    var cameraHeight = ellipsoid.cartesianToCartographic(camera.position).height;

    var moveRate = cameraHeight / 100.0;

    if (flags.moveForward) {

        camera.moveForward(moveRate);

    }

    if (flags.moveBackward) {

        camera.moveBackward(moveRate);

    }

    if (flags.moveUp) {

        camera.moveUp(moveRate);

    }

    if (flags.moveDown) {

        camera.moveDown(moveRate);

    }

    if (flags.moveLeft) {

        camera.moveLeft(moveRate);

    }

    if (flags.moveRight) {

        camera.moveRight(moveRate);

    }

});
Camera
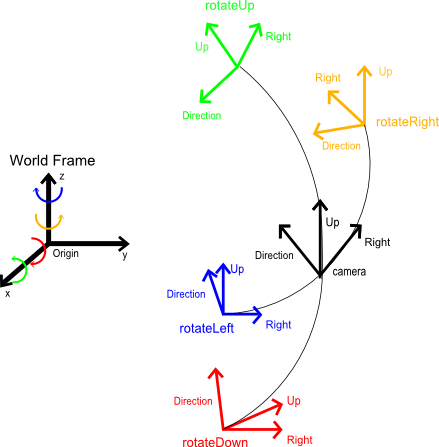
Camera表示Camera当前位置、方向、参考帧和视图截锥的状态。上面的Camera向量在每帧中都是正交的。
move**和zoom**函数平移Camera的位置按照它的方向或指定的方向矢量。方向保持固定不变。
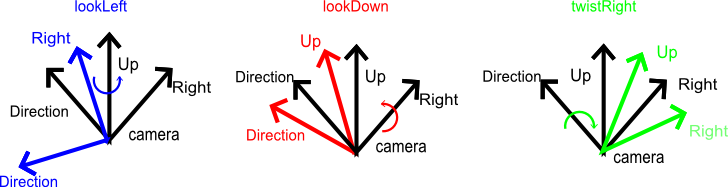
look**和twist**函数旋转Camera的方向比如向上、或向右矢量。位置保持固定不变。
*rotate**函数玄幻位置和方向基于给定矢量。
函数设置Camera给定范围或位置和目标的Camera位置和方向。例如:
var west = Cesium.Math.toRadians(-77.0);

var south = Cesium.Math.toRadians(38.0);

var east = Cesium.Math.toRadians(-72.0);

var north = Cesium.Math.toRadians(42.0);

var extent = new Cesium.Extent(west, south, east, north);

camera.viewExtent(extent, Cesium.Ellipsoid.WGS84);
创建变量ray,通过像素拾取Camera的位置。该方法可用于拾取,例如:
// find intersection of the pixel picked and an ellipsoid

var ray = camera.getPickRay(mousePosition);

var intersection = Cesium.IntersectionTests.rayEllipsoid(ray, Cesium.Ellipsoid.WGS84);
Screen space camera controller
ScreenSpaceCameraController将用户输入(如鼠标和触摸)从窗口坐标转换为Camera运动。它包含用于启用和禁用不同类型输入、修改惯性量以及最小和最大缩放距离的属性。
资源
可在Sandcastle中查看camera样例代码:
API文档:
Cesium中文网交流QQ群:807482793
Cesium中文网:http://cesiumcn.org/ | 国内快速访问:http://cesium.coinidea.com/
Cesium中级教程3 - Camera - 相机(摄像机)的更多相关文章
- Cesium中级教程9 - Advanced Particle System Effects 高级粒子系统效应
Cesium中文网:http://cesiumcn.org/ | 国内快速访问:http://cesium.coinidea.com/ 要了解粒子系统的基础知识,请参见粒子系统入门教程. Weathe ...
- Cesium中级教程10 - CesiumJS and webpack
Cesium中文网:http://cesiumcn.org/ | 国内快速访问:http://cesium.coinidea.com/ webpack是打包JavaScript模块流行且强大的工具.它 ...
- Cesium案例解析(三)——Camera相机
目录 1. 概述 2. 实例 2.1. Camera.html 2.2. Camera.js 2.2.1. 飞行至某一点 2.2.2. 飞行至某区域 2.2.3. 两地之间飞行 2.2.4. 设置视图 ...
- Cesium中级教程4 - 空间数据可视化(二)
Cesium中文网:http://cesiumcn.org/ | 国内快速访问:http://cesium.coinidea.com/ Viewer中的Entity功能 让我们看看Viewer为操作e ...
- Cesium中级教程6 - 3D Models 三维模型
3D Models 三维模型 本教程将教您如何通过Primitive API转换.加载和使用Cesium中的三维模型.如果你是Cesium的新用户,可能需要阅读三维模型部分的(空间数据可视化教程)[h ...
- Cesium中级教程8 - Introduction to Particle Systems 粒子系统入门
Cesium中文网:http://cesiumcn.org/ | 国内快速访问:http://cesium.coinidea.com/ What is a particle system? 什么是粒子 ...
- Cesium中级教程7 - Geometry and Appearances 几何图形和外观
Cesium中文网:http://cesiumcn.org/ | 国内快速访问:http://cesium.coinidea.com/ 本教程将向您介绍提供使用Primitive API的几何图形和外 ...
- Cesium中级教程5 - Terrain 地形
Cesium中文网:http://cesiumcn.org/ | 国内快速访问:http://cesium.coinidea.com/ CesiumJS支持对与水流相关的海洋.湖泊和河流以及全球高分辨 ...
- Cesium中级教程2 - 图层
Cesium中文网:http://cesiumcn.org/ | 国内快速访问:http://cesium.coinidea.com/ Cesium支持从几个标准服务绘制和添加高分辨率图像(地图)图层 ...
随机推荐
- Linux的课堂便利脚本
上课的时,因为教室机总会重新重启,有时候就要重配网卡yum源和下载一些辅助工具,这里写一个脚本省去冗杂的过程 if [[]]可以防止unary operator expected的报错 nmcli d ...
- Caused by: java.lang.NoClassDefFoundError: javax/jms/Message报错
Caused by: java.lang.NoClassDefFoundError: javax/jms/Message at java.lang.Class.getDeclaredMethods0( ...
- Visiual Studio之c++项目瘦身(删除中间项)
欢迎指正 本文主要涉及 Visiual Studio(简称VS) 创建的c++项目 和 windows下批处理相关点. 1.中间项 A.VS创建的c++项目,生成后,会有许多中间项,包括项目生成的中间 ...
- 【LeetCode】1047. Remove All Adjacent Duplicates In String 解题报告(Python)
作者: 负雪明烛 id: fuxuemingzhu 个人博客: http://fuxuemingzhu.cn/ 目录 题目描述 题目大意 解题方法 栈 日期 题目地址:https://leetcode ...
- 【LeetCode】746. Min Cost Climbing Stairs 解题报告(Python)
作者: 负雪明烛 id: fuxuemingzhu 个人博客: http://fuxuemingzhu.cn/ 目录 题目描述 题目大意 解题方法 动态规划 日期 题目地址:https://leetc ...
- Once Again...
Once Again... 题目链接 题意 给n个数,然后T次循环后组成一个新的数列,求这个数列的最长不递减子序列. 思路 因为最多就100个元素,所以当m<=100的时候直接暴力求最长不递减子 ...
- 【LeetCode】99. Recover Binary Search Tree 解题报告(Python)
[LeetCode]99. Recover Binary Search Tree 解题报告(Python) 标签(空格分隔): LeetCode 题目地址:https://leetcode.com/p ...
- [源码解析] PyTorch 分布式之弹性训练(5)---Rendezvous 引擎
[源码解析] PyTorch 分布式之弹性训练(5)---Rendezvous 引擎 目录 [源码解析] PyTorch 分布式之弹性训练(5)---Rendezvous 引擎 0x00 摘要 0x0 ...
- RabbitMQ学习笔记四:RabbitMQ命令(附疑难问题解决)
本来今天是想做RabbitMQ之优先级队列的,但是,在RabbitMQ Server创建queue时,增加优先级的最大值,头脑发热写了9999999,导致电脑内存直接飙到100%,只能重启电脑,并卸载 ...
- Linux环境下Django App部署到XAMPP上
Django App部署到XAMPP上 准备工作 首先一定要保证自己的代码在本地可以运行! 同时在服务器上把需要的库,什么数据库之类的都装好! 源码安装mod_wsgi 从mod_wsgi的gitgu ...