编译安装基于fastcgi模式的多虚拟主机的wordpress和discuz的LAMP架构
一、环境准备
两台主机:
- httpd+php(fastcgi模式)
- mariadb 服务器
软件版本:
- mariadb-10.2.40-linux-x86_64.tar.gz
- apr-1.7.0.tar.bz2
- apr-util-1.6.1.tar.bz2
- httpd-2.4.46.tar.gz
- php-7.4.27.tar.gz
- latest-zh_CN.tar.gz
- Discuz_X3.4_SC_UTF8_20210926.zip
二、进制安装 mariadb
1、准备二进制包
# tar xvf  mariadb-10.2.40-linux-x86_64.tar.gz -C /usr/local/

# cd /usr/local

# 把解压后的数据库目录通过软链接到usr/local下统一管理

# ln -sv mariadb-10.2.40-linux-x86_64/ mysql

‘mysql’ -> ‘mariadb-10.2.40-linux-x86_64/’
2、安装依赖包,创建用户
# yum install libaio -y

# useradd -r -s /sbin/nologin -d /data/mysql -u 306 mysql

# mkdir -pv /data/mysql

mkdir: created directory ‘/data’

mkdir: created directory ‘/data/mysql’
3、修改mysql目录权限,以 root 身份安装 MariaDB
# chown -R root.root /usr/local/mysql/*

# ll /usr/local/mysql/*

drwxr-xr-x  2 root root  4096 Jul 27 15:08 /usr/local/mysql/bin

-rw-r--r--  1 root root 17987 Aug  2 17:40 /usr/local/mysql/COPYING

-rw-r--r--  1 root root  2093 Aug  2 17:40 /usr/local/mysql/CREDITS

drwxrwxr-x  3 root root    18 Aug  4 06:06 /usr/local/mysql/data

drwxrwxr-x  3 root root    19 Aug  4 06:06 /usr/local/mysql/include

-rw-r--r--  1 root root  8694 Aug  2 17:40 /usr/local/mysql/INSTALL-BINARY

drwxr-xr-x  5 root root   335 Jul 27 15:08 /usr/local/mysql/lib

drwxrwxr-x  4 root root    30 Aug  4 06:06 /usr/local/mysql/man

drwxrwxr-x 11 root root  4096 Aug  4 06:06 /usr/local/mysql/mysql-test

-rw-r--r--  1 root root  2440 Aug  2 17:40 /usr/local/mysql/README.md

-rw-r--r--  1 root root 19477 Aug  2 17:40 /usr/local/mysql/README-wsrep

drwxrwxr-x  2 root root    30 Aug  4 06:06 /usr/local/mysql/scripts

drwxrwxr-x 31 root root  4096 Aug  4 06:06 /usr/local/mysql/share

drwxrwxr-x  4 root root  4096 Aug  4 06:06 /usr/local/mysql/sql-bench

drwxrwxr-x  3 root root   275 Aug  4 06:06 /usr/local/mysql/support-files

-rw-r--r--  1 root root 86263 Aug  2 17:40 /usr/local/mysql/THIRDPARTY
4、运行可执行脚本,生成数据库文件
# /usr/local/mysql/scripts/mysql_install_db --datadir=/data/mysql --user=mysql
5、修改配置文件
# cp /usr/local/mysql/support-files/my-huge.cnf /etc/my.cnf

# vi /etc/my.cnf

[mysqld]

datadir=/data/mysql		#添加这两行

skip_name_resolve=ON
6、将服务设置为开机自启动
# cp /usr/local/mysql/support-files/mysql.server /etc/init.d/mysqld

# chkconfig --add mysqld && chkconfig mysqld on && chkconfig --list

Note: This output shows SysV services only and does not include native

      systemd services. SysV configuration data might be overridden by native

      systemd configuration.

      If you want to list systemd services use 'systemctl list-unit-files'.

      To see services enabled on particular target use

      'systemctl list-dependencies [target]'.

mysqld         	0:off	1:off	2:on	3:on	4:on	5:on	6:off

netconsole     	0:off	1:off	2:off	3:off	4:off	5:off	6:off

network        	0:off	1:off	2:on	3:on	4:on	5:on	6:off
7、添加PATH变量
# echo 'PATH=/usr/local/mysql/bin:$PATH' > /etc/profile.d/mysql.sh

# . /etc/profile.d/mysql.sh
8、启动服务
# service mysqld start

Starting mysqld (via systemctl):                           [  OK  ]
9、为wordprss和discuz应用准备数据库和用户帐号
mysql> create database wordpress;

Query OK, 1 row affected (0.00 sec)

mysql> create database discuz;

Query OK, 1 row affected (0.00 sec)

mysql> grant all on wordpress.* to wordpress@'10.0.0.%' identified by "wppass";

Query OK, 0 rows affected (0.00 sec)

mysql> grant all on discuz.* to discuz@'10.0.0.%' identified by 'dispass';

Query OK, 0 rows affected (0.00 sec)
三、编译安装 httpd 2.4
1、安装相关依赖包
yum install gcc pcre-devel openssl-devel expat-devel -y
2、解压源码包
# wget -O /usr/local/src/ https://mirror.bit.edu.cn/apache//apr/apr-1.7.0.tar.bz2

# wget -O /usr/local/src/ https://mirror.bit.edu.cn/apache//apr/apr-util-1.6.1.tar.gz

# tar xvf apr-1.7.0.tar.bz2

# tar xvf apr-util-1.6.1.tar.bz2

# tar xvf httpd-2.4.46.tar.gz

# 合并三个目录在一起

# mv apr-1.7.0 httpd-2.4.46/srclib/apr

# mv apr-util-1.6.1 httpd-2.4.46/srclib/apr-util
3、开始编译
# cd httpd-2.4.46/

./configure \

--prefix=/apps/httpd \

--enable-so \

--enable-ssl \

--enable-cgi \

--enable-rewrite \

--with-zlib \

--with-pcre \

--with-included-apr \

--enable-modules=most \

--enable-mpms-shared=all \

--with-mpm=event

# make -j 4 && make install
4、准备PATH变量
# echo 'PATH=/apps/httpd/bin:$PATH' >/etc/profile.d/httpd.sh

# . /etc/profile.d/httpd.sh
5、创建和配置用户和组
# useradd -s /sbin/nologin -r -u 88 apache

# vi /apps/httpd/conf/httpd.conf +172

User apache    #改成apache

Group apache   #改成apache
6、设置开机启动
# vi /usr/lib/systemd/system/httpd.service

[Unit]

Description=The Apache HTTP Server

After=network.target remote-fs.target nss-lookup.target

Documentation=man:httpd(8)

Documentation=man:apachectl(8)

[Service]

Type=forking

#EnvironmentFile=/etc/sysconfig/httpd

ExecStart=/apps/httpd/bin/apachectl start

#ExecStart=/apps/httpd/bin/httpd $OPTIONS -k start

ExecReload=/apps/httpd/bin/apachectl graceful

#ExecReload=/apps/httpd/bin/httpd $OPTIONS -k graceful

ExecStop=/apps/httpd/bin/apachectl stop

KillSignal=SIGCONT

PrivateTmp=true

[Install]

WantedBy=multi-user.targe
7、启动服务
# apachectl start

AH00558: httpd: Could not reliably determine the server's fully qualified domain name, using fe80::20c:29ff:fec4:3eef%eth0. Set the 'ServerName' directive globally to suppress this message
四、编译安装 fastcgi 方式的 php 7.4
1、安装依赖包
yum -y install gcc libxml2-devel bzip2-devel libmcrypt-devel sqlite-devel oniguruma-devel
2、解压源码包开始编译
# tar xf php-7.4.27.tar.gz

# cd php-7.4.27/

# ./configure \

--prefix=/apps/php \

--enable-mysqlnd \

--with-mysqli=mysqlnd \

--with-pdo-mysql=mysqlnd \

--with-openssl \

--with-zlib \

--with-config-file-path=/etc \

--with-config-file-scan-dir=/etc/php.d \

--enable-mbstring \

--enable-xml \

--enable-sockets \

--enable-fpm \

--enable-maintainer-zts \

--disable-fileinfo

# make -j 4 && make install
3、添加PATH变量
# echo 'PATH=/apps/php/bin:/apps/httpd/bin:$PATH' > /etc/profile.d/php.sh

# . /etc/profile.d/php.sh

# php --version

PHP 7.4.27 (cli) (built: Dec 24 2021 23:40:16) ( ZTS )

Copyright (c) The PHP Group

Zend Engine v3.4.0, Copyright (c) Zend Technologies
五、修改php配置
1、拷贝模板文件
# cp php.ini-production /etc/php.ini

# cp sapi/fpm/php-fpm.service /usr/lib/systemd/system/

# cd /apps/php/etc

# cp php-fpm.conf.default  php-fpm.conf

# cd php-fpm.d/

# cp www.conf.default  www.conf

# vi /apps/php/etc/php-fpm.d/www.conf

user apache  #修改进程所有者

group apache

pm.status_path = /fpm_status	#开启状态页面status

ping.path = /ping	#开启ping模块
2、启用opcache加速
# mkdir /etc/php.d/

# vi /etc/php.d/opcache.ini

[opcache]

zend_extension=opcache.so

opcache.enable=1
3、启动PHP
# systemctl daemon-reload

# systemctl enable --now php-fpm.service

# ss -ntl	#监听端口127.0.0.1:9000打开

State       Recv-Q Send-Q Local Address:Port                Peer Address:Port

LISTEN      0      128                *:111                            *:*

LISTEN      0      128                *:22                             *:*

LISTEN      0      100        127.0.0.1:25                             *:*

LISTEN      0      128        127.0.0.1:9000                           *:*

LISTEN      0      128             [::]:111                         [::]:*

LISTEN      0      128             [::]:80                          [::]:*

LISTEN      0      128             [::]:22                          [::]:*

LISTEN      0      100            [::1]:25                          [::]:*
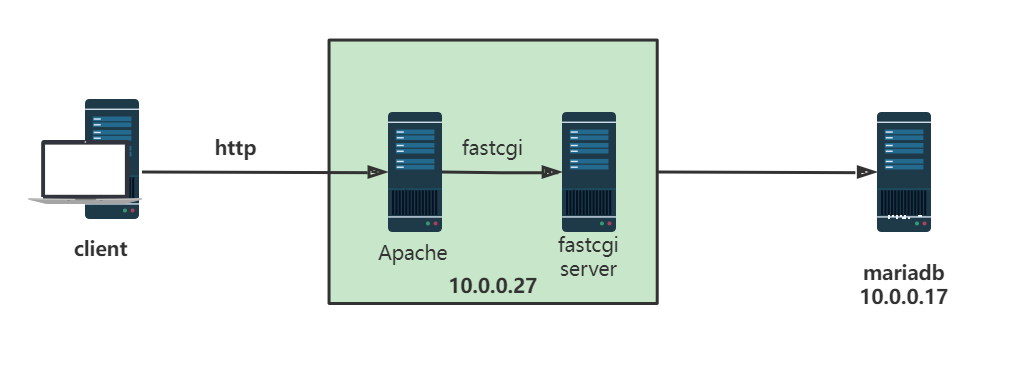
六、http配置文件修改
[root@httpd-fastcgi ~]# vi /apps/httpd/conf/httpd.conf

#开启反向代理模块

LoadModule proxy_module modules/mod_proxy.so

LoadModule proxy_fcgi_module modules/mod_proxy_fcgi.so

#添加index为主页面

<IfModule dir_module>

DirectoryIndex index.php index.html

</IfModule>

AddType application/x-httpd-php .php

ProxyRequests Off

# 实现第一个虚拟主机:wordpress

<virtualhost *:80>

servername blog.magedu.org

documentroot /data/wordpress

<directory /data/wordpress>

require all granted

</directory>

ProxyPassMatch ^/(.*\.php)$ fcgi://127.0.0.1:9000/data/wordpress/$1

#实现status和ping页面

ProxyPassMatch ^/(fpm_status|ping)$ fcgi://127.0.0.1:9000/$1

CustomLog "logs/access_wordpress_log" common

</virtualhost>

#实现第二个虚拟主机:discuz

<virtualhost *:80>

servername forum.magedu.org

documentroot /data/discuz

<directory /data/discuz/>

require all granted

</directory>

ProxyPassMatch ^/(.*\.php)$ fcgi://127.0.0.1:9000/data/discuz/$1

CustomLog "logs/access_discuz_log" common

</virtualhost>
七、部署wordpress
1、安装wordpress
# wget https://cn.wordpress.org/latest-zh_CN.tar.gz

# tar xvf latest-zh_CN.tar.gz

# mv wordpress/ /data

# setfacl -R -m u:apache:rwx /data/wordpress/
2、 web界面访问wordpress
在Windows客户端打开hosts文件,添加域名解析:
C:\Windows\System32\drivers\etc\hosts
10.0.0.27 forum.magedu.org blog.magedu.org
打开浏览器输入网址blog.magedu.org访问
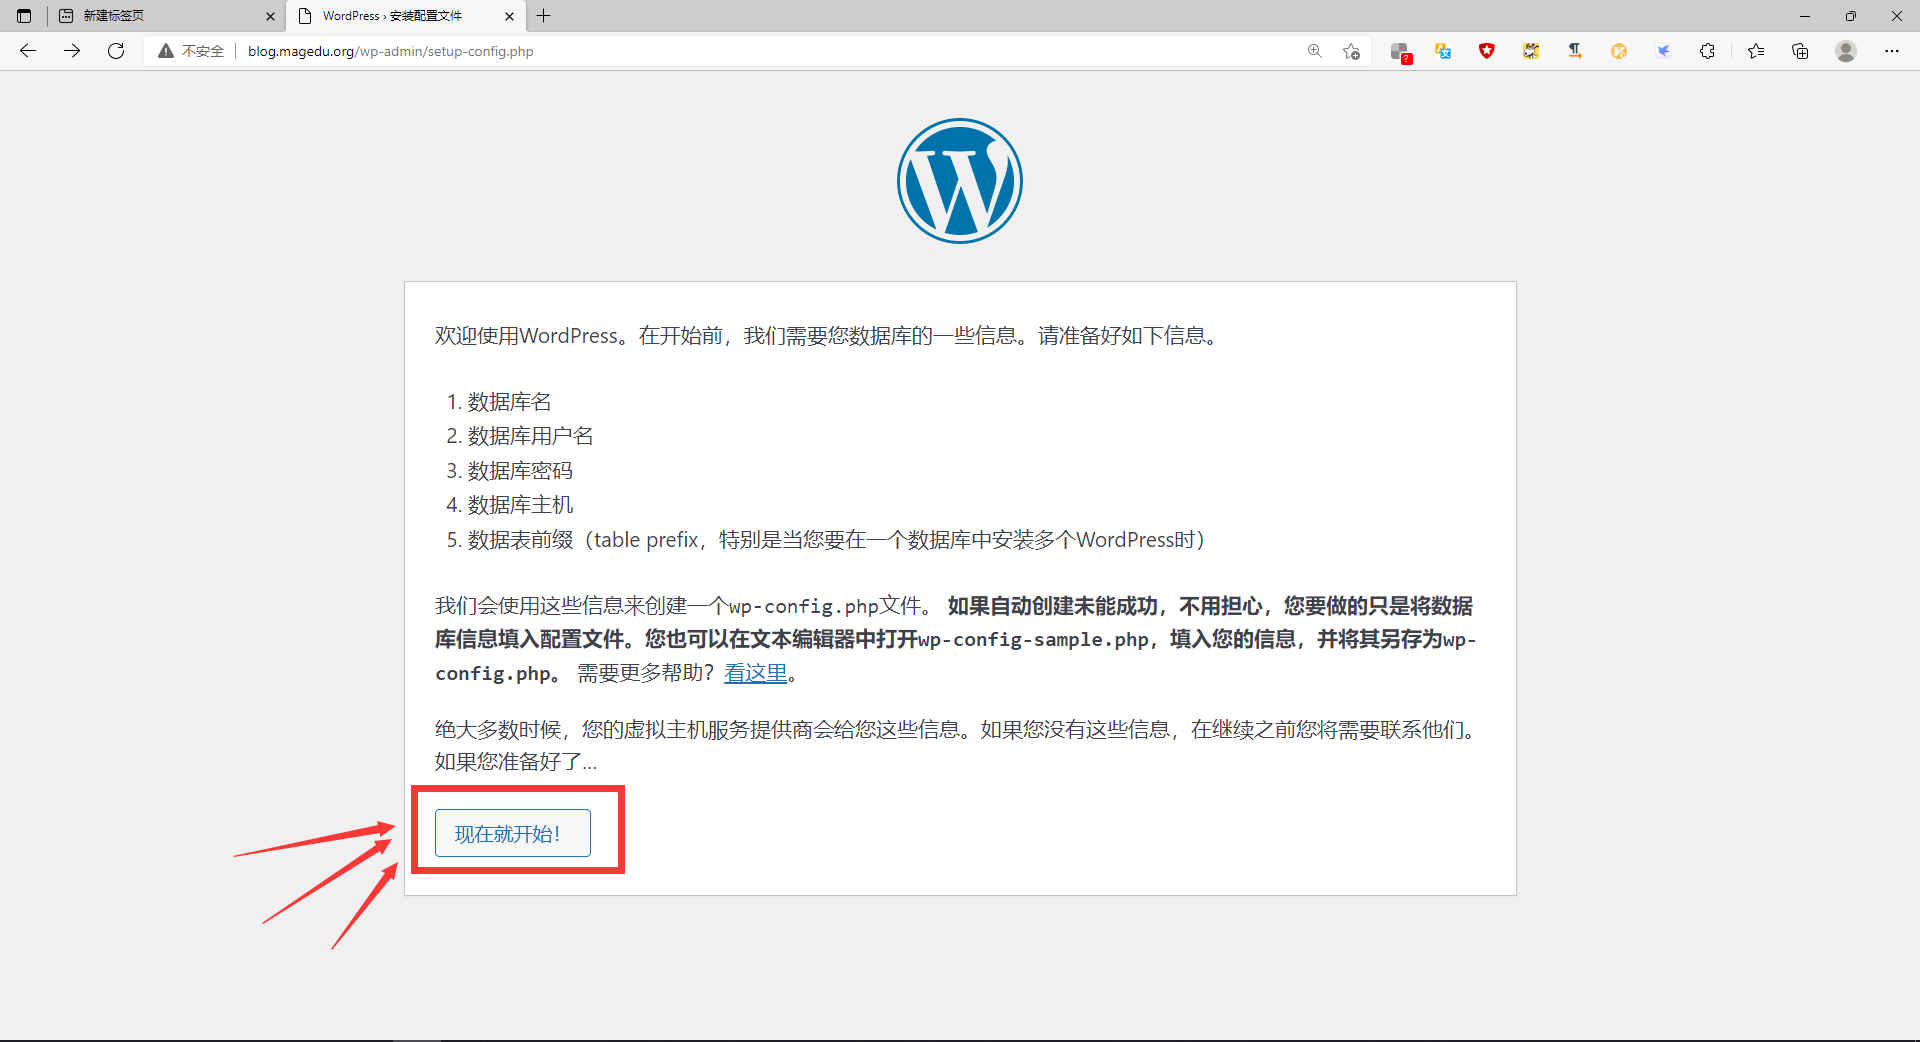
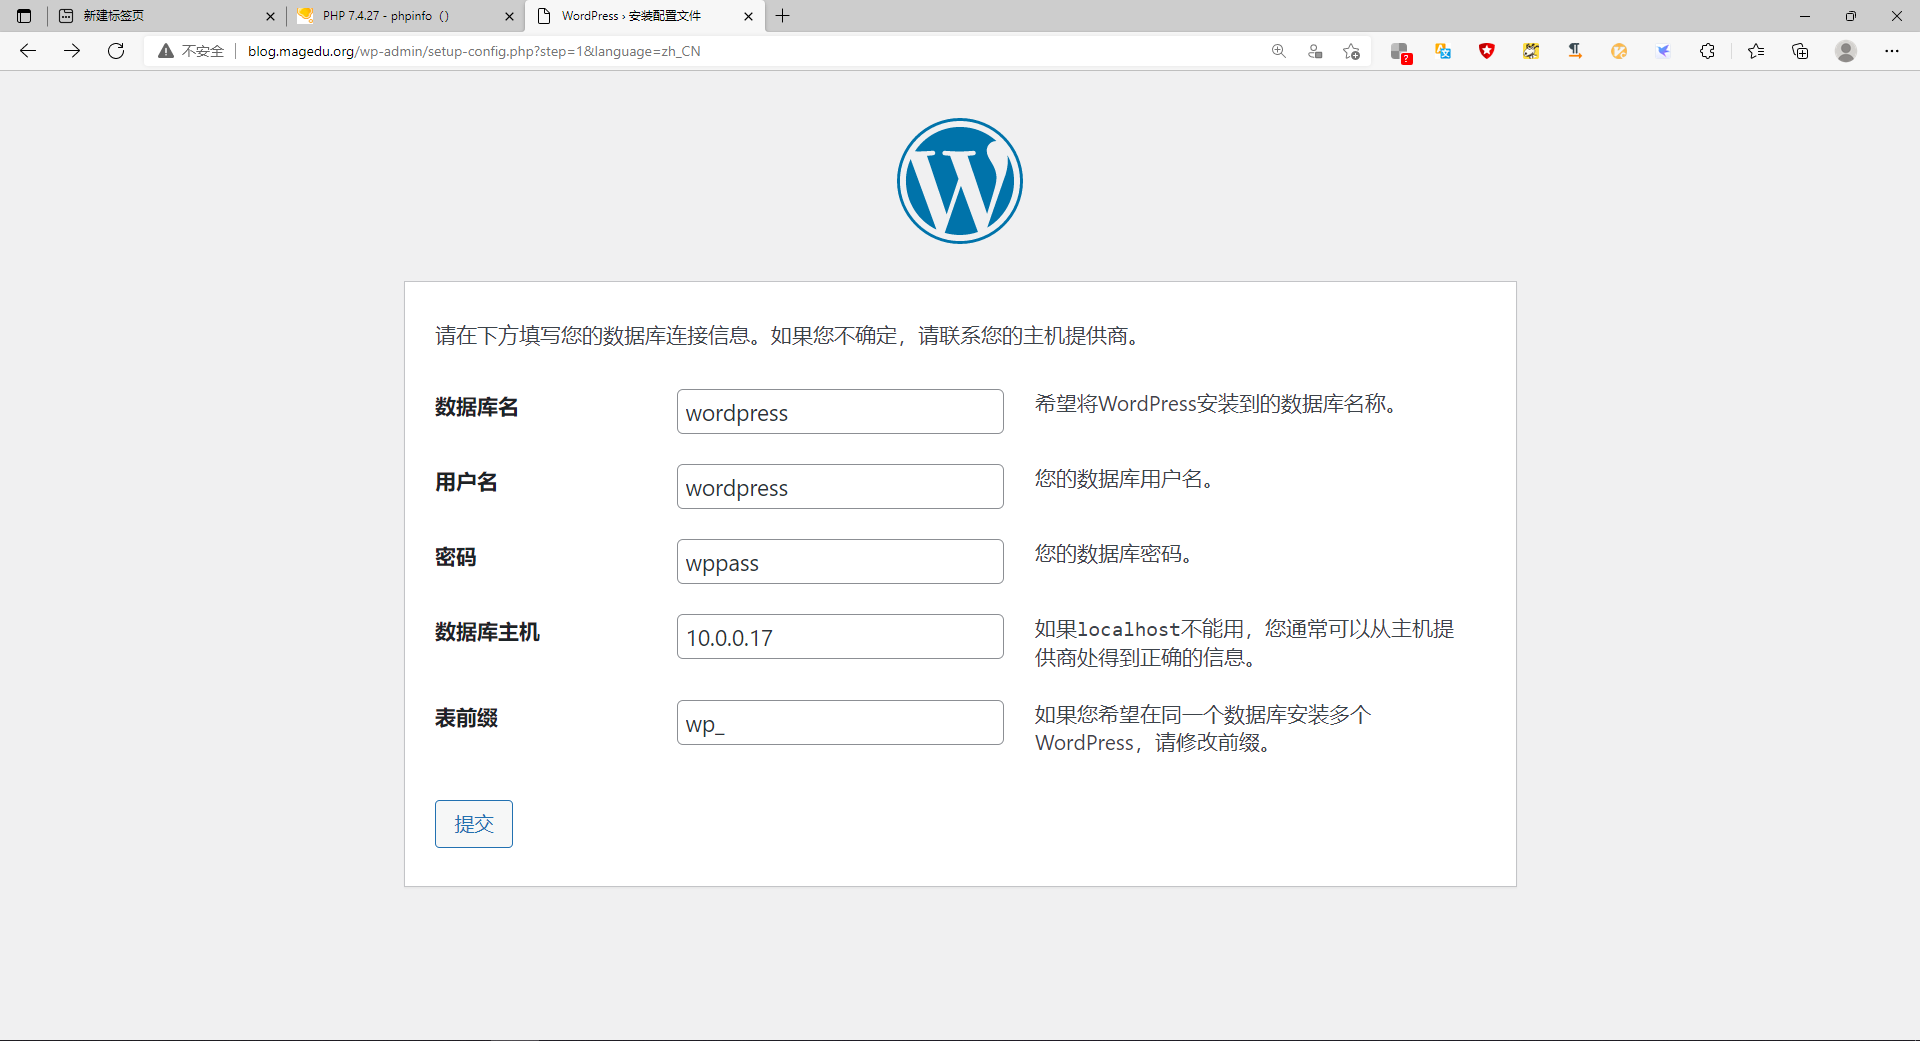


已经可以使用wordpress搭建博客了
八、部署discuz!
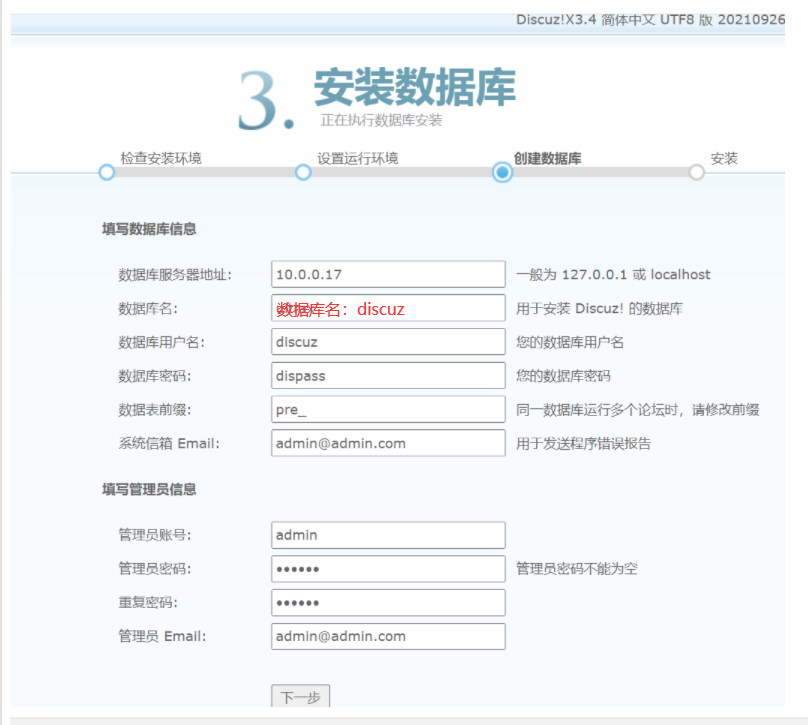
1、安装discuz!
# mkdir /data/discuz

# unzip Discuz_X3.4_SC_UTF8_20210926.zip

# mv upload/* /data/discuz

# setfacl -R -m u:apache:rwx /data/discuz/
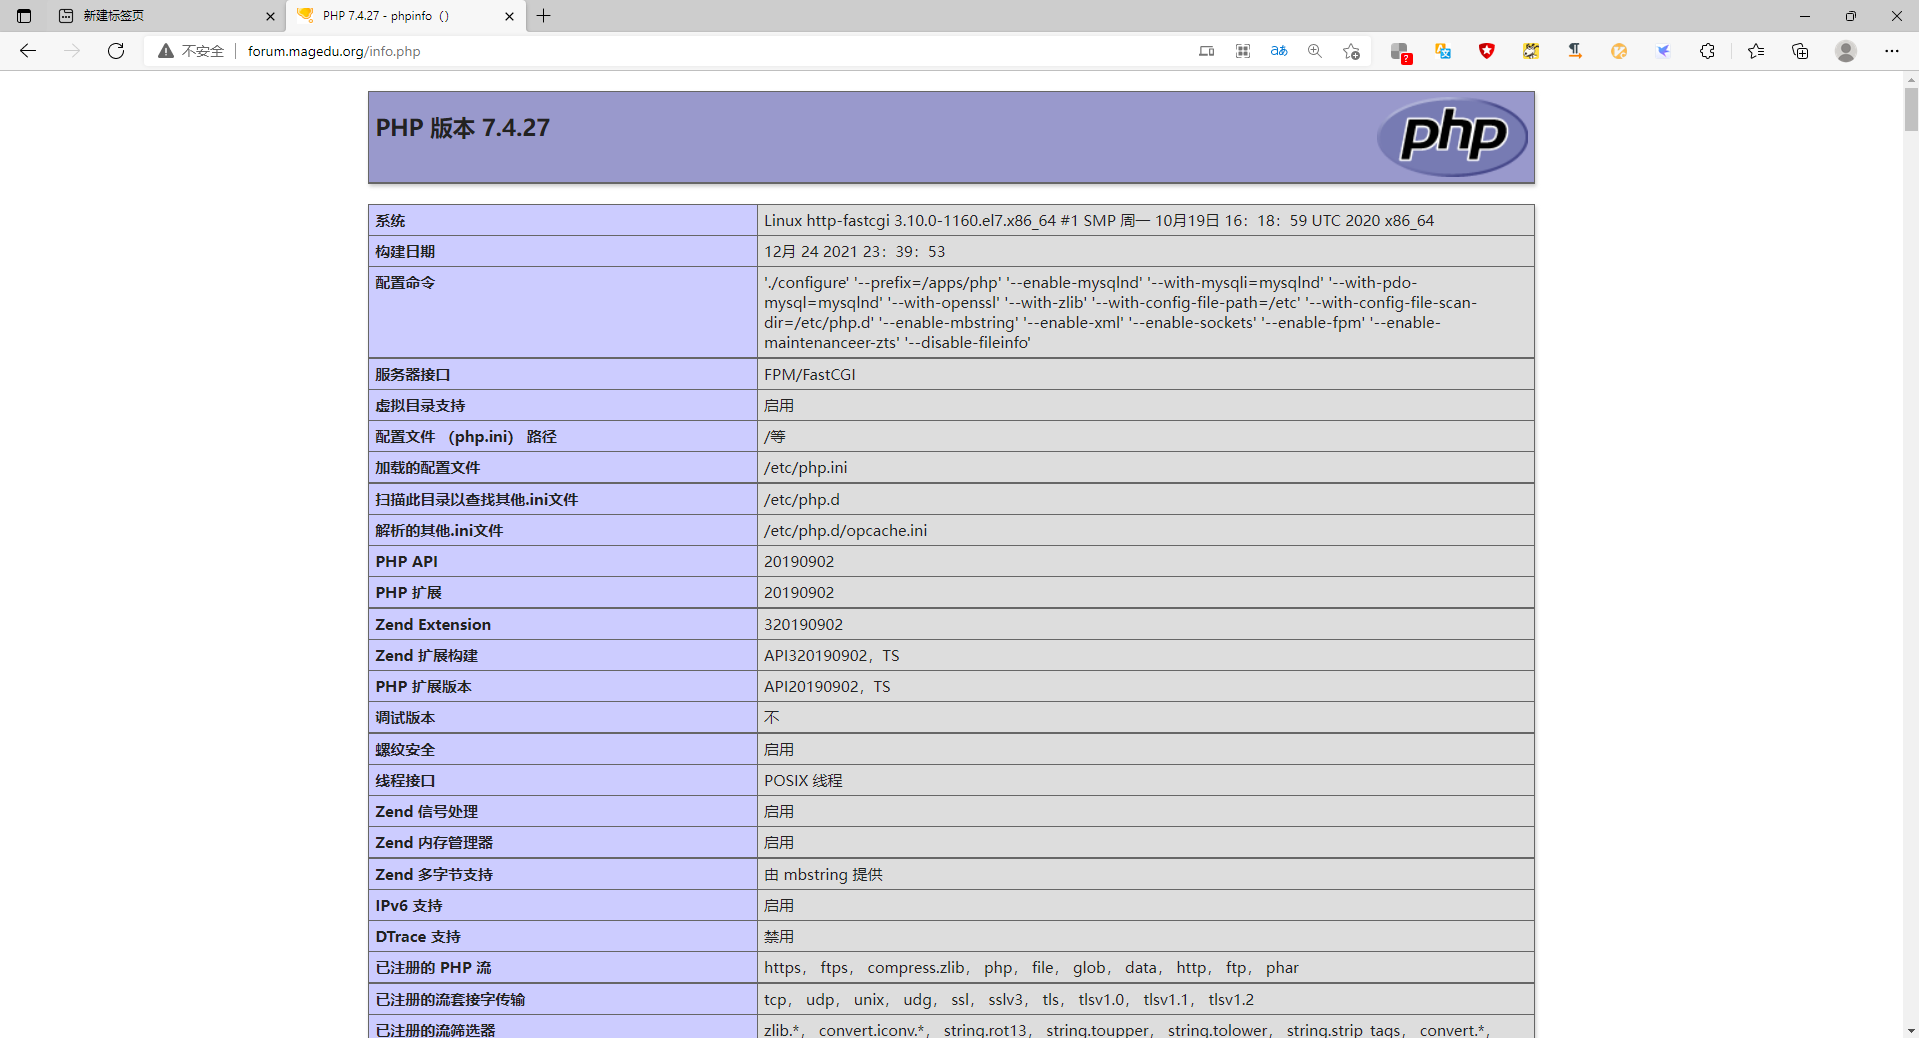
2、 web界面测试discuz
# cat /data/discuz/info.php

  <?php phpinfo() ?>
在浏览器输入地址打开forum.magedu.org/info.php
在浏览器输入地址打开forum.magedu.org/install进入安装向导

编译安装基于fastcgi模式的多虚拟主机的wordpress和discuz的LAMP架构的更多相关文章
- 编译安装基于 fastcgi 模式的多虚拟主机的wordpress和discuz的LAMP架构
目录 实现CentOS 7 编译安装基于 fastcgi 模式的多虚拟主机的wordpress和discuz的LAMP架构 准备环境: 准备软件版本: 主机名修改用以区分 数据库服务器 实现数据库二进 ...
- nginx篇最初级用法之三种虚拟主机基于域名\基于端口\基于IP地址端口的虚拟主机
在nginx中虚拟主机的类型与apache一样也有三种 1.基于域名的虚拟主机 2.基于端口的虚拟主机 3.基于IP地址端口的虚拟主机 在nginx配置文件中每一个server为一个虚拟主机如果需要多 ...
- 源码编译安装LAMP环境及配置基于域名访问的多虚拟主机
实验环境及软件版本: CentOS版本: 6.6(2.6.32.-504.el6.x86_64) apache版本: apache2.2.27 mysql版本: Mysql-5.6.23 php版本 ...
- 源码编译安装LNMP环境及配置基于域名访问的多虚拟主机
实验环境及软件版本: CentOS版本: 6.6(2.6.32.-504.el6.x86_64) nginx版本: nginx-1.6.2 mysql版本: Mysql-5.6.23 php版本: ...
- 编译安装基于nginx与lua的高性能web平台-openresty
1.首先编译安装nginx(不多说) 2.开始安装openresty cd /usr/local/src wget https://openresty.org/download/openresty-1 ...
- centos 6.5 安装 tomcat8 及性能优化_虚拟主机
Tomcat服务器是一个免费的开放源代码的Web应用服务器,属于轻量级应用服务器,在中小型系统和并发访问用户不是很多的场合下被普遍使用,是开发和调试JSP程序的首选. Tomcat和Nginx.Apa ...
- nginx笔记 安装nginx 配置 反向代理 多虚拟主机
1,检测linux上是否 通过yum安装了nginxrpm -qi nginx 2.安装nginx之前的依赖包yum install gcc patch libffi-devel python- ...
- Nginx网络架构实战学习笔记(一):Nginx简介、安装、信号控制、nginx虚拟主机配置、日志管理、location 语法、Rewrite语法详解
文章目录 nginx简介 nginx安装 nginx信号控制 nginx虚拟主机配置 日志管理 location 语法 精准匹配的一般匹配 正则匹配 总结 Rewrite语法详解 nginx简介 Ng ...
- centos7 安装 iRedmail 后 给nginx添加虚拟主机
iRedmail安装参考官方文档和 https://ywnz.com/linuxyffq/4563.html 准备工作 更新操作系统 yum update -y 安装必要组件 yum install ...
随机推荐
- Java如何打好牢固的基础?
如果纯粹是为了学Java,那么不建议阅读本文,因为本文不是从理论和教科书的角度讲述如何打好java基础,而是会从"快速用java挣钱"这个角度,讲边学.边做项目和边提升的方法. 在 ...
- Microsoft HoloLens 开发(1): 搭建 HoloLens 开发环境
1.硬件配置 64位 Windows 10 专业版, 企业版, or 教育版 (注: 家庭版不支持 Hyper-V 或者 HoloLens emulator) 64位 CPU 4核CPU (或者大于4 ...
- linux修改默认的SSH远程端口22
1.编辑sshd_config文件 [root@localhost ~]# vim /etc/ssh/sshd_config 搜索 #Port 22行,删除开头的 # 字符,然后将其替换为要使用的端 ...
- Word文档学习小练习链接
1. < Word2010初学> https://www.toutiao.com/i6487370439910752782/ 2. <Word2010格式化可爱的家乡> htt ...
- Keil MDK STM32系列(八) STM32F4基于HAL的PWM和定时器输出音频
Keil MDK STM32系列 Keil MDK STM32系列(一) 基于标准外设库SPL的STM32F103开发 Keil MDK STM32系列(二) 基于标准外设库SPL的STM32F401 ...
- RHCSA 第八天
1.查询ip的几种方式: ip, ifconfig, nmcli,nmtui 2.nmcli命令使用: a.在ens160网卡上新建连接static_con,并配置静态ip b.在ens160网卡上新 ...
- 问题记录——BigDecimal保留两位小数及格式化成百分比
1.函数总结 BigDecimal.setScale()方法用于格式化小数点 setScale(1)表示保留一位小数,默认用四舍五入方式 setScale(1,BigDecimal.ROUND_DOW ...
- BAT经典面试题之redis的热KEY问题怎么解决
引言 讲了几天的数据库系列的文章,大家一定看烦了,其实还没讲完...(以下省略一万字).今天我们换换口味,来写redis方面的内容,谈谈热key问题如何解决.其实热key问题说来也很简单,就是瞬间有几 ...
- go面试题-基础类
go基础类 1. go优势 * 天生支持并发,性能高 * 单一的标准代码格式,比其它语言更具可读性 * 自动垃圾收集比java和python更有效,因为它与程序同时执行 go数据类型 int stri ...
- Go 结构体方法
#### Go 结构体方法本来今天有些事情忙的不准备更新内容了,后来提前完成了, 所以还是要更新了; 毕竟坚持本就是一件不容易的事情!加油,相信不管是大家还是我,都有一些事情想要做,那就坚持吧,剩下的 ...