
jumpserver安装
一. 准备 Python3 和 Python 虚拟环境
1.1 安装依赖包
yum -y install wget sqlite-devel xz gcc automake zlib-devel openssl-devel epel-release git vim
1.2 编译安装
wget https://www.python.org/ftp/python/3.6.1/Python-3.6.1.tar.xz
tar xvf Python-3.6.1.tar.xz && cd Python-3.6.1
./configure && make && make install
1.3 建立 Python 虚拟环境
mkdir /software
cd /software
python3 -m venv py3
source /software/py3/bin/activate
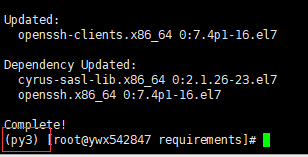
看到下面的提示符代表成功,以后运行 Jumpserver 都要先运行以上 source 命令,以下所有命令均在该虚拟环境中运行
(py3) [root@ywx542847 software]
如图 所示:

退出虚拟环境:deactivate
1.4 自动载入 Python 虚拟环境配置
此项仅为懒癌晚期的人员使用,防止运行 Jumpserver 时忘记载入 Python 虚拟环境导致程序无法运行。使用autoenv
cd /software
git clone https://github.com/kennethreitz/autoenv.git
echo 'source /software/autoenv/activate.sh' >> ~/.bashrc
source ~/.bashrc
(如果失败,可以去bashrc看一下目录地址是否正确,不正确可以手动修改一下)
配合jumpserver的.env环境
二. 安装 Jumpserver
cd /software
git clone https://github.com/jumpserver/jumpserver.git && cd jumpserver && git checkout master
echo "source /software/py3/bin/activate" > /software/jumpserver/.env
cd /software/jumpserver/requirements/
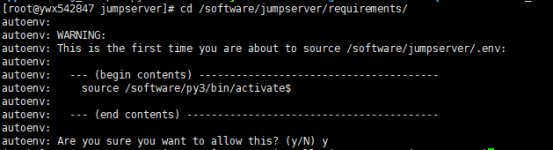
在虚拟环境中安装依赖包
yum -y install $(cat rpm_requirements.txt)
2.1安装 Python 库依赖
pip install -r requirements.txt -i https://pypi.python.org/simple
2.2 安装 Redis, Jumpserver 使用 Redis 做 cache 和 celery broke
yum -y install redis
systemctl enable redis
systemctl start redis
2.3 安装 MySQL
yum -y install mariadb mariadb-devel mariadb-server
systemctl enable mariadb
systemctl start mariadb
2.4 创建数据库 Jumpserver 并授权
$ mysql
> create database jumpserver default charset 'utf8';
> grant all on jumpserver.* to 'jumpserver'@'127.0.0.1' identified by 'weakPassword';
> flush privileges;
2.5 修改 Jumpserver 配置文件
cd /software/jumpserver
cp config_example.py config.py
vim config.py
注意: 配置文件是 Python 格式,不要用 TAB,而要用空格
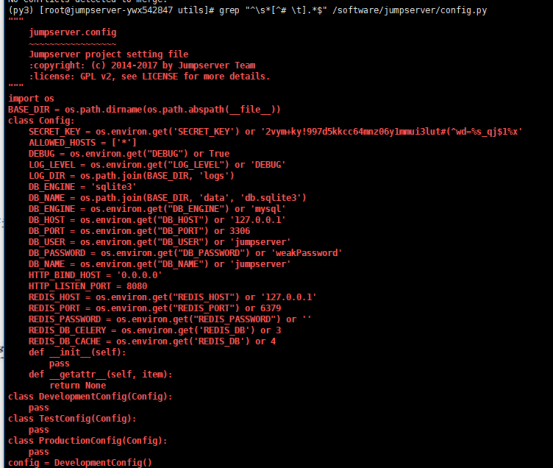
2.6 生成数据库表结构和初始化数据
cd /software/jumpserver/utils
bash make_migrations.sh
2.7 运行 Jumpserver
cd /software/jumpserver
./jms start all # 后台运行使用 -d 参数./jms start all -d
# 新版本更新了运行脚本,使用方式./jms start|stop|status|restart all 后台运行请添加 -d 参数
三. 安装 SSH Server 和 WebSocket Server: Coco
3.1 下载或 Clone 项目
cd /software
source /software/py3/bin/activate
git clone https://github.com/jumpserver/coco.git && cd coco && git checkout master
echo "source /software/py3/bin/activate" > /software/coco/.env
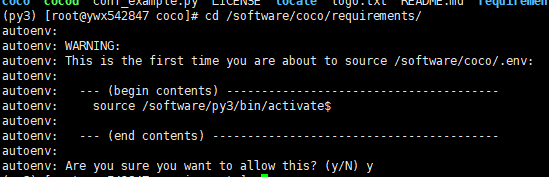
首次进入 coco 文件夹会有提示,按 y 即可
# Are you sure you want to allow this? (y/N) y
3.2 安装依赖
cd /software/coco/requirements
yum -y install $(cat rpm_requirements.txt)
pip install -r requirements.txt -i https://pypi.python.org/simple
3.3 修改配置文件并运行
cd /software/coco
cp conf_example.py conf.py
vim conf.py
注意: 配置文件是 Python 格式,不要用 TAB,而要用空格
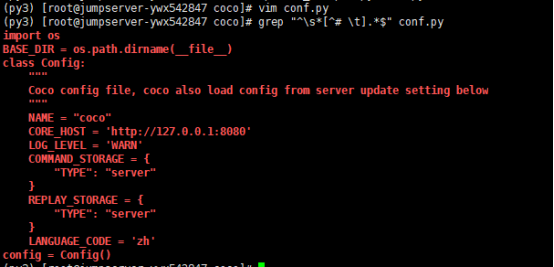
./cocod start # 后台运行使用 -d 参数./cocod start -d
# 新版本更新了运行脚本,使用方式./cocod start|stop|status|restart 后台运行请添加 -d 参数
四. 安装 Web Terminal 前端: Luna
4.1 解压 Luna
cd /software
wget https://github.com/jumpserver/luna/releases/download/1.4.1/luna.tar.gz
tar xvf luna.tar.gz
chown -R root:root luna
五. 安装 Windows 支持组件(如果不需要管理 windows 资产,可以直接跳过这一步)
$ rpm --import http://li.nux.ro/download/nux/RPM-GPG-KEY-nux.ro
$ rpm -Uvh http://li.nux.ro/download/nux/dextop/el7/x86_64/nux-dextop-release-0-5.el7.nux.noarch.rpm
$ yum -y localinstall --nogpgcheck https://download1.rpmfusion.org/free/el/rpmfusion-free-release-7.noarch.rpm https://download1.rpmfusion.org/nonfree/el/rpmfusion-nonfree-release-7.noarch.rpm
$ yum install -y java-1.8.0-openjdk libtool
$ yum install -y cairo-devel libjpeg-turbo-devel libpng-devel uuid-devel
$ yum install -y ffmpeg-devel freerdp-devel pango-devel libssh2-devel libtelnet-devel libvncserver-devel pulseaudio-libs-devel openssl-devel libvorbis-devel libwebp-devel ghostscript
$ mkdir /usr/local/lib/freerdp/
$ ln -s /usr/local/lib/freerdp /usr/lib64/freerdp
5.2 编译安装 guacamole 服务
cd /software
cd /software/docker-guacamole/
tar -zxvf guacamole-server-0.9.14.tar.gz
autoreconf -fi
./configure --with-init-dir=/etc/init.d
make && make install
cd ..
rm -rf guacamole-server-0.9.14
ldconfig
mkdir -p /software/config/guacamole /software/config/guacamole/lib /software/config/guacamole/extensions # 创建 guacamole 目录
$ cp /software/docker-guacamole/guacamole-auth-jumpserver-0.9.14.jar /config/guacamole/extensions/guacamole-auth-jumpserver-0.9.14.jar
$ cp /software/docker-guacamole/root/app/guacamole/guacamole.properties /config/guacamole/ # guacamole 配置文件
$ cd /software/config
$ wget http://mirror.bit.edu.cn/apache/tomcat/tomcat-8/v8.5.35/bin/apache-tomcat-8.5.35.tar.gz
$ tar xf apache-tomcat-8.5.35.tar.gz
$ rm -rf apache-tomcat-8.5.35.tar.gz
$ mv apache-tomcat-8.5.35 tomcat8
$ rm -rf /config/tomcat8/webapps/*
$ cp /software/docker-guacamole/guacamole-0.9.14.war /software/config/tomcat8/webapps/ROOT.war # guacamole client
$ sed -i 's/Connector port="8080"/Connector port="8081"/g' `grep 'Connector port="8080"' -rl /software/config/tomcat8/conf/server.xml` # 修改默认端口为 8081
$ sed -i 's/FINE/WARNING/g' `grep 'FINE' -rl /software/config/tomcat8/conf/logging.properties` # 修改 log 等级为 WARNING
$ cd /software/config
$ wget https://github.com/ibuler/ssh-forward/releases/download/v0.0.5/linux-amd64.tar.gz
$ tar xf linux-amd64.tar.gz -C /bin/
$ chmod +x /bin/ssh-forward
5.4 配置环境变量
$ export JUMPSERVER_SERVER=http://127.0.0.1:8080 # http://127.0.0.1:8080 指 jumpserver 访问地址
$ echo "export JUMPSERVER_SERVER=http://127.0.0.1:8080" >> ~/.bashrc
$ export JUMPSERVER_KEY_DIR=/software/config/guacamole/keys
$ echo "export JUMPSERVER_KEY_DIR=/software/config/guacamole/keys" >> ~/.bashrc
$ export GUACAMOLE_HOME=/software/config/guacamole
$ echo "export GUACAMOLE_HOME=/software/config/guacamole" >> ~/.bashrc
5.5 启动 Guacamole
$ /etc/init.d/guacd start
$ sh /software/config/tomcat8/bin/startup.sh
六. 配置 Nginx 整合各组件
$ yum -y install nginx
$ vi /etc/nginx/nginx.conf
... 原内容include /etc/nginx/conf.d/*.conf;
# 注释掉整个server {}# server {
# listen 80 default_server;
# listen [::]:80 default_server;
# server_name _;
# root /usr/share/nginx/html;
# Load configuration files for the default server block.
# include /etc/nginx/default.d/*.conf;
# location / {
# }
# error_page 404 /404.html;
# location = /40x.html {
# }
# error_page 500 502 503 504 /50x.html;
# location = /50x.html {
# }# }... 原内容
6.2 准备配置文件 修改 /etc/nginx/conf.d/jumpserver.conf
$ vi /etc/nginx/conf.d/jumpserver.conf# 注意注释 nginx.conf 里面的 server {} 内容 ,CentOS 6 需要修改文件 /etc/nginx/cond.f/default.conf
server {
listen 80; # 代理端口,以后将通过此端口进行访问,不再通过8080端口
server_name demo.jumpserver.org; # 修改成你的域名
client_max_body_size 100m; # 录像及文件上传大小限制
location /luna/ {
try_files $uri / /index.html;
alias /software/luna/; # luna 路径,如果修改安装目录,此处需要修改
}
location /media/ {
add_header Content-Encoding gzip;
root /software/jumpserver/data/; # 录像位置,如果修改安装目录,此处需要修改
}
location /static/ {
root /software/jumpserver/data/; # 静态资源,如果修改安装目录,此处需要修改
}
location /socket.io/ {
proxy_pass http://localhost:5000/socket.io/; # 如果coco安装在别的服务器,请填写它的ip
proxy_buffering off;
proxy_http_version 1.1;
proxy_set_header Upgrade $http_upgrade;
proxy_set_header Connection "upgrade";
proxy_set_header X-Real-IP $remote_addr;
proxy_set_header Host $host;
proxy_set_header X-Forwarded-For $proxy_add_x_forwarded_for;
access_log off;
}
location /coco/ {
proxy_pass http://localhost:5000/coco/; # 如果coco安装在别的服务器,请填写它的ip
proxy_set_header X-Real-IP $remote_addr;
proxy_set_header Host $host;
proxy_set_header X-Forwarded-For $proxy_add_x_forwarded_for;
access_log off;
}
location /guacamole/ {
proxy_pass http://localhost:8081/; # 如果guacamole安装在别的服务器,请填写它的ip
proxy_buffering off;
proxy_http_version 1.1;
proxy_set_header Upgrade $http_upgrade;
proxy_set_header Connection $http_connection;
proxy_set_header X-Real-IP $remote_addr;
proxy_set_header Host $host;
proxy_set_header X-Forwarded-For $proxy_add_x_forwarded_for;
access_log off;
}
location / {
proxy_pass http://localhost:8080; # 如果jumpserver安装在别的服务器,请填写它的ip
proxy_set_header X-Real-IP $remote_addr;
proxy_set_header Host $host;
proxy_set_header X-Forwarded-For $proxy_add_x_forwarded_for;
}}
6.3 运行 Nginx
nginx -t # 确保配置没有问题, 有问题请先解决
# CentOS 7
$ systemctl start nginx
$ systemctl enable nginx
# CentOS 6
$ service nginx start
$ chkconfig nginx on
6.4 开始使用 Jumpserver
检查应用是否已经正常运行
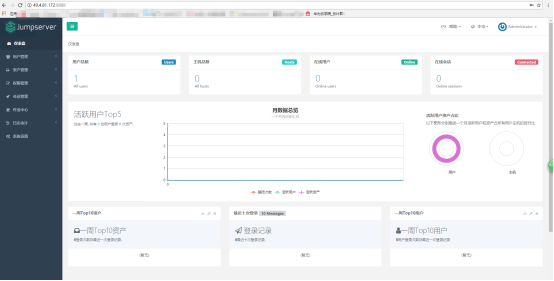
服务全部启动后,访问http://49.4.81.172:8888,访问nginx代理的端口,不要再通过8080端口访问
默认账号: admin 密码: admin
如果部署过程中没有接受应用的注册,需要到Jumpserver 会话管理-终端管理 接受 Coco Guacamole 等应用的注册。
测试连接
如果登录客户端是 macOS 或 Linux ,登录语法如下
$ ssh -p2222 admin@49.4.81.172
$ sftp -P2222 admin@49.4.81.172
密码: admin

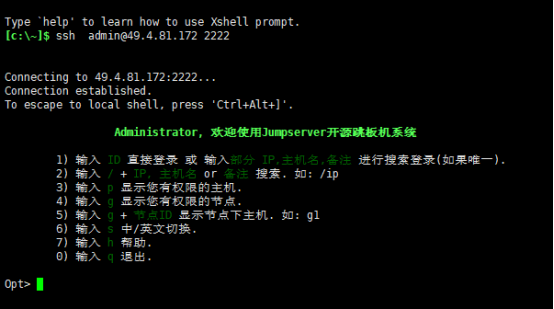
如果登录客户端是 Windows ,Xshell Terminal 登录语法如下
$ ssh admin@49.4.81.172 2222
$ sftp admin@49.4.81.172 2222
密码: admin
如果能登陆代表部署成功
# sftp默认上传的位置在资产的 /tmp 目录下# windows拖拽上传的位置在资产的 Guacamole RDP上的 G 目录下
jumpserver安装的更多相关文章
- jumpserver安装详解
环境说明 主机为最小 安装的centos6.9 x86_64. [root@m01 ~]# cat /etc/redhat-release CentOS release 6.9 (Final) [ro ...
- JumpServer 安装配置
环境 系统:Centos 7.4 阿里云ECS,单独绑定弹性公网IP 关闭selinux,防火墙对本机公司IP全开 #CentOS 7 $ setenforce 0 # 临时关闭,重启后失效 #修改字 ...
- jumpserver安装与部署
1.简介 Jumpserver 是一款由Python编写开源的跳板机(堡垒机)系统,实现了跳板机应有的功能.基于ssh协议来管理,客户端无需安装agent.特点: 完全开源,GPL授权 Pyth ...
- CentOS 7下JumpServer安装及配置
环境 系统 # cat /etc/redhat-release CentOS Linux release 7.4.1708 (Core) # uname -r 3.10.0-693.21.1.el7. ...
- Jumpserver安装过程
Jumpserver 安装过程 可参照此官方文档搭建: http://docs.jumpserver.org/zh/docs/step_by_step.html 其中,需注意处: # docker ...
- jumpserver安装和使用
jumpserver安装 #centos6 centos7都可用yum -y install git python-pip mysql-devel gcc automake autoconf pyth ...
- jumpserver安装及使用教程
我自己是jumpserver的新手,以下两个链接是比较好的教程: 安装教程:http://blog.csdn.net/wanglei_storage/article/details/51001810 ...
- jumpserver安装教程
centos7系统一步一步安装jumpserver 参照官方文档,查找了百度所有的文档,基本上都是按照官方的文档操作的 官方文档点我-> 安装jumpserver需注意: 1:网络环境要好,有的 ...
- jumpserver 安装详解
一,下载软件 下载前安装依赖软件 yum install -y epel-release yum -y install git python-pip my ...
随机推荐
- 索引堆(Index Heap)
首先我们先来看一个由普通数组构建的普通堆. 然后我们通过前面的方法对它进行堆化(heapify),将其构建为最大堆. 结果是这样的: 对于我们所关心的这个数组而言,数组中的元素位置发生了改变.正是因为 ...
- RPC框架学习总结
1.RPC是一种技术框架的称呼,不是某种具体协议,不局限于某种协议,RPC顾名思义就是远程过程调用,其核心思想是,RPC客户端调用远程服务器上的接口完成过程调用,远程服务器把结果返回. 2.RPC的最 ...
- (后端)项目中的错误之java中判断字符里面含有某些字符
数据库的数据出现了数据错误.找到原因是因为代码里面Spring的判断所导致的.其实就是判断字符里有01,走这里,有02,走那里,全是if,但是是类似indexOf的那种判断,偏偏有一个数据是0102, ...
- perfect-scrollbar在vue中的使用
1.下载perfect-scrollbar依赖包 npm install perfect-scrollbar 2.perfect-scrollbar特性 1)直接下载依赖包及包含css样式和js 2) ...
- Percona XtraBackup 备份还原篇
Percona XtraBackup 安装介绍篇已经对Percona XtraBackup的功能和安装做了比较详细的介绍,那么本篇我们直接进入主题,如何使用XtraBackup做备份.还原,下面主要介 ...
- C和C++头文件大全
C.传统 C++ #include <assert.h> //设定插入点#include <ctype.h> //字符处理#include <errno.h> ...
- mysql中导入导出sql文件
1.导出整个数据库: mysqldump -u用户名 -p密码 数据库名 > 导出的文件名 例:mysqldump -uroot -proot user > user.sql 2.导出一个 ...
- LeetCode算法题-Factorial Trailing Zeroes(Java实现)
这是悦乐书的第183次更新,第185篇原创 01 看题和准备 今天介绍的是LeetCode算法题中Easy级别的第42题(顺位题号是172).给定一个整数n,返回n!中的尾随零数.例如: 输入:3 输 ...
- Docker: docker network 容器网络
容器网络命令 : docker network --help 常用的是 docker network create/ls/rm/inspect 容器网络类型,一共有以下5种 bridge–net=br ...
- css滚动条样式自定义
很简单的几行代码 <!DOCTYPE html> <html lang="en"> <head> <meta charset=" ...