Python全栈开发之路 【第六篇】:Python基础之常用模块
本节内容
模块分类:

    好处:

    标准库:

        help("modules") 查看所有python自带模块列表

    第三方开源模块:

    自定义模块:

模块调用: import module

         from os import rmdir

         from module.xx.xx import xx as rename

         from module.xx import *  (不推荐)

    注意: 模块一旦被调用,就相当于执行了另为一个py文件里的代码。

自定义模块:

         查找模块路径依据:当前目录范围、sys.path ---> 只在当前程序里有效

         site-packages: 所有的标准库,包括第三方 和 自带模块。

                        依次去查找module

开源模块安装、使用:

         https://pypi.python.org/pypi 是python的开元模块库。

         pip install PyTrion

         怎么去配置国内的豆瓣源。

包(Package)及跨模块导入:

         包: 一个文件夹管理多个模块文件,这个文件夹就成为包。

         crm  proj  manage.py 都在同一级别下

         从当前路径下寻找,想在manage.py里导入views.py ---> from crm import views

         python2:

             包就是文件夹,但该文件夹下必须存在 __init__.py 文件, 该文件的内容可以为空。

             __int__.py用于标识当前文件夹是一个包。

         python3:

             在python3里,即使目录下没__int__.py文件也能创建成功,

             猜应该是解释器优化所致,但创建包还是要记得加上这个文件.

    跨模块的导入:

         为什么crm包里的views.py想导入proj包里的settings.py

            ---> sit-packages 列表打印的第一个值是''。  ''代表着总入口程序manage.py所在的路径

            而不是执行views.py 的路径。只有入口的程序的路径会加入到sit-packages里,

            而里面间接的调用不管多少层和views.py 没关系。

            只要manage.py的路径在sie-packages里,只能是from proj import setting。

跨模块导入2:

    问题一:

         把views.py作为入口文件,在views.py里导入proj文件里的settings.py

            ---> import os,sys

                 # sys.path.append("……/my_proj/")

                 # print(dir())

                 # print(__file__)  ---> 在pycharm里打印的是绝对路径,但在命令行里打印相对路径

                 # print(os.path.abspath(__file__)) ---> 就是真正的获取 绝对路径

                 # os.path.dirname() 的作用是 在绝对路径的基础上 返到上一层。

                 BASE_DIR = os.path.dirname(os.path.dirname(os.path.abspath(__file__)))

                 sys.path.append(BASE_DIR)

                 from proj import settings

    "出手就是专业的"

    程序在哪执行,当前路径就是那个。要想导入其他模块,就要找到那个模块的路径。

相对导入:

    问题一:

        在入口manages.py里导入在crm文件夹里的views.py, 在views.py里导入models

            --->在views.py里:

                 import models # 错误,原因: 因为当前路径是manages.py的所在路径,没有models.py,

                                           并且sit-packages里也没有。不要认为views与models同级别就可以!

                 from crm import models  # 正确写法

                 from . import models  # 正确写法, . 代表相对导入

                 from ..proj import settings

                 -> SystemError: Parent module '' not loaded, cannot perform relative import

                 -> 或 ValueError: attempted relative import beyond top-level package

                 这两个错误的原因归根结底是一样的:在涉及到相对导入时,package所对应的文件夹必须正确的被python解释器视作package,

                 而不是普通文件夹。否则由于不被视作package,无法利用package之间的嵌套关系实现python中包的相对导入。

    文件夹被python解释器视作package需要满足两个条件:

        1、文件夹中必须有__init__.py文件,该文件可以为空,但必须存在该文件。

        2、不能作为顶层模块来执行该文件夹中的py文件(即不能作为主函数的入口)。

time模块详解:

    time.time(): 当前时间戳, 从1970.2.1 8:00年到现在

    time.localtime(): 本地时间 (是操作系统的时间)

    time.gmtime(): 将一个时间戳转换为UTC时区(0时区)的struct_time。

    time.mktime(): 将一个struct_time转化为时间戳。

    time.sleep(): 推迟执行时间

    time.asctime(): 形式:'Sun Oct 1 12:04:38 2017'

    time.ctime():

    time.strftime('%Y-%m-%d %H:%M:%S %A', 时间对象):

    time.strptime():

datetime模块详解:

    datetime.date: 表示日期的类。常用的属性有year, month, day;

    datetime.time: 表示时间的类。常用的属性有hour, minute, second, microsecond;

    datetime.datetime.now(): 返回当前的datetime日期类型

    datetime.date.fromtimestamp(time.time()): 把一个时间戳转为datetime日期类型

    datetime.datetime: 表示日期时间。

    datetime.timedelta: 表示时间间隔,即两个时间点之间的长度。

    时间运算:

        >>> datetime.datetime.now()

        datetime.datetime(2018, 5, 8, 15, 55, 8, 864325)

        >>> datetime.datetime.now() + datetime.timedelta(4) #当前时间 +4天

        datetime.datetime(2018, 5, 12, 15, 55, 33, 643242)

        >>> datetime.datetime.now() + datetime.timedelta(hours=4) #当前时间+4小时

        datetime.datetime(2018, 5, 8, 19, 55, 53, 93034)

    时间替换:

        >>> d = datetime.datetime.now()

        >>> d.replace(year=2999,month=11,day=30)

        datetime.date(2999, 11, 30)

random模块:

    random.randint(1,100): 1-100之间的随机数,包含100

    random.randrange(1,100): 1-100之间的随机数,不包含100

    random.choice('assxds$#%ds'): 返回一个给定数据集合中的随机字符

    random.sample('abcdefghi',3): 从多个字符中选取特定数量的字符['a', 'd', 'b']

    random.random(): 返回一个随机浮点数

    生成随机字符串: 随机验证码

        >>> import string

        >>> ''.join(random.sample(string.ascii_lowercase + string.digits, 6))

        '4fvda1'

        >>> string.digits

        ''

        >>> string.ascii_letters

        'abcdefghijklmnopqrstuvwxyzABCDEFGHIJKLMNOPQRSTUVWXYZ'

        >>> string.hexdigits

        '0123456789abcdefABCDEF'

        >>> string.octdigits

        ''

        >>> string.ascii_lowercase

        'abcdefghijklmnopqrstuvwxyz'

        >>> string.ascii_uppercase

        'ABCDEFGHIJKLMNOPQRSTUVWXYZ'

        >>>string.punctuation

        '!"#$%&\'()*+,-./:;<=>?@[\\]^_`{|}~'

    洗牌:

        >>> a

        [0, 1, 2, 3, 4, 5, 6, 7, 8, 9]

        >>> random.shuffle(a)

        >>> a

        [3, 0, 7, 2, 1, 6, 5, 8, 9, 4]

os模块:

    得到当前工作目录,即当前Python解释器 脚本工作的目录路径: os.getcwd()

    返回指定目录下的所有文件和目录名:os.listdir()

    函数用来删除一个文件:os.remove()

    删除多个目录:os.removedirs(r“c:\python”)

    检验给出的路径是否是一个文件:os.path.isfile()

    检验给出的路径是否是一个目录:os.path.isdir()

    判断是否是绝对路径:os.path.isabs()

    检验给出的路径是否真地存:os.path.exists()

    返回一个路径的目录名和文件名:os.path.split()     e.g os.path.split('/home/swaroop/byte/code/poem.txt') 结果:('/home/swaroop/byte/code', 'poem.txt')

    分离扩展名:os.path.splitext()       e.g  os.path.splitext('/usr/local/test.py')    结果:('/usr/local/test', '.py')

    获取路径名:os.path.dirname()

    获得绝对路径: os.path.abspath()

    获取文件名:os.path.basename()

    运行shell命令: os.system()

    读取操作系统环境变量HOME的值:os.getenv("HOME")

    返回操作系统所有的环境变量: os.environ

    设置系统环境变量,仅程序运行时有效:os.environ.setdefault('HOME','/home/alex')

    给出当前平台使用的行终止符:os.linesep    Windows使用'\r\n',Linux and MAC使用'\n'

    指示你正在使用的平台:os.name       对于Windows,它是'nt',而对于Linux/Unix用户,它是'posix'

    重命名:os.rename(old, new)

    创建多级目录:os.makedirs(r“c:\python\test”)

    创建单个目录:os.mkdir(“test”)

    获取文件属性:os.stat(file)

    修改文件权限与时间戳:os.chmod(file)

    获取文件大小:os.path.getsize(filename)

    结合目录名与文件名:os.path.join(dir,filename)

    改变工作目录到dirname: os.chdir(dirname)

    获取当前终端的大小: os.get_terminal_size()

    杀死进程: os.kill(10884,signal.SIGKILL)

sys模块:

shutil模块:

    高级的 文件、文件夹、压缩包 处理模块.

    shutil.copyfileobj(fsrc, fdst[, length]):将文件内容拷贝到另一个文件中.

    shutil.copyfile(src, dst): 拷贝文件.

    shutil.copymode(src, dst): 仅拷贝权限。内容、组、用户均不变.

    shutil.copystat(src, dst): 仅拷贝状态的信息,包括:mode bits, atime, mtime, flags

    shutil.copy(src, dst): 拷贝文件和权限.

    shutil.copy2(src, dst): 拷贝文件和状态信息.

    shutil.ignore_patterns(*patterns)

    shutil.copytree(src, dst, symlinks=False, ignore=None): 递归的去拷贝文件夹

    shutil.rmtree(path[, ignore_errors[, onerror]]): 递归的去删除文件

    shutil.move(src, dst): 递归的去移动文件,它类似mv命令,其实就是重命名。

    shutil.make_archive(base_name, format,...): 创建压缩包并返回文件路径,例如:zip、tar

                                                创建压缩包并返回文件路径,例如:zip、tar

    base_name: 压缩包的文件名,也可以是压缩包的路径。只是文件名时,则保存至当前目录,否则保存至指定路径,

序列化模块: json & pickle

    序列化是指把内存里的数据类型转变成字符串,

    以使其能存储到硬盘或通过网络传输到远程,因为硬盘或网络传输时只能接受bytes

    json模块:

        import json

    ①  d = json.dumps(data)  # 把data变成字符串

        f = open("test.json", 'w', encoding='utf-8')

        f.write(d)

        f.close()

    ②  f = open("test.json", "w")

        json.dump(data, f)  # 转成字符串, 并写入文件里

        或 json.dump(data,open("test.json", "w"))

    ③  d = json.dumps(data)  # 仅把data变成字符串.(现在状态仅存在内存里)

        d2 = json.loads(d)  # 从序列化中读出来

    ④  f = open("test.json", "r")

        json.load(f)

    只是把数据类型转换成字符串存到内存里的意义?

        json.dumps()   json.loads()

      1、把你的内存数据 通过网络 共享给远程其他人.

      2、定义了不同语言的之间的交互规则(跨平台、体积小)

    注意: dumps只能进行一次, loads多次会出错!

         json序列化的数据类型 只能支持int\str\list\tuple\dict

pickle模块:

    import pickle

    与 json 模块用法相同, dumps、dump、loads、load

    d = {'name': 'hyp', 'age': 22}

    pk = open("data.pkl", "wb")

    # print(pickle.dumps(d))  # 结果: b'\x80\x03}q\x00(X\x04\x00\x00\x00nameq\x01X\x03\x00\x00\x00hypq\x02X\x03\x00\x00\x00ageq\x03K\x16u.'

    pickle.dump(d, pk)

    f = open("data.pkl", "rb")

    d = pickle.load(f)

    print(d)

    注意: 优点:专为python设计,支持python所有的数据类型

         缺点: 缺点:只能在python中使用,存储数据占空间大

序列化shelve模块:

    import shelve

        shelve模块是一个简单的k,v将内存数据通过文件持久化的模块,

        可以持久化任何pickle可支持的python数据格式

    可以修改,但只能是以给key重新赋值的方式改。

    可以添加,删除

xml处理模块:  <>节点

    xml是实现不同语言或程序之间进行数据交换的协议,跟json差不多,

    但json使用起来更简单,不过,古时候,在json还没诞生的黑暗年代,

    大家只能选择用xml呀,至今很多传统公司如金融行业的很多系统的接口还主要是xml。

    import xml.etree.ElementTree as ET

    tree = ET.parse("xml test")  # open

    root = tree.getroot()  # 相当于 f.seek(0)

    print(root.tag)  # 打印标签: data

    # 遍历xml文档

    for child in root:  # 循环每一个<country>

        print(child.tag, child.attrib)  # child.tag -> country, child.attrib ->字典结构的数据

        for i in child:  # 循环每一个country下的结构

            print(i.tag, i.text)

    # 只遍历year 节点

    for node in root.iter('year'):

        print(node.tag, node.text)

    # 修改和删除xml文档内容

    for node in root.iter('year'):

    new_year = int(node.text) + 1

    node.text = str(new_year)

    node.set("updated", "yes")  # 存储属性,存到country的后面

    tree.write("xml test")

    #删除node

    for country in root.findall('country'):  # 查找所有的country节点

       rank = int(country.find('rank').text)  # 找到所有rank的值

       if rank > 50:

         root.remove(country)  # 删掉rank>50的country

    tree.write('output.xml')

    # 自己创建xml文档

    import xml.etree.ElementTree as ET

    # 根(root)是namelist

    root = ET.Element("namelist")

    # 创建子节点name 和 对应的属性attrib

    name = ET.SubElement(root, "name", attrib={"enrolled":"yes"})

    # 在name节点下放的参数age,sex,

    age = ET.SubElement(name, "age", attrib={"checked":"no"})

    sex = ET.SubElement(name, "sex")

    sex.text = 'male'  # 给sex赋值

    # 第二个节点: name2

    name2 = ET.SubElement(root, "name", attrib={"enrolled":"no"})

    age = ET.SubElement(name2, "age")

    age.text = ''  # 给age赋值

    et = ET.ElementTree(root)  # 生成文档对象

    # xml_declaration ---> 版本号声明

    et.write("build_out.xml", encoding="utf-8", xml_declaration=True)

    ET.dump(root) #打印生成的格式

configparser模块:

    此模块用于生成和修改常见配置文档

    [DEFAULT]里默认存储每一个节点里都要有的默认值

    解析配置文件:

        >>> import configparser # 导入模块

        >>> config = configparser.ConfigParser()  # 实例化(生成对象)

        >>> config.sections()  # 调用sections方法

        []

        >>> config.read('config.ini')  # 读配置文件(注意文件路径)

        ['config.ini']

        >>> config.sections()  # 调用sections方法(默认不会读取default)

        ['bitbucket.org', 'topsecret.server.com']

        # 会默认打印DEFAULT下的

        for k, v in conf["bitbucket.org"].items():

            print(k, v)

        >>> 'bitbucket.org' in config  # 判断元素是否在sections列表内

        True

        >>> 'bytebong.com' in config

        False

        >>> config['bitbucket.org']['User']  # 通过字典的形式取值

        'hg'

        >>> config['DEFAULT']['Compression']  #

        'yes'

        >>> topsecret = config['topsecret.server.com']

        >>> topsecret['ForwardX11']

        'no'

        >>> topsecret['Port']

        ''

        >>> for key in config['bitbucket.org']: print(key)  # for循环 bitbucket.org 字典的key

        ...

        user

        compressionlevel

        serveraliveinterval

        compression

        forwardx11

        >>> config['bitbucket.org']['ForwardX11']

        'yes'

    其它增删改查语法:

hashlib加密模块:

subprocess模块:

    run()

    call()

    Popen()

logging模块:

    logging的日志可以分为:

    debug(), info(), warning(), error() and critical()5个级别.

    调试      记录    潜在问题    出问题        严重问题

    StreamHandler、FileHandler设置的日志级别要 高于 全局设置的日志级别,

    否则不起作用!  (全局的日志级别默认是 warning)

re模块:

软件开发目录规范:
模块笔记
一、什么是模块?
在计算机程序的开发过程中,随着程序代码越写越多,在一个文件里代码就会越来越长,越来越不容易维护。
为了编写可维护的代码,我们把很多函数分组,分别放到不同的文件里,这样,每个文件包含的代码就相对较少,很多编程语言都采用这种组织代码的方式。在Python中,一个.py文件就称之为一个模块(Module)。
二、使用模块的好处
1、最大的好处是大大提高了代码的可维护性。其次,编写代码不必从零开始。当一个模块编写完毕,就可以被其他地方引用。我们在编写程序的时候,也经常引用其他模块,包括Python内置的模块和来自第三方的模块。
2、使用模块还可以避免函数名和变量名冲突。每个模块有独立的命名空间,因此相同名字的函数和变量完全可以分别存在不同的模块中,所以,我们自己在编写模块时,不必考虑名字会与其他模块冲突。
三、模块分类
分为三种:
①内置标准模块(又称为 标准库),执行hel('modules')查看所有python自带模块列表。
②第三方开源模块,可以通过 pip install 模块名 联网安装。
③自定义模块
四、模块调用
import module

from module import xx

from module.xx.xx import xx as rename

from module.xx.xx import *
注意:模块一旦被调用,即相当于执行了另外一个py文件里的代码。
自定义模块
这个最简单, 创建一个.py文件,就可以称之为模块,就可以在另外一个程序里导入。
模块查找路径
import sys

print(sys.path)
注意:列表第一个元素为空,即代表当前目录,所以你自己定义的模块在当前目录会被优先导入。
五、包
当模块文件越来越多,就需要对模块文件进行划分,比如把负责跟数据库交互的都放一个文件夹,把与页面交互相关的放一个文件夹。
└── my_proj

    ├── crm #代码目录

    │   ├── admin.py

    │   ├── apps.py

    │   ├── models.py

    │   ├── tests.py

    │   └── views.py

    ├── manage.py

    └── my_proj #配置文件目录

        ├── settings.py

        ├── urls.py

        └── wsgi.py
一个文件夹管理多个模块文件,这个文件夹就被称为 包 。
包就是文件夹,但该文件夹下必须存在 __init__.py 文件, 该文件的内容可以为空。__int__.py用于标识当前文件夹是一个包。
注意:在python3里,即使目录下没__int__.py文件也能创建成功,猜应该是解释器优化所致,但创建包还是要记得加上这个文件 吧。
模块间的相互导入
from crm import views
跨模块导入
目录结构如下
.

├── __init__.py

├── crm

│   ├── __init__.py

│   ├── admin.py

│   ├── apps.py

│   ├── models.py

│   ├── tests.py

│   ├── views.py

├── manage.py

└── proj

    ├── __init__.py

    ├── settings.py

    ├── urls.py

    └── wsgi.py
根据上面的结构,如何实现在crm/views.py里导入proj/settings.py模块?
直接导入的话,会报错,说找到不模块。所以需要 添加环境变量,把父亲级的路径添加到sys.path中,就可以了,这样导入 就相当于从父亲级开始找模块了。
import sys ,os

BASE_DIR = os.path.dirname(os.path.dirname(os.path.abspath(__file__))) #__file__的是打印当前被执行的模块.py文件相对路径,注意是相对路径

print(BASE_DIR)

sys.path.append(BASE_DIR)

from proj import settings

def sayhi():

    print('hello world!')

print(settings.DATABASES)
绝地导入&相对导入
.

├── __init__.py

├── crm

│   ├── __init__.py

│   ├── admin.py

│   ├── apps.py

│   ├── models.py

│   ├── tests.py

│   ├── views.py  #from ..proj import settings

├── manage.py

└── proj

    ├── __init__.py

    ├── settings.py #from .import urls

    ├── urls.py

    └── wsgi.py
views.py里代码
from ..proj import settings

def sayhi():

    print('hello world!')

print(settings.DATABASES)
执行结果报错了
Traceback (most recent call last):

File "my_proj/crm/views.py", line 4, in <module>

 from ..proj import settings

SystemError: Parent module '' not loaded, cannot perform relative import
或者有人会看到这个错
ValueError: attempted relative import beyond top-level package
其实这两个错误的原因归根结底是一样的:在涉及到相对导入时,package所对应的文件夹必须正确的被python解释器视作package,而不是普通文件夹。否则由于不被视作package,无法利用package之间的嵌套关系实现python中包的相对导入。
文件夹被python解释器视作package需要满足两个条件:
1、文件夹中必须有__init__.py文件,该文件可以为空,但必须存在该文件。

2、不能作为顶层模块来执行该文件夹中的py文件(即不能作为主函数的入口)。
正确的代码目录结构如下:
packages/

    ├── __init__.py

    ├── manage.py #from my_proj.crm  import views

    └── my_proj

        ├── crm

        │   ├── admin.py

        │   ├── apps.py

        │   ├── models.py

        │   ├── tests.py

        │   ├── views.py  #from . import models;  from ..proj import settings

        └── proj

            ├── __init__.py

            ├── settings.py

            ├── urls.py

            └── wsgi.py
注:虽然python支持相对导入,但对模块间的路径关系要求比较严格,处理不当就容易出错,so并不建议在项目里经常使用。
六、time & datetime 模块
通常表示时间的方式:
1、时间戳
2、格式化的时间字符串
3、元组(struct_time)
时间戳(timestamp)的方式:从 1970年1 月1日00:00:00 开始按秒计算。
元组的方式:一共有9个元素。
索引(Index)    属性(Attribute)    值(Values)

0     tm_year(年)                 比如2011

1     tm_mon(月)                  1 - 12

2     tm_mday(日)                 1 - 31

3     tm_hour(时)                 0 - 23

4     tm_min(分)                  0 - 59

5     tm_sec(秒)                  0 - 61

6     tm_wday(weekday)            0 - 6(0表示周日)

7     tm_yday(一年中的第几天)       1 - 366

8     tm_isdst(是否是夏令时)        默认为-1
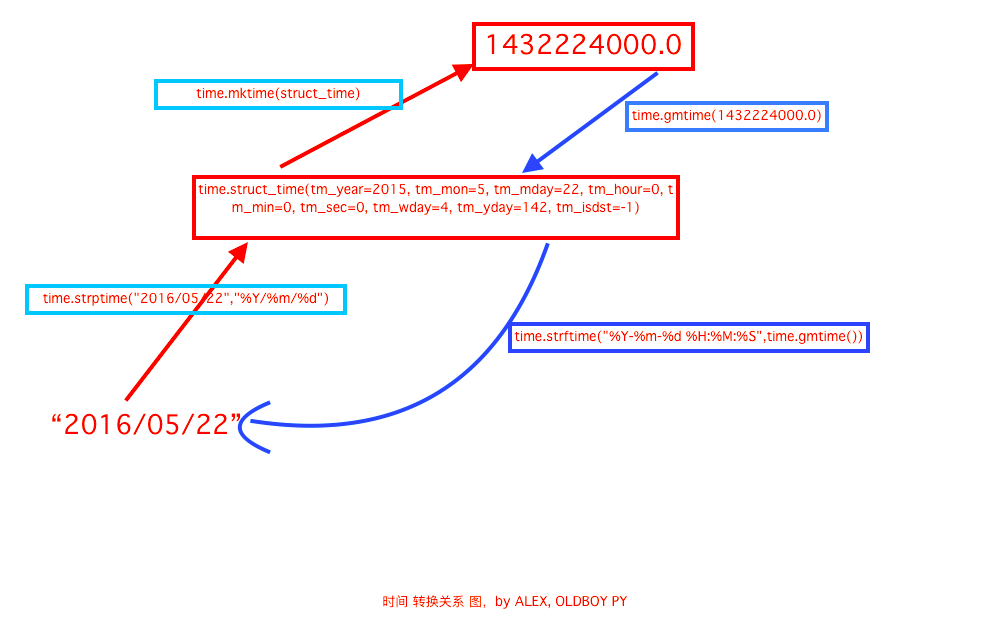
time模块的方法:
1、time.localtime():将一个时间戳转换为当前时区的元组(struct_time)。
2、time.gmtime() :和 localtime()方法类似,gtime()方法是将一个时间戳转换为 UTC 时区(0时区)的struct_time。
3、time.time():返回当前时间的时间戳。
4、time.mktime(t):将一个struct_time转换为时间戳。
5、time.sleep():线程推迟指定的时间运行(单位为 秒)。
6、time.asctime():把一个表示时间的元组或者struct_time表示为这种形式:'Sun Oct 1 12:04:38 2017'。如果没有参数,将会将time.localtime()作为参数传入。
7、time.ctime():把一个时间戳转换为time.asctime()的形式。如果不传参数,就会以 time.time() 为默认参数。它的作用相当于time.asctime(time.localtime(secs))。
8、time.strftime(format[, t]):把一个代表时间的元组或struct_time转换为格式化的时间字符串。如果 t 未指定,默认传入 time.localtime()。
例:time.strftime("%Y-%m-%d %X", time.localtime()) 输出:'2018-4-10 15:45:20'。
9、time.strptime(string[, format]):把一个格式化时间字符串转化为 struct_time。与 strftime 是逆向操作。
datetime模块
1、datetime.date:表示日期的类。常用的属性:year、month、day;
2、datetime.time:表示时间的类。常用的属性:hour、minute、second、microsecond;
3、datetime.datatime:表示的是日期的时间。
4、datetime.timedelta:表示时间间隔,即两点时间点之间的长度。
方法:
1、d = datetime.datetime.now() 返回当前的datetime日期类型。
d.timestamp(),d.today(), d.year,d.timetuple()等方法可以调用
2、时间运算
>>> datetime.datetime.now()

datetime.datetime(2017, 10, 1, 12, 53, 11, 821218)

>>> datetime.datetime.now() + datetime.timedelta(4) #当前时间 +4天

datetime.datetime(2017, 10, 5, 12, 53, 35, 276589)

>>> datetime.datetime.now() + datetime.timedelta(hours=4) #当前时间+4小时

datetime.datetime(2017, 10, 1, 16, 53, 42, 876275)
3、时间替换
>>> d.replace(year=2999,month=11,day=30)

datetime.date(2999, 11, 30)
七、random()模块
>>> random.randrange(1,10) #返回1-10之间的一个随机数,不包括10

>>> random.randint(1,10) #返回1-10之间的一个随机数,包括10

>>> random.randrange(0, 100, 2) #随机选取0到100间的偶数

>>> random.random()  #返回一个随机浮点数 ,在[0, 1)范围内。

>>> random.choice('abce3#$@1') #返回一个给定数据集合中的随机字符

'#'

>>> random.sample('abcdefghij',3)  #从多个字符中选取特定数量的字符

['a', 'd', 'b']

#生成随机字符串

>>> import string

>>> ''.join(random.sample(string.ascii_lowercase + string.digits, 6))

'4fvda1'

#洗牌

>>> a

[0, 1, 2, 3, 4, 5, 6, 7, 8, 9]

>>> random.shuffle(a)

>>> a

[3, 0, 7, 2, 1, 6, 5, 8, 9, 4]
八、os模块
得到当前工作目录,即当前Python脚本工作的目录路径: os.getcwd()

返回指定目录下的所有文件和目录名:os.listdir()

函数用来删除一个文件:os.remove()

删除多个目录:os.removedirs(r“c:\python”)

检验给出的路径是否是一个文件:os.path.isfile()

检验给出的路径是否是一个目录:os.path.isdir()

判断是否是绝对路径:os.path.isabs()

检验给出的路径是否真地存:os.path.exists()

返回一个路径的目录名和文件名:os.path.split()     e.g os.path.split('/home/swaroop/byte/code/poem.txt') 结果:('/home/swaroop/byte/code', 'poem.txt')

分离扩展名:os.path.splitext()       e.g  os.path.splitext('/usr/local/test.py')    结果:('/usr/local/test', '.py')

获取路径名:os.path.dirname()

获得绝对路径: os.path.abspath()

获取文件名:os.path.basename()

运行shell命令: os.system()

读取操作系统环境变量HOME的值:os.getenv("HOME")

返回操作系统所有的环境变量: os.environ

设置系统环境变量,仅程序运行时有效:os.environ.setdefault('HOME','/home/alex')

给出当前平台使用的行终止符:os.linesep    Windows使用'\r\n',Linux and MAC使用'\n'

指示你正在使用的平台:os.name       对于Windows,它是'nt',而对于Linux/Unix用户,它是'posix'

重命名:os.rename(old, new)

创建多级目录:os.makedirs(r“c:\python\test”)

创建单个目录:os.mkdir(“test”)

获取文件属性:os.stat(file)

修改文件权限与时间戳:os.chmod(file)

获取文件大小:os.path.getsize(filename)

结合目录名与文件名:os.path.join(dir,filename)

改变工作目录到dirname: os.chdir(dirname)

获取当前终端的大小: os.get_terminal_size()

杀死进程: os.kill(10884,signal.SIGKILL)

九、sys模块
sys.argv           命令行参数List,第一个元素是程序本身路径

sys.exit(n)        退出程序,正常退出时exit(0)

sys.version        获取Python解释程序的版本信息

sys.maxint         最大的Int值

sys.path           返回模块的搜索路径,初始化时使用PYTHONPATH环境变量的值

sys.platform       返回操作系统平台名称

sys.stdout.write('please:')  #标准输出 , 引出进度条的例子, 注,在py3上不行,可以用print代替

val = sys.stdin.readline()[:-1] #标准输入

sys.getrecursionlimit() #获取最大递归层数

sys.setrecursionlimit(1200) #设置最大递归层数

sys.getdefaultencoding()  #获取解释器默认编码

sys.getfilesystemencoding  #获取内存数据存到文件里的默认编码
十、shutil模块
高级的文件、文件夹、压缩包 处理模块
shutil.copyfile( src, dst) 从源src复制到dst中去。当然前提是目标地址是具备可写权限。抛出的异常信息为IOException. 如果当前的dst已存在的话就会被覆盖掉

shutil.move( src, dst)  移动文件或重命名

shutil.copymode( src, dst) 只是会复制其权限其他的东西是不会被复制的

shutil.copystat( src, dst) 复制权限、最后访问时间、最后修改时间

shutil.copy( src, dst)  复制一个文件到一个文件或一个目录

shutil.copy2( src, dst)  在copy上的基础上再复制文件最后访问时间与修改时间也复制过来了,类似于cp –p的东西

shutil.copy2( src, dst)  如果两个位置的文件系统是一样的话相当于是rename操作,只是改名;如果是不在相同的文件系统的话就是做move操作

shutil.copytree( olddir, newdir, True/Flase)

把olddir拷贝一份newdir,如果第3个参数是True,则复制目录时将保持文件夹下的符号连接,如果第3个参数是False,则将在复制的目录下生成物理副本来替代符号连接

shutil.rmtree( src ) 递归删除一个目录以及目录内的所有内容
1、shutil.copyfileobj(fsrc, fdst[, length])
将文件内容拷贝到另一个文件中 ,主要是将url返回的数据复制到jpg文件中,形成一个图形。
import shutil

shutil.copyfileobj(open('old.xml','r'), open('new.xml', 'w'))
2、shutil.copyfile(src, dst)
拷贝文件,将 src 复制 dst 中去。如果当前的dst存在的话就会被覆盖掉。src和dst必须是文件。
shutil.copyfile('f1.log', 'f2.log') #目标文件无需存在
3、shutil.copymode(src, dst)
仅拷贝权限。内容、组、用户均不变,目标文件需要存在。
shutil.copymode('f1.log', 'f2.log') #目标文件必须存在
4、shutil.copystat(src, dst)
仅拷贝文件状态的信息,包括:mode bits atims mtime flags,目标文件必须存在。
shutil.copystat('f1.log', 'f2.log') #目标文件必须存在
5、shutil.copy(src, dst)
拷贝文件和权限。
shutil.copy('f1.log', 'f2.log')
6、shutil.copy2(src, dst)
拷贝文件和状态信息。
7、shutil.ignore_patterns(*patterns)
shutil.copytree(src, dst, symlinks=False, ignore=None)
递归的去拷贝文件夹。
shutil.copytree('folder1', 'folder2', ignore=shutil.ignore_patterns('*.pyc', 'tmp*'))

 #目标目录不能存在,注意对folder2目录父级目录要有可写权限,ignore的意思是排除
#ubuntu 默认的可能没有安装tree,安装下即可apt-get install tree

#

root@tim:/opt# tree 1/

1/

└── 2

    └── 3

        └── 4

            └── 5

>>> shutil.copytree("1","0")

root@tim:/opt# tree 0

└── 2

    └── 3

        └── 4

            └── 5

directories, 0 files
def ignore_patterns(*patterns):

    """Function that can be used as copytree() ignore parameter.

    Patterns is a sequence of glob-style patterns

    that are used to exclude files"""

    def _ignore_patterns(path, names):

        ignored_names = []

        for pattern in patterns:

            ignored_names.extend(fnmatch.filter(names, pattern))

        return set(ignored_names)

    return _ignore_patterns

def copytree(src, dst, symlinks=False, ignore=None):

    """Recursively copy a directory tree using copy2().

    The destination directory must not already exist.

    If exception(s) occur, an Error is raised with a list of reasons.

    If the optional symlinks flag is true, symbolic links in the

    source tree result in symbolic links in the destination tree; if

    it is false, the contents of the files pointed to by symbolic

    links are copied.

    The optional ignore argument is a callable. If given, it

    is called with the `src` parameter, which is the directory

    being visited by copytree(), and `names` which is the list of

    `src` contents, as returned by os.listdir():

        callable(src, names) -> ignored_names

    Since copytree() is called recursively, the callable will be

    called once for each directory that is copied. It returns a

    list of names relative to the `src` directory that should

    not be copied.

    XXX Consider this example code rather than the ultimate tool.

    """

    names = os.listdir(src)

    if ignore is not None:

        ignored_names = ignore(src, names)

    else:

        ignored_names = set()

    os.makedirs(dst)

    errors = []

    for name in names:

        if name in ignored_names:

            continue

        srcname = os.path.join(src, name)

        dstname = os.path.join(dst, name)

        try:

            if symlinks and os.path.islink(srcname):

                linkto = os.readlink(srcname)

                os.symlink(linkto, dstname)

            elif os.path.isdir(srcname):

                copytree(srcname, dstname, symlinks, ignore)

            else:

                # Will raise a SpecialFileError for unsupported file types

                copy2(srcname, dstname)

        # catch the Error from the recursive copytree so that we can

        # continue with other files

        except Error, err:

            errors.extend(err.args[0])

        except EnvironmentError, why:

            errors.append((srcname, dstname, str(why)))

    try:

        copystat(src, dst)

    except OSError, why:

        if WindowsError is not None and isinstance(why, WindowsError):

            # Copying file access times may fail on Windows

            pass

        else:

            errors.append((src, dst, str(why)))

    if errors:

        raise Error, errors

shutil.copytree
shutil.copytree
8、shutil.rmtree(path[, ignore_errors[, onerror]])
递归的去删除文件。
def rmtree(path, ignore_errors=False, onerror=None):

    """Recursively delete a directory tree.

    If ignore_errors is set, errors are ignored; otherwise, if onerror

    is set, it is called to handle the error with arguments (func,

    path, exc_info) where func is os.listdir, os.remove, or os.rmdir;

    path is the argument to that function that caused it to fail; and

    exc_info is a tuple returned by sys.exc_info().  If ignore_errors

    is false and onerror is None, an exception is raised.

    """

    if ignore_errors:

        def onerror(*args):

            pass

    elif onerror is None:

        def onerror(*args):

            raise

    try:

        if os.path.islink(path):

            # symlinks to directories are forbidden, see bug #1669

            raise OSError("Cannot call rmtree on a symbolic link")

    except OSError:

        onerror(os.path.islink, path, sys.exc_info())

        # can't continue even if onerror hook returns

        return

    names = []

    try:

        names = os.listdir(path)

    except os.error, err:

        onerror(os.listdir, path, sys.exc_info())

    for name in names:

        fullname = os.path.join(path, name)

        try:

            mode = os.lstat(fullname).st_mode

        except os.error:

            mode = 0

        if stat.S_ISDIR(mode):

            rmtree(fullname, ignore_errors, onerror)

        else:

            try:

                os.remove(fullname)

            except os.error, err:

                onerror(os.remove, fullname, sys.exc_info())

    try:

        os.rmdir(path)

    except os.error:

        onerror(os.rmdir, path, sys.exc_info())

shutil.rmtree
shutil.rtree
9、shutil.move(src, dst)
递归的去移动文件,它类似mv命令,其实就是重命名。
10、shutil.make_archive(base_name, format,...)
创建压缩包并返回文件路径,例如:zip、tar创建压缩包并返回文件路径,例如:zip、tar
- base_name: 压缩包的文件名,也可以是压缩包的路径。只是文件名时,则保存至当前目录,否则保存至指定路径,
如 data_bak =>保存至当前路径
如:/tmp/data_bak =>保存至/tmp/
- format: 压缩包种类,“zip”, “tar”, “bztar”,“gztar”
- root_dir: 要压缩的文件夹路径(默认当前目录)
- owner: 用户,默认当前用户
- group: 组,默认当前组
- logger: 用于记录日志,通常是logging.Logger对象
#将 /data 下的文件打包放置当前程序目录

import shutil

ret = shutil.make_archive("data_bak", 'gztar', root_dir='/data')

#将 /data下的文件打包放置 /tmp/目录

import shutil

ret = shutil.make_archive("/tmp/data_bak", 'gztar', root_dir='/data')
shutil 对压缩包的处理是调用 ZipFile 和 TarFile 两个模块来进行的,详细:
zipfile压缩&解压缩
import zipfile

# 压缩

z = zipfile.ZipFile('laxi.zip', 'w')

z.write('a.log')

z.write('data.data')

z.close()

# 解压

z = zipfile.ZipFile('laxi.zip', 'r')

z.extractall(path='.')

z.close()
tarfile压缩&解压缩
import tarfile

# 压缩

>>> t=tarfile.open('/tmp/egon.tar','w')

>>> t.add('/test1/a.py',arcname='a.bak')

>>> t.add('/test1/b.py',arcname='b.bak')

>>> t.close()

# 解压

>>> t=tarfile.open('/tmp/egon.tar','r')

>>> t.extractall('/egon')

>>> t.close()
十一、json、pickle模块
序列化是指把内存里的数据类型转变成字符串,以使其能存储到硬盘或通过网络传输到远程,因为硬盘或网络传输时只能接受bytes。
用于序列化的两个模块:
1、json,用于 字符串 和 Python数据类型 间的转换。
2、pickle,用于Python特有的类型和Python的数据类型间的转换。
json模块 和 pickle模块 都有四个功能:dumps、dump、loads、load
import pickle

data = {'k1':123,'k2':'Hello'}

# pickle.dumps 将数据通过特殊的形式转换位只有python语言认识的字符串

p_str = pickle.dumps(data)

print(p_str)

#pickle.dump 将数据通过特殊的形式转换位只有python语言认识的字符串,并写入文件

with open('D:/result.pk','wb',encoding='utf8') as fp:

    pickle.dump(data,fp)

import json

# json.dumps 将数据通过特殊的形式转换位所有程序语言都认识的字符串

j_str = json.dumps(data)

print(j_str)

#pickle.dump 将数据通过特殊的形式转换位只有python语言认识的字符串,并写入文件

with open('D:/result.json','wb',encoding='utf8') as fp:

    json.dump(data,fp)
json和pickle的区别
json:跨语言,体积小,但只能 支持 int/str/list/tuple/dict
pickle:专为Python设计,支持Python所有的数据类型,但只能在Python中使用,存储数据占空间大。
十二、xml模块
xml的格式如下,就是通过<>节点来区别数据结构的:
<?xml version="1.0"?>

<data>

    <country name="Liechtenstein">

        <rank updated="yes">2</rank>

        <year>2008</year>

        <gdppc>141100</gdppc>

        <neighbor name="Austria" direction="E"/>

        <neighbor name="Switzerland" direction="W"/>

    </country>

    <country name="Singapore">

        <rank updated="yes">5</rank>

        <year>2011</year>

        <gdppc>59900</gdppc>

        <neighbor name="Malaysia" direction="N"/>

    </country>

    <country name="Panama">

        <rank updated="yes">69</rank>

        <year>2011</year>

        <gdppc>13600</gdppc>

        <neighbor name="Costa Rica" direction="W"/>

        <neighbor name="Colombia" direction="E"/>

    </country>

</data>
xml协议在各个语言里的都 是支持的,在python中可以用以下模块操作xml:
import xml.etree.ElementTree as ET

tree = ET.parse("xmltest.xml")

root = tree.getroot()

print(root.tag)

#遍历xml文档

for child in root:

    print(child.tag, child.attrib)

    for i in child:

        print(i.tag,i.text)

#只遍历year 节点

for node in root.iter('year'):

    print(node.tag,node.text)
修改和删除xml文档内容
import xml.etree.ElementTree as ET

tree = ET.parse("xmltest.xml")

root = tree.getroot()

#修改

for node in root.iter('year'):

    new_year = int(node.text) + 1

    node.text = str(new_year)

    node.set("updated","yes")

tree.write("xmltest.xml")

#删除node

for country in root.findall('country'):

   rank = int(country.find('rank').text)

   if rank > 50:

     root.remove(country)

tree.write('output.xml')
自己创建xml文档:
import xml.etree.ElementTree as ET

new_xml = ET.Element("namelist")

name = ET.SubElement(new_xml,"name",attrib={"enrolled":"yes"})

age = ET.SubElement(name,"age",attrib={"checked":"no"})

sex = ET.SubElement(name,"sex")

sex.text = '33'

name2 = ET.SubElement(new_xml,"name",attrib={"enrolled":"no"})

age = ET.SubElement(name2,"age")

age.text = '19'

et = ET.ElementTree(new_xml) #生成文档对象

et.write("test.xml", encoding="utf-8",xml_declaration=True)

ET.dump(new_xml) #打印生成的格式
十三、configparser模块
好多软件的常见配置文件格式如下:
[DEFAULT]

ServerAliveInterval = 45

Compression = yes

CompressionLevel = 9

ForwardX11 = yes

[bitbucket.org]

User = hg

[topsecret.server.com]

Port = 50022

ForwardX11 = no

```
解析配置文件
>>> import configparser # 导入模块

>>> config = configparser.ConfigParser()  #实例化(生成对象)

>>> config.sections()  #调用sections方法

[]

>>> config.read('example.ini')  # 读配置文件(注意文件路径)

['example.ini']

>>> config.sections() #调用sections方法(默认不会读取default)

['bitbucket.org', 'topsecret.server.com']

>>> 'bitbucket.org' in config #判断元素是否在sections列表内

True

>>> 'bytebong.com' in config

False

>>> config['bitbucket.org']['User'] # 通过字典的形式取值

'hg'

>>> config['DEFAULT']['Compression']

'yes'

>>> topsecret = config['topsecret.server.com']

>>> topsecret['ForwardX11']

'no'

>>> topsecret['Port']

'50022'

>>> for key in config['bitbucket.org']: print(key) # for循环 bitbucket.org 字典的key

...

user

compressionlevel

serveraliveinterval

compression

forwardx11

>>> config['bitbucket.org']['ForwardX11']

'yes'
其它增删改查语法
```python

[group1] # 支持的两种分隔符“=”, “:”

k1 = v1

k2:v2

[group2]

k1 = v1

import ConfigParser

config = ConfigParser.ConfigParser()

config.read('i.cfg')

# ########## 读 ##########

#secs = config.sections()

#print(secs)

#options = config.options('group2') # 获取指定section的keys

#print(options)

#item_list = config.items('group2') # 获取指定 section 的 keys & values ,key value 以元组的形式

#print(item_list)

#val = config.get('group1','key') # 获取指定的key 的value

#val = config.getint('group1','key')

# ########## 改写 ##########

#sec = config.remove_section('group1') # 删除section 并返回状态(true, false)

#config.write(open('i.cfg', "w")) # 对应的删除操作要写入文件才会生效

#sec = config.has_section('wupeiqi')

#sec = config.add_section('wupeiqi')

#config.write(open('i.cfg', "w")) #

#config.set('group2','k1',11111)

#config.write(open('i.cfg', "w"))

#config.remove_option('group2','age')

#config.write(open('i.cfg', "w"))

```
十四、hashlib模块
十五、subprocess模块
十六、logging模块
十七、re模块
常用的正则表达式规则:
二十个正则表达式:

1.校验密码强度

密码的强度必须是包含大小写字母和数字的组合,不能使用特殊字符,长度在8-10之间。

^(?=.*\\d)(?=.*[a-z])(?=.*[A-Z]).{8,10}$

2.校验中文

字符串只能是中文

^[\\]u4e00-\\u9fa5]{0,}$

3.由数字、26个英文字母或下划线组成的字符串

^\\w+$

4.校验E-Mail地址

同密码一样,下面是email地址合规性的正则检查语句

[\\w!#$%&'*+/=?^_`{|}~-]+(?:\\.[\\w!#$%&'*+/=?^_`{|}~-]+)*@(?:[\\w](?:[\\w-]*[\\w])?\\.)+[\\w](?:[\\w-]*[\\w])?

5.校验身份证号码

下面是身份证号码的正则校验,15或18位。

15位:

^[1-9]\\d{7}((0\\d)|(1[0-2]))(([0|1|2]\\d)|3[0-1])\\d{3}$

18位:

^[1-9]\\d{5}[1-9]\\d{3}((0\\d)|(1[0-2]))(([0|1|2]\\d)|3[0-1])\\d{3}([0-9]|X)$

6.校验日期

"yyyy-mm-dd" 格式的日期校验,已考虑平闰年。

^(?:(?!0000)[0-9]{4}-(?:(?:0[1-9]|1[0-2])-(?:0[1-9]|1[0-9]|2[0-8])|(?:0[13-9]|1[0-2])-(?:29|30)|(?:0[13578]|1[02])-31)|(?:[0-9]{2}(?:0[48]|[2468][048]|[13579][26])|(?:0[48]|[2468][048]|[13579][26])00)-02-29)$

7.校验金额

金额校验,精确到2位小数

^[0-9]+.(.[0-9]{2})?$1

8.校验手机号
下面是国内13、15、18开头的手机号正则表达式。(可根据目前收集号扩展前两位开头号码)
^(13[0-9]|14[5|7]|15[0|1|2|3|4|5|6|7|8|9])\\d{8}$

9.判断IE版本
^.*MSIE [5-8](?:\\.[0-9]+?(?!.*Trident\\/)[5-9]\\.0).*$

10.校验IP-v4地址

11.校验IP-v4地址

12.检查URL的前缀
应用开发中很多时候需要区分请求是HTTPS或者是HTTP,通过下面的表达式可以提取一个url前缀然后再进行逻辑判断
if (!s.match(/^[a-zA-Z]+:\\/\\//))
{
  s = 'http://' + s;
}

13.提取URL链接
下面的表达式可以筛选处一段文本中的URL。
^(f|ht){1}(tp|tps):\\/\\/([\\w-]+\\.)+[\\w-]+(\\/[\\w- ./?%&=]*)?

14.文件路径及扩展名校验
验证Windows下文件路径和扩展名(下面是以.txt文件为例)
^([a-zA-Z]\\:|\\\\)\\\\([^\\\\]+\\\\)*[^\\/:*?"<>|]+\\.txt(1)?$

15.提取Color Hex Codes
抽取网页中的颜色的代码,可以使用下面的表达式
^#([A-Fa-f0-9]{6}|[A-Fa-f0-9]{3})$

16.提取网页图片
若想提取网页中所有图片信息,可以利用下面的表达式
\\<*[img][^\\\\>]*[src] *= *[\\"\\']{0,1}([^\\"\\'\\ >]*)

17.提取页面超链接

提取HTML中的超链接

(<a\\s*(?!.*\\brel=)[^>]*)(href="https?:\\/\\/)((?!(?:www\\.)?'/implode('|(?:www\\/)?',$follow_list).'))[^"]+((?!.*\\brel=)[^>]*)(?:[^>]*)>
18.查找css属性
可以搜索到相匹配的css属性
^\\s*[a-zA-Z\\-]+\\s*[:]{1}\\s[a-zA-Z0-9\\s.#]+[;]{1}

19.抽取注释
如果需要移除html长的注释,可以使用如下表达式
<!--(.*?)-->

20.匹配HTML标签 可以匹配出html中的标签属性
<\\/?\\w+((\\s+\\w+(\\s*=\\s*(?:".*?"|'.*?'|[\\^'">\\s]+))?)+\\s*)\\/?>
'.'     默认匹配除\n之外的任意一个字符,若指定flag DOTALL,则匹配任意字符,包括换行

'^'     匹配字符开头,若指定flags MULTILINE,这种也可以匹配上(r"^a","\nabc\neee",flags=re.MULTILINE)

'$'     匹配字符结尾, 若指定flags MULTILINE ,re.search('foo.$','foo1\nfoo2\n',re.MULTILINE).group() 会匹配到foo1

'*'     匹配*号前的字符0次或多次, re.search('a*','aaaabac')  结果'aaaa'

'+'     匹配前一个字符1次或多次,re.findall("ab+","ab+cd+abb+bba") 结果['ab', 'abb']

'?'     匹配前一个字符1次或0次 ,re.search('b?','alex').group() 匹配b 0次

'{m}'   匹配前一个字符m次 ,re.search('b{3}','alexbbbs').group()  匹配到'bbb'

'{n,m}' 匹配前一个字符n到m次,re.findall("ab{1,3}","abb abc abbcbbb") 结果'abb', 'ab', 'abb']

'|'     匹配|左或|右的字符,re.search("abc|ABC","ABCBabcCD").group() 结果'ABC'

'(...)' 分组匹配, re.search("(abc){2}a(123|45)", "abcabca456c").group() 结果为'abcabca45'

'\A'    只从字符开头匹配,re.search("\Aabc","alexabc") 是匹配不到的,相当于re.match('abc',"alexabc") 或^

'\Z'    匹配字符结尾,同$

'\d'    匹配数字0-9

'\D'    匹配非数字

'\w'    匹配[A-Za-z0-9]

'\W'    匹配非[A-Za-z0-9]

's'     匹配空白字符、\t、\n、\r , re.search("\s+","ab\tc1\n3").group() 结果 '\t'

'(?P<name>...)' 分组匹配 re.search("(?P<province>[0-9]{4})(?P<city>[0-9]{2})(?P<birthday>[0-9]{4})","").groupdict("city") 结果{'province': '', 'city': '', 'birthday': ''}
re的匹配语法:
1、re.match 从头开始匹配
2、re.search 匹配包含
3、re.findall 把所有匹配到的字符放到以列表中的元素返回
4、re.split 以匹配到的字符当做列表的分隔符
5、re.sub 匹配字符并替换
6、re.fullmatch 全部匹配
Python全栈开发之路 【第六篇】:Python基础之常用模块的更多相关文章
- Python全栈开发之路 【第一篇】:Python 介绍
本节内容 一.Python介绍 python的创始人为荷兰人——吉多·范罗苏姆(Guido van Rossum).1989年的圣诞节期间,吉多·范罗苏姆为了在阿姆斯特丹打发时间,决心开发一个新的脚本 ...
- Python全栈开发之路 【第二篇】:Python基础之数据类型
本节内容 一.字符串 记住: 有序类型:列表,元组,字符串 ---> 都可迭代: 无序类型:字典,集合 ---> 不可迭代: 特性:不可修改 class str(object): &quo ...
- Python全栈开发记录_第六篇(生成器和迭代器)
说生成器之前先说一个列表生成式:[x for x in range(10)] ->[0,1,2....,9]这里x可以为函数(因为对python而言就是一个对象而已),range(10)也可 ...
- python 全栈开发之路 day1
python 全栈开发之路 day1 本节内容 计算机发展介绍 计算机硬件组成 计算机基本原理 计算机 计算机(computer)俗称电脑,是一种用于高速计算的电子计算机器,可以进行数值计算,又可 ...
- Python全栈开发之路 【第七篇】:面向对象编程设计与开发(1)
本节内容 一.编程范式 编程指的是写程序.敲代码,就是指程序员用特定的语法.数据结构和算法编写的代码,目的是来告诉计算机如何执行任务的. 在编程的世界里最常见的两大流派是:面向过程与面向对象.“功夫的 ...
- Python全栈开发之路 【第四篇】:Python基础之函数
本节内容 函数def: 1.位置参数,默认参数 2.位置参数,关键参数 3.如果参数中出现 *users,传递的参数就可以不再是固定的个数, 传过来的所有元素进行打包成元组 *args,**kwarg ...
- Python全栈开发之路 【第八篇】:面向对象编程设计与开发(2)
一.继承与派生 什么是继承? 继承指的是类与类之间的关系,是一种什么是什么的关系,继承的功能之一就是用来解决代码重用问题. 继承是一种创建新的类的方式,在python中,新建的类可以继承一个或多个父类 ...
- python 全栈开发,Day134(爬虫系列之第1章-requests模块)
一.爬虫系列之第1章-requests模块 爬虫简介 概述 近年来,随着网络应用的逐渐扩展和深入,如何高效的获取网上数据成为了无数公司和个人的追求,在大数据时代,谁掌握了更多的数据,谁就可以获得更高的 ...
- python 全栈开发,Day32(知识回顾,网络编程基础)
一.知识回顾 正则模块 正则表达式 元字符 : . 匹配除了回车以外的所有字符 \w 数字字母下划线 \d 数字 \n \s \t 回车 空格 和 tab ^ 必须出现在一个正则表达式的最开始,匹配开 ...
随机推荐
- zabbix监控自动发现监控tomcat(V1)
背景说明: 由于zabbix监控使用自带的模版,只能监控主机上只有1个tomcat的场景适合,虽然网上很多朋友都是在每个监控项上面添加一个空格来解决问题.但是个人感觉这种方法还是蛮麻烦的,所以写一篇使 ...
- Springboot helloworld入门最经典例子
一.建立maven java项目 导入springboot包 二.配置pom.xml <project xmlns="http://maven.apache.org/POM/4.0.0 ...
- spring4笔记----UrlResource访问网络资源读取xml内容
package com.ij34.bean; import java.util.Iterator; import java.util.List; import org.dom4j.Document; ...
- 在CentOS上配置SAMBA共享目录(转载)
在CentOS上配置SAMBA共享目录 From: https://blog.csdn.net/qiumei1101381170/article/details/53265341 2016年11月21 ...
- 自动化测试基础篇--Selenium弹出框alert
摘自https://www.cnblogs.com/sanzangTst/p/7685304.html 不是所有的弹出框都叫alert,在使用alert方法前,先要识别出到底是不是alert.先认 ...
- 四、Tableau如何设置数据格式
一.要求 ‘销售额’:K为单位 ‘利润’: M为单位,负值用括号括起来,但是正值 ‘利润率’:带百分号,负值用括号括起来仍然时负值 二.解决方案 1.‘销售额’:m为单位 2.‘利润’: ...
- ASP.Net上传文件
在做Web项目时,上传文件是经常会碰到的需求.ASP.Net的WebForm开发模式中,封装了FileUpload控件,可以方便的进行文件上传操作.但有时,你可能不希望使用ASP.Net中的服务器控件 ...
- Go学习笔记06-内建容器
Go学习笔记06-内建容器 Go语言 数组 *切片(Slice) #F44336 Slice的操作 Map map示例 字符处理 数组 定义数组: //这样定义数组编译器自动初始化每个元素为0 va ...
- echarts 设置图例的颜色,不设置color,echarts里面也会有默认的颜色
- JavaScript 概述
什么是JavaScriptJavaScript 是一种具有面向对象能力的.解释型的程序设计语言. 它是基于对象和事件驱动并具有相对安全性的客户端脚本语言. 主要目的是,验证发往服务器端的数据.增加 W ...