angular cli http请求封装+拦截器配置+ 接口配置文件
内容:接口配置文件、http请求封装 、拦截器验证登录
1、接口配置文件
app.api.ts
import { Component, OnInit } from '@angular/core';

/**

 * 接口配置文件

 * baseurl

 * urlList

 */

export class apiList implements OnInit {

  baseurl: any = '';

  urlList: any = {};

  constructor() {

    this.baseurl = 'http://127.0.0.1';

    this.urlList =  {

      'login': {

        path: '/login',

        params: {

          username: '',

          password: ''

        }

      },

      'getUser': {

        path: '/getUser',

        params: {

          id: ''

        }

      }

    }

  }

  ngOnInit() {}

}
上面模拟定义了两个接口
2、http请求封装
app.service.ts
import { Component, Injectable } from '@angular/core';
import { HttpClient, HttpParams } from '@angular/common/http';
import {apiList} from './app.api'; // 引入api配置文件
@Component({
providers:[apiList]
})
@Injectable()
export class selfHttp {
public restServer;
public http;
status = {
'': '请求超时,请检查网络是否断开或者链接是否正确',
"": "错误的请求。由于语法错误,该请求无法完成。",
"": "未经授权。服务器拒绝响应。",
"": "已禁止。服务器拒绝响应。",
"": "未找到。无法找到请求的位置。",
"": "方法不被允许。使用该位置不支持的请求方法进行了请求。",
"": "不可接受。服务器只生成客户端不接受的响应。",
"": "需要代理身份验证。客户端必须先使用代理对自身进行身份验证。",
"": "请求超时。等待请求的服务器超时。",
"": "冲突。由于请求中的冲突,无法完成该请求。",
"": "过期。请求页不再可用。",
"": "长度必需。未定义“内容长度”。",
"": "前提条件不满足。请求中给定的前提条件由服务器评估为 false。",
"": "请求实体太大。服务器不会接受请求,因为请求实体太大。",
"": "请求 URI 太长。服务器不会接受该请求,因为 URL 太长。",
"": "不支持的媒体类型。服务器不会接受该请求,因为媒体类型不受支持。",
"": "HTTP 状态代码 {0}",
"": "内部服务器错误。",
"": "未实现。服务器不识别该请求方法,或者服务器没有能力完成请求。",
"": "服务不可用。服务器当前不可用(过载或故障)。"
};
constructor(Http: HttpClient, public api: apiList) {
console.log(this.api.baseurl);
this.http = Http;
this.restServer = this.api.baseurl;
}
public get(url, params?: Object, cb?: Function) {
this.msg(url);
let httpParams = new HttpParams();
const vm = this;
if (params) {
for (const key in params) {
if (params[key] === false || params[key]) {
httpParams = httpParams.set(key, params[key]);
}
}
}
vm.http.get(vm.restServer + url, { params: httpParams })
.subscribe(data => {
cb(data);
},(err)=>{
console.log(this.status[err.status]);
});
}
public post(url, data?: Object, cb?: Function, options?: Object) {
this.msg(url);
const vm = this;
vm.http.post(vm.restServer + url, data, options)
.subscribe(res => {
cb(res);
}, (err) => {
console.log(err);
console.log(this.status[err.status]);
}, () => {
//...请求完成
}
);
}
public put(url, data?: Object, cb?: Function, options?: Object) {
this.msg(url);
const vm = this;
vm.http.put(vm.restServer + url, data, options)
.subscribe(res => {
cb(res);
},(err)=>{
console.log(this.status[err.status]);
});
}
public delete(url, params?: Object, cb?: Function) {
this.msg(url);
let httpParams = new HttpParams();
const vm = this;
if (params) {
for (const key in params) {
if (params[key]) {
httpParams = httpParams.set(key, params[key]);
}
}
}
vm.http.delete(vm.restServer + url, { params: httpParams })
.subscribe(data => {
cb(data);
},(err)=>{
console.log(this.status[err.status]);
});
}
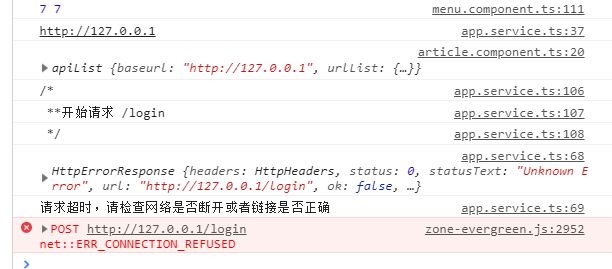
public msg(url) {
console.log('/*')
console.log(' **开始请求',url)
console.log(' */')
}
}
上面定义了几个请求的函数,已经提示信息的函数。
app.module.ts注入
import {apiList} from './common/app.api';

.

.

..

providers: [httpInterceptorProviders, apiList],
example.ts
import { Component, OnInit } from '@angular/core';

import { HttpHeaders } from '@angular/common/http';

import { selfHttp } from 'src/app/common/app.service';

import {apiList} from '../common/app.api';  // 引入

@Component({

  selector: 'app-article',

  templateUrl: './article.component.html',

  styleUrls: ['./article.component.css'],

  providers:[selfHttp, apiList]

})

export class ArticleComponent implements OnInit {

  httpOptions = {

    headers: new HttpHeaders({

      'Content-Type': 'application/json',

      'Authorization': 'my-auth-token'

    })

  };

  data: any;

  constructor(public http: selfHttp, public api: apiList) {

    console.log(this.api);

  }

  ngOnInit() {

    this.http.post(this.api.urlList.login.path, {username: , password:, other:}, res => {

      console.log('结果', res);

    }, this.httpOptions);

  }

}
然后访问的话就会
2、拦截器
app.myintercept.ts
/**

 * 拦截器验证token

 */

import { Injectable } from '@angular/core';

import {HttpInterceptor, HttpHandler, HttpRequest, HttpEvent,} from '@angular/common/http';

import { Router } from '@angular/router';

import { Observable,  } from 'rxjs';

import {apiList} from './app.api'

@Injectable()

export class InterceptorService implements HttpInterceptor {

    constructor( public router: Router,  public api: apiList) {

        // localStorage.setItem('access_token', 'xxxxxxxxxxxxx')

    };

    intercept(req: HttpRequest<any>, next: HttpHandler): Observable<HttpEvent<any>> {

        let authReq: any;

        // 实现第一次不拦截的方式:1. 指定接口不拦截  2. 判断本地localStorage

        let loginUrl = this.api.baseurl + this.api.urlList['login']['path'];

        if (req.url !== loginUrl) {

            if (localStorage.getItem('access_token')) {

                // console.log(2);

                const token = localStorage.getItem('access_token');

                authReq = req.clone({ setHeaders: { token } });

                return next.handle(authReq);

            } else {

                // 未登录  ==  access_token

                this.router.navigate(['/login']);

            }

        }

        authReq = req.clone({ setHeaders: {} });

        return next.handle(authReq);

    }

}
上面请求会验证是否有token,没有就跳转到登录页面。
定义拦截器收集文件

http-intercepts/index.ts
/**

 * 拦截器 收集

 * barrel

 */

import { HTTP_INTERCEPTORS } from '@angular/common/http';

import { InterceptorService } from '../app.myIntercept';

export const httpInterceptorProviders = [

    { provide: HTTP_INTERCEPTORS, useClass: InterceptorService, multi: true },

];
app.module.ts注入
import {httpInterceptorProviders} from 'src/app/common/http-interceptors/index'

.

.

.

.

providers: [httpInterceptorProviders, apiList],
现在如果进入页面请求,没有带token的话就会自动跳转到登录页面。
github: https://github.com/ft1107949255/BackSystem
angular cli http请求封装+拦截器配置+ 接口配置文件的更多相关文章
- Vue-admin工作整理(十六):Ajax-axios进行请求封装+拦截器
典型的工具类封装,增加拦截起来做相应的处理 user.js: import axios from './index' export const getUserInfo = ({ userId }) = ...
- 【转】AngularJs HTTP请求响应拦截器
任何时候,如果我们想要为请求添加全局功能,例如身份认证.错误处理等,在请求发送给服务器之前或服务器返回时对其进行拦截,是比较好的实现手段. angularJs通过拦截器提供了一个从全局层面进行处理的途 ...
- Struts2 拦截器配置以及实现
@(Java ThirdParty)[Struts|Interceptor] Struts2 拦截器配置以及实现 Struts2的拦截器应用于Action,可以在执行Action的方法之前,之后或者两 ...
- Spring 拦截器配置
Spring interceptor拦截器配置 Spring mvc的拦截器是通过handlerinterceptor来实现的 实现方式: 1.自定义一个类实现Spring的handlerinterc ...
- Struts2拦截器配置
1. 理解拦截器 1.1. 什么是拦截器: 拦截器,在AOP(Aspect-Oriented Programming)中用于在某个方法或字段被访问之前,进行拦截然后在之前或之后加入某些操作.拦截是AO ...
- Struts2-整理笔记(五)拦截器、拦截器配置
拦截器(Interceptor) 拦截器是Struts2最强大的特性之一,它是一种可以让用户在Action执行之前和Result执行之后进行一些功能处理的机制. 拦截器的优点 简化了Action的实现 ...
- SpringBoot整合Mybatis完整详细版二:注册、登录、拦截器配置
接着上个章节来,上章节搭建好框架,并且测试也在页面取到数据.接下来实现web端,实现前后端交互,在前台进行注册登录以及后端拦截器配置.实现简单的未登录拦截跳转到登录页面 上一节传送门:SpringBo ...
- Springboot中SpringMvc拦截器配置与应用(实战)
一.什么是拦截器,及其作用 拦截器(Interceptor): 用于在某个方法被访问之前进行拦截,然后在方法执行之前或之后加入某些操作,其实就是AOP的一种实现策略.它通过动态拦截Action调用的对 ...
- 转载 - Struts2拦截器配置
出处:http://blog.csdn.net/axin66ok/article/details/7321430 目录(?)[-] 理解拦截器 1 什么是拦截器 2 拦截器的实现原理 拦截器的配置 使 ...
随机推荐
- 【经验分享】linux交叉编译 - openssl动态库
一.准备工作 1.到openssl官网下载最新版本openssl(如openssl-1.1.1d.tar.gz),上传到linux编译机上(如上传到目录/home/test下),并使用tar -xvf ...
- pop 与 popitem
pop给出一个键弹出值 popitem弹出一个项 >>> a.pop(2)'two'>>> a{1: 'one', 3: 'three', 4: 'four'}&g ...
- luogu P1102 A-B 数对 |二分查找
题目描述 出题是一件痛苦的事情! 题目看多了也有审美疲劳,于是我舍弃了大家所熟悉的 A+B Problem,改用 A-B 了哈哈! 好吧,题目是这样的:给出一串数以及一个数字 C,要求计算出所有 A- ...
- jQuery中的基本选择器,id,class,元素,通用
常用的基本选择器: 后续的补充选择器 为了后面看的方便,我们先将body中的内容展示出来: <body> <p> 账号:<input type="text&qu ...
- openlayers5-webpack 入门开发系列一初探篇(附源码下载)
前言 openlayers5-webpack 入门开发系列环境知识点了解: node 安装包下载webpack 打包管理工具需要依赖 node 环境,所以 node 安装包必须安装,上面链接是官网下载 ...
- R语言主成分分析(PCA)
数据的导入 > data=read.csv('F:/R语言工作空间/pca/data.csv') #数据的导入> > ls(data) #ls()函数列出所有变量 [1] " ...
- 《吊打面试官》系列-ConcurrentHashMap & HashTable
你知道的越多,你不知道的越多 点赞再看,养成习惯 本文 GitHub https://github.com/JavaFamily 已收录,有一线大厂面试点思维导图,也整理了很多我的文档,欢迎Star和 ...
- OPPO R11刷机初体验
刷机目的 最初打算是用旧手机搭一个服务器,首先想到的是刷一个Linux系统,但这太难了,我搞不定,然后就想着可以用一些软件比如KSWEB之类的来代替,但是想要访问80端口的话还是需要root,但是普通 ...
- js打乱数组排序
用到的知识点:Math.random()//用于打乱数组索引 random() 方法可返回介于 0(包含) ~ 1(不包含) 之间的一个随机数. var arr=[1,2,3,4,5,6]; for( ...
- 基于 HTML5 WebGL 构建智能数字化城市 3D 全景
前言 自 2011 年我国城镇化率首次突破 50% 以来,<新型城镇化发展规划>将智慧城市列为我国城市发展的三大目标之一,并提出到 2020 年,建成一批特色鲜明的智慧城市.截至现今,全国 ...