Android五大布局详解——TableLayout(表格布局)
TableLayout
前面所学的LinearLayout和RelativeLayout两大布局已经完全适用于各种开发条件下,其他的布局仅供参考学习,毕竟知识就是力量,以后的开发过程中万一遇到也能游刃有余。
表格布局允许我们使用表格的方式来排列组件,就是行与列的方式。
简单描述
1.直接往TableLayout中添加组件,这个组件占满一行。
<?xml version="1.0" encoding="utf-8"?>

<TableLayout xmlns:android="http://schemas.android.com/apk/res/android"

    android:layout_width="match_parent"

    android:layout_height="match_parent"

    >

    <Button

        android:id="@+id/button"

        android:layout_width="wrap_content"

        android:layout_height="wrap_content"

        android:text="TableLayout"

        />

</TableLayout>
效果如图:

2.如果想要一行上有多个组件,就要添加一个TableRow的容器。
<?xml version="1.0" encoding="utf-8"?>

<TableLayout xmlns:android="http://schemas.android.com/apk/res/android"

    android:layout_width="match_parent"

    android:layout_height="match_parent"

    >

    <TableRow>

        <Button

            android:id="@+id/button_1"

            android:layout_width="wrap_content"

            android:layout_height="wrap_content"

            android:text="1"

            />

        <Button

            android:id="@+id/button_2"

            android:layout_width="wrap_content"

            android:layout_height="wrap_content"

            android:text="2"

            />

        <Button

            android:id="@+id/button_3"

            android:layout_width="wrap_content"

            android:layout_height="wrap_content"

            android:text="3"

            />

        <Button

            android:id="@+id/button_4"

            android:layout_width="wrap_content"

            android:layout_height="wrap_content"

            android:text="4"

            />

    </TableRow>

</TableLayout>
效果如图:
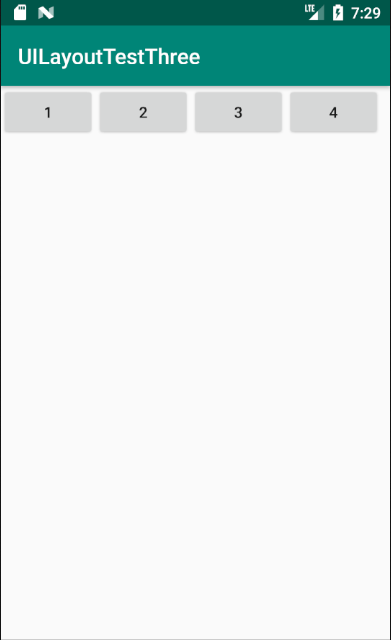
3.tablerow中的组件个数就决定了该行有多少列。
常用属性
1.android:collapseColumns:设置需要被隐藏的列的序号。比如android:collapseColumns="0,2",隐藏第一列和第三列。
<?xml version="1.0" encoding="utf-8"?>

<TableLayout xmlns:android="http://schemas.android.com/apk/res/android"

    android:layout_width="match_parent"

    android:layout_height="match_parent"

    android:collapseColumns="0,2"

    >

    <TableRow>

        <Button

            android:id="@+id/button_1"

            android:layout_width="wrap_content"

            android:layout_height="wrap_content"

            android:text="1"

            />

        <Button

            android:id="@+id/button_2"

            android:layout_width="wrap_content"

            android:layout_height="wrap_content"

            android:text="2"

            />

        <Button

            android:id="@+id/button_3"

            android:layout_width="wrap_content"

            android:layout_height="wrap_content"

            android:text="3"

            />

        <Button

            android:id="@+id/button_4"

            android:layout_width="wrap_content"

            android:layout_height="wrap_content"

            android:text="4"

            />

        <Button

            android:id="@+id/button_5"

            android:layout_width="wrap_content"

            android:layout_height="wrap_content"

            android:text="5"

            />

        <Button

            android:id="@+id/button_6"

            android:layout_width="wrap_content"

            android:layout_height="wrap_content"

            android:text="6"

            />

    </TableRow>

</TableLayout>
效果如图:

2.android:stretchColumns:设置允许被拉伸的列的列序号。比如android:stretchColumns="1",设置第二列可拉伸列,让该列填满这一行所有的剩余空间。
<?xml version="1.0" encoding="utf-8"?>

<TableLayout xmlns:android="http://schemas.android.com/apk/res/android"

    android:layout_width="match_parent"

    android:layout_height="match_parent"

    android:stretchColumns="1"

    >

    <TableRow>

        <Button

            android:id="@+id/button_1"

            android:layout_width="wrap_content"

            android:layout_height="wrap_content"

            android:text="1"

            />

        <Button

            android:id="@+id/button_2"

            android:layout_width="wrap_content"

            android:layout_height="wrap_content"

            android:text="2"

            />

        <Button

            android:id="@+id/button_3"

            android:layout_width="wrap_content"

            android:layout_height="wrap_content"

            android:text="3"

            />

    </TableRow>

</TableLayout>
效果如图:

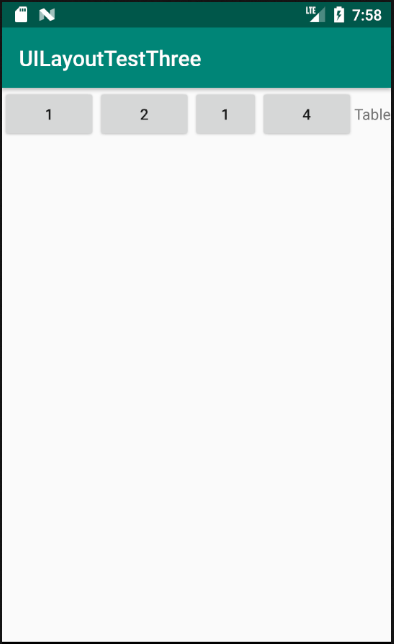
3.android:shrinkColumns:设置允许被收缩的列的列序号
<?xml version="1.0" encoding="utf-8"?>

<TableLayout xmlns:android="http://schemas.android.com/apk/res/android"

    android:layout_width="match_parent"

    android:layout_height="match_parent"

    android:shrinkColumns="2"

    >

    <TableRow>

        <Button

            android:id="@+id/button_1"

            android:layout_width="wrap_content"

            android:layout_height="wrap_content"

            android:text="1"

            />

        <Button

            android:id="@+id/button_2"

            android:layout_width="wrap_content"

            android:layout_height="wrap_content"

            android:text="2"

            />

        <Button

            android:id="@+id/button_3"

            android:layout_width="wrap_content"

            android:layout_height="wrap_content"

            android:text="1"

            />

        <Button

            android:id="@+id/button_4"

            android:layout_width="wrap_content"

            android:layout_height="wrap_content"

            android:text="4"

            />

        <TextView

            android:layout_width="wrap_content"

            android:layout_height="wrap_content"

            android:text="Table" />

    </TableRow>

</TableLayout>
运行结果如图:
demo
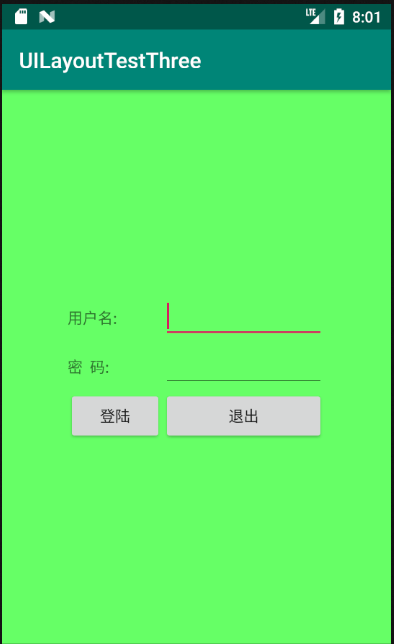
实现如图所示的界面
<?xml version="1.0" encoding="utf-8"?>

<TableLayout xmlns:android="http://schemas.android.com/apk/res/android"

    xmlns:tools="http://schemas.android.com/tools"

    android:id="@+id/TableLayout1"

    android:layout_width="match_parent"

    android:layout_height="match_parent"

    tools:context=".MainActivity"

    android:stretchColumns="0,3"

    android:gravity="center_vertical"

    android:background="#66FF66"

    >

    <TableRow>

        <TextView />

        <TextView

            android:layout_width="wrap_content"

            android:layout_height="wrap_content"

            android:text="用户名:"/>

        <EditText

            android:layout_width="wrap_content"

            android:layout_height="wrap_content"

            android:minWidth="150dp"/>

        <TextView />

    </TableRow>

    <TableRow>

        <TextView />

        <TextView

            android:layout_width="wrap_content"

            android:layout_height="wrap_content"

            android:text="密  码:"

            />

        <EditText

            android:layout_width="wrap_content"

            android:layout_height="wrap_content"

            android:minWidth="150dp"

            />

        <TextView />

    </TableRow>

    <TableRow>

        <TextView />

        <Button

            android:layout_width="wrap_content"

            android:layout_height="wrap_content"

            android:text="登陆"/>

        <Button

            android:layout_width="wrap_content"

            android:layout_height="wrap_content"

            android:text="退出"/>

        <TextView />

    </TableRow>

</TableLayout>
分析:
调用gravity属性,设置为center_vertical,让布局里面的组件在竖直方向上居中;将TableLayout中的第一和第四列设置为可拉伸;在每个TableRow中添加两个TextView,用于拉伸填满该行,这样可以让表格水平居中,android:stretchColumns="0,3" 设置为0和3,是为了让两边都充满,那么中间部分就可以居中了。
Android五大布局详解——TableLayout(表格布局)的更多相关文章
- Android 布局详解 -三表格布局(TableLayout)以及重要属性
TableLayout跟TableRow 是一组搭配应用的布局,TableLayout置底,TableRow在TableLayout的上方,而Button.TextView等控件就 ...
- Html5移动端页面自适应布局详解(阿里rem布局)
在移动设备上进行网页的重构或开发,首先得搞明白的就是移动设备上的viewport,通读网上的各种对于viewport的解释之后 大概viewport可以理解为三种 1.layout viewport ...
- Android 布局详解
Android 布局详解 1.重用布局 当一个布局文件被多处使用时,最好<include>标签来重用布局. 例如:workspace_screen.xml的布局文件,在另一个布局文件中被重 ...
- Grid 网格布局详解
Grid网格布局详解: Grid布局与Flex布局有着一定的相似性,Grid布局是将容器划分成行和列,产生单元格,可以看做是二维布局. 基本概念: 采用网格布局的区域,称为"容器" ...
- android:TableLayout表格布局详解
1.TableLayout简介2.TableLayout行列数的确定3.TableLayout可设置的属性详解4.一个包含4个TableLayout布局的实例及效果图一.Tablelayout简介 ...
- android:TableLayout表格布局详解
http://blog.csdn.net/justoneroad/article/details/6835915 这篇博文包括的内容:1.TableLayout简介2.TableLayout行列数的确 ...
- [置顶] Android系统五大布局详解Layout
我们知道Android系统应用程序一般是由多个Activity组成,而这些Activity以视图的形式展现在我们面前,视图都是由一个一个的组件构成的.组件就是我们常见的Button.TextEdit等 ...
- Android系统五大布局详解Layout
我们知道Android系统应用程序一般是由多个Activity组成,而这些Activity以视图的形式展现在我们面前, 视图都是由一个一个的组件构成的.组件就是我们常见的Button.TextEdit ...
- Android开发之详解五大布局
http://bbs.chinaunix.net/thread-3654213-1-1.html 为了适应各式各样的界面风格,Android系统提供了5种布局,这5种布局分别是: LinearLayo ...
随机推荐
- CF579 - A Raisinng bacteria
You are a lover of bacteria. You want to raise some bacteria in a box. Initially, the box is empty. ...
- CodeForces 5C Longest Regular Backet sequence
This is yet another problem dealing with regular bracket sequences. We should remind you that a brac ...
- cmd 窗口中运行 Java 程序
1.CMD 命令提示符(Command Processor)(CMD) CMD命令:开始->运行->键入 cmd(在命令行里可以看到系统版本.文件系统版本) 2.对文件夹操作的部分命令 启 ...
- python读取,显示,保存mnist图片
python处理二进制 python的struct模块可以将整型(或者其它类型)转化为byte数组.看下面的代码. # coding: utf-8 from struct import * # 包装成 ...
- HtmlAgilityPack 获取节点的子节点
这个问题真的是好无语 var table = doc.DocumentNode.SelectSingleNode("//table[@class='ddd']"); var a = ...
- MySQL InnoDB 存储引擎原理浅析
注:本文主要基于MySQL 5.6以后版本编写,多数知识来着书籍<MySQL技术内幕++InnoDB存储引擎>,本文章仅记录个人认为比较重要的部分,有兴趣的可以花点时间读原书. 一.MyS ...
- 【JS】327- javascript 的 api 设计原则
点击上方"前端自习课"关注,学习起来~ 前言 本篇博文来自一次公司内部的前端分享,从多个方面讨论了在设计接口时遵循的原则,总共包含了七个大块.系卤煮自己总结的一些经验和教训.本篇博 ...
- 浅谈Redis面试热点之工程架构篇[1]
前言 前面用两篇文章大致介绍了Redis热点面试中的底层实现相关的问题,感兴趣的可以回顾一下:[决战西二旗]|Redis面试热点之底层实现篇[决战西二旗]|Redis面试热点之底层实现篇(续) 接下来 ...
- LNMP-Nginx配置不记录静态文件、过期时间
用户访问web网站,通常日志文件会记录很多web站点上的一些静态文件信息,如果长期不处理,日志文件会越来越大,占用的系统资源也越大,此时就需要我们配置不记录静态文件和过期时间,减少日志文件记录过多不必 ...
- VS Code 成主宰、Vue 备受热捧!2019 前端开发趋势必读
前端在生产和开发中占据着越来越重要的地位,PC 端.手机端.桌面端.智能手表端等等设备都离不开前端的身影.本文将围绕框架.编程语言.工具.React.Vue 等方面,全面回顾 2019 年前端与 We ...