ubuntu安装elasticsearch及head插件
1.安装elasticsearch,参考http://www.cnblogs.com/hanyinglong/p/5409003.html就可以了
简单描述下:
mkdir -p /usr/local/kencery/elasticsearch
groupadd elasticsearch
useradd -d /usr/local/kencery/elasticsearch -g elasticsearch -p elasticsearch elasticsearch
然后将tar包解压到elasticsearch目录下就可以了,我下载的版本是elasticsearch-6.2.4.tar.gz
启动时直接在bin目录下执行:./elasticsearch
有两个问题注意下,一是不要用root用户执行,二是有可能会遇到错误:
[]: max virtual memory areas vm.max_map_count [] is too low, increase to at least []
参考https://blog.csdn.net/jiankunking/article/details/65448030修改下/etc/sysctl.conf,记得改下elasticsearch.yml中的network.host以及端口配置,重启后就可以访问了:http://192.168.141.13:9200/
name    "4tlNeHN"
cluster_name    "elasticsearch"
cluster_uuid    "BYwLfhswS8O2y-WYXAKUsA"
version
number    "6.2.4"
build_hash    "ccec39f"
build_date    "2018-04-12T20:37:28.497551Z"
build_snapshot    false
lucene_version    "7.2.1"
minimum_wire_compatibility_version    "5.6.0"
minimum_index_compatibility_version    "5.0.0"
tagline    "You Know, for Search"
2.安装elasticsearch-head,这里敲下黑板,真的很麻烦,如果不了解,花费大半天时间也是很正常的,这里就直接说下最后成功的办法
2.1 elasticsearch 5.x之后不支持直接plugin安装head插件,而是将head作为一个独立的服务安装的,首先需要安装依赖的node,npm,grunt,参考https://blog.csdn.net/hard_boy/article/details/79565068,我是以root执行的,稍微有点不同:
apt-get install npm
apt-get install nodejs-legacy
npm install -g grunt
npm install -g grunt-cli
下载elasticsearch-head,我解压到目录/usr/local/kencery/elasticsearch-head,将目录用户改为elasticsearch
2.2 然后修改配置
2.2.1 修改head的连接地址 elasticsearch-head/_site/app.js
this.base_uri = this.config.base_uri || this.prefs.get("app-base_uri") || "http://localhost:9200";
将localhost改为自己的ip
2.2.2 修改服务器的监听地址elasticsearch-head/Gruntfile.js
connect: {
               server: {
                   options: {
                       port: ,
                       base: '.',
                       keepalive: true
                   }
               }
           }
options中添加 hostname: '*'
2.2.3 修改elasticseach的配置文件elasticsearch.yml, 修改对应的ip以及跨域的设置,添加:
http.cors.enabled: true
http.cors.allow-origin: "*"
2.3 在elasticsearch-head下运行: grunt server
2.3.1 但是会出现错误提示(当时命令敲的npm start,应该是一样的):
root@ubuntu:/usr/local/kencery/elasticsearch-head# npm start

> elasticsearch- start /usr/local/kencery/elasticsearch-head
> grunt server

grunt-cli: The grunt command line interface (v1.2.0)

Fatal error: Unable to find local grunt.

If you're seeing this message, grunt hasn't been installed locally to
your project. For more information about installing and configuring grunt,
please see the Getting Started guide:

http://gruntjs.com/getting-started

npm ERR! Linux --generic
npm ERR! argv "/usr/bin/nodejs" "/usr/bin/npm" "start"
npm ERR! node v4.2.6
npm ERR! npm  v3.5.2
npm ERR! code ELIFECYCLE
npm ERR! elasticsearch- start: `grunt server`
npm ERR! Exit status
npm ERR!
npm ERR! Failed at the elasticsearch- start script 'grunt server'.
npm ERR! Make sure you have the latest version of node.js and npm installed.
npm ERR! If you do, this is most likely a problem with the elasticsearch-head package,
npm ERR! not with npm itself.
npm ERR! Tell the author that this fails on your system:
npm ERR!     grunt server
npm ERR! You can get information on how to open an issue for this project with:
npm ERR!     npm bugs elasticsearch-head
npm ERR! Or if that isn't available, you can get their info via:
npm ERR!     npm owner ls elasticsearch-head
npm ERR! There is likely additional logging output above.

npm ERR! Please include the following file with any support request:
npm ERR!     /usr/local/kencery/elasticsearch-head/npm-debug.log
看提示大概有提到版本不是最新的问题,所以就抱着试一试的心态去升级npm以及node
参考https://www.cnblogs.com/ae6623/p/6242423.html
npm cache clean -f
npm install -g n
n stable
npm install npm@latest -g
再查看下版本,会看到
elasticsearch@ubuntu:~$ node -v
v10.4.0
elasticsearch@ubuntu:~$ npm -v
2.3.2 但是运行grunt server依然报错:
grunt hasn't been installed locally to your project
参考https://segmentfault.com/q/1010000004172559/a-1020000004193932,执行:
npm install grunt --save-dev
2.3.3 再次运行,依然报错:
elasticsearch@ubuntu:/usr/local/kencery/elasticsearch-head$ grunt server
>> Local Npm module "grunt-contrib-clean" not found. Is it installed?
>> Local Npm module "grunt-contrib-concat" not found. Is it installed?
>> Local Npm module "grunt-contrib-watch" not found. Is it installed?
>> Local Npm module "grunt-contrib-connect" not found. Is it installed?
>> Local Npm module "grunt-contrib-copy" not found. Is it installed?
>> Local Npm module "grunt-contrib-jasmine" not found. Is it installed?
Warning: Task "connect:server" not found. Use --force to continue.
然后我干脆把有关grunt的都装了一遍最新的:
npm install grunt@latest
npm install grunt-cli@latest
npm install grunt-contrib-copy@latest
npm install grunt-contrib-concat@latest
npm install grunt-contrib-uglify@latest
npm install grunt-contrib-clean@latest
npm install grunt-contrib-watch@latest
npm install grunt-contrib-connect@latest
npm install grunt-contrib-jasmine@latest
2.3.4 最后grunt server终于可以启动了:
elasticsearch@ubuntu:/usr/local/kencery/elasticsearch-head$ grunt server
(node:) ExperimentalWarning: The http2 module is an experimental API.
Running "connect:server" (connect) task
Waiting forever...
Started connect web server on http://localhost:9100
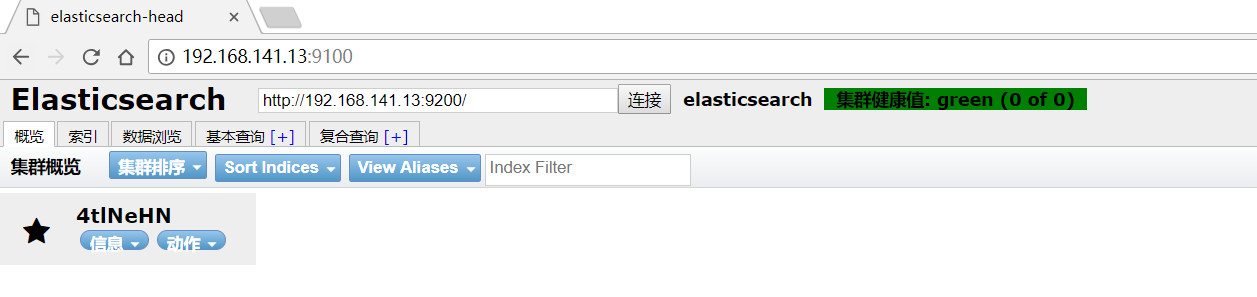
可以看到elasticsearch服务的端口是9200,head插件服务的端口是9100,我们访问head然后head再访问的elasticsearch。
可以新建索引试一下:

状态yellow还是有一些问题,并不影响使用,对于ES也只是刚接触,并没多少了解,后续使用过程中遇到问题再作纪录。
参考文章:
1.http://www.cnblogs.com/hanyinglong/p/5409003.html
2.https://blog.csdn.net/jiankunking/article/details/65448030
3.https://blog.csdn.net/hard_boy/article/details/79565068
4.https://www.cnblogs.com/ae6623/p/6242423.html
5.https://segmentfault.com/q/1010000004172559/a-1020000004193932
ubuntu安装elasticsearch及head插件的更多相关文章
- docker安装elasticsearch及head插件
使用 Docker 拉取ElasticSearch镜像 docker pull elasticsearch:7.0.0 查看镜像 ID docker images 运行 docker run -e E ...
- docker安装elasticsearch和head插件
使用 Docker 拉取ElasticSearch镜像 docker pull elasticsearch:7.0.0 查看镜像 ID docker images 运行 docker run -e E ...
- ubuntu安装elasticSearch及插件
原文地址:http://www.niu12.com/article/18 前提 1.安装好Java1.8以上环境并配置好JAVA_HOME(elasticsearch运行环境) 2.node环境6.5 ...
- ubuntu 安装elasticsearch
elasticsearch简介 环境准备 elasticsearch:7.0.0 kibana :7.0.0 安装 1.新创建普通用户 elasticsearch不能用root账号 ...
- 安装Elasticsearch中Head插件并使用
基础环境 Elasticsearch集群搭建请参考前一篇文章http://www.cnblogs.com/aubin/p/8012840.html 系统 节点名 IP 软件版本 CentOS7.3 e ...
- windows下安装ElasticSearch的Head插件
es5以上版本安装head需要安装node和grunt(之前的直接用plugin命令即可安装) (一)从地址:https://nodejs.org/en/download/ 下载相应系统的msi,双击 ...
- windows安装elasticsearch和elasticsearch-head插件
1.去官网下载最新软件 选择zip包,https://www.elastic.co/downloads/elasticsearch 2.下载node 必须 > 6.0已上 3.解压elastic ...
- Windows10安装Elasticsearch IK分词插件
安装插件 cmd切换到Elasticsearch安装目录下 C:\Users\Administrator>D: D:\>cd D:\Program Files\Elastic\Elasti ...
- win7安装Elasticsearch和Elasticsearch-Head插件
1.环境搭建 1)Java环境搭建可以参考相关的资料,这里不做详细介绍 2)nodejs环境搭建 到官方网站下载相应的zip包:https://nodejs.org/dist/v8.9.1/node- ...
随机推荐
- 【Android】drawable VS mipmap
Android Studio 创建工程后默认的资源文件夹如下图所示: 一直有些疑惑的是 mipmap 和 drawable 文件夹有什么区别,以及是否还需要创建 drawable-xhdpi, dra ...
- android 基于wifi模块通信开发
这篇文章主要是我写完手机与wifi模块通信后所用来总结编写过程的文章,下面,我分几点来说一下编写的大概流程. 一.拉出按钮控件并设置它的点击事件 二.设置wifi权限 三.打开和关闭wifi 四.扫描 ...
- ProcessBuilder waitFor 调用外部应用
小程序项目最初使用ffmpeg转换微信录音文件为wav格式,再交给阿里云asr识别成文字.视频音频转换最常用是ffmpeg. 1 ffmpeg -i a.mp3 b.wav 相关文章: 小程序实现语音 ...
- react开发中的小细节
目前开始使用react余遇到的问题还不是很多,但还是希望总结一下. react中的属性prop: 在react中组件的父子组件的通信是基于prop的,当然对于底层的东西不是特别了解,但可以说一说它的基 ...
- Oracle DBLink跨数据库访问SQL server数据同步 踩坑实录
项目需求:这里暂且叫A公司吧,A公司有一套人事管理软件,需要与我们公司的软件做人员信息同步,A公司用的是SQL server数据库,我们公司用的Oracle,接口都不会开发(一万句"fuck ...
- Extjs的textfield的颜色设置和出现的问题笔记
Ext.getCmp('alarmsLevelVal').setFieldStyle('background-color:#ff0000;background-p_w_picpath: none; ' ...
- RocketMQ中Broker的消息存储源码分析
Broker和前面分析过的NameServer类似,需要在Pipeline责任链上通过NettyServerHandler来处理消息 [RocketMQ中NameServer的启动源码分析] 实际上就 ...
- Java匹马行天下之J2EE框架开发——Spring—>Spring框架知多少
————也许我注定成不了一个伟大的人,但是至少我可以做一个很棒的自己.我想我现在应该做的不是瞻前顾后,而是活在当下,正确认知自己,做好自己现在的工作,努力提升自己的能力,踏踏实实地做一个程序员 一.思 ...
- SpringMVC学习笔记之---简单入门
SpringMVC简单入门 (一)什么是MVC设计模式 (1)model:模型数据,业务逻辑 (3)view:呈现模型,与用户进行交互 (3)controller:负责接收并处理请求,响应客户端 (二 ...
- 佳木斯集训Day2
D2好点了,最起码不像之前那么水 T1按照常规操作是个找规律,类似于括号匹配的题,但是又不是,推进栈里,然后看最长的左括号有多少个,然后直接cout就可以了 #include <bits/std ...