
《Java Spring框架》Spring切面(AOP)配置详解
1. Spring 基本概念
AOP(Aspect Oriented Programming)称为面向切面编程,在程序开发中主要用来解决一些系统层面上的问题,比如日志,事务,权限等待,Struts2的拦截器设计就是基于AOP的思想,是个比较经典的例子。
在不改变原有的逻辑的基础上,增加一些额外的功能。代理也是这个功能,读写分离也能用aop来做。
2. 原理图:
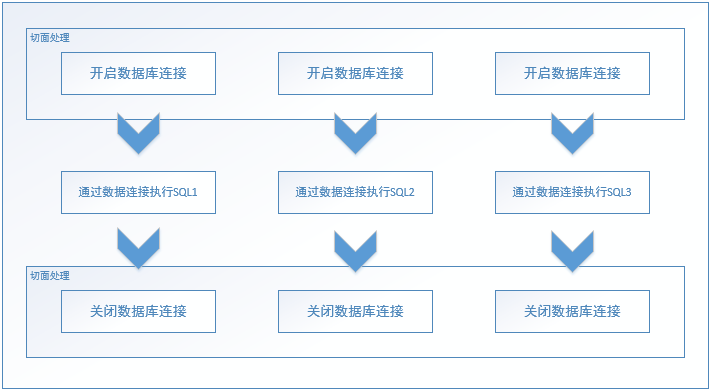
我们希望业务开发人员只关心中间部分,不再需要关系开启和关闭数据库连接的情况,同时也避免了代码重复和可能出现的问题。
3. 代码
public interface UserService {

    //删

    void save();

    String getStr();

    void setStr(String str);

}
public class UserServiceImpl implements UserService {

    private String str = "0";

    public String getStr() {

        return str;

    }

    public void setStr(String str) {

        this.str = str;

    }

    @Override

    public void save() {

        System.out.println("--------- save --------------");

    }

}
import org.aspectj.lang.ProceedingJoinPoint;

/**

 * 自定义通知类

 */

public class MyAdvice {

    //before 前置通知 在目标方法前调用

    public void before() {

        System.out.println("before");

    }

    //after 最终通知(后置通知)在目标方法后调用,无论是否出现异常都会执行 finally

    public void after() {

        System.out.println("after");

    }

    //afterReturning 成功通知(后置通知)在目标方法执行后,并且执行成功,如果方法出现异常则不调用

    public void afterReturning() {

        System.out.println("afterReturning");

    }

    //afterThrowing 异常通知(后置通知)在目标方法执行出现异常的时候才会调用

    public void afterThrowing() {

        System.out.println("afterThrowing");

    }

    //around 环绕通知 需要我们手动调用目标方法,并且可以设置通知

    public Object around(ProceedingJoinPoint pjp) throws Throwable {

        System.out.println("around before");

        Object proceed = pjp.proceed();

        System.out.println("around after");

        return proceed;

    }

}
import com.bing.aop.service.UserService;

import org.junit.Test;

import org.junit.runner.RunWith;

import org.springframework.test.context.ContextConfiguration;

import org.springframework.test.context.junit4.SpringJUnit4ClassRunner;

import javax.annotation.Resource;

@RunWith(SpringJUnit4ClassRunner.class)

@ContextConfiguration("classpath:applicationContext_aop.xml")

public class AopTest {

    @Resource(name="userService")

    UserService us;

    @Test

    public void Test2() {

        us.save();

    }

}
配置文件:文件名(applicationContext_aop.xml)
<?xml version="1.0" encoding="UTF-8"?>

<beans xmlns="http://www.springframework.org/schema/beans"

       xmlns:xsi="http://www.w3.org/2001/XMLSchema-instance"

       xmlns:aop="http://www.springframework.org/schema/aop"

       xsi:schemaLocation="http://www.springframework.org/schema/beans http://www.springframework.org/schema/beans/spring-beans-4.3.xsd

        http://www.springframework.org/schema/aop http://www.springframework.org/schema/aop/spring-aop-4.3.xsd">

    <!-- 目标对象 -->

    <bean name="userService" class="com.bing.aop.service.UserServiceImpl"></bean>

    <!-- 通知对象 -->

    <bean name="myAdvice" class="com.bing.aop.MyAdvice"></bean>

    <aop:config>

        <!-- 切入点  expression 切入点表达式 可以配置要增强的方法

                            public void com.bing.aop.service.UserServiceImpl.save()

                            * com.bing.aop.service.*ServiceImpl.*(..)

                           id 就是唯一标识

        -->

        <aop:pointcut expression="execution(* com.bing.aop.service.*ServiceImpl.*(..))" id="servicePc"/>

        <!-- 切面 通知+切入点 -->

        <aop:aspect ref="myAdvice">

            <!-- 通知类型 -->

            <aop:before method="before" pointcut-ref="servicePc"/>

            <!-- 最终通知 后置通知 -->

            <aop:after method="after" pointcut-ref="servicePc"/>

            <!-- 成功通知 后置通知 -->

            <aop:after-returning method="afterReturning" pointcut-ref="servicePc"/>

            <!-- 异常通知 后置通知 -->

            <aop:after-throwing method="afterThrowing" pointcut-ref="servicePc"/>

            <!--  环绕通知-->

            <aop:around method="around" pointcut-ref="servicePc"/>

        </aop:aspect>

    </aop:config>

</beans>
运行结果:

到这里其实发现这个AOP没有什么实际用处,前后中间执行的东西都没有关系,并不能体现真正的AOP思想。
我们将上述代码修改一下:修改环绕通知的方法。
import com.bing.aop.service.UserService;

import com.bing.aop.service.UserServiceImpl;

import org.aspectj.lang.ProceedingJoinPoint;

/**

 * 自定义通知类

 */

public class MyAdvice {

    //before 前置通知 在目标方法前调用

    public void before() {

        System.out.println("before");

    }

    //after 最终通知(后置通知)在目标方法后调用,无论是否出现异常都会执行 finally

    public void after() {

        System.out.println("after");

    }

    //afterReturning 成功通知(后置通知)在目标方法执行后,并且执行成功,如果方法出现异常则不调用

    public void afterReturning() {

        System.out.println("afterReturning");

    }

    //afterThrowing 异常通知(后置通知)在目标方法执行出现异常的时候才会调用

    public void afterThrowing() {

        System.out.println("afterThrowing");

    }

    //around 环绕通知 需要我们手动调用目标方法,并且可以设置通知

    public Object around(ProceedingJoinPoint pjp) throws Throwable {

        UserService userService = (UserServiceImpl)pjp.getTarget();

        Object proceed = null;

        if("1".equals(userService.getStr()) || "setStr".equals(pjp.getSignature().getName())){

            proceed = pjp.proceed();

        }

        return proceed;

    }

}
import com.bing.aop.service.UserService;

import org.junit.Test;

import org.junit.runner.RunWith;

import org.springframework.test.context.ContextConfiguration;

import org.springframework.test.context.junit4.SpringJUnit4ClassRunner;

import javax.annotation.Resource;

@RunWith(SpringJUnit4ClassRunner.class)

@ContextConfiguration("classpath:applicationContext_aop.xml")

public class AopTest {

    @Resource(name="userService")

    UserService us;

    @Test

    public void Test2() {

        System.out.println("设置前:------------Str == 0");

        us.save();

        us.setStr("1");

        System.out.println("设置前:------------Str == 1");

        us.save();

    }

}
然后将配置文件的其他通知都去掉:
<?xml version="1.0" encoding="UTF-8"?>

<beans xmlns="http://www.springframework.org/schema/beans"

       xmlns:xsi="http://www.w3.org/2001/XMLSchema-instance"

       xmlns:aop="http://www.springframework.org/schema/aop"

       xsi:schemaLocation="http://www.springframework.org/schema/beans http://www.springframework.org/schema/beans/spring-beans-4.3.xsd

        http://www.springframework.org/schema/aop http://www.springframework.org/schema/aop/spring-aop-4.3.xsd">

    <!-- 目标对象 -->

    <bean name="userService" class="com.bing.aop.service.UserServiceImpl"></bean>

    <!-- 通知对象 -->

    <bean name="myAdvice" class="com.bing.aop.MyAdvice"></bean>

    <aop:config>

        <!-- 切入点  expression 切入点表达式 可以配置要增强的方法

                            public void com.bing.aop.service.UserServiceImpl.save()

                            * com.bing.aop.service.*ServiceImpl.*(..)

                           id 就是唯一标识

        -->

        <aop:pointcut expression="execution(* com.bing.aop.service.*ServiceImpl.*(..))" id="servicePc"/>

        <!-- 切面 通知+切入点 -->

        <aop:aspect ref="myAdvice">

            <!--  环绕通知-->

            <aop:around method="around" pointcut-ref="servicePc"/>

        </aop:aspect>

    </aop:config>

</beans>
运行效果:

把实体类和MyAdvice 结合起来,可以更加方便的写你想要处理的逻辑。
XML 用的越来越少了,现在大部分都使用注解了,下面是使用注解的Demo
import org.springframework.context.annotation.ComponentScan;

import org.springframework.context.annotation.Configuration;

import org.springframework.context.annotation.EnableAspectJAutoProxy;

@ComponentScan("com.hundsun.cop.aop")

@Configuration

@EnableAspectJAutoProxy

public class AppConfig {

}
import org.aspectj.lang.ProceedingJoinPoint;

import org.aspectj.lang.annotation.After;

import org.aspectj.lang.annotation.AfterReturning;

import org.aspectj.lang.annotation.AfterThrowing;

import org.aspectj.lang.annotation.Around;

import org.aspectj.lang.annotation.Aspect;

import org.aspectj.lang.annotation.Before;

import org.aspectj.lang.annotation.Pointcut;

import org.springframework.stereotype.Component;

@Aspect

@Component

public class MyAdvice {

    //设置切点

    @Pointcut("execution(public * com.hundsun.cop.aop.UserService.*(..))")

    public void execution(){

    }

    // 执行前

    @Before("MyAdvice.execution()")

    public void before(){

    }

    // 执行后

    @After("MyAdvice.execution()")

    public void after() {

        System.out.println("after");

    }

    //afterReturning 成功通知(后置通知)在目标方法执行后,并且执行成功,如果方法出现异常则不调用

    @AfterReturning("MyAdvice.execution()")

    public void afterReturning() {

        System.out.println("afterReturning");

    }

    //afterThrowing 异常通知(后置通知)在目标方法执行出现异常的时候才会调用

    @AfterThrowing("MyAdvice.execution()")

    public void afterThrowing() {

        System.out.println("afterThrowing");

    }

    //around 环绕通知 需要我们手动调用目标方法,并且可以设置通知

    @Around("MyAdvice.execution()")

    public Object around(ProceedingJoinPoint pjp) throws Throwable {

        System.out.println("around before");

        Object proceed = pjp.proceed();

        System.out.println("around after");

        return proceed;

    }

}
public interface UserService {

    void save();

    String getStr();

    void setStr(String str);

}
@Component

public class UserServiceImpl implements UserService {

    private String str = "0";

    public String getStr() {

        return str;

    }

    public void setStr(String str) {

        this.str = str;

    }

    @Override

    public void save() {

        System.out.println("--------- save --------------");

    }

}
import org.springframework.context.annotation.AnnotationConfigApplicationContext;

public class Test {

    public static void main(String[] args) {

        AnnotationConfigApplicationContext annotationConfigApplicationContext = new AnnotationConfigApplicationContext(AppConfig.class);

        UserService userService = annotationConfigApplicationContext.getBean(UserService.class);

        userService.save();

    }

}
运行结果

不喜欢夸夸奇谈,实战才是真理。代码是说明原理的最可靠的方式。
总结来源:http://www.sikiedu.com/ 网站学习。
《Java Spring框架》Spring切面(AOP)配置详解的更多相关文章
- 【Spring】——声明式事务配置详解
项目中用到了spring的事务: @Transactional(rollbackFor = Exception.class, transactionManager = "zebraTrans ...
- spring, spring mvc, mybatis整合文件配置详解
转自:http://www.cnblogs.com/wxisme/p/4924561.html 使用SSM框架做了几个小项目了,感觉还不错是时候总结一下了.先总结一下SSM整合的文件配置.其实具体的用 ...
- Spring MVC的web.xml配置详解(转)
出处http://blog.csdn.net/u010796790 1.spring 框架解决字符串编码问题:过滤器 CharacterEncodingFilter(filter-name) 2.在w ...
- Spring mvc的web.xml配置详解
1.spring 框架解决字符串编码问题:过滤器 CharacterEncodingFilter(filter-name) 2.在web.xml配置监听器ContextLoaderListener(l ...
- Spring学习(十九)----- Spring的五种事务配置详解
前段时间对Spring的事务配置做了比较深入的研究,在此之间对Spring的事务配置虽说也配置过,但是一直没有一个清楚的认识.通过这次的学习发觉Spring的事务配置只要把思路理清,还是比较好掌握的. ...
- 1、Spring MVC的web.xml配置详解(转)
版权声明:本文为博主原创文章,转载请注明出处http://blog.csdn.net/u010796790 1.spring 框架解决字符串编码问题:过滤器 CharacterEncodingFilt ...
- Spring Boot 2.0 教程 - 配置详解
Spring Boot 可以通过properties文件,YAML文件,环境变量和命令行参数进行配置.属性值可以通过,@Value注解,Environment或者ConfigurationProper ...
- Spring中配置文件applicationContext.xml配置详解
<?xml version="1.0" encoding="UTF-8"?><beans xmlns="http://www.spr ...
- spring框架的定时任务cronExpression表达式详解
附:cronExpression表达式解释: 0 0 12 * * ?---------------在每天中午12:00触发 0 15 10 ? * *---------------每天上午10:15 ...
- spring boot slf4j日记记录配置详解
https://blog.csdn.net/liuweixiao520/article/details/78900779
随机推荐
- .NET高级特性-Emit(2)类的定义
在上一篇博文发了一天左右的时间,就收到了博客园许多读者的评论和推荐,非常感谢,我也会及时回复读者的评论.之后我也将继续撰写博文,梳理相关.NET的知识,希望.NET的圈子能越来越大,开发者能了解/深入 ...
- 小白学 Python 爬虫(4):前置准备(三)Docker基础入门
人生苦短,我用 Python 前文传送门: 小白学 Python 爬虫(1):开篇 小白学 Python 爬虫(2):前置准备(一)基本类库的安装 小白学 Python 爬虫(3):前置准备(二)Li ...
- Java 数据类型、变量
Java 数据类型 在 Java 中,对于每一种数据都定义了明确的具体的数据类型,在内存中分配了不同大小的内存空间. 整数类型 (byte.short.int.long) 1.Java 各整数类型 ...
- python3 之 字符串编码小结(Unicode、utf-8、gbk、gb2312等)
python3 解释器默认编码为Unicode,由str类型进行表示.二进制数据使用byte类型表示. 字符串通过编码转换成字节串,字节码通过解码成为字符串. encode:str-->byte ...
- windows下的nginx应用
nginx(背景) nginx是一个高性能的HTTP服务器,以前我经常在linux系统中配置,主要做反向代理和负载均衡,最近根据业务需要,需要在window中配置反向和负载,下面就介绍一下nginx的 ...
- selenium处理隐藏元素的方法
<li class="navbar-nav-item "> <a href="#" id="cust"> ...
- JavaScript的定时器是如何工作的
理解JavaScript定时器工作原理对于学习JavaScript非常重要.因为JavaScript是单线程运行的,定时器使用场合少,不是很直观.下面通过三个函数来学习JavaScript如何定义,操 ...
- Android Native Binder,在Native层与App交互数据
Binder底层是基于C实现的,因此可以作为Native进程与App层交互数据的渠道.其应用场景为:Native Service.Hal驱动设置.应用层JNI服务等. Android 4.4引入SEA ...
- PHP随机生成中国人姓名的类
PHP随机生成类 <?php /*rndChinaName.class.php*/ Class rndChinaName { private $arrXing,$numbXing; privat ...
- P2910 [USACO08OPEN]寻宝之路Clear And Present Danger |Floyd
题目描述 农夫约翰正驾驶一条小艇在牛勒比海上航行. 海上有N(1≤N≤100)个岛屿,用1到N编号.约翰从1号小岛出发,最后到达N号小岛. 一张藏宝图上说,如果他的路程上经过的小岛依次出现了Ai,A2 ...