SpringBoot整合MyBatis例子
1、pom.xml
<?xml version="1.0" encoding="UTF-8"?>

<project xmlns="http://maven.apache.org/POM/4.0.0" xmlns:xsi="http://www.w3.org/2001/XMLSchema-instance"

	xsi:schemaLocation="http://maven.apache.org/POM/4.0.0 http://maven.apache.org/xsd/maven-4.0.0.xsd">

	<modelVersion>4.0.0</modelVersion>

	<groupId>com.java</groupId>

	<artifactId>HelloWorldSpringBoot</artifactId>

	<version>0.0.1-SNAPSHOT</version>

	<packaging>war</packaging>

	<name>HelloWorldSpringBoot</name>

	<description>Demo project for Spring Boot</description>

	<parent>

		<groupId>org.springframework.boot</groupId>

		<artifactId>spring-boot-starter-parent</artifactId>

		<version>1.5.7.RELEASE</version>

		<relativePath/> <!-- lookup parent from repository -->

	</parent>

	<properties>

		<project.build.sourceEncoding>UTF-8</project.build.sourceEncoding>

		<project.reporting.outputEncoding>UTF-8</project.reporting.outputEncoding>

		<java.version>1.8</java.version>

	</properties>

	<dependencies>

		<dependency>

			<groupId>org.springframework.boot</groupId>

			<artifactId>spring-boot-starter-web</artifactId>

		</dependency>

		<dependency>

			<groupId>org.springframework.boot</groupId>

			<artifactId>spring-boot-starter-tomcat</artifactId>

			<scope>provided</scope>

		</dependency>

		<dependency>

			<groupId>org.springframework.boot</groupId>

			<artifactId>spring-boot-starter-test</artifactId>

			<scope>test</scope>

		</dependency>

		<dependency>

			<groupId>org.springframework.boot</groupId>

			<artifactId>spring-boot-configuration-processor</artifactId>

			<optional>true</optional>

		</dependency>

		 <dependency>

                <groupId>javax.servlet</groupId>

                <artifactId>javax.servlet-api</artifactId>

                <scope>provided</scope>

         </dependency>

         <dependency>

                <groupId>javax.servlet</groupId>

                <artifactId>jstl</artifactId>

         </dependency>

         <dependency>

         	<groupId>org.springframework.boot</groupId>

         	<artifactId>spring-boot-starter-thymeleaf</artifactId>

         </dependency>

         <dependency>

         	<groupId>org.springframework.boot</groupId>

         	<artifactId>spring-boot-starter-freemarker</artifactId>

         </dependency>

         <dependency>

         	<groupId>mysql</groupId>

         	<artifactId>mysql-connector-java</artifactId>

         	<scope>runtime</scope>

         </dependency>

         <dependency>

         	<groupId>org.springframework.boot</groupId>

         	<artifactId>spring-boot-starter-data-jpa</artifactId>

         </dependency>

         <dependency>

         	<groupId>org.mybatis.spring.boot</groupId>

         	<artifactId>mybatis-spring-boot-starter</artifactId>

         	<version>1.3.1</version>

         </dependency>

	</dependencies>

	<build>

		<plugins>

			<plugin>

				<groupId>org.springframework.boot</groupId>

				<artifactId>spring-boot-maven-plugin</artifactId>

			</plugin>

		</plugins>

	</build>

</project>
2、项目结构
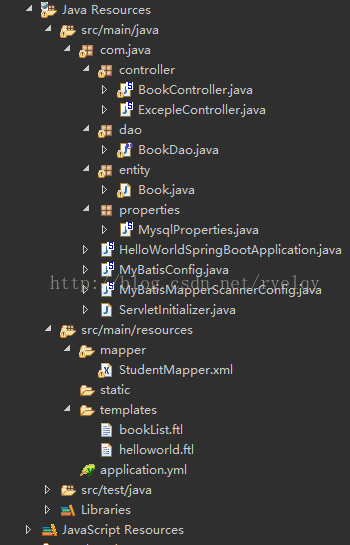
3、application.yml
server:

  port: 8080

  context-path: /

helloWorld: Hi,SpringBoot!

spring:

  datasource:

    driver-class-name: com.mysql.jdbc.Driver

    url: jdbc:mysql://localhost:3306/db_book

    username: root

    password: 123456

  jpa:

    hibernate:

      ddl-auto: update

      show-sql: true

mybatis:

  mapperLocations: classpath:mapper/*.xml

  typeAliasesPackage: com.java.entity
注意:是yml文件,不是xml文件!
4、mybatis基础配置
/**

 * MyBatis基础配置

 *

 * @author liuzh

 * @since 2015-12-19 10:11

 */

@Configuration

@EnableTransactionManagement

public class MyBatisConfig implements TransactionManagementConfigurer {

    @Autowired

    DataSource dataSource;

    @Bean(name = "sqlSessionFactory")

    public SqlSessionFactory sqlSessionFactoryBean() {

        SqlSessionFactoryBean bean = new SqlSessionFactoryBean();

        bean.setDataSource(dataSource);

        bean.setTypeAliasesPackage("com.java.entity");

        //分页插件

       // ParserHelper pageHelper = new ParserHelper();

        Properties properties = new Properties();

        properties.setProperty("reasonable", "true");

        properties.setProperty("supportMethodsArguments", "true");

        properties.setProperty("returnPageInfo", "check");

        properties.setProperty("params", "count=countSql");

        //添加XML目录

        ResourcePatternResolver resolver = new PathMatchingResourcePatternResolver();

        try {

            bean.setMapperLocations(resolver.getResources("classpath:mapper/*.xml"));

            return bean.getObject();

        } catch (Exception e) {

            e.printStackTrace();

            throw new RuntimeException(e);

        }

    }

    @Bean

    public SqlSessionTemplate sqlSessionTemplate(SqlSessionFactory sqlSessionFactory) {

        return new SqlSessionTemplate(sqlSessionFactory);

    }

    @Bean

    @Override

    public PlatformTransactionManager annotationDrivenTransactionManager() {

        return new DataSourceTransactionManager(dataSource);

    }

}
5、mybaits接口扫描
/**

 * MyBatis扫描接口

 *

 * @author liuzh

 * @since 2015-12-19 14:46

 */

//TODO 注意,由于MapperScannerConfigurer执行的比较早,所以必须有下面的注解

@Configuration

@AutoConfigureAfter(MyBatisConfig.class)

public class MyBatisMapperScannerConfig {

    @Bean

    public MapperScannerConfigurer mapperScannerConfigurer() {

        MapperScannerConfigurer mapperScannerConfigurer = new MapperScannerConfigurer();

        mapperScannerConfigurer.setSqlSessionFactoryBeanName("sqlSessionFactory");

        mapperScannerConfigurer.setBasePackage("com.java.mapper");

        return mapperScannerConfigurer;

    }

}
6、SpringBoot Application启动
@SpringBootApplication

@MapperScan(basePackages = "com.java.dao")

public class HelloWorldSpringBootApplication {

	public static void main(String[] args) {

		SpringApplication.run(HelloWorldSpringBootApplication.class, args);

	}

}
7、Controller层
@RestController

@RequestMapping("/book")

public class BookController {

	@Value("${helloWorld}")

	private String hello;

	@Resource

	private BookDao bookDao;

	@RequestMapping("/helloWorld")

	public String say() {

		System.out.println(hello);

		return "Hello SpringBoot";

	}

	/**

	 * 查找所有

	 * @return

	 */

	@RequestMapping("/findAllList")

	public ModelAndView findAllList() {

		ModelAndView  mav = new ModelAndView("bookList");

		List<Book> bookList = bookDao.findAll();

		mav.addObject("bookList", bookList);

		return mav;

	}

}
8、Dao层
public interface BookDao {

	public List<Book> findAll();

}
9、mapper
<mapper namespace="com.java.dao.BookDao">

	<select id="findAll" resultType="Book">

		SELECT * FROM t_book

	</select>

</mapper>
10、Thymeleaf模板引擎
<!DOCTYPE html>

<html>

<head>

<meta charset="UTF-8">

<title>图书管理</title>

</head>

<body>

<table>

	<tr>

		<th>操作</th>

		<th>编号</th>

		<th>图书名称</th>

		<th>图书作者</th>

	</tr>

	<#list bookList as book>

	<tr>

		<td></td>

		<td>${book.id}</td>

		<td>${book.name}</td>

		<td>${book.author}</td>

	</tr>

	</#list>

</table>

</body>

</html>
11、数据库表结构
CREATE TABLE `t_book` (
`id` varchar(255) NOT NULL,
`name` varchar(100) DEFAULT NULL,
`author` varchar(50) DEFAULT NULL,
PRIMARY KEY (`id`)
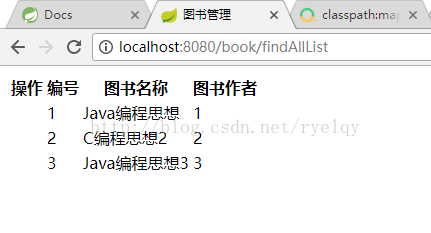
) ENGINE=InnoDB DEFAULT CHARSET=utf8启动HelloWorldSpringBootApplication,请求http://localhost:8080/book/findAllList即可
12、效果
2018.11.13更新
本文成文与2017.11.06,一年之后,SpringBoot推出了2.0,MySQL数据库推出了8.0。如果使用SpringBoot2.0 + MyBatis + MySQL8.0,可参考https://blog.csdn.net/ryelqy/article/details/84030884解决兼容问题。
Reference:
[1] isea533, Spring Boot 集成MyBatis, http://blog.csdn.net/isea533/article/details/50359390
[2] 编程点滴, Spring Boot 整合 MyBatis, http://www.cnblogs.com/powercto/p/6717874.html
SpringBoot整合MyBatis例子的更多相关文章
- SpringBoot整合mybatis、shiro、redis实现基于数据库的细粒度动态权限管理系统实例
1.前言 本文主要介绍使用SpringBoot与shiro实现基于数据库的细粒度动态权限管理系统实例. 使用技术:SpringBoot.mybatis.shiro.thymeleaf.pagehelp ...
- SpringBoot整合Mybatis之项目结构、数据源
已经有好些日子没有总结了,不是变懒了,而是我一直在奋力学习springboot的路上,现在也算是完成了第一阶段的学习,今天给各位总结总结. 之前在网上找过不少关于springboot的教程,都是一些比 ...
- SpringBoot整合Mybatis【非注解版】
接上文:SpringBoot整合Mybatis[注解版] 一.项目创建 新建一个工程 选择Spring Initializr,配置JDK版本 输入项目名 选择构建web项目所需的state ...
- SpringBoot整合Mybatis注解版---update出现org.apache.ibatis.binding.BindingException: Parameter 'XXX' not found. Available parameters are [arg1, arg0, param1, param2]
SpringBoot整合Mybatis注解版---update时出现的问题 问题描述: 1.sql建表语句 DROP TABLE IF EXISTS `department`; CREATE TABL ...
- springboot学习随笔(四):Springboot整合mybatis(含generator自动生成代码)
这章我们将通过springboot整合mybatis来操作数据库 以下内容分为两部分,一部分主要介绍generator自动生成代码,生成model.dao层接口.dao接口对应的sql配置文件 第一部 ...
- springboot整合mybatis出现的一些问题
springboot整合mybatis非常非常的简单,简直简单到发指.但是也有一些坑,这里我会详细的指出会遇到什么问题,并且这些配置的作用 整合mybatis,无疑需要mapper文件,实体类,dao ...
- springBoot整合mybatis、jsp 或 HTML
springBoot整合mybatis.jsp Spring Boot的主要优点: 1: 为所有Spring开发者更快的入门: 2: 开箱即用,提供各种默认配置来简化项目配置: 3: 内嵌式容器 ...
- SpringBoot系列七:SpringBoot 整合 MyBatis(配置 druid 数据源、配置 MyBatis、事务控制、druid 监控)
1.概念:SpringBoot 整合 MyBatis 2.背景 SpringBoot 得到最终效果是一个简化到极致的 WEB 开发,但是只要牵扯到 WEB 开发,就绝对不可能缺少数据层操作,所有的开发 ...
- SpringBoot整合Mybatis完整详细版二:注册、登录、拦截器配置
接着上个章节来,上章节搭建好框架,并且测试也在页面取到数据.接下来实现web端,实现前后端交互,在前台进行注册登录以及后端拦截器配置.实现简单的未登录拦截跳转到登录页面 上一节传送门:SpringBo ...
随机推荐
- nginx 配置跨域
location / { add_header Access-Control-Allow-Origin *; add_header Access-Control-Allow-Methods 'GET, ...
- Kafka Streams开发入门(5)
1. 背景 上一篇演示了split操作算子的用法.今天展示一下split的逆操作:merge.Merge算子的作用是把多股实时消息流合并到一个单一的流中. 2. 功能演示说明 假设我们有多个Kafka ...
- centos7配置jdk8环境变量
最近在Linux的环境下配置jdk,参照网上的一些教程出现了一些问题,原因大致是由于centos的系统版本不同或者是jdk的版本不同导致出现了一定的问题.包括常规的因为classpath配置不对出现的 ...
- java 时间格式
自定义时间格式:yyyy 年MM 月dd 天HH 24小时制hh 12小时制mm 分钟ss 秒 java.util.Date日期格式为:年月日时分秒 java.sql.Date日期格式为:年月日jav ...
- Nginx的特性功能-反向代理、负载均衡、缓存、动静分离、平滑升级
反向代理 nginx配置文件 events { } 事件驱动 httpd { } 关于httpd相关的配置 server { } 定义虚拟主机 location { } ...
- zabbix--微信告警
zabbix 微信告警机制 zabbix 告警机制有很多,比如邮件.微信.电话.短信等等.很多,但是像电话和短信都是有钱人玩的,我们这些穷屌丝玩玩 微信 邮件 就可以了. 参考:https://git ...
- 多态典型用例之virtual
多态典型用例之virtual 参考:https://www.cnblogs.com/dormant/p/5223215.html 1.虚函数(virtual) (1)在某基类中声明为 virtual ...
- 2019年杭电多校第二场 1008题Harmonious Army(HDU6598+最小割+建图)
题目链接 传送门 题意 有\(n\)个士兵,要你给他们分配职业.有\(m\)对关系,对于某一对关系\(u,v\),如果同为勇士则总能力增加\(a\),同法师则增加\(c\),一个勇士一个法师增加\(\ ...
- httprunner学习11-辅助函数debugtalk.py
前言 在httprunner里面,每个 YAML / JSON 文件的脚本都是独立运行的,有时候我们希望能跨文件使用公用的参数. 比如登录生成一个token,后面的用例都可以去引用这个token值,或 ...
- 关于 " i=i++"是否等价于"i=i+1"的问题探讨 -Java版/C版
如题 (总结要点) 假设i=1 ,那么 i=i++ 的结果也就是2, 对吗? 不对,是1. -总结如下: 测试过程如下: 1.java版 public class Test { public stat ...