
自定义view(13)自定义属性
1.添加attrs.xml文件
在android studio下,在res/values 下新建资源文件attrs.xml
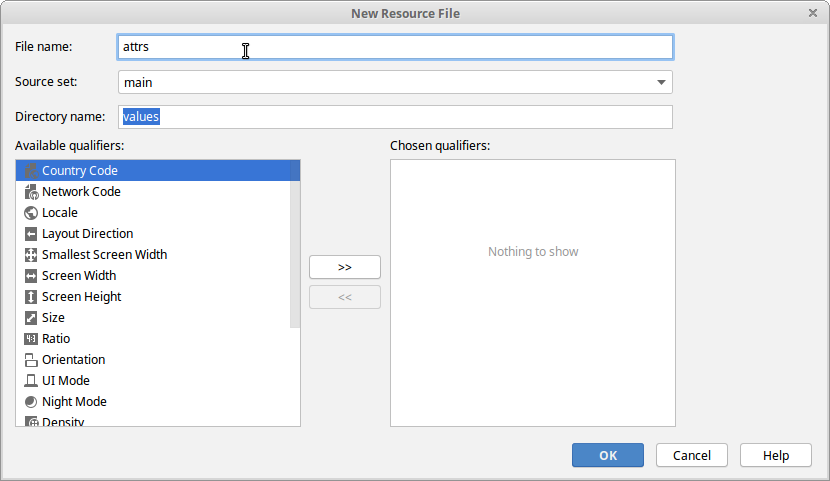
2.添加自定义的属性
在attrs.xml中添加属性,如下。其中format是属性的类型,如float,color,boolean,dimension
 <?xml version="1.0" encoding="utf-8"?>

 <resources>

     <declare-styleable name="thermograph">

         <attr name="minValue"       format="float" />

         <attr name="maxValue"       format="float" />

         <attr name="ratio"          format="float" />

         <attr name="hotValue"       format="float" />

         <attr name="coldValue"      format="float" />

         <attr name="thermoValue"    format="float" />

         <attr name="textSize"       format="dimension" />

         <attr name="warningColor"   format="color" />

         <attr name="contourColor"   format="color" />

         <attr name="textColor"      format="color" />

         <attr name="borderColor"    format="color" />

         <attr name="hotColor"       format="color" />

         <attr name="coldColor"      format="color" />

         <attr name="valueColor"     format="color" />

         <attr name="showValue"      format="boolean" />

     </declare-styleable>

 </resources>
3.在布局文件中使用自定义的属性
3.1 在布局文件根结点中添加命名空间。
 <?xml version="1.0" encoding="utf-8"?>

 <androidx.constraintlayout.widget.ConstraintLayout xmlns:android="http://schemas.android.com/apk/res/android"

     xmlns:app="http://schemas.android.com/apk/res-auto"

     xmlns:thermograph="http://schemas.android.com/apk/res-auto"

     android:layout_width="match_parent"

     android:layout_height="match_parent"

     android:background="@color/colorMainBackground"

     >
3.2 使用自定义的属性
 <?xml version="1.0" encoding="utf-8"?>

 <androidx.constraintlayout.widget.ConstraintLayout xmlns:android="http://schemas.android.com/apk/res/android"

     xmlns:app="http://schemas.android.com/apk/res-auto"

     xmlns:thermograph="http://schemas.android.com/apk/res-auto"

     android:layout_width="match_parent"

     android:layout_height="match_parent"

     android:background="@color/colorMainBackground"

     >

     <com.cnblogs.sjjg.tempview.Thermograph

         android:id="@+id/thermograph1"

         android:layout_width="10dp"

         android:layout_height="30dp"

         android:layout_marginStart="8dp"

         android:layout_marginLeft="8dp"

         android:layout_marginEnd="8dp"

         android:layout_marginRight="8dp"

         app:layout_constraintBottom_toBottomOf="@+id/thermograph2"

         app:layout_constraintEnd_toStartOf="@+id/thermograph2"

         app:layout_constraintStart_toStartOf="parent"

         app:layout_constraintTop_toTopOf="@+id/thermograph2"

         thermograph:borderColor="@color/temp1_color"

         thermograph:coldValue="10"

         thermograph:hotValue="50"

         thermograph:maxValue="70"

         thermograph:minValue="-30" />

     <com.cnblogs.sjjg.tempview.Thermograph

         android:id="@+id/thermograph2"

         android:layout_width="100dp"

         android:layout_height="250dp"

         android:layout_marginStart="8dp"

         android:layout_marginLeft="8dp"

         android:layout_marginTop="32dp"

         android:layout_marginEnd="8dp"

         android:layout_marginRight="8dp"

         app:layout_constraintEnd_toEndOf="parent"

         app:layout_constraintHorizontal_bias="0.5"

         app:layout_constraintStart_toStartOf="parent"

         app:layout_constraintTop_toTopOf="parent"

         thermograph:coldValue="0"

         thermograph:hotValue="50"

         thermograph:maxValue="70"

         thermograph:minValue="-30" />

     <SeekBar

         android:id="@+id/seekBar"

         android:layout_width="0dp"

         android:layout_height="24dp"

         android:layout_marginStart="8dp"

         android:layout_marginLeft="8dp"

         android:layout_marginTop="32dp"

         android:layout_marginEnd="8dp"

         android:layout_marginRight="8dp"

         android:max="100"

         android:progress="50"

         app:layout_constraintEnd_toEndOf="parent"

         app:layout_constraintStart_toStartOf="parent"

         app:layout_constraintTop_toBottomOf="@+id/thermograph2" />

 </androidx.constraintlayout.widget.ConstraintLayout>
4.在自定义的view中取属性值
     private void init(Context context,AttributeSet attrs){

         paint = new Paint(Paint.ANTI_ALIAS_FLAG);

         paint.setStyle(Paint.Style.FILL);

         setLayerType(View.LAYER_TYPE_SOFTWARE,paint);

         TypedArray ta = context.obtainStyledAttributes(attrs, R.styleable.thermograph);

         min = ta.getFloat(R.styleable.thermograph_minValue, -);

         max = ta.getFloat(R.styleable.thermograph_maxValue,);

         value = ta.getFloat(R.styleable.thermograph_thermoValue,);

         hot = ta.getFloat(R.styleable.thermograph_hotValue,);

         cold = ta.getFloat(R.styleable.thermograph_coldValue,);

         ratio = ta.getFloat(R.styleable.thermograph_ratio,0.25f);

         txtColor = ta.getColor(R.styleable.thermograph_textColor,Color.WHITE);

         int c = ContextCompat.getColor(context,R.color.temp_color);

         borderColor = ta.getColor(R.styleable.thermograph_borderColor,c);

         c = ContextCompat.getColor(context,R.color.temp_cold_color);

         contourColor = ta.getColor(R.styleable.thermograph_contourColor,c);

         c = ContextCompat.getColor(context,R.color.temp_hot_color);

         hotColor = ta.getColor(R.styleable.thermograph_hotColor,c);

         c = ContextCompat.getColor(context,R.color.temp_cold_color);

         coldColor = ta.getColor(R.styleable.thermograph_coldColor,c);

         showValue = ta.getBoolean(R.styleable.thermograph_showValue,true);

     }

     public Thermograph(Context context) {

         super(context);

         init(context,null);

     }

     public Thermograph(Context context, @Nullable AttributeSet attrs) {

         super(context, attrs);

         init(context,attrs);

     }

     public Thermograph(Context context, @Nullable AttributeSet attrs, int defStyleAttr) {

         super(context, attrs, defStyleAttr);

         init(context,attrs);

     }

     @RequiresApi(api = Build.VERSION_CODES.LOLLIPOP)

     public Thermograph(Context context, @Nullable AttributeSet attrs, int defStyleAttr, int defStyleRes) {

         super(context, attrs, defStyleAttr, defStyleRes);

         init(context,attrs);

     }
自定义view(13)自定义属性的更多相关文章
- Android 高手进阶之自定义View,自定义属性(带进度的圆形进度条)
Android 高手进阶(21) 版权声明:本文为博主原创文章,未经博主允许不得转载. 转载请注明地址:http://blog.csdn.net/xiaanming/article/detail ...
- 手机安全卫士——在设置中心 自定义view和自定义属性
自定义组合控件 1. 自定义一个View, 继承ViewGroup,比如RelativeLayout,此文中是SettingItemView 2. 编写组合控件的布局文件,在自定义的View中加载 ...
- Android 自定义View修炼-自定义View-带百分比进度的圆形进度条(采用自定义属性)
很多的时候,系统自带的View满足不了我们功能的需求,那么我们就需要自己来自定义一个能满足我们需求的View,自定义View我们需要先继承View,添加类的构造方法,重写父类View的一些方法,例如o ...
- Android初级教程初谈自定义view自定义属性
有些时候,自己要在布局文件中重复书写大量的代码来定义一个布局.这是最基本的使用,当然要掌握:但是有些场景都去对应的布局里面写对应的属性,就显得很无力.会发现,系统自带的控件无法满足我们的要求,这个时候 ...
- 【Android - 自定义View】之自定义View浅析
1.概述 Android自定义View / ViewGroup的步骤大致如下: 1) 自定义属性: 2) 选择和设置构造方法: 3) 重写onMeasure()方法: 4) 重写onDraw()方法: ...
- Android 自定义view (一)——attr 理解
前言: 自定义view是android自定义控件的核心之一,那么在学习自定义view之前,我们先来了解下自定义view的自定义属性的attr的用法吧 Android attr 是什么 (1)attr ...
- 自定义View的基本流程
1.明确需求,确定你想实现的效果2.确定是使用组合控件的形式还是全新自定义的形式,组合控件即使用多个系统控件来合成一个新控件,你比如titilebar,这种形式相对简单,参考:http://blog. ...
- Android查缺补漏(View篇)--自定义 View 的基本流程
View是Android很重要的一部分,常用的View有Button.TextView.EditView.ListView.GridView.各种layout等等,开发者通过对这些View的各种组合以 ...
- Android自定义View学习笔记(一)
绘制基础 参考:HenCoder Android 开发进阶: 自定义 View 1-1 绘制基础 Paint详解 参考:HenCoder Android 开发进阶: 自定义 View 1-2 Pain ...
随机推荐
- Jquery根据name取得所有选中的Checkbox值
var spCodesTemp = ""; $('input:checkbox[name=supNO]:checked').each(function (i) ...
- Xcode6.1 Prefix.pch添加方式
本文转载:http://blog.csdn.net/foolsong/article/details/40653497 在Xcode6.1中创建工程默认是没有Prefix.pch文件的,需要 ...
- java 获取时间戳
//java 获取时间戳 long currentTime=System.currentTimeMillis();
- leetcode 684. Redundant Connection
We are given a "tree" in the form of a 2D-array, with distinct values for each node. In th ...
- SpringBoot使用logback日志记录
在resources里的配置文件: logback-spring.xml <?xml version="1.0" encoding="UTF-8" ?&g ...
- Android零碎知识点,之后会一直更新的哦!
view的getCompoundDrawables()方法,调用这个方法返回的是控件的左上右下四个位置的Drawable,并且返回的类型是数据 setBounds(x,y,width,height); ...
- 什么是Intent
Intent负责在应用程序的主要部件——活动,服务,广播接收器(处理Android消息)之间传递消息的信使对象 Intent是对要执行的操作的一种抽象的描述,它除了指定一个动作之外,Intent对象还 ...
- Opencv实现两幅图像融合
实现两幅图像线性(不同系数下)的融合涉及到Opencv中两个关键的方法,addWeighted()和createTrackbar() addWeighted方法: 函数原型: void addWeig ...
- I.MX6 lcd lvds 注册流程
/************************************************************************ * I.MX6 lcd lvds 注册流程 * 说明 ...
- POJ1228:Grandpa's Estate(给定一些点,问是否可以确定一个凸包)
Being the only living descendant of his grandfather, Kamran the Believer inherited all of the grandp ...