Spring Boot 整合 FastDFS 客户端
原文地址:Spring Boot 整合 FastDFS 客户端
博客地址:http://www.extlight.com
一、前言
前两篇介绍整体上介绍了通过 Nginx 和 FastDFS 的整合来实现文件服务器。但是,在实际开发中对图片或文件的操作都是通过应用程序来完成的,因此,本篇将介绍 Spring Boot 整合 FastDFS 客户端来实现对图片/文件服务器的访问。
如果有不了解 FastDFS 的读者可以先浏览《FastDFS 环境搭建》 和 《Nginx 整合 FastDFS 实现文件服务器》 来普及内容,或是另行查阅网上相关资料。
二、整合编码
2.1 添加依赖
<dependency>

	<groupId>org.springframework.boot</groupId>

	<artifactId>spring-boot-starter-web</artifactId>

</dependency>

<dependency>

	<groupId>org.springframework.boot</groupId>

	<artifactId>spring-boot-starter-test</artifactId>

	<scope>test</scope>

</dependency>

<dependency>

    <groupId>org.springframework.boot</groupId>

    <artifactId>spring-boot-devtools</artifactId>

    <optional>true</optional>

    <scope>true</scope>

</dependency>

<dependency>

    <groupId>com.github.tobato</groupId>

    <artifactId>fastdfs-client</artifactId>

    <version>1.26.3</version>

</dependency>

<dependency>

    <groupId>commons-io</groupId>

    <artifactId>commons-io</artifactId>

    <version>2.6</version>

</dependency>

<dependency>

    <groupId>org.springframework.boot</groupId>

    <artifactId>spring-boot-starter-thymeleaf</artifactId>

</dependency>
上边的 fastdfs-client 是并非 FastDFS Client 原作者编写的整合包,具体详情可以访问 https://github.com/tobato/FastDFS_Client。
2.2 application.properties
server.port=8080

# fastDFS 配置

fdfs.so-timeout=1501

fdfs.connect-timeout=601

fdfs.thumb-image.width=150

fdfs.thumb-image.height=150

fdfs.web-server-url=192.168.10.110/

fdfs.tracker-list[0]=192.168.10.110:22122
2.3 后端代码
- 加载 FastDFS 配置类:
@Configuration

@Import(FdfsClientConfig.class)

// 解决jmx重复注册bean的问题

@EnableMBeanExport(registration = RegistrationPolicy.IGNORE_EXISTING)

public class ComponetImport {

    // 导入依赖组件

}
- FastDFS 工具类:
@Component

public class FastDFSClient {

    private final Logger logger = LoggerFactory.getLogger(FastDFSClient.class);

    @Autowired

    private FastFileStorageClient storageClient;

    @Autowired

    private FdfsWebServer fdfsWebServer;

    /**

     * 上传文件

     * @param file 文件对象

     * @return 文件访问地址

     * @throws IOException

     */

    public String uploadFile(MultipartFile file) throws IOException {

        StorePath storePath = storageClient.uploadFile(file.getInputStream(),file.getSize(), FilenameUtils.getExtension(file.getOriginalFilename()),null);

        return getResAccessUrl(storePath);

    }

    /**

     * 上传文件

     * @param file 文件对象

     * @return 文件访问地址

     * @throws IOException

     */

    public String uploadFile(File file) throws IOException {

        FileInputStream inputStream = new FileInputStream (file);

        StorePath storePath = storageClient.uploadFile(inputStream,file.length(), FilenameUtils.getExtension(file.getName()),null);

        return getResAccessUrl(storePath);

    }

    /**

     * 将一段字符串生成一个文件上传

     * @param content 文件内容

     * @param fileExtension

     * @return

     */

    public String uploadFile(String content, String fileExtension) {

        byte[] buff = content.getBytes(Charset.forName("UTF-8"));

        ByteArrayInputStream stream = new ByteArrayInputStream(buff);

        StorePath storePath = storageClient.uploadFile(stream,buff.length, fileExtension,null);

        return getResAccessUrl(storePath);

    }

    // 封装图片完整URL地址

    private String getResAccessUrl(StorePath storePath) {

        String fileUrl = fdfsWebServer.getWebServerUrl() + storePath.getFullPath();

        return fileUrl;

    }

    /**

     * 下载文件

     * @param fileUrl 文件url

     * @return

     */

    public byte[]  download(String fileUrl) {

    	 String group = fileUrl.substring(0, fileUrl.indexOf("/"));

         String path = fileUrl.substring(fileUrl.indexOf("/") + 1);

         byte[] bytes = storageClient.downloadFile(group, path, new DownloadByteArray());

         return bytes;

    }

    /**

     * 删除文件

     * @param fileUrl 文件访问地址

     * @return

     */

    public void deleteFile(String fileUrl) {

        if (StringUtils.isEmpty(fileUrl)) {

            return;

        }

        try {

            StorePath storePath = StorePath.praseFromUrl(fileUrl);

            storageClient.deleteFile(storePath.getGroup(), storePath.getPath());

        } catch (FdfsUnsupportStorePathException e) {

            logger.warn(e.getMessage());

        }

    }

}
- controller 类:
@RestController

@RequestMapping("/fdfs")

public class FastDFSController {

	@Autowired

	private FastDFSClient fdfsClient;

	/**

	 * 文件上传

	 * @param file

	 * @return

	 * @throws Exception

	 */

	@RequestMapping("/upload")

	public Map<String,Object> upload(MultipartFile file) throws Exception{

		String url = fdfsClient.uploadFile(file);

		Map<String,Object> result = new HashMap<>();

		result.put("code", 200);

		result.put("msg", "上传成功");

		result.put("url", url);

		return result;

	}

	/**

	 * 文件下载

	 * @param fileUrl  url 开头从组名开始

	 * @param response

	 * @throws Exception

	 */

	@RequestMapping("/download")

	public void  download(String fileUrl, HttpServletResponse response) throws Exception{

		byte[] data = fdfsClient.download(fileUrl);

		response.setCharacterEncoding("UTF-8");

		response.setHeader("Content-disposition", "attachment;filename=" + URLEncoder.encode("test.jpg", "UTF-8"));

		// 写出

		ServletOutputStream outputStream = response.getOutputStream();

		IOUtils.write(data, outputStream);

	}

}
2.4 前端页面
<!DOCTYPE html>

<html xmlns:th="http://www.thymeleaf.org">

<head>

<meta charset="UTF-8">

<title>文件上传</title>

<link rel="stylesheet" th:href="@{/css/bootstrap.css}">

<style>

	form {

		margin-top: 30px;

	}

</style>

</head>

<body>

	<div class="container">

		<div class="row">

			<div class="col-md-4 col-sm-4"></div>

			<div class="col-md-4 col-sm-4">

				<h2> FastDFS 文件上传</h2>

			<form th:action="@{/fdfs/upload}" method="post" enctype="multipart/form-data">

			  <div class="form-group">

			    <input type="file" name="file" id="exampleInputFile">

			  </div>

			  <button type="submit" class="btn btn-default">上传</button>

			</form>

			</div>

			<div class="col-md-4 col-sm-4"></div>

		</div>

	</div>

</body>

</html>
三、测试
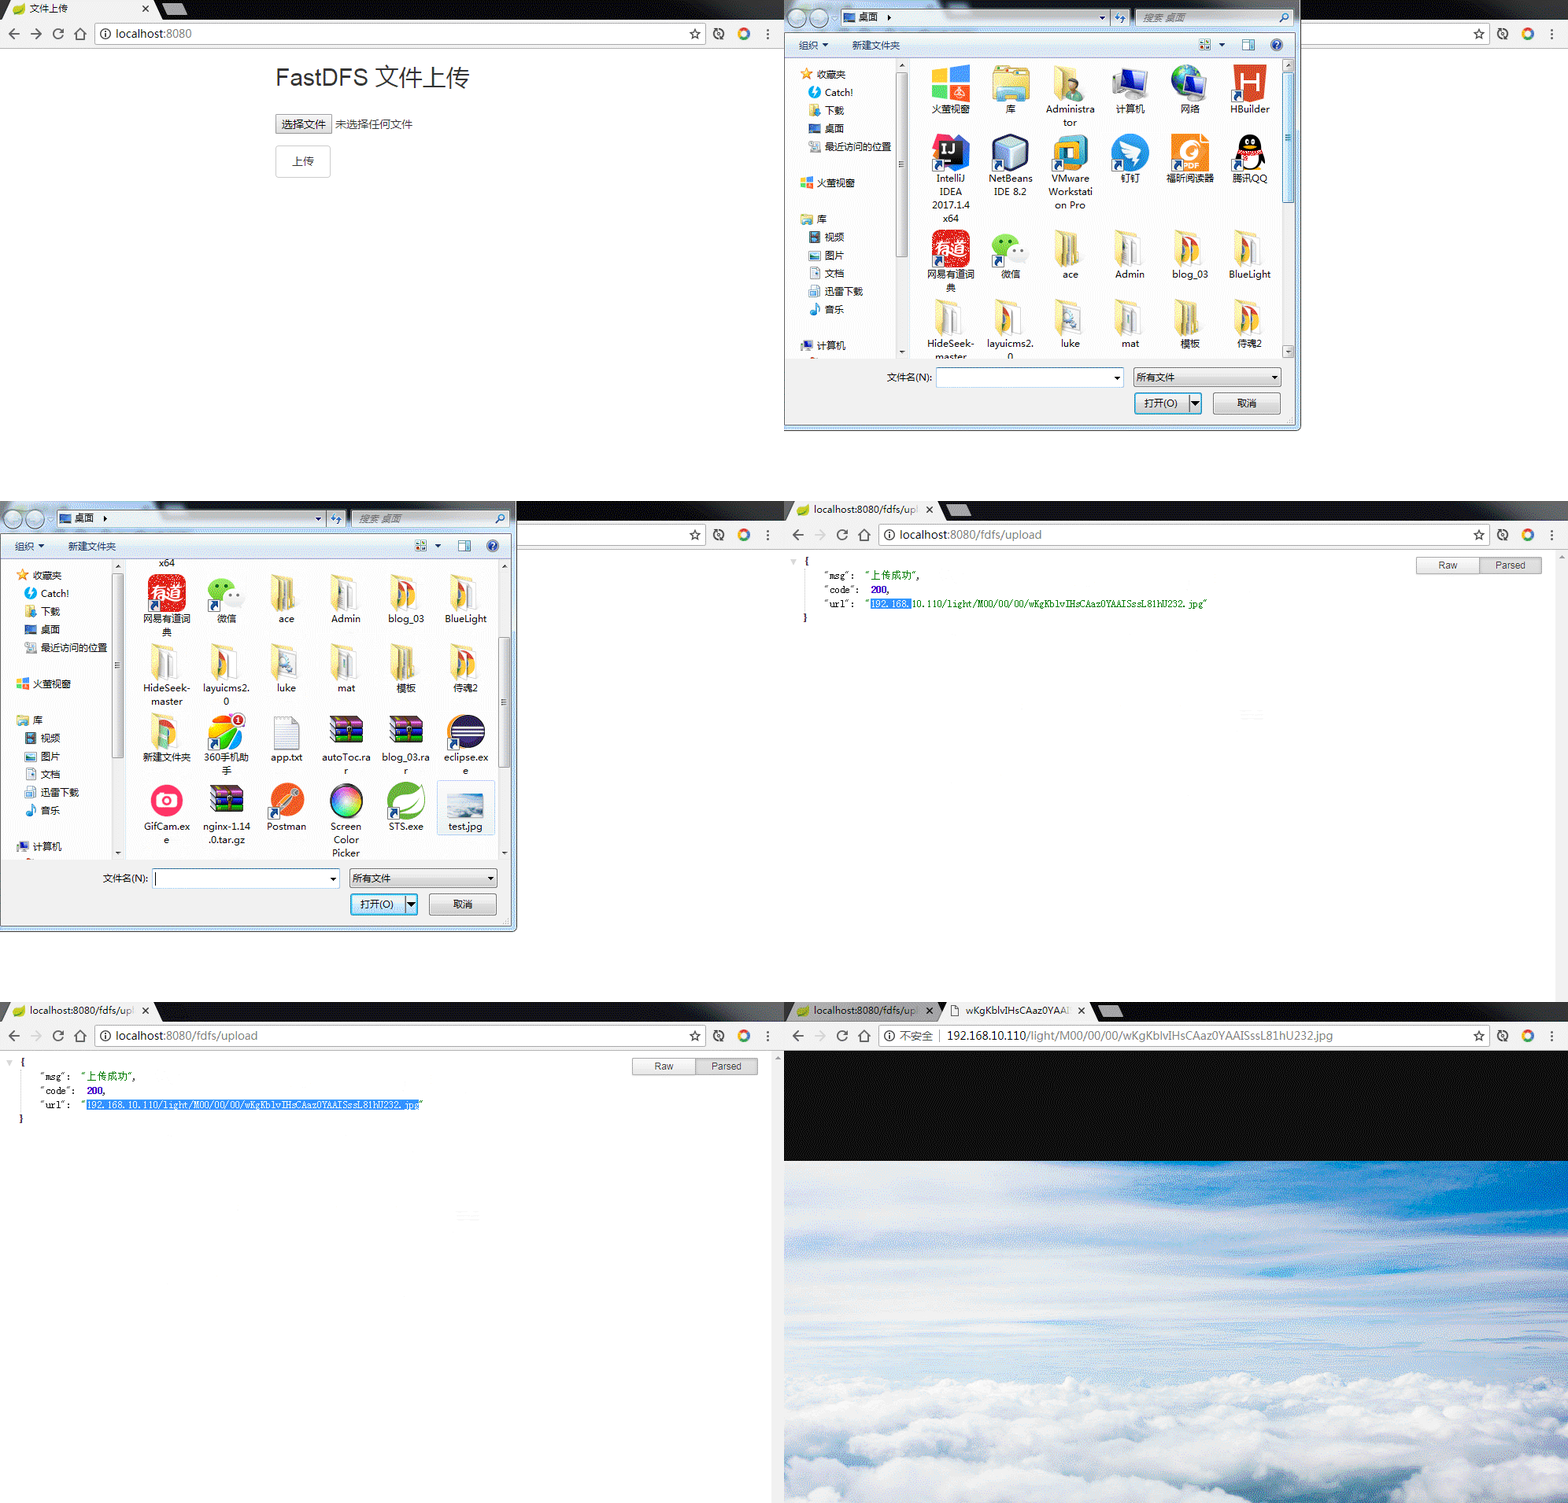
本篇只测试文件上传和访问的效果,演示图如下:

整合成功~~
Spring Boot 整合 FastDFS 客户端的更多相关文章
- Spring Kafka整合Spring Boot创建生产者客户端案例
每天学习一点点 编程PDF电子书.视频教程免费下载:http://www.shitanlife.com/code 创建一个kafka-producer-master的maven工程.整个项目结构如下: ...
- Spring Boot 整合 Elasticsearch,实现 function score query 权重分查询
摘要: 原创出处 www.bysocket.com 「泥瓦匠BYSocket 」欢迎转载,保留摘要,谢谢! 『 预见未来最好的方式就是亲手创造未来 – <史蒂夫·乔布斯传> 』 运行环境: ...
- Spring Kafka和Spring Boot整合实现消息发送与消费简单案例
本文主要分享下Spring Boot和Spring Kafka如何配置整合,实现发送和接收来自Spring Kafka的消息. 先前我已经分享了Kafka的基本介绍与集群环境搭建方法.关于Kafka的 ...
- Spring Boot整合Elasticsearch
Spring Boot整合Elasticsearch Elasticsearch是一个全文搜索引擎,专门用于处理大型数据集.根据描述,自然而然使用它来存储和搜索应用程序日志.与Logstash和K ...
- (转)Spring Boot(十八):使用 Spring Boot 集成 FastDFS
http://www.ityouknow.com/springboot/2018/01/16/spring-boot-fastdfs.html 上篇文章介绍了如何使用 Spring Boot 上传文件 ...
- Spring Boot初识(4)- Spring Boot整合JWT
一.本文介绍 上篇文章讲到Spring Boot整合Swagger的时候其实我就在思考关于接口安全的问题了,在这篇文章了我整合了JWT用来保证接口的安全性.我会先简单介绍一下JWT然后在上篇文章的基础 ...
- Spring Boot(十八):使用 Spring Boot 集成 FastDFS
上篇文章介绍了如何使用 Spring Boot 上传文件,这篇文章我们介绍如何使用 Spring Boot 将文件上传到分布式文件系统 FastDFS 中. 这个项目会在上一个项目的基础上进行构建. ...
- Spring Boot(十八):使用Spring Boot集成FastDFS
Spring Boot(十八):使用Spring Boot集成FastDFS 环境:Spring Boot最新版本1.5.9.jdk使用1.8.tomcat8.0 功能:使用Spring Boot将文 ...
- spring boot整合Swagger2
Swagger 是一个规范和完整的框架,用于生成.描述.调用和可视化RESTful风格的 Web 服务.总体目标是使客户端和文件系统作为服务器以同样的速度来更新.文件的方法,参数和模型紧密集成到服务器 ...
随机推荐
- HashMap相关(二)
基于哈希表的 Map 接口的实现.此实现提供所有可选的映射操作,并允许使用 null 值和 null 键.(除了不同步和允许使用 null 之外, HashMap 类与 Hashtable 大致相同. ...
- JQ插件写法 扩展JQ方法
目录: 1.基本JQ扩展插件js的格式 2.对JQ选中元素的方法的扩展,调用类似于$("selector").myMethod(),这里的myMethod是自己扩展的方法,与.cl ...
- 记python3 UnicodeEncodeError: 'latin-1' codec... 报错
python3用cx_Oracle查询oracle数据库并打印输出,在windows上执行没问题,打算放suse上跑的时候就遇到了打印中文UnicodeEncodeError: 'latin-1' c ...
- STL标准库-仿函数与仿函数适配器
技术在于交流.沟通,本文为博主原创文章转载请注明出处并保持作品的完整性 概要: 1.仿函数 2.bind2nd() 3.not1() 4.bind() 仿函数的实现:声明一个类,重载它的operato ...
- 解决Viewpager满屏不能自适应填充内容的三种办法
由于排版问题,本人博客园同名博文地址为:http://www.cnblogs.com/bill-technology/articles/3143667.html 很多Android开发者在使用View ...
- Ubuntu下安装virtualbox失败解决方案
安装失败的截图: 因此使用常规方法:对依赖的两个包进行获取安装,依旧失败: 因此解决方法为在官网上下载相对应版本的virtualbox软件:下载地址为:https://www.virtualbox.o ...
- Exchange Server 2007 多名称证书配置(转载)
原文:http://www.exchangecn.com/exchange2007/20141130_529.html Exchange Server 2007 多名称证书配置 Exchange ...
- Robolectric测试框架使用笔记
1. 概述 Robolectric(http://robolectric.org/)是一款支持在桌面JVM模拟Android环境的测试框架,通过shadow包下的类来截取view.activity等类 ...
- 一个两年Java的面试总结
前言 16年毕业到现在也近两年了,最近面试了阿里集团(菜鸟网络,蚂蚁金服),网易,滴滴,点我达,最终收到点我达,网易offer,蚂蚁金服二面挂掉,菜鸟网络一个月了还在流程中...最终有幸去了网易.但是 ...
- CKPT,SCN
CKPT进程:完全检查点 ckpt进程的作用,触发全局检查点,通过DBWR将buffer_cache中的所有脏块写入数据文件中:由于DBWR的机制,因此lgwr会先写,然后dbwr后写. 当完全检查点 ...
