
spring boot整合Swagger2
Swagger 是一个规范和完整的框架,用于生成、描述、调用和可视化RESTful风格的 Web 服务。总体目标是使客户端和文件系统作为服务器以同样的速度来更新。文件的方法,参数和模型紧密集成到服务器端的代码,允许API来始终保持同步。Swagger 让部署管理和使用功能强大的API从未如此简单。
1.代码示例
1).在pom.xml文件中引入Swagger2
<dependency>
<groupId>io.springfox</groupId>
<artifactId>springfox-swagger2</artifactId>
<version>2.6.1</version>
</dependency>
<dependency>
<groupId>io.springfox</groupId>
<artifactId>springfox-swagger-ui</artifactId>
<version>2.6.1</version>
</dependency>
2).在Application同级目录下添加Swagger2的配置类
package com.example;
import org.springframework.context.annotation.Bean;
import org.springframework.context.annotation.Configuration;
import springfox.documentation.builders.ApiInfoBuilder;
import springfox.documentation.builders.PathSelectors;
import springfox.documentation.builders.RequestHandlerSelectors;
import springfox.documentation.service.ApiInfo;
import springfox.documentation.spi.DocumentationType;
import springfox.documentation.spring.web.plugins.Docket;
import springfox.documentation.swagger2.annotations.EnableSwagger2;
@Configuration
@EnableSwagger2
public class Swagger2Config {
@Bean
public Docket createRestApi() {
return new Docket(DocumentationType.SWAGGER_2)
.apiInfo(apiInfo())
.select()
.apis(RequestHandlerSelectors.basePackage("com.example"))
.paths(PathSelectors.any())
.build();
}
private ApiInfo apiInfo() {
return new ApiInfoBuilder()
.title("Spring Boot中使用Swagger2构建RESTful APIs")
.description("spring boot整合swagger2")
.termsOfServiceUrl("www.baidu.com")
.contact("牛头人")
.version("1.0")
.build();
}
}
如上代码所示,通过 @Configuration 注解,让Spring来加载该类配置。再通过 @EnableSwagger2 注解来启用Swagger2。
通过 createRestApi 函数创建 Docket 的Bean之后, apiInfo() 用来创建该Api的基本信息(这些基本信息会展现在文档页面中)。 select() 函数返回一个 ApiSelectorBuilder 实例用来控制哪些接口暴露给Swagger来展现,本例采用指定扫描的包路径来定义,Swagger会扫描该包下所有Controller定义的API,并产生文档内容(除了被 @ApiIgnore 指定的请求)。
3).新建User实体类
package com.example.swagger2;
public class User {
private String id;
private String name;
public String getId() {
return id;
}
public void setId(String id) {
this.id = id;
}
public String getName() {
return name;
}
public void setName(String name) {
this.name = name;
}
}
4).新建SwaggerDemoController类
package com.example.swagger2;
import java.util.ArrayList;
import java.util.Collections;
import java.util.HashMap;
import java.util.List;
import java.util.Map;
import org.springframework.web.bind.annotation.PathVariable;
import org.springframework.web.bind.annotation.RequestBody;
import org.springframework.web.bind.annotation.RequestMapping;
import org.springframework.web.bind.annotation.RequestMethod;
import org.springframework.web.bind.annotation.RestController;
import io.swagger.annotations.Api;
import io.swagger.annotations.ApiImplicitParam;
import io.swagger.annotations.ApiImplicitParams;
import io.swagger.annotations.ApiOperation;
import io.swagger.annotations.ApiResponse;
import io.swagger.annotations.ApiResponses;
@RestController
@RequestMapping(value="/api")
@Api("SwaggerDemoController相关api")
public class SwaggerDemoController {
static Map<String, User> users = Collections.synchronizedMap(new HashMap<String, User>());
@ApiOperation(value="获取用户列表", notes="")
@ApiResponses({
@ApiResponse(code=400,message="请求参数没填好"),
@ApiResponse(code=404,message="请求路径没有或页面跳转路径不对")
})
@RequestMapping(value={""}, method=RequestMethod.GET)
public List<User> getUserList() {
List<User> r = new ArrayList<User>(users.values());
return r;
}
@ApiOperation(value="创建用户", notes="根据User对象创建用户")
@ApiImplicitParam(name = "user", value = "用户详细实体user", required = true, dataType = "User")
@ApiResponses({
@ApiResponse(code=400,message="请求参数没填好"),
@ApiResponse(code=404,message="请求路径没有或页面跳转路径不对")
})
@RequestMapping(value="", method=RequestMethod.POST)
public String postUser(@RequestBody User user) {
users.put(user.getId(), user);
return "success";
}
@ApiOperation(value="获取用户详细信息", notes="根据url的id来获取用户详细信息")
@ApiImplicitParam(name = "id", value = "用户ID",paramType="path", required = true, dataType = "String")
@ApiResponses({
@ApiResponse(code=400,message="请求参数没填好"),
@ApiResponse(code=404,message="请求路径没有或页面跳转路径不对")
})
@RequestMapping(value="/{id}", method=RequestMethod.GET)
public User getUser(@PathVariable String id) {
System.out.println("id="+id);
return users.get(id);
}
@ApiOperation(value="更新用户详细信息", notes="根据url的id来指定更新对象,并根据传过来的user信息来更新用户详细信息")
@ApiImplicitParams({
@ApiImplicitParam(name = "id", value = "用户ID",paramType="path", required = true, dataType = "String"),
@ApiImplicitParam(name = "user", value = "用户详细实体user", required = true, dataType = "User")
})
@ApiResponses({
@ApiResponse(code=400,message="请求参数没填好"),
@ApiResponse(code=404,message="请求路径没有或页面跳转路径不对")
})
@RequestMapping(value="/{id}", method=RequestMethod.PUT)
public String putUser(@PathVariable String id, @RequestBody User user) {
System.out.println("id="+id);
User u = users.get(id);
u.setName(user.getName());
users.put(id, u);
return "success";
}
@ApiOperation(value="删除用户", notes="根据url的id来指定删除对象")
@ApiImplicitParam(name = "id", value = "用户ID",paramType="path", required = true, dataType = "String")
@ApiResponses({
@ApiResponse(code=400,message="请求参数没填好"),
@ApiResponse(code=404,message="请求路径没有或页面跳转路径不对")
})
@RequestMapping(value="/{id}", method=RequestMethod.DELETE)
public String deleteUser(@PathVariable String id) {
System.out.println("id="+id);
users.remove(id);
return "success";
}
}
说明:
@Api:用在类上,说明该类的作用
@ApiOperation:用在方法上,说明方法的作用
@ApiImplicitParams:用在方法上包含一组参数说明
@ApiImplicitParam:用在@ApiImplicitParams注解中,指定一个请求参数的各个方面
paramType:参数放在哪个地方
header-->请求参数的获取:@RequestHeader
query-->请求参数的获取:@RequestParam
path(用于restful接口)-->请求参数的获取:@PathVariable
body(不常用)
form(不常用)
name:参数名
dataType:参数类型
required:参数是否必须传
value:参数的意思
defaultValue:参数的默认值
@ApiResponses:用于表示一组响应
@ApiResponse:用在@ApiResponses中,一般用于表达一个错误的响应信息
code:数字,例如400
message:信息,例如"请求参数没填好"
response:抛出异常的类
@ApiModel:描述一个Model的信息(这种一般用在post创建的时候,使用@RequestBody这样的场景,请求参数无法使用@ApiImplicitParam注解进行描述的时候)
@ApiModelProperty:描述一个model的属性
通过 @ApiOperation 注解来给API增加说明、通过 @ApiImplicitParams 、 @ApiImplicitParam 注解来给参数增加说明。
需要注意的是:
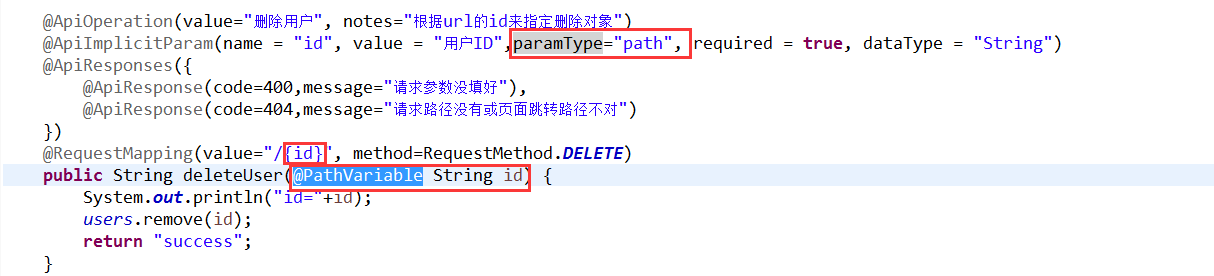
如果ApiImplicitParam中的phone的paramType是query的话,是无法注入到rest路径中的,而且如果是path的话,是不需要配置ApiImplicitParam的,即使配置了,其中的value="用户ID"也不会在swagger-ui展示出来。
具体其他的注解,查看:
https://github.com/swagger-api/swagger-core/wiki/Annotations#apimodel
2.测试:
启动服务,浏览器输入"http://localhost:8080/swagger-ui.html"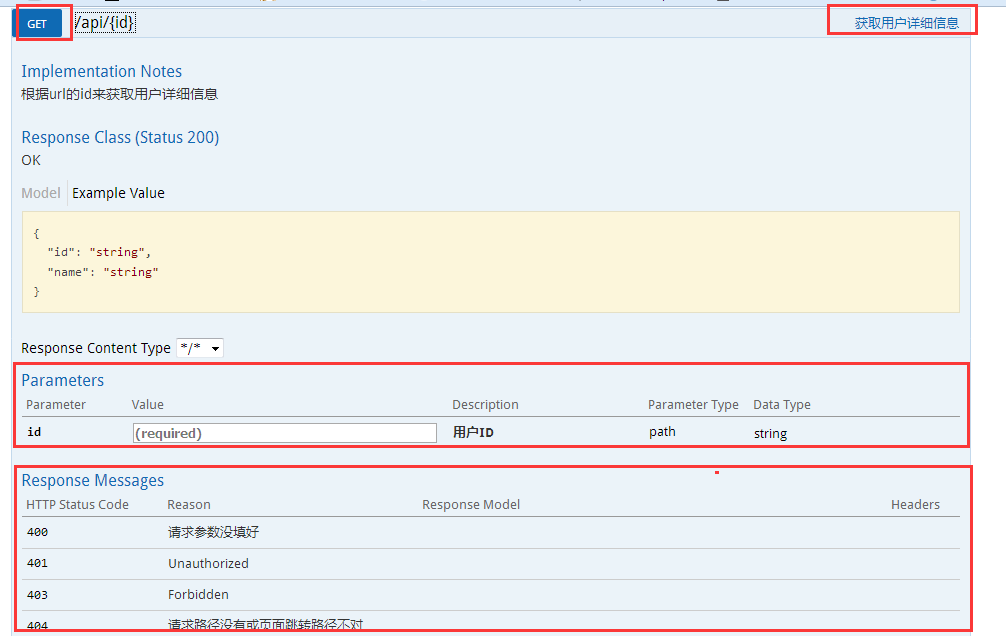
GET红框:method=RequestMethod.GET
右边红框:@ApiOperation
parameter红框:@ApiImplicitParams系列注解
response messages红框:@ApiResponses系列注解
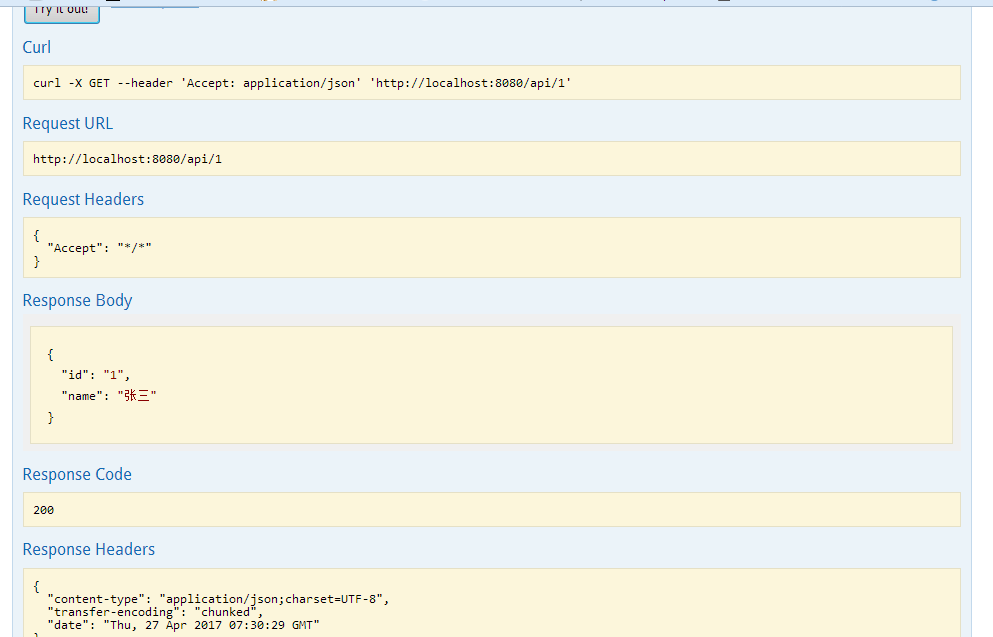
输入参数后,点击"try it out!",查看响应内容:
spring boot整合Swagger2的更多相关文章
- Spring Boot 项目学习 (四) Spring Boot整合Swagger2自动生成API文档
0 引言 在做服务端开发的时候,难免会涉及到API 接口文档的编写,可以经历过手写API 文档的过程,就会发现,一个自动生成API文档可以提高多少的效率. 以下列举几个手写API 文档的痛点: 文档需 ...
- 2018 最新 spring boot 整合 swagger2 (swagger2 版本 2.8.0)
好久没上了, 看到又有人回复了. 我就来修改一下. 修改时间 2018年5月16日 这回给你上全新版本. 至发稿时间,所有的包都是新版. 注意: 高版本需要添加 jaxb-api 包, 否则会报错 ...
- spring boot 整合 swagger2
swagger2为了更好的管理api文档接口 swagger构建的api文档如下,清晰,避免了手写api诸多痛点 一,添加依赖 <!--swagger2的官方依赖--> <depen ...
- Spring Boot 整合Swagger2构建API文档
1.pom.xml中引入依赖 <dependency> <groupId>io.springfox</groupId> <artifactId>spri ...
- Spring Boot整合JPA、Redis和Swagger2
好久没有总结了,最近也一直在学习.今天就把spring boot与其它技术的整合做个小总结,主要是jpa.redis和swagger2.公司里有用到这些,整合起来也很简单. 首先,新建一个Spring ...
- Spring Boot初识(3)- Spring Boot整合Swagger
一.本文介绍 如果Web项目是完全前后端分离的话(我认为现在完全前后端分离已经是趋势了)一般前端和后端交互都是通过接口的,对接口入参和出参描述的文档就是Mock文档.随着接口数量的增多和参数的个数增加 ...
- Spring Boot之Swagger2集成
一.Swagger2简单介绍 Swagger2,它可以轻松的整合到Spring Boot中,并与Spring MVC程序配合组织出强大RESTful API文档.它既可以减少我们创建文档的工作量,同时 ...
- Spring Boot 整合 Elasticsearch,实现 function score query 权重分查询
摘要: 原创出处 www.bysocket.com 「泥瓦匠BYSocket 」欢迎转载,保留摘要,谢谢! 『 预见未来最好的方式就是亲手创造未来 – <史蒂夫·乔布斯传> 』 运行环境: ...
- spring boot整合jsp的那些坑(spring boot 学习笔记之三)
Spring Boot 整合 Jsp 步骤: 1.新建一个spring boot项目 2.修改pom文件 <dependency> <groupId>or ...
随机推荐
- IDEA SpringBoot Deprecated configuration property ‘server.servlet-path’
错误样式如图所示.说我这个版本中的这个标签是过时的. 解决: 出现这个问题后,这个标签被IDEA化成了黄线,同时,想使用server.servlet-path=*.html,配置servlet路径跳转 ...
- windows开启禁用网卡
' 在Windows中实现sudo命令--命令行环境中获取管理员权限 'ShellExecute 方法 '作用: 用于运行一个程序或脚本. '语法 ' .ShellExecute "appl ...
- svn 创建tag
1. 右键项目(源) 2. 选择复制到哪个路径(创建文件夹选项) 3. 选择哪个版本(源的) 4. 填写备注 5. 结束 使用:import .合并等
- 挂载镜像SD卡的FAT32文件系统分区到Linux中
首先使用fdisk –l命令查看sd卡的分区息 可以看到,sd卡有三个分区,第一个分区是FAT32系统,主要存放内核img文件和dtb文件,第二个分区是Linux系统分区,第三个分区格式未知,实际是U ...
- float 为什么不能用== ,或者大于等于,或者小于等于
本文尝试着将以下内容做一个浅显的解释,主要包括浮点数为什么是不精确的,浮点数为什么不能用==和!=直接比较,以及浮点数的比较方法等几个方面.如果那个地方说的不对还请各位看官不吝赐教!欢迎大家评论区讨论 ...
- hdu 1163 Eddy's digital Roots 【九余数定理】
http://acm.hdu.edu.cn/showproblem.php?pid=1163 九余数定理: 如果一个数的各个数位上的数字之和能被9整除,那么这个数能被9整除:如果一个数各个数位上的数字 ...
- JAVA服务器与C#客户端的通信技术调研
JAVA服务器与C#客户端的通信技术调研 研究背景及目的: ARPG项目的需求:需要将现有的服务器从C++的编写平台换为java语言.在对需求进行分析的过程中,发现几点需要研究实现的问题 java与c ...
- Two ways to see predicates added by VPD or FGAC
http://www.bobbydurrettdba.com/2012/07/17/two-ways-to-see-predicates-added-by-vpd-or-fgac/ Two ways ...
- Linux系统下ping命令报错 name or service not know
问题描述 CentOS,但是当执行ping命令的时候,提示name or service not known 解决方法 1.添加DNS服务器 vi /etc/resolv.conf 进入编辑模式,增加 ...
- ASP.NET在请求中检测到包含潜在危险的数据,因为它可能包括 HTML标记或脚本
背景:程序迁移到新的服务器上,在程序进行修改操作时,提示包含危险数据.然而在旧服务器上却没有问题,我猜想的可能是,新服务器IIS安装的ASP.NET版本框架高于以前的IIS上的版本框架,导致web.c ...