
『Sklearn』数据划分方法
原理介绍
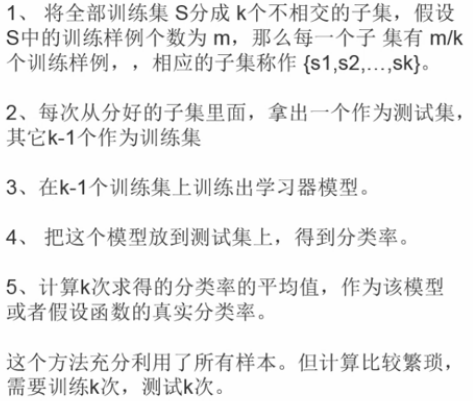
K折交叉验证:
KFold,GroupKFold,StratifiedKFold,
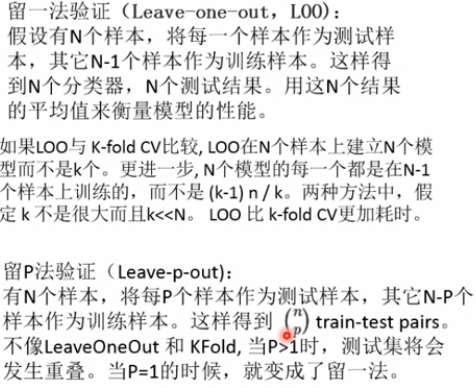
留一法:
LeaveOneGroupOut,LeavePGroupsOut,LeaveOneOut,LeavePOut,
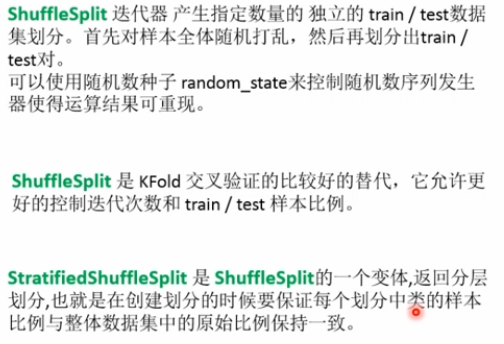
随机划分法:
ShuffleSplit,GroupShuffleSplit,StratifiedShuffleSplit,
代码实现
流程:
实例化分类器 -> 迭代器迭代组[.split()]
KFold(n_splits=2)
#KFold

import numpy as np

from sklearn.model_selection import KFold

X=np.array([[1,2],[3,4],[5,6],[7,8],[9,10],[11,12]])

y=np.array([1,2,3,4,5,6])

kf=KFold(n_splits=2)    # 定义分成几个组

# kf.get_n_splits(X)    # 查询分成几个组

print(kf)

for train_index,test_index in kf.split(X):

    print("Train Index:",train_index,",Test Index:",test_index)

    X_train,X_test=X[train_index],X[test_index]

    y_train,y_test=y[train_index],y[test_index]

    #print(X_train,X_test,y_train,y_test)
GroupKFold(n_splits=2)
# GroupKFold,不是很懂这个划分方法

import numpy as np

from sklearn.model_selection import GroupKFold

X=np.array([[1,2],[3,4],[5,6],[7,8],[9,10],[11,12]])

y=np.array([1,2,3,4,5,6])

groups=np.array([1,2,3,4,5,6])

group_kfold=GroupKFold(n_splits=2)

group_kfold.get_n_splits(X,y,groups)

print(group_kfold)

for train_index,test_index in group_kfold.split(X,y,groups):

    print("Train Index:",train_index,",Test Index:",test_index)

    X_train,X_test=X[train_index],X[test_index]

    y_train,y_test=y[train_index],y[test_index]

    #print(X_train,X_test,y_train,y_test)

#GroupKFold(n_splits=2)

#Train Index: [0 2 4] ,Test Index: [1 3 5]

#Train Index: [1 3 5] ,Test Index: [0 2 4]
StratifiedKFold(n_splits=3)
# stratifiedKFold:保证训练集中每一类的比例是相同的(尽量)

import numpy as np

from sklearn.model_selection import StratifiedKFold

X=np.array([[1,2],[3,4],[5,6],[7,8],[9,10],[11,12]])

y=np.array([1,1,1,2,2,2])

skf=StratifiedKFold(n_splits=3)

skf.get_n_splits(X,y)

print(skf)

for train_index,test_index in skf.split(X,y):

    print("Train Index:",train_index,",Test Index:",test_index)

    X_train,X_test=X[train_index],X[test_index]

    y_train,y_test=y[train_index],y[test_index]

    #print(X_train,X_test,y_train,y_test)

#StratifiedKFold(n_splits=3, random_state=None, shuffle=False)

#Train Index: [1 2 4 5] ,Test Index: [0 3]

#Train Index: [0 2 3 5] ,Test Index: [1 4]
LeaveOneOut()
# leaveOneOut:测试集就留下一个

import numpy as np

from sklearn.model_selection import LeaveOneOut

X=np.array([[1,2],[3,4],[5,6],[7,8],[9,10],[11,12]])

y=np.array([1,2,3,4,5,6])

loo=LeaveOneOut()

loo.get_n_splits(X)

print(loo)

for train_index,test_index in loo.split(X,y):

    print("Train Index:",train_index,",Test Index:",test_index)

    X_train,X_test=X[train_index],X[test_index]

    y_train,y_test=y[train_index],y[test_index]

    #print(X_train,X_test,y_train,y_test)

#LeaveOneOut()

#Train Index: [1 2 3 4 5] ,Test Index: [0]

#Train Index: [0 2 3 4 5] ,Test Index: [1]

#Train Index: [0 1 3 4 5] ,Test Index: [2]

#Train Index: [0 1 2 4 5] ,Test Index: [3]

#Train Index: [0 1 2 3 5] ,Test Index: [4]

#Train Index: [0 1 2 3 4] ,Test Index: [5]
LeavePOut(p=3)
LeavePOut:测试集留下P个

import numpy as np

from sklearn.model_selection import LeavePOut

X=np.array([[1,2],[3,4],[5,6],[7,8],[9,10],[11,12]])

y=np.array([1,2,3,4,5,6])

lpo=LeavePOut(p=3)

lpo.get_n_splits(X)

print(lpo)

for train_index,test_index in lpo.split(X,y):

    print("Train Index:",train_index,",Test Index:",test_index)

    X_train,X_test=X[train_index],X[test_index]

    y_train,y_test=y[train_index],y[test_index]

    #print(X_train,X_test,y_train,y_test)

#LeavePOut(p=3)

#Train Index: [3 4 5] ,Test Index: [0 1 2]

#Train Index: [2 4 5] ,Test Index: [0 1 3]

#Train Index: [2 3 5] ,Test Index: [0 1 4]

#Train Index: [2 3 4] ,Test Index: [0 1 5]

#Train Index: [1 4 5] ,Test Index: [0 2 3]

#Train Index: [1 3 5] ,Test Index: [0 2 4]

#Train Index: [1 3 4] ,Test Index: [0 2 5]

#Train Index: [1 2 5] ,Test Index: [0 3 4]

#Train Index: [1 2 4] ,Test Index: [0 3 5]

#Train Index: [1 2 3] ,Test Index: [0 4 5]

#Train Index: [0 4 5] ,Test Index: [1 2 3]

#Train Index: [0 3 5] ,Test Index: [1 2 4]

#Train Index: [0 3 4] ,Test Index: [1 2 5]

#Train Index: [0 2 5] ,Test Index: [1 3 4]

#Train Index: [0 2 4] ,Test Index: [1 3 5]

#Train Index: [0 2 3] ,Test Index: [1 4 5]

#Train Index: [0 1 5] ,Test Index: [2 3 4]

#Train Index: [0 1 4] ,Test Index: [2 3 5]

#Train Index: [0 1 3] ,Test Index: [2 4 5]

#Train Index: [0 1 2] ,Test Index: [3 4 5]
ShuffleSplit(n_splits=3,test_size=.25,random_state=0)
# ShuffleSplit 把数据集打乱顺序,然后划分测试集和训练集,训练集额和测试集的比例随机选定,

# 训练集和测试集的比例的和可以小于1

import numpy as np

from sklearn.model_selection import ShuffleSplit

X=np.array([[1,2],[3,4],[5,6],[7,8],[9,10],[11,12]])

y=np.array([1,2,3,4,5,6])

rs=ShuffleSplit(n_splits=3,test_size=.25,random_state=0)

rs.get_n_splits(X)

print(rs)

for train_index,test_index in rs.split(X,y):

    print("Train Index:",train_index,",Test Index:",test_index)

    X_train,X_test=X[train_index],X[test_index]

    y_train,y_test=y[train_index],y[test_index]

    #print(X_train,X_test,y_train,y_test)

print("==============================")

rs=ShuffleSplit(n_splits=3,train_size=.5,test_size=.25,random_state=0)

rs.get_n_splits(X)

print(rs)

for train_index,test_index in rs.split(X,y):

    print("Train Index:",train_index,",Test Index:",test_index)

#ShuffleSplit(n_splits=3, random_state=0, test_size=0.25, train_size=None)

#Train Index: [1 3 0 4] ,Test Index: [5 2]

#Train Index: [4 0 2 5] ,Test Index: [1 3]

#Train Index: [1 2 4 0] ,Test Index: [3 5]

#==============================

#ShuffleSplit(n_splits=3, random_state=0, test_size=0.25, train_size=0.5)

#Train Index: [1 3 0] ,Test Index: [5 2]

#Train Index: [4 0 2] ,Test Index: [1 3]

#Train Index: [1 2 4] ,Test Index: [3 5]
StratifiedShuffleSplit(n_splits=3,test_size=.5,random_state=0)
# StratifiedShuffleSplitShuffleSplit 把数据集打乱顺序,然后划分测试集和训练集,

# 训练集额和测试集的比例随机选定,训练集和测试集的比例的和可以小于1,但是还要保证训练集中各类所占的比例是一样的

import numpy as np

from sklearn.model_selection import StratifiedShuffleSplit

X=np.array([[1,2],[3,4],[5,6],[7,8],[9,10],[11,12]])

y=np.array([1,2,1,2,1,2])

sss=StratifiedShuffleSplit(n_splits=3,test_size=.5,random_state=0)

sss.get_n_splits(X,y)

print(sss)

for train_index,test_index in sss.split(X,y):

    print("Train Index:",train_index,",Test Index:",test_index)

    X_train,X_test=X[train_index],X[test_index]

    y_train,y_test=y[train_index],y[test_index]

    #print(X_train,X_test,y_train,y_test)

#StratifiedShuffleSplit(n_splits=3, random_state=0, test_size=0.5,train_size=None)

#Train Index: [5 4 1] ,Test Index: [3 2 0]

#Train Index: [5 2 3] ,Test Index: [0 4 1]

#Train Index: [5 0 4] ,Test Index: [3 1 2]
『Sklearn』数据划分方法的更多相关文章
- 『Sklearn』特征向量化处理
『Kaggle』分类任务_决策树&集成模型&DataFrame向量化操作 1 2 3 4 5 6 7 8 9 '''特征提取器''' from sklearn.feature_extr ...
- 『Sklearn』框架自带数据集接口
自带数据集类型如下: # 自带小型数据集# sklearn.datasets.load_<name># 在线下载数据集# sklearn.datasets.fetch_<name&g ...
- JS 中通过对象关联实现『继承』
JS 中继承其实是种委托,而不是传统面向对象中的复制父类到子类,只是通过原型链将要做的事委托给父类. 下面介绍通过对象关联来实现『继承』的方法: Foo = { // 需要提供一个 init 方法来初 ...
- 『Python』__getattr__()特殊方法
self的认识 & __getattr__()特殊方法 将字典调用方式改为通过属性查询的一个小class, class Dict(dict): def __init__(self, **kw) ...
- 『TensorFlow』模型保存和载入方法汇总
『TensorFlow』第七弹_保存&载入会话_霸王回马 一.TensorFlow常规模型加载方法 保存模型 tf.train.Saver()类,.save(sess, ckpt文件目录)方法 ...
- 『转载』hadoop2.x常用端口、定义方法及默认端口
『转载』hadoop2.x常用端口.定义方法及默认端口 1.问题导读 DataNode的http服务的端口.ipc服务的端口分别是哪个? NameNode的http服务的端口.ipc服务的端口分别是哪 ...
- 『计算机视觉』Mask-RCNN_推断网络终篇:使用detect方法进行推断
一.detect和build 前面多节中我们花了大量笔墨介绍build方法的inference分支,这节我们看看它是如何被调用的. 在dimo.ipynb中,涉及model的操作我们简单进行一下汇总, ...
- 『TensorFlow』读书笔记_降噪自编码器
『TensorFlow』降噪自编码器设计 之前学习过的代码,又敲了一遍,新的收获也还是有的,因为这次注释写的比较详尽,所以再次记录一下,具体的相关知识查阅之前写的文章即可(见上面链接). # Aut ...
- 『AngularJS』$location 服务
项目中关于 $location的用法 简介 $location服务解析在浏览器地址栏中的URL(基于window.location)并且让URL在你的应用中可用.改变在地址栏中的URL会作用到$loc ...
随机推荐
- 【JavaScript】数组随机排序 之 Fisher–Yates 洗牌算法
Fisher–Yates随机置乱算法也被称做高纳德置乱算法,通俗说就是生成一个有限集合的随机排列.Fisher-Yates随机置乱算法是无偏的,所以每个排列都是等可能的,当前使用的Fisher-Yat ...
- CSS前叙
1 css是什么?层叠样式表,修饰网页结构2 如何去使用css?a.在html网页中,加入一个style标签,在这个style标签里面写css代码b.可以直接把style里面的代码放到一个单独的文件中 ...
- QImage与QPixmap完全解析
转载自http://www.civilnet.cn/bbs/browse.php?topicno=4691 用Qt程序在手机上显示一幅图片对编程人员来说是再基础不过的一件事情了.那么先让大家看两段代码 ...
- 【运维技术】Nexus私服安装配置常用问题
maven私服安装配置 软件安装及基本配置 安装配置 # 安装jdk,参考其他教程 mkdir -p /app/nexus2 # 创建目录 wget https://download.sonatype ...
- 手撕vue-cli配置——webpack.dev.conf.js篇
const utils = require('./utils') const webpack = require('webpack') const config = require('../confi ...
- 09: python基础补充
1.1 闭包 1.闭包概念 1. 在一个外函数中定义了一个内函数,内函数里运用了外函数的临时变量,并且外函数的返回值是内函数的引用,这样就构成了一个闭包 2. 一般情况下,在我们认知当中,如果一个函数 ...
- C_Learning (4)
/ 预处理命令 / 宏定义 / 一般形式:#define 宏名 字符串 # 表示这是一条预处理命令 宏名是一个标识符,必须符合C语言标识符的规定 字符串可以是常数.表达式.格式化字符串等 / 注意: ...
- 20145330 《网络对抗》 Eternalblue(MS17-010)漏洞复现与S2-045漏洞的利用及修复
20145330 <网络对抗> Eternalblue(MS17-010)漏洞利用工具实现Win 7系统入侵与S2-045漏洞的利用及修复 加分项目: PC平台逆向破解:注入shellco ...
- 汽车OBD接口定义
汽车上的OBD-II接口(母): ELM327用到的引脚: 2: SAE-J1850 PWM和SAE-1850 VPW总线(+) 4. 车身地 5. 信号地 6. CAN high (ISO 157 ...
- Git 基础笔记整理1
Git 官网:http://git-scm.com/ git教程1:http://www.yiibai.com/git/home.html git教程2 :http://www.liaoxuefeng ...