【第十一章】 springboot + mongodb(简单查询)
1、mongodb在mac上的安装
- 下载mongodb,https://www.mongodb.org/
- 解压缩到一个指定文件夹,如:/Users/enniu1/Desktop/zjg/mongodb-osx-x86_64-3.2.6(这是我的mongodb的版本)
- 配置PATH
- 输入命令:"vi ~/.bash_profile"
- 添加如下两句配置:
1 export MONGO_HOME=/Users/enniu1/Desktop/zjg/mongodb-osx-x86_64-3.2.6
2 export PATH=$PATH:$MONGO_HOME/bin
- 创建数据目录
- 输入命令:"sudo mkdir -p /data/db"
- 赋予数据目录权限
- 输入命令:"sudo chmod 777 /data/db"
- 启动
- 输入命令:"mongod"
- 退出:Ctrl+c
注意两个错:
- 如果没有创建目录直接启动,会报错http://stackoverflow.com/questions/7948789/mongodb-mongod-complains-that-there-is-no-data-db-folder
- 如果没有赋予数据目录权限,会报错http://stackoverflow.com/questions/15229412/unable-to-create-open-lock-file-data-mongod-lock-errno13-permission-denied
参考:https://docs.mongodb.org/manual/tutorial/install-mongodb-on-os-x/
2、代码(4个部分)
2.1、com.xxx.firstboot.domain.Custome
package com.xxx.firstboot.domain;

import org.springframework.data.annotation.Id;

/**
 * 测试mongodb
 */
public class Customer {
    /**
     * cid:该字段用于mongodb的"_id"索引
     * 1、需要@Id注解
     * 2、取名无所谓,反正在mongodb中最后都会转化为"_id"
     * 3、定义为String类型,如果定义为Integer可能索引只会是0,会出现key重复导致数据库插不进去的情况;
     * 4、该类型也是MongoRepository泛型中主键的ID
     */
    @Id
    private String cid;
    private String firstname;
    private String secondname;

    public String getCid() {
        return cid;
    }

    public void setCid(String cid) {
        this.cid = cid;
    }

    public String getFirstname() {
        return firstname;
    }

    public void setFirstname(String firstname) {
        this.firstname = firstname;
    }

    public String getSecondname() {
        return secondname;
    }

    public void setSecondname(String secondname) {
        this.secondname = secondname;
    }

}
说明:生成的colletion(类似于MySQL中的表)就是domain类的简单类名,eg.customer。
注意:
- cid:该字段用于mongodb的"_id"索引
- 需要@Id注解
- 取名无所谓,反正在mongodb中最后都会转化为"_id"
- 定义为String类型,如果定义为Integer可能索引只会是0,会出现key重复导致数据库插不进去的情况
- 该类型也是MongoRepository泛型中主键的ID
package com.xxx.firstboot.mongo;

import java.util.List;

import org.springframework.data.mongodb.repository.MongoRepository;

import com.xxx.firstboot.domain.Customer;

/**
 * MongoRepository<Customer, Integer>
 * 第一个参数:T 操作的vo
 * 第二个参数:ID T的主键类型
 * 作用:该接口实现了CRUD方法
 *
 * 注意:
 * 1、由于boot使用了spring-data-mongodb,所以我们不需要写该接口的实现,
 *   当我们运行程序的时候,spring-data-mongodb会动态创建
 * 2、findBySecondname命名是有讲究的,Secondname(是Customer的属性)若改为lastname就会报找不到属性lastname的错误
 */
public interface CustomerRepository extends MongoRepository<Customer, String> {
    public Customer findByFirstname(String firstname);
    public List<Customer> findBySecondname(String secondname);
2.2、com.xxx.firstboot.mongo.CustomerRepository
package com.xxx.firstboot.mongo;

import java.util.List;
import org.springframework.data.mongodb.repository.MongoRepository;
import com.xxx.firstboot.domain.Customer;

/**
 * MongoRepository<Customer, Integer>
 * 第一个参数:T 操作的vo
 * 第二个参数:ID T的主键类型
 * 作用:该接口实现了CRUD方法
 *
 * 注意:
 * 1、由于boot使用了spring-data-mongodb,所以我们不需要写该接口的实现,
 *   当我们运行程序的时候,spring-data-mongodb会动态创建
 * 2、findBySecondname命名是有讲究的,Secondname(是Customer的属性)若改为lastname就会报找不到属性lastname的错误
 */
public interface CustomerRepository extends MongoRepository<Customer, String> {
    public Customer findByFirstname(String firstname);
    public List<Customer> findBySecondname(String secondname);
}
说明:该接口就是我们的业务接口。
注意:
- 继承MongoRepository<T, ID>接口
- T:操作的domain,例如com.xxx.firstboot.domain.Customer
- ID:T的主键类型(@ID修饰的属性),通常就是String
- 该接口的实现类也实现了CRUD操作
- 我们的接口只需要定义方法的定义,不需要做实现,spring-data-mongodb会在程序运行的时候动态创
- 方法的命名是有讲究的,与domain的属性有关(可以再测测)
package com.xxx.firstboot.web;

import java.util.List;

import org.springframework.beans.factory.annotation.Autowired;
import org.springframework.web.bind.annotation.RequestMapping;
import org.springframework.web.bind.annotation.RequestMethod;
import org.springframework.web.bind.annotation.RequestParam;
import org.springframework.web.bind.annotation.RestController;

import com.xxx.firstboot.domain.Customer;
import com.xxx.firstboot.mongo.CustomerRepository;

import io.swagger.annotations.Api;
import io.swagger.annotations.ApiOperation;

@RestController
@RequestMapping("/customer")
@Api("customer相关的API,用于测试mongodb")
public class CustomerController {

    @Autowired
    private CustomerRepository customerRepository;

    @ApiOperation("增加一个Customer")
    @RequestMapping(value = "/addCustomer", method = RequestMethod.GET)
    public Customer addCustomer(@RequestParam("firstname") String firstname,
                                @RequestParam("secondname") String secondname) {
        Customer customer = new Customer();
        customer.setFirstname(firstname);
        customer.setSecondname(secondname);
        return customerRepository.save(customer);
    }

    @ApiOperation("获取所有的Customer")
    @RequestMapping(value = "/getAllCustomer", method = RequestMethod.GET)
    public List<Customer> getAllCustomer() {
        return customerRepository.findAll();
    }

    @ApiOperation("根据firstname获取Customer")
    @RequestMapping(value = "/getCustomerByFirstname", method = RequestMethod.GET)
    public Customer getCustomerByFirstname(@RequestParam("firstname") String firstname) {
        return customerRepository.findByFirstname(firstname);
    }

    @ApiOperation("根据secondname获取多个Customer")
    @RequestMapping(value = "/getCustomerBySecondname", method = RequestMethod.GET)
    public List<Customer> getCustomerBySecondname(@RequestParam("secondname") String secondname) {
        return customerRepository.findBySecondname(secondname);
    }

    @ApiOperation("根据id删除Customer")
    @RequestMapping(value = "/deleteCustomerById", method = RequestMethod.GET)
    public boolean deleteCustomerById(@RequestParam("cid") String cid) {
        customerRepository.delete(cid);
        return true;
    }
2.3、com.xxx.firstboot.web.CustomerController
package com.xxx.firstboot.web;

import java.util.List;
import org.springframework.beans.factory.annotation.Autowired;
import org.springframework.web.bind.annotation.RequestMapping;
import org.springframework.web.bind.annotation.RequestMethod;
import org.springframework.web.bind.annotation.RequestParam;
import org.springframework.web.bind.annotation.RestController;
import com.xxx.firstboot.domain.Customer;
import com.xxx.firstboot.mongo.CustomerRepository;
import io.swagger.annotations.Api;
import io.swagger.annotations.ApiOperation;

@RestController
@RequestMapping("/customer")
@Api("customer相关的API,用于测试mongodb")
public class CustomerController {

    @Autowired
    private CustomerRepository customerRepository;

    @ApiOperation("增加一个Customer")
    @RequestMapping(value = "/addCustomer", method = RequestMethod.GET)
    public Customer addCustomer(@RequestParam("firstname") String firstname,
                                @RequestParam("secondname") String secondname) {
        Customer customer = new Customer();
        customer.setFirstname(firstname);
        customer.setSecondname(secondname);
        return customerRepository.save(customer);
    }

    @ApiOperation("获取所有的Customer")
    @RequestMapping(value = "/getAllCustomer", method = RequestMethod.GET)
    public List<Customer> getAllCustomer() {
        return customerRepository.findAll();
    }

    @ApiOperation("根据firstname获取Customer")
    @RequestMapping(value = "/getCustomerByFirstname", method = RequestMethod.GET)
    public Customer getCustomerByFirstname(@RequestParam("firstname") String firstname) {
        return customerRepository.findByFirstname(firstname);
    }

    @ApiOperation("根据secondname获取多个Customer")
    @RequestMapping(value = "/getCustomerBySecondname", method = RequestMethod.GET)
    public List<Customer> getCustomerBySecondname(@RequestParam("secondname") String secondname) {
        return customerRepository.findBySecondname(secondname);
    }

    @ApiOperation("根据id删除Customer")
    @RequestMapping(value = "/deleteCustomerById", method = RequestMethod.GET)
    public boolean deleteCustomerById(@RequestParam("cid") String cid) {
        customerRepository.delete(cid);
        return true;
    }
}
说明:直接注入我们自己的业务接口,然后进行相应的操作即可。
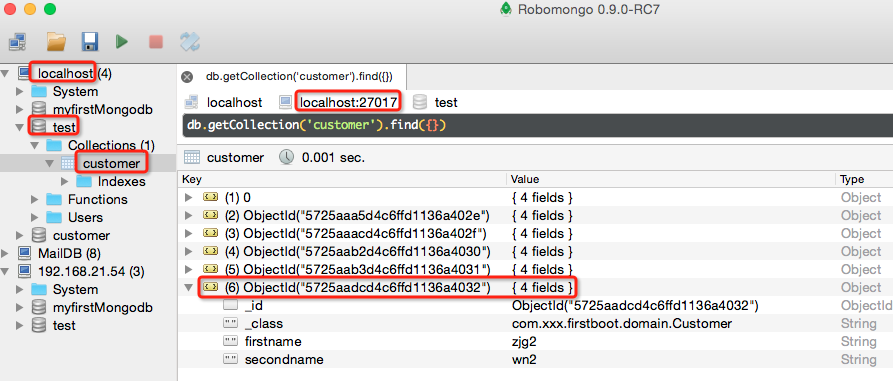
此时,就可以进行测试了。只是此时使用的都是mongodb的默认信息。
- host:localhost
- port:27017
- 数据库:test
- collection:customer(domain类的简单类名)
2.4、application.properties
1 #mongodb note:mongo3.x will not use host and port,only use uri
2 spring.data.mongodb.host=192.168.21.54
3 spring.data.mongodb.port=27017
4 spring.data.mongodb.uri=mongodb://192.168.21.54:27017/myfirstMongodb
说明:如果需要指定host、port、数据库,需要在application.properties文件中配置以上信息。
注意:
- 配置必须以"spring.data.mongodb"为前缀
- 如果是mongo3.x的话,host和port没用,需要uri。(未测过)
- uri = mongodb://host:port/数据库
- mongo2.x支持以上两种配置方式
- mongo3.x仅支持uri方式
3、测试
启动应用,启动mongo服务进程,打开swagger,使用robomongo或者mongobooster客户端观察mongodb存储情况。
没有在application.properties中设置属性。
设置属性后,

参考:
https://spring.io/guides/gs/accessing-data-mongodb/ 其中的例子就是对sample代码的解释
http://www.jianshu.com/p/e59cd2dc5274 关于mongodb主键
https://docs.spring.io/spring-boot/docs/current/reference/html/boot-features-nosql.html 关于mongo2.x与3.x对host、port、uri配置的支持。
http://blog.didispace.com/springbootmongodb/ 主键为Long uri用户名、密码配置
【第十一章】 springboot + mongodb(简单查询)的更多相关文章
- 第十一章 springboot + mongodb(简单查询)
1.mongodb在mac上的安装 下载mongodb,https://www.mongodb.org/ 解压缩到一个指定文件夹,如:/Users/enniu1/Desktop/zjg/mongodb ...
- 第十二章 springboot + mongodb(复杂查询)
简单查询:使用自定义的XxxRepository接口即可.(见 第十一章 springboot + mongodb(简单查询)) 复杂查询:使用MongoTemplate以及一些查询条件构建类(Bas ...
- SpringBoot | 第三十一章:MongoDB的集成和使用
前言 上一章节,简单讲解了如何集成Spring-data-jpa.本章节,我们来看看如何集成NoSQL的Mongodb.mongodb是最早热门非关系数据库的之一,使用也比较普遍.最适合来存储一些非结 ...
- MongoDB简单查询语句<平时使用语录,持续更新>
MongoDB查询语句 --查询近三个月的客户使用量 aggregate:使用聚合 match:过滤 group分组 -- mysql中select org_code as 近三个月使用商户 ...
- 第二十一章 springboot + 定时任务
1.application.properties #cron job.everysecond.cron=0/1 * * * * * job.everytensecond.cron=0/10 * * * ...
- 【第十二章】 springboot + mongodb(复杂查询)
简单查询:使用自定义的XxxRepository接口即可.(见 第十一章 springboot + mongodb(简单查询)) 复杂查询:使用MongoTemplate以及一些查询条件构建类(Bas ...
- SpringBoot学习笔记(十一:使用MongoDB存储文件 )
@ 目录 一.MongoDB存储文件 1.MongoDB存储小文件 2.MongoDB存储大文件 2.1.GridFS存储原理 2.2.GridFS使用 2.2.1.使用shell命令 2.2.2.使 ...
- java MongoDB查询(一)简单查询
前言 MongoDB的java驱动提供了查询的功能,查询条件也是bson对象,这篇就看下怎么进行简单的数据查询 1.数据结构 集合:firstCollection 数据内容: { "_id& ...
- 落网数据库简单查询接口 caddy+php7+mongodb
落网数据库简单查询接口 一个简单的DEMO,使用了caddy + php7 + mongodb 数据库&接口设计 来自 https://github.com/Aedron/Luoo.spide ...
- mongodb的简单查询
此篇文章简单的记录一下mongodb 的简单查询操作. 一.数据准备: db.persons.insertMany([ {'userId':1,name:'张三','age':20,'scores': ...
随机推荐
- 洛谷P1941 飞扬的小鸟 [noip2014] 背包
正解:背包 解题报告: 话说好久没做背包的题了,都有些陌生了?这几天加强基础题目多刷点儿dp和背包趴qwq 其实这题是95...然后我下了我错的那个测试点,我答案是9874正解是9875...然后读入 ...
- Zero-Copy技术
概述 考虑这样一种常用的情形:你需要将静态内容(类似图片.文件)展示给用户.那么这个情形就意味着你需要先将静态内容从磁盘中拷贝出来放到一个内存buf中,然后将这个buf通过socket传输给用户,进而 ...
- 匿名内部类的参数引用只能是final,可能遇到的问题及其解决
这个是我碰到比较多次的问题,一开始是不解,不过查了下大家都觉得没什么,而且只是加个final好像影响也不大,于是我就直接加个final了事,之后也不管了 直到昨天: 遇到了这个宿命般的问题 难道解决方 ...
- dbms_stats.gather_table_stats详解
dbms_stats.gather_table_stats 统计表,列,索引的统计信息(包含该表的自身-表的行数.数据块数.行长等信息: 列的分析--列值的重复数.列上的空值.数据在列上的分布情 ...
- 编码问题:python写入文件
方法一:(推荐) line1 = "我爱中国111" line2 = u"我爱祖国222" with open('1.txt','w',encoding='ut ...
- Ubuntu14.04+eclipse下cocos2d-x3.0正式版环境的搭建
环境: ubuntu14.04 adt-bundle-linux-x86_64 android-ndk-r9d-linux-x86_64 cocos2d-x-3.0正式版 apache-ant 1.9 ...
- hduPiggy-Bank(完全背包)
http://acm.hdu.edu.cn/showproblem.php?pid=1114 此题就是最简单的完全背包,顺序!!! for i=1..N for v=0..V f[v]=max{f[v ...
- JMS规范与Kafka
一.为什么需要消息队列 消息队列的核心作用就是三点:解耦一个系统中各个子模块的互相绑定与依赖,异步执行后台耗时逻辑,并行处理一个请求中涉及的多个操作. 以我们常见的下订单场景来说明,我们熟悉的淘宝,后 ...
- linux命令:帮助命令
帮助命令:man 命令名称:man 命令英文原意:manual 命令所在路径:/usr/bin/man 执行权限:所有用户 语法:man [命令或配置文件] 功能描述:获得帮助信息 范例:$man l ...
- kafka监控工具之一--kafka-manager
部署环境 jdk7 kafka_2.10-0.9.0.1 xshell4 rhel-server-6.5 kafka-manager 是功能比较多的kafka管控工具. 安装方法一 安装方法二 步骤一 ...