
android学习1——LinearLayout
用linearLayout,上面放4个按钮,不作任何设置。xml文件内容如下:
<?xml version="1.0" encoding="utf-8"?>

<LinearLayout xmlns:android="http://schemas.android.com/apk/res/android"

              android:layout_width="fill_parent"

              android:layout_height="fill_parent"

        >

    <Button android:id="@+id/bn1"

            android:layout_width="wrap_content"

            android:layout_height="wrap_content"

            android:text="@string/bn1"

            />

    <Button android:id="@+id/bn2"

            android:layout_width="wrap_content"

            android:layout_height="wrap_content"

            android:text="@string/bn2"

            />

    <Button android:id="@+id/bn3"

            android:layout_width="wrap_content"

            android:layout_height="wrap_content"

            android:text="@string/bn3"

            />

    <Button android:id="@+id/bn4"

            android:layout_width="wrap_content"

            android:layout_height="wrap_content"

            android:text="@string/bn4"

            />

    <Button android:id="@+id/bn5"

            android:layout_width="wrap_content"

            android:layout_height="wrap_content"

            android:text="@string/bn5"

            />

</LinearLayout>
显示的效果如下图下所示:
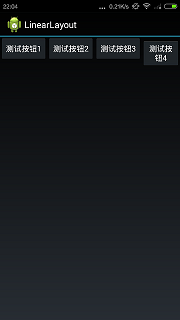
从上图可以看出,xml中一共是5个按钮,但是linearlayout默认是横向排列,所以第5个按钮已经看不到了.下面加一个配制选项:
<LinearLayout xmlns:android="http://schemas.android.com/apk/res/android"

              android:orientation="vertical"

              android:layout_width="fill_parent"

              android:layout_height="fill_parent"

        >
android:orientation指定是横向排列(horizontal)还是纵向(vertical)排列.默认是横向,设置成vertical效果如下:
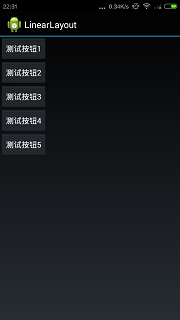
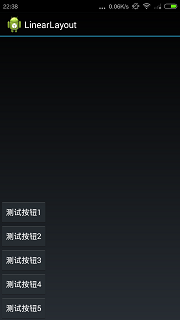
android:gravity控制竖直方向的对齐方式,看下面的例子:
<LinearLayout xmlns:android="http://schemas.android.com/apk/res/android"

              android:orientation="vertical"

              android:layout_width="fill_parent"

              android:layout_height="fill_parent"

              android:gravity="bottom"

        >
指定竖直方向为底部对齐,效果如下图所示
android:gravity的参数还可以组合,比如:
<LinearLayout xmlns:android="http://schemas.android.com/apk/res/android"

              android:orientation="vertical"

              android:layout_width="fill_parent"

              android:layout_height="fill_parent"

              android:gravity="bottom|center"

        >
效果是下方居中对齐,不再帖图片了.
源代码地址:https://github.com/zhouyang209117/AndroidTutorial/tree/master/Crazy/ch2/LinearLayout
看布局管理器嵌套的例子:
<?xml version="1.0" encoding="utf-8"?>

<LinearLayout xmlns:android="http://schemas.android.com/apk/res/android"

              android:orientation="horizontal"

              android:layout_width="fill_parent"

              android:layout_height="fill_parent"

        >

    <Button

            android:layout_width="wrap_content"

            android:layout_height="wrap_content"

            android:text="Button1"/>

    <LinearLayout

            android:orientation="vertical"

            android:layout_width="fill_parent"

            android:layout_height="fill_parent">

        <Button

            android:layout_width="wrap_content"

            android:layout_height="wrap_content"

            android:text="Button3"/>

        <Button

                android:layout_width="wrap_content"

                android:layout_height="wrap_content"

                android:text="Button4"/>

    </LinearLayout>

</LinearLayout>
按钮3,4被看成一个整体,在这个整体中Linearlayout的排列规则和上面讲到的相同.排列效果如下:
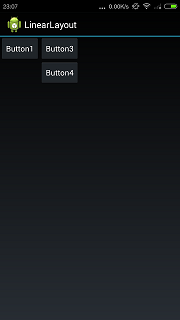
有一个问题:android:layout_width="fill_parent"表示填充父容器的宽度.但LinearLayout是根布局管理器,那么它填充的是谁的?
android学习1——LinearLayout的更多相关文章
- Android学习笔记——LinearLayout
该工程的功能是实现LinearLayout 以下的代码是MainActivity.java中的代码 package com.example.linearlayout; import android.a ...
- [Android学习笔记]LinearLayout布局,剩余空间的使用
转自:http://segmentfault.com/q/1010000000095725 如果使得一个View占用其父View的剩余空间? 答案是使用:android:layout_weight = ...
- 在LinearLayout中实现列表,列表采用LinearLayout横向布局-android学习
不多讲直接上代码 1.Activity 对应的布局文件如下: <?xml version="1.0" encoding="utf-8"?> < ...
- Android 布局学习之——LinearLayout的layout_weight属性
一直对layout_weight属性感到比较困惑,今天学习一下,来深入了解layout_weight属性和它的用法. 定义 首先,看看Android官方文档是怎么说的,毕竟人家才是权威 ...
- 【转】Pro Android学习笔记(二五):用户界面和控制(13):LinearLayout和TableLayout
目录(?)[-] 布局Layout 线性布局LinearLayout 表格布局TableLayout 布局Layout Layout是容器,用于对所包含的view进行布局.layout是view的子类 ...
- Android学习笔记之LinearLayout
<?xml version="1.0" encoding="utf-8"?> <LinearLayout xmlns:android=&quo ...
- android系列9.LinearLayout 学习2
<?xml version="1.0" encoding="utf-8"?> <LinearLayout xmlns:android=&quo ...
- Android学习——LinearLayout布局实现居中、左对齐、右对齐
android:orientation="vertical"表示该布局下的元素垂直排列: 在整体垂直排列的基础上想要实现内部水平排列,则在整体LinearLayout布局下再创建一 ...
- Android学习——第一个NDK程序
在前面的学习中,我们已经讲解了关于NDK编程的环境搭建流程,简单的使用我们也通过官网本身自带的例子进行说明了.可是相信大家一定还存在这么的一个疑惑:“如果我要自己利用NDK编写一个Android应用, ...
随机推荐
- flask-sqlalchemy relationship
http://www.ergo.io/blog/sqlalchemy-relationships-from-beginner-to-advanced class Cabinet(db.Model): ...
- 博客停更及OI退役公告
停更&&OI退役 公告 高中OI之路就这样结束了,曾经想过回在NOI跪,APIO跪,HNOI跪却从未想过会在NOIP跪! 没办法自己作死啊,CCF感觉还是很良心的混个省一回来了,看以后 ...
- Oracle用户权限分配
一.权限分类 系统权限:系统规定用户使用数据库的权限.(系统权限是对用户而言). 实体权限:某种权限用户对其它用户的表或视图的存取权限.(是针对表或视图而言的). 二.系统权限管理 1.系统权限分类: ...
- Bzoj3473
传送门:http://www.lydsy.com/JudgeOnline/problem.php?id=3473 题解:待更 代码:待更 开始时间: 结束时间:
- prism silverlight
转自 http://www.cnblogs.com/li-xiao/archive/2011/01/13/1934564.html Prism简介 Prism是由微软Patterns & ...
- 安卓自定义类似TabHost的导航栏
有时候为了项目需要我们要自定义一些导航控件,类似下面这样. 下面给大家讲讲我是怎么实现的, 1.素材准备(这个都是美工的事情) 2.①资源文件共有五个 如下: activity_main_first. ...
- 7-1 vim 编辑器
1. vi:visual interface. 1. vim:vi improved 这些都属于全屏编辑器,又是模式化编辑器 vim模式(3种) 编辑模式(命令模式) 输入模式 末行模式 模式转换 编 ...
- oracle语句总结(一)
1,建外键 新建两个表来实现外键的关联. create table main_tab ( id number, name varchar2(30) ); create table sub_tab ( ...
- Spring AOP切面的时候参数的传递
Spring AOP切面的时候参数的传递 Xml: <?xml version="1.0" encoding="UTF-8"?> <beans ...
- jqGrid Demos
http://www.trirand.com/blog/jqgrid/jqgrid.html http://www.cnblogs.com/huozhicheng/archive/2012/11/11 ...