
picker控件详解与使用,(实现省市的二级联动)
picker控件详解与使用,(实现省市的二级联动)
第一步:新建一个单视图(single view)的工程,
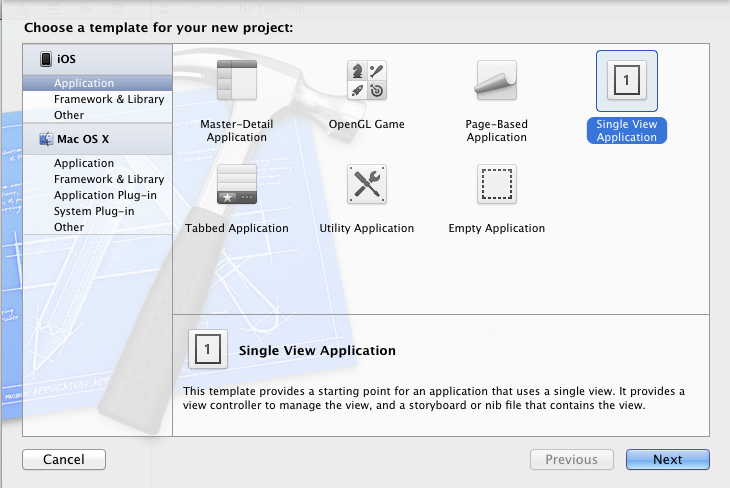
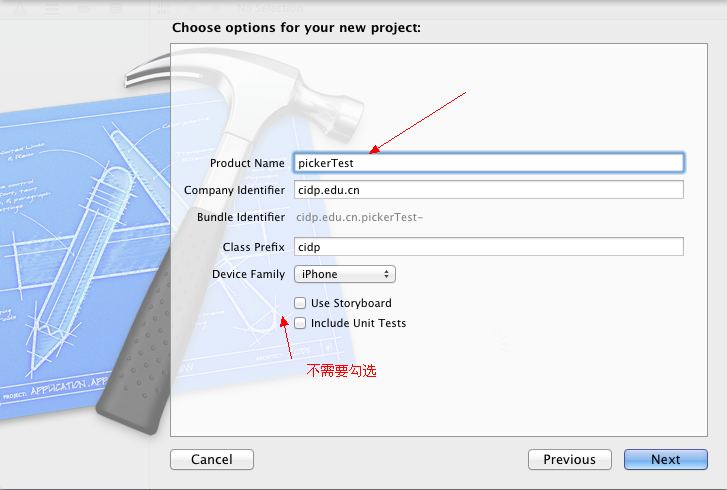
命名为pickerTest,不要勾选下面两个选项,第一个是新版本里面的,第二个是单元测试,现在用不着。
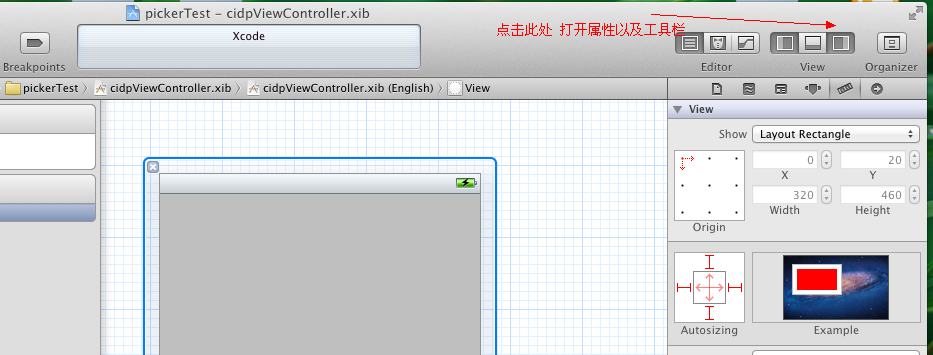
点击next ->creat之后,打开工具栏:
在下面的控件工具栏中往视图上拖放一个Picker View控件,一个UIButton控件,一个UILable控件,(所有在前端可以看得见的控件都继承自UIView)
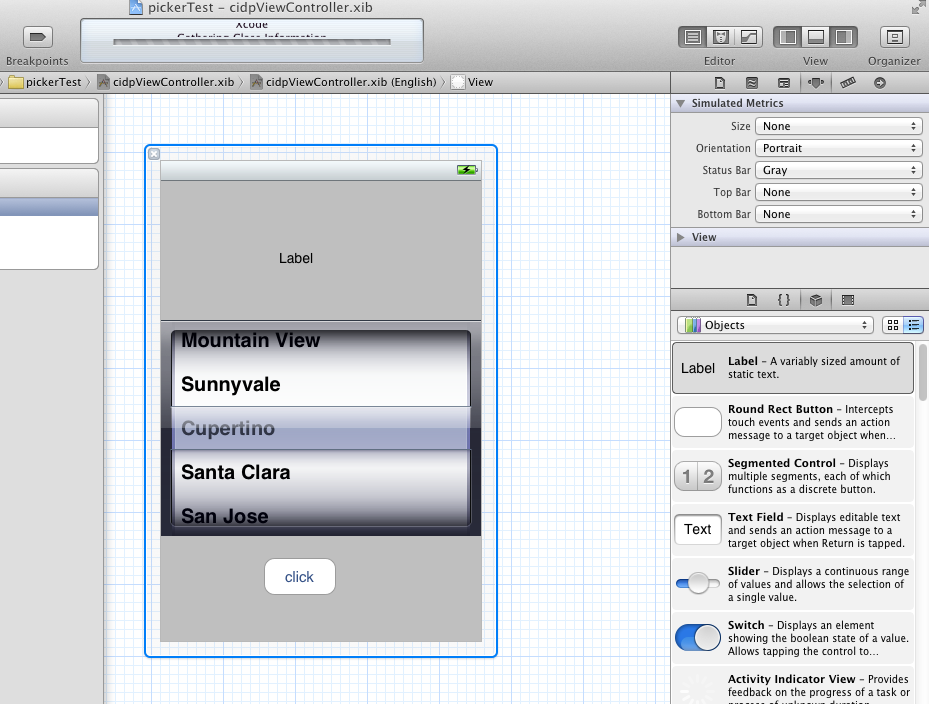
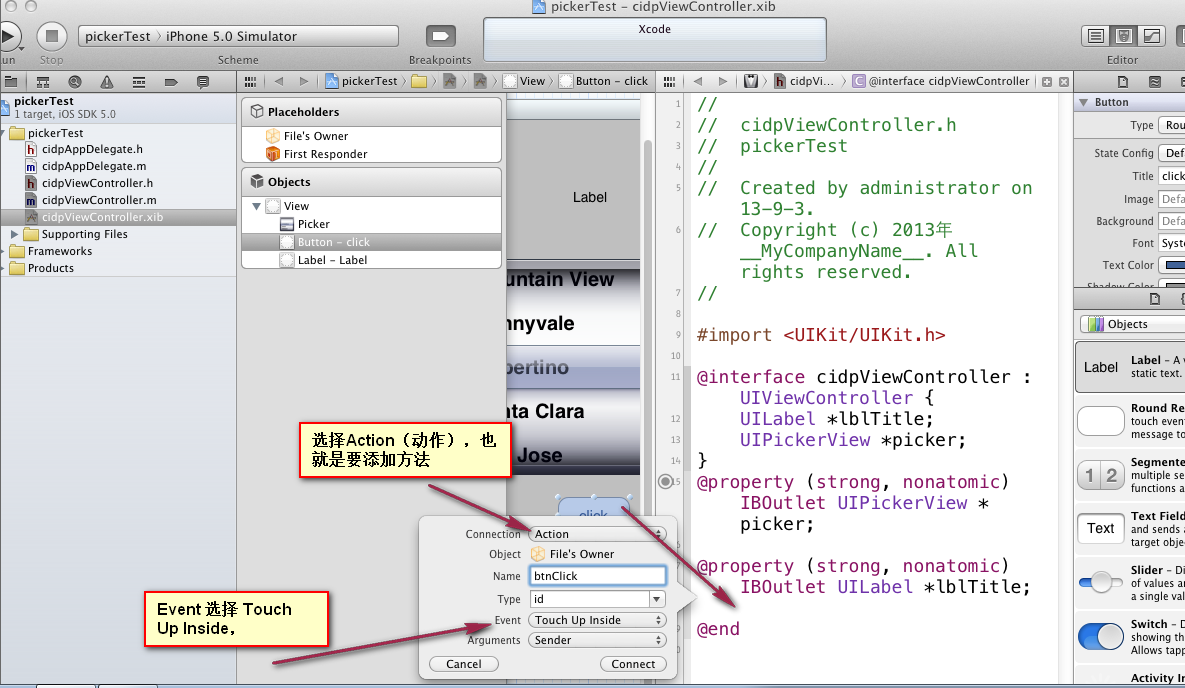
修改UIButton的title属性,设置为click 然后点击分栏按钮,为控件连线(这种方式相对于手动去写,要快速很多)。

依次为UILable 和 Picker View 控件添加插座变量,并且为UIButton添加Action
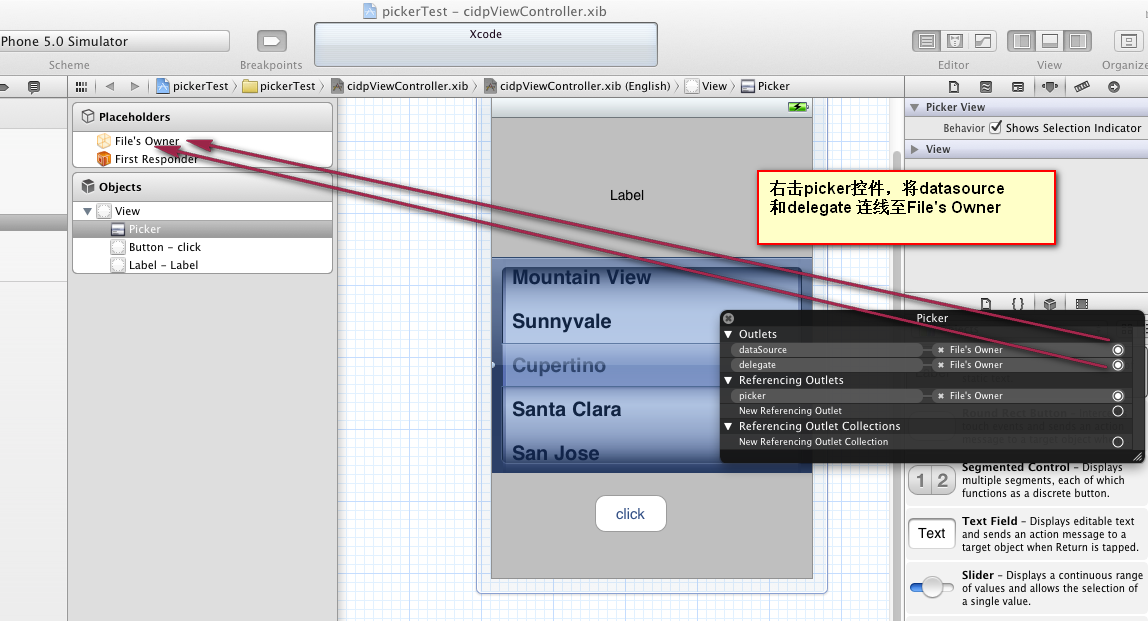
右击picker控件,将 Datesource和delegate连线至File's Owner, 设置它的数据源和代理。
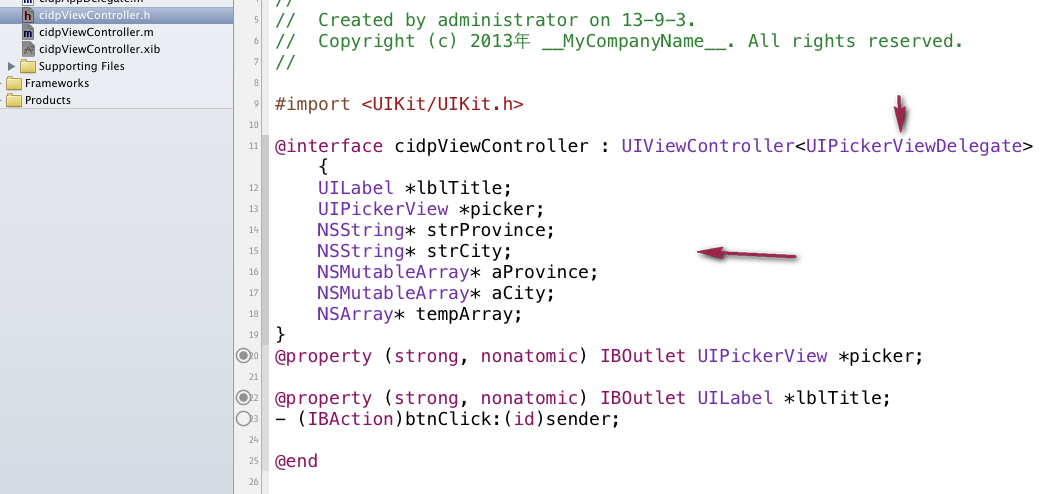
在 cidpViewController.h文件中添加几个变量和遵循 UIPickerViewDelegate 协议,这样就可以用UIPickerViewDelegate里面的几个方法了 。
@interface cidpViewController : UIViewController<UIPickerViewDelegate>

#import <UIKit/UIKit.h>

@interface cidpViewController : UIViewController<UIPickerViewDelegate> {

    UILabel *lblTitle;

    UIPickerView *picker;

    NSString* strProvince;

    NSString* strCity;

    NSMutableArray* aProvince;

    NSMutableArray* aCity;

    NSArray* tempArray;

}

@property (strong, nonatomic) IBOutlet UIPickerView *picker;

@property (strong, nonatomic) IBOutlet UILabel *lblTitle;

- (IBAction)btnClick:(id)sender;

@end
#import "cidpViewController.h"

@implementation cidpViewController

@synthesize picker;

@synthesize lblTitle;

- (void)didReceiveMemoryWarning

{

    [super didReceiveMemoryWarning];

    // Release any cached data, images, etc that aren't in use.

}

#pragma mark - View lifecycle

- (void)viewDidLoad

{

    [super viewDidLoad];

    //初始哈5个省份

    aProvince = [[NSMutableArray alloc] initWithObjects:@"北京",@"甘肃",@"山西",@"湖北",@"广州", nil];

    //初始化5个数组 ,分别初始化为5个省的城市

    NSArray* array1 = [NSArray arrayWithObjects:@"海淀",@"昌平",@"朝阳",@"西城",@"丰台", nil];

    NSArray* array2 = [NSArray arrayWithObjects:@"兰州",@"白银",@"张掖",@"陇西",@"天水", nil];

    NSArray* array3 = [NSArray arrayWithObjects:@"太原",@"大同",@"运城",@"晋城",@"五台山", nil];

    NSArray* array4 = [NSArray arrayWithObjects:@"武汉",@"荆州",@"襄阳",@"赣州", nil];

    NSArray* array5 = [NSArray arrayWithObjects:@"广州",@"佛山",@"尖沙咀",@"中山", nil];

    aCity = [[NSMutableArray alloc] initWithObjects:array1,array2,array3,array4,array5, nil];

    //tempArray 用来初始化第二个 ,并且引用一次,避免提前释放,内存出错

    tempArray = [array1 retain];

    // 用来第一次显示UIlable,负责的话就会显示 null,null

    strProvince = [aProvince objectAtIndex:0];

    strCity = [tempArray objectAtIndex:0];

    [aProvince release];

    [aCity release];

}

-(NSInteger)numberOfComponentsInPickerView:(UIPickerView*)pickerView{

    //返回2 表示将有两个component(滚轮)

    return 2;

}

-(NSInteger)pickerView:(UIPickerView*)pivkerView numberOfRowsInComponent:(NSInteger)component{

    if(component == 0){

        // 返回省份数组的长度

        return [aProvince count];

    }else{

        //返回省份对应城市数组的长度。

        [tempArray count];

}

- (NSString *)pickerView:(UIPickerView *)pickerView titleForRow:(NSInteger)row forComponent:(NSInteger)component{

        if(component == 0){

            //返回对应row 的数组元素。

            return [aProvince objectAtIndex:row];

        }else{

            return [tempArray objectAtIndex:row];

        }

}

- (void)pickerView:(UIPickerView *)pickerView didSelectRow:(NSInteger)row inComponent:(NSInteger)component{

    if(component == 0){

        //返回省份对应的城市数组,

        tempArray = [aCity objectAtIndex:row]

        [picker selectRow:0 inComponent:1 animated:YES];

        [picker reloadComponent:1];

        strProvience = [aProvince objectAtIndex:row];

        strCity = [tempArray objectAtIndex:0];

    }else{

        //城市滚轮滚动时,strCity也随着改变。

       strCity =  [tempArray objectAtIndex:0];

    }

    lblTitle.text = [[NSString alloc] initWithFormat:@"%@,%@",strProvince,strCity,nil];

}

- (void)viewDidUnload

{

    [self setLblTitle:nil];

    [self setPicker:nil];

    [super viewDidUnload];

}

- (void)viewWillAppear:(BOOL)animated

{

    [super viewWillAppear:animated];

}

- (void)viewDidAppear:(BOOL)animated

{

    [super viewDidAppear:animated];

}

- (void)viewWillDisappear:(BOOL)animated

{

    [super viewWillDisappear:animated];

}

- (void)viewDidDisappear:(BOOL)animated

{

    [super viewDidDisappear:animated];

}

- (BOOL)shouldAutorotateToInterfaceOrientation:(UIInterfaceOrientation)interfaceOrientation

{

    // Return YES for supported orientations

    return (interfaceOrientation != UIInterfaceOrientationPortraitUpsideDown);

}

- (IBAction)btnClick:(id)sender {

    lblTitle.text = [[NSString alloc] initWithFormat:@"%@,%@",strProvince,strCity,nil];

}

-(void)dealloc{

    [aProvince release];

    [aCity release];

    [lblTitle release];

    [strCity release];

    [strProvince release];

    [picker release];

    [super  dealloc];

}

@end
@protocol UIPickerViewDataSource<NSObject>

@required

// returns the number of 'columns' to display.

- (NSInteger)numberOfComponentsInPickerView:(UIPickerView *)pickerView;

// returns the # of rows in each component..

- (NSInteger)pickerView:(UIPickerView *)pickerView numberOfRowsInComponent:(NSInteger)component;

@end
UIPickerViewDelegate协议中的五个方法,非必须实现,
@protocol UIPickerViewDelegate<NSObject>

@optional

// returns width of column and height of row for each component.

- (CGFloat)pickerView:(UIPickerView *)pickerView widthForComponent:(NSInteger)component;

- (CGFloat)pickerView:(UIPickerView *)pickerView rowHeightForComponent:(NSInteger)component;

// these methods return either a plain UIString, or a view (e.g UILabel) to display the row for the component.

// for the view versions, we cache any hidden and thus unused views and pass them back for reuse.

// If you return back a different object, the old one will be released. the view will be centered in the row rect

- (NSString *)pickerView:(UIPickerView *)pickerView titleForRow:(NSInteger)row forComponent:(NSInteger)component;

- (UIView *)pickerView:(UIPickerView *)pickerView viewForRow:(NSInteger)row forComponent:(NSInteger)component reusingView:(UIView *)view;

- (void)pickerView:(UIPickerView *)pickerView didSelectRow:(NSInteger)row inComponent:(NSInteger)component;

@end
picker控件详解与使用,(实现省市的二级联动)的更多相关文章
- Objective-C ,ios,iphone开发基础:picker控件详解与使用,(实现省市的二级联动)
第一步:新建一个单视图(single view)的工程, 命名为pickerTest,不要勾选下面两个选项,第一个是新版本里面的,第二个是单元测试,现在用不着. 点击next ->creat之 ...
- IOS—UITextFiled控件详解
IOS—UITextFiled控件详解 //初始化textfield并设置位置及大小 UITextField *text = [[UITextField alloc]initWithFrame:CGR ...
- Switch控件详解
Switch控件详解 原生效果 5.x 4.x 布局 <Switch android:id="@+id/setting_switch" android:layout_widt ...
- ToolBar控件详解
ToolBar控件详解 在Activity中添加ToolBar 1.添加库 dependencies { ... compile "com.android.support:appcompat ...
- Spinner控件详解
Spinner控件详解 效果图 修改Spinner样式 在介绍之前,先看一下系统原生的样式 6.x & 5.x系统样式 4.x系统样式 官方文档 XML属性 方法 描述 android:dro ...
- Android开发:文本控件详解——TextView(一)基本属性
一.简单实例: 新建的Android项目初始自带的Hello World!其实就是一个TextView. 在activity_main.xml中可以新建TextView,从左侧组件里拖拽到右侧预览界面 ...
- Android开发:文本控件详解——TextView(二)文字跑马灯效果实现
一.需要使用的属性: 1.android:ellipsize 作用:若文字过长,控制该控件如何显示. 对于同样的文字“Android开发:文本控件详解——TextView(二)文字跑马灯效果实现”,不 ...
- C++ CComboBox控件详解
转载:http://blog.sina.com.cn/s/blog_46d93f190100m395.html C++ CComboBox控件详解 (2010-09-14 14:03:44) 转载▼ ...
- 【iOS 开发】基本 UI 控件详解 (UIButton | UITextField | UITextView | UISwitch)
博客地址 : http://blog.csdn.net/shulianghan/article/details/50051499 ; 一. UI 控件简介 1. UI 控件分类 UI 控件分类 : 活 ...
随机推荐
- python_在windows下安装配置python开发环境及Ulipad开发工具
最近开始学习Python,在网上寻找一下比较好的IDE.因为以前用C#做开发的,用Visual Studio作为IDE,鉴于用惯了VS这么强大的IDE,所以对IDE有一定的依赖性. Python的ID ...
- Windows Phone 8.1 多媒体(2):视频
原文:Windows Phone 8.1 多媒体(2):视频 Windows Phone 8.1 多媒体(1):相片 Windows Phone 8.1 多媒体(2):视频 Windows Phone ...
- Linux环境编程相关的文章
Linux环境编程相关的文章 好几年没有接触Linux环境下编程了,好多东西都有点生疏了.趁着现在有空打算把相关的一些技能重拾一下,顺手写一些相关的文章加深印象. 因为不是写书,也受到许多外部因素限制 ...
- Ejb in action(七)——message与JMS
我们扩大MDBs学前,我们需要理解message(新闻)与JMS(Java Message Service)的概念. 我们在Java EE中谈论消息,实际上就是意味着实现一个松耦合的过程.系统组件之间 ...
- Windows安全事件日志中的事件编号与描述
帐号登录事件(事件编号与描述) 672 身份验证服务(AS)票证得到成功发行与验证.673 票证授权服务(TGS)票证得到授权.TGS是一份由Kerberos 5.0版票证授权服务(TGS)发行.且允 ...
- QT中出现“无法解析的外部符号”错误
串口中我要把奇偶校验等enum数据对应写到一个ComboBox中去,所以需要在我的Settings类中加入一个函数用来转换. 这里,我首先在settings.h的class Settings中加上对该 ...
- html5 音频和视频(audio And video)
1.音频和视频 Web 上的视频 直到现在,仍然不存在一项旨在网页上显示视频的标准. 今天,大多数视频是通过插件(比如 Flash)来显示的.然而,并非所有浏览器都拥有同样的插件. HTML5 规定 ...
- AngularJS学习笔记filter
filter是对数据进行过滤操作,比如按某个字段搜索.格式化数据等等,是一个非常有用的接口.下面就简单介绍下它的用法. AngularJS自带的filter接口,|是filter的分隔符,参数用:分隔 ...
- 【转】GIT和SVN之间的五个基本区别
如果你在读这篇文章,说明你跟大多数开发者一样对GIT感兴趣,如果你还没有机会来试一试GIT,我想现在你就要了解它了. GIT不仅仅是个版本控制系统,它也是个内容管理系统(CMS),工作管理系统等.如果 ...
- “String.h” 源代码总结
<String.h> 总结: 常用的函数: 一.memchr: 说明:当第一次遇到字符ch时停止查找.如果成功,返回指向字符ch的指针:否则返回NULL. 代码: #include ...