Android:布局实例之模仿QQ登录界面
预览图:
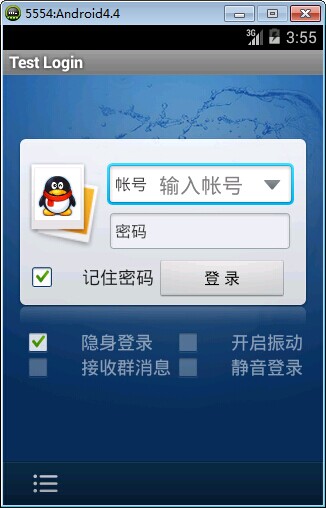
准备:
1、找到模仿对象 QQ登陆界面UI下载>>>>>
2、导入工程
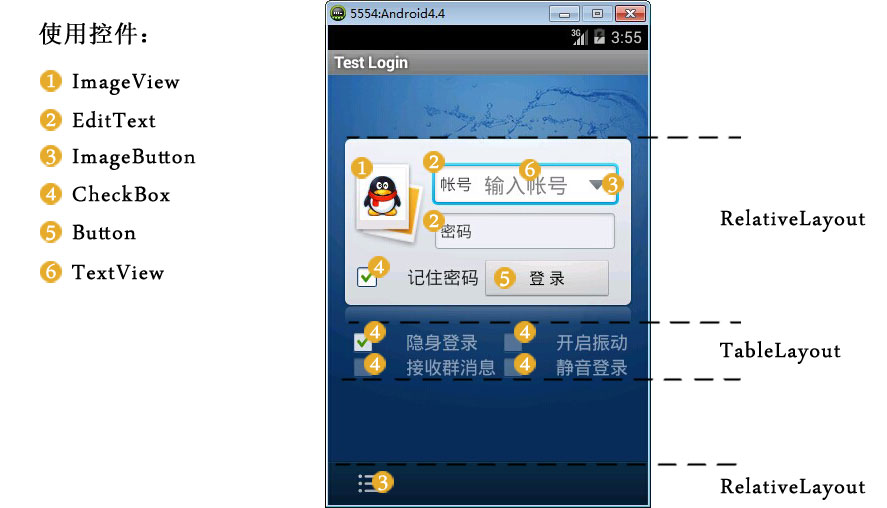
3、查看布局结构和使用控件

其对应效果图分布为
4、分析样式选择器
下拉箭头2种样式:点击和默认状态
文本框2种样式:聚焦和默认状态
复选框3种样式:选择、不选择和鼠标点着不放
左下角按钮2种样式:点击和默认
登录按钮2样式:点击和默认
============================================帖代码===========================
布局:
 <?xml version="1.0" encoding="utf-8"?>

 <LinearLayout xmlns:android="http://schemas.android.com/apk/res/android"

     android:layout_width="match_parent"

     android:layout_height="match_parent"

     android:orientation="vertical" >

     <include layout="@layout/head" />

     <LinearLayout

         android:layout_width="match_parent"

         android:layout_height="wrap_content"

         android:layout_weight="1.0"

         android:background="@drawable/default_bg"

         android:orientation="vertical" >

         <RelativeLayout

             android:layout_width="match_parent"

             android:layout_height="wrap_content"

             android:layout_marginLeft="15px"

             android:layout_marginRight="15px"

             android:layout_marginTop="63px"

             android:background="@drawable/login_back"

             android:paddingBottom="10px"

             android:paddingTop="21px" >

             <!-- QQ左栏logo -->

             <ImageView

                 android:id="@+id/faceImg"

                 android:layout_width="wrap_content"

                 android:layout_height="wrap_content"

                 android:background="@drawable/qqfaceleft" />

             <!-- 帐号文本框 -->

             <EditText

                 android:id="@+id/login_edit_account"

                 android:layout_width="match_parent"

                 android:layout_height="wrap_content"

                 android:layout_alignParentTop="true"

                 android:layout_marginBottom="5px"

                 android:layout_marginLeft="5dp"

                 android:layout_marginRight="5dp"

                 android:layout_marginTop="5dp"

                 android:layout_toRightOf="@+id/faceImg"

                 android:background="@drawable/qq_edit_login"

                 android:paddingLeft="45sp"

                 android:text="输入帐号"

                 android:textColor="#ddd" />

             <!-- 文本框左边帐号提示 -->

             <TextView

                 android:layout_width="wrap_content"

                 android:layout_height="wrap_content"

                 android:layout_alignBottom="@+id/login_edit_account"

                 android:layout_alignLeft="@+id/login_edit_account"

                 android:layout_alignTop="@+id/login_edit_account"

                 android:layout_marginRight="15.0sp"

                 android:gravity="center_vertical"

                 android:paddingLeft="7sp"

                 android:text="帐号"

                 android:textSize="16dp" />

             <!-- 下拉菜单按钮 -->

             <ImageButton

                 android:layout_width="wrap_content"

                 android:layout_height="wrap_content"

                 android:layout_alignBottom="@+id/login_edit_account"

                 android:layout_alignRight="@+id/login_edit_account"

                 android:layout_alignTop="@+id/login_edit_account"

                 android:layout_marginRight="1dp"

                 android:background="@drawable/more_select" />

             <!-- 密码文本框 -->

             <EditText

                 android:id="@+id/login_edit_pwd"

                 android:layout_width="wrap_content"

                 android:layout_height="wrap_content"

                 android:layout_alignLeft="@+id/login_edit_account"

                 android:layout_alignRight="@+id/login_edit_account"

                 android:layout_below="@+id/login_edit_account"

                 android:background="@drawable/qq_edit_login"

                 android:paddingLeft="45sp"

                 android:text="输入帐号"

                 android:textColor="#ddd" />

             <TextView

                 android:layout_width="wrap_content"

                 android:layout_height="wrap_content"

                 android:layout_alignBottom="@+id/login_edit_pwd"

                 android:layout_alignLeft="@+id/login_edit_pwd"

                 android:layout_alignTop="@+id/login_edit_pwd"

                 android:layout_marginRight="15.0sp"

                 android:gravity="center_vertical"

                 android:paddingLeft="7sp"

                 android:text="密码"

                 android:textSize="16dp" />

             <!-- 记住密码选项 -->

             <CheckBox

                 android:layout_width="wrap_content"

                 android:layout_height="wrap_content"

                 android:layout_alignBaseline="@+id/login_btn_login"

                 android:button="@drawable/qq_btn_check"

                 android:text="记住密码" />

             <!-- 登录按钮 -->

             <Button

                 android:id="@+id/login_btn_login"

                 android:layout_width="130px"

                 android:layout_height="42px"

                 android:layout_alignParentRight="true"

                 android:layout_below="@+id/login_edit_pwd"

                 android:layout_marginRight="7px"

                 android:layout_marginTop="12px"

                 android:text="登录" />

         </RelativeLayout>

         <!-- 复选框层 -->

         <TableLayout

             android:layout_width="match_parent"

             android:layout_height="wrap_content"

             android:layout_marginLeft="20px"

             android:layout_marginRight="20px"

             android:stretchColumns="1" >

             <TableRow>

                 <CheckBox

                     style="@style/MyCheckBox"

                     android:layout_width="wrap_content"

                     android:layout_height="wrap_content"

                     android:text="隐身登录" />

                 <CheckBox

                     style="@style/MyCheckBox"

                     android:layout_width="wrap_content"

                     android:layout_height="wrap_content"

                     android:layout_gravity="right"

                     android:text="开启震动" />

             </TableRow>

             <TableRow>

                 <CheckBox

                     style="@style/MyCheckBox"

                     android:layout_width="wrap_content"

                     android:layout_height="wrap_content"

                     android:text="接收群消息" />

                 <CheckBox

                     style="@style/MyCheckBox"

                     android:layout_width="wrap_content"

                     android:layout_height="wrap_content"

                     android:layout_gravity="right"

                     android:text="静音登录" />

             </TableRow>

         </TableLayout>

     </LinearLayout>

     <!-- 底部 -->

     <RelativeLayout

         android:layout_width="match_parent"

         android:layout_height="44dp"

         android:background="@drawable/bottom"

         android:gravity="center_vertical" >

         <ImageButton

             android:layout_width="wrap_content"

             android:layout_height="wrap_content"

             android:background="@drawable/option" />

     </RelativeLayout>

 </LinearLayout>
布局xml
样式:
    <style name="MyCheckBox" parent="@android:style/Widget.CompoundButton.CheckBox">

        <item name="android:textSize">16sp</item>

        <item name="android:textColor">#7fffffff</item>

        <item name="android:paddingLeft">28px</item>

        <item name="android:button">@drawable/qq_btn_check</item>

    </style>
CheckBox样式
样式选择器:
<?xml version="1.0" encoding="UTF-8"?>

<selector

  xmlns:android="http://schemas.android.com/apk/res/android">

    <item android:state_window_focused="false" android:state_enabled="true" android:state_checked="true" android:drawable="@drawable/btn_check_on" />

    <item android:state_window_focused="false" android:state_enabled="true" android:state_checked="false" android:drawable="@drawable/btn_check_off" />

    <item android:state_enabled="true" android:state_checked="true" android:state_pressed="true" android:drawable="@drawable/btn_check_on_pressed" />

    <item android:state_enabled="true" android:state_checked="false" android:state_pressed="true" android:drawable="@drawable/btn_check_off_pressed" />

    <item android:state_focused="true" android:state_enabled="true" android:state_checked="true" android:drawable="@drawable/btn_check_on_selected" />

    <item android:state_focused="true" android:state_enabled="true" android:state_checked="false" android:drawable="@drawable/btn_check_off_selected" />

    <item android:state_enabled="true" android:state_checked="false" android:drawable="@drawable/btn_check_off" />

    <item android:state_enabled="true" android:state_checked="true" android:drawable="@drawable/btn_check_on" />

</selector>
复选框selector
<?xml version="1.0" encoding="utf-8"?>

<selector xmlns:android="http://schemas.android.com/apk/res/android" >

    <item android:state_enabled="false" android:drawable="@drawable/login_input"></item>

    <item android:state_pressed="true" android:drawable="@drawable/login_input"></item>

    <item android:state_focused="true" android:drawable="@drawable/input_over"></item>

</selector>
文本框selector
<?xml version="1.0" encoding="UTF-8"?>

<selector

  xmlns:android="http://schemas.android.com/apk/res/android">

    <item android:state_pressed="true" android:drawable="@drawable/option_selected" />

    <item android:state_focused="true" android:state_enabled="true" android:drawable="@drawable/option_selected" />

    <item android:state_enabled="true" android:drawable="@drawable/option_normal" />

</selector>
左下角按钮selector
<?xml version="1.0" encoding="UTF-8"?>

<selector

  xmlns:android="http://schemas.android.com/apk/res/android">

    <item android:state_pressed="true" android:drawable="@drawable/button2_down" />

    <item android:state_focused="true" android:state_enabled="true" android:drawable="@drawable/button2_over" />

    <item android:state_enabled="true" android:drawable="@drawable/button2" />

</selector>
下拉菜单selector
相关文章:
Android:布局实例之模仿QQ登录界面的更多相关文章
- [转]Android:布局实例之模仿QQ登录界面
Android:布局实例之模仿QQ登录界面 预览图: 准备: 1.找到模仿对象 QQ登陆界面UI下载>>>>> 2.导入工程 3.查看布局结构和使用控件 其对应效果图分布 ...
- Android:布局实例之模仿京东登录界面
预览图及布局结构参考: 布局: <?xml version="1.0" encoding="utf-8"?> <RelativeLayout ...
- java代码完全手写模仿qq登录界面
这是我模仿QQ2015版界面,实现的基本功能有登陆验证,重置等,当然直接复制代码运行是不一样的,还要注意自己插入自己的图片. 结果截图如下所示: import java.awt.BorderLayou ...
- 界面编程模仿篇(QQ登录界面逼真篇)
写了好多天的爬虫,偷空前前后后用了两天的时间(排除吃饭睡觉)写完了这个QQ登录界面,看起来还凑和着吧,如果是的大神的,莫见笑,纯属业余作品,废话先不多说,截图如下,其中第二幅图片中的红色方框部份有待完 ...
- Android菜鸟的成长笔记(3)——给QQ登录界面说So Easy
原文:Android菜鸟的成长笔记(3)--给QQ登录界面说So Easy 上一篇:Android菜鸟的成长笔记(2)--第一个Android应用 我们前面已经做了第一个Android应用程序,虽然有 ...
- QQ登录界面布局
简单的qq登录界面布局 <?xml version="1.0" encoding="utf-8"?> <RelativeLayout xmln ...
- WPF开发实例——仿QQ登录界面
原文:WPF开发实例--仿QQ登录界面 版权声明:本文为博主原创文章,如需转载请标明转载地址 http://blog.csdn.net/u013981858 https://blog.csdn.net ...
- swing实现QQ登录界面1.0( 实现了同一张图片只加载一次)、(以及实现简单的布局面板添加背景图片控件的标签控件和添加一个关闭按钮控件)
swing实现QQ登录界面1.0( 实现了同一张图片只加载一次).(以及实现简单的布局面板添加背景图片控件的标签控件和添加一个关闭按钮控件) 代码思路分析: 1.(同一张图片仅仅需要加载一次就够了,下 ...
- 编写Java程序,使用Swing布局管理器和常用控件,实现仿QQ登录界面
返回本章节 返回作业目录 需求说明: 使用Swing布局管理器和常用控件,实现仿QQ登录界面 实现思路: 创建登录界面的类QQLogin,该类继承父类JFrame,在该类中创建无参数的构造方法,在构造 ...
随机推荐
- python中的ftplib模块
前言 Python中默认安装的ftplib模块定义了FTP类. ftplib模块相关参数: 加载ftp模块:from ftplib import FTP ftp = FTP()#设置变量ftp.set ...
- Win7(64bit)搭建SVN
开始: 第一步:下载SVN客户端程序TortoiseSVN并安装(不习惯英文操作界面的顺便在最底下下载一个语言包),下载地址tortoiseSVN下载(由于系统是64位的,我下载的是TortoiseS ...
- 【swupdate文档 二】许可证
许可证 SWUpdate是免费软件.它的版权属于Stefano Babic和其他许多贡献代码的人(详情请参阅实际源代码和git提交信息). 您可以根据自由软件基金会发布的GNU通用公共许可证第2版的条 ...
- MariaDB 复合语句和优化套路
测试环境准备 本文主要围绕的对象是mariadb 高级语法, 索引优化, 基础sql语句调优. 下面那就开始搭建本次测试的大环境. 首先下载mariadb开发环境, 并F5 run起来. 具体参照 ...
- Linux操作系统中内存buffer和cache的区别--从free命令说起(转)
原文链接:http://os.51cto.com/art/200709/56603.htm 我们一开始,先从Free命令说起. Free free 命令相对于top 提供了更简洁的查看系统内存使用情况 ...
- 【Java基础】重写equals需要重写hashcode
Object里的equals用来比较两个对象的相等性,一般情况下,当重写这个方法时,通常有必要也重写hashcode,以维护hashcode方法的常规协定,或者说这是JDK的规范,该协定声明相等对象必 ...
- 让IE6支持css3,让 IE7、IE8 都支持CSS3
但凡是前端工程师,都知道IE6,IE7,IE8不支持.或者不完全支持CSS3的属性. CSS3 有很多很强大.绚丽的效果,比如,圆角,阴影,渐变透明,渐变背景,等等. 因为IE6时代,没有什么标准,而 ...
- JavaScript中常用的BOM属性
window 窗口 window.open():打开窗口.返回一个指向新窗口的引用. window.close():关闭窗口. window.resizeTo():调整窗口尺寸到指定值 window. ...
- Vue优化首屏加载
背景: 使用vue + iview搭建的一个后台管理系统,路由已经用了懒加载,加载登陆页面,居然还是需要18S左右,刚到一个新公司,项目经理很委婉的说,看看能不能优化了一下.然后就开始了网上一大堆'v ...
- Android Studio代码字体模糊解决方法
问题描述: 我的电脑分辨率是(1920*1080),然而安装了Android Studio后代码的一些部分区域出现模糊的现象,应该是软件默认设置与高分屏有冲突. 如下图所示. 解决方法: 打开设置对话 ...